


hbase预分区示例
步骤:
1.规划hbase预分区
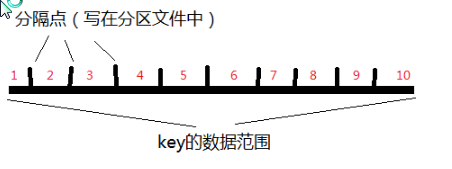
首先就是要想明白数据的key是如何分布的,然后规划一下要分成多少region,每个region的startkey和endkey是多少,然后将规划的key写到一个文件中。比如,key的前几位字符串都是从0001~0010的数字,这样可以分成10个region,划分key的文件如下:
0001|
0002|
0003|
0004|
0005|
0006|
0007|
0008|
0009|
为什么后面会跟着一个"|",是因为在ASCII码中,"|"的值是124,大于所有的数字和字母等符号,当然也可以用“~”(ASCII-126)。分隔文件的第一行为第一个region的stopkey,每行依次类推,最后一行不仅是倒数第二个region的stopkey,同时也是最后一个region的startkey。也就是说分区文件中填的都是key取值范围的分隔点,如下图所示:
2.hbase shell中建分区表,指定分区文件
在hbase shell中直接输入create,会看到如下的提示:
Create a table with namespace=ns1 and table qualifier=t1
  hbase> create 'ns1:t1', {NAME => 'f1', VERSIONS => 5}

Create a table with namespace=default and table qualifier=t1
  hbase> create 't1', {NAME => 'f1'}, {NAME => 'f2'}, {NAME => 'f3'}
  hbase> # The above in shorthand would be the following:
  hbase> create 't1', 'f1', 'f2', 'f3'
  hbase> create 't1', {NAME => 'f1', VERSIONS => 1, TTL => 2592000, BLOCKCACHE => true}
  hbase> create 't1', {NAME => 'f1', CONFIGURATION => {'hbase.hstore.blockingStoreFiles' => '10'}}

Table configuration options can be put at the end.
Examples:

  hbase> create 'ns1:t1', 'f1', SPLITS => ['10', '20', '30', '40']
  hbase> create 't1', 'f1', SPLITS => ['10', '20', '30', '40']
  hbase> create 't1', 'f1', SPLITS_FILE => 'splits.txt', OWNER => 'johndoe'
  hbase> create 't1', {NAME => 'f1', VERSIONS => 5}, METADATA => { 'mykey' => 'myvalue' }
  hbase> # Optionally pre-split the table into NUMREGIONS, using
  hbase> # SPLITALGO ("HexStringSplit", "UniformSplit" or classname)
  hbase> create 't1', 'f1', {NUMREGIONS => 15, SPLITALGO => 'HexStringSplit'}
  hbase> create 't1', 'f1', {NUMREGIONS => 15, SPLITALGO => 'HexStringSplit', CONFIGURATION => {'hbase.hregion.scan.loadColumnFamiliesOnDemand' => 'true'}}
  hbase> create 't1', {NAME => 'f1'}, {NAME => 'if1', LOCAL_INDEX=>'COMBINE_INDEX|INDEXED=f1:q1:8|rowKey:rowKey:10,UPDATE=true'}
可以通过指定SPLITS_FILE的值指定分区文件,如果分区信息比较少,也可以直接用SPLITS分区。我们可以通过如下命令建一个分区表,指定第一步中生成的分区文件:
假如我还想对hbase表做一个SNAPPY压缩,应该怎么写呢?
create 'split_table_test',{NAME =>'cf', COMPRESSION => 'SNAPPY'}, {SPLITS_FILE => 'region_split_info.txt'} 这里注意,一定要将分区的参数指定单独用一个大括号扩起来,因为分区是针对全表,而不是针对某一个column family。
下面,我们登陆一下master的web页面<Hmaster:60010>,查看一下hbase的表信息,找到刚刚新建的预分区表,进入查看region信息:
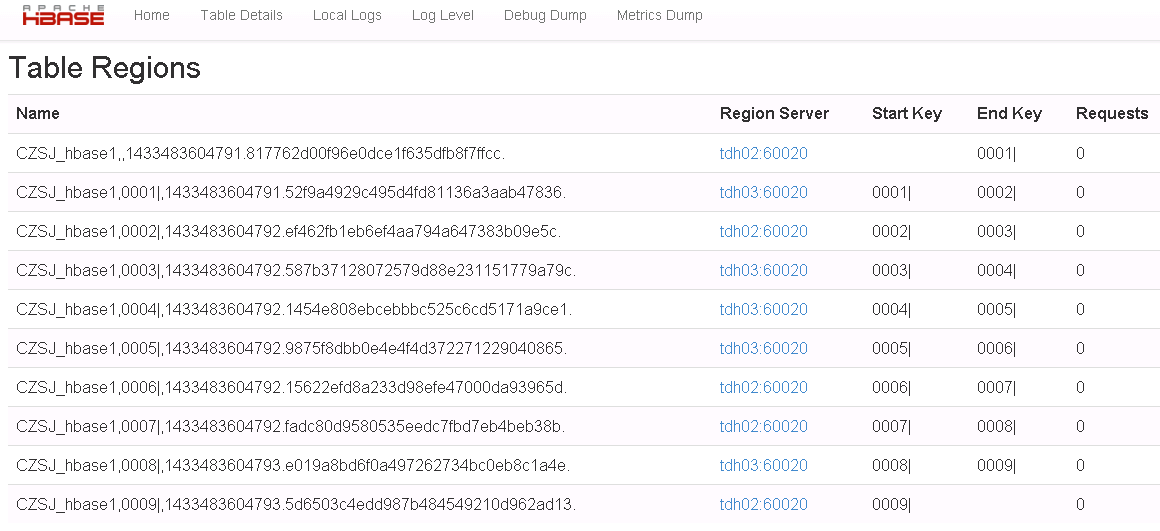
我们看到第一个region是没有startkey的,最后一个region是没有stopkey的。
hbase预分区方案
在HBase中,表会被划分为1...n个Region,被托管在RegionServer中。Region二个重要的属性:StartKey与EndKey表示这个Region维护的rowKey范围,当我们要读/写数据时,如果rowKey落在某个start-end key范围内,那么就会定位到目标region并且读/写到相关的数据。
1、由于业务数据一般都是从小到大增长的,根据上面hbase的region规则,就会出现“热点写”问题,随着系统的运营,数据总是会往最大的start-key所在的region里写,因为我们的rowkey总是会比之前的大,并且hbase的是按升序方式排序的。所以写操作总是被定位到无上界的那个region中。
2、其次,由于写热点,我们总是往最大start-key的region写记录,之前分裂出来的region不会再被写数据,有点被打进冷宫的赶脚,它们都处于半满状态,这样的分布也是不利的。
如果在写比较频率的场景下,数据增长快,split的次数也会增多,由于split是比较耗时耗资源的,所以我们并不希望这种事情经常发生。
看到这些缺点,我们知道,在集群的环境中,为了得到更好的并行性,我们希望有好的load blance,让每个节点提供的请求处理都是均等的。我们也希望,region不要经常split,因为split会使server有一段时间的停顿,如何能做到呢?
随机散列与预分区
随机散列与预分区:二者结合起来,是比较完美的,预分区一开始就预建好了一部分region,这些region都维护着自已的start-end keys,再配合上随机散列,写数据能均等地命中这些预建的region,就能解决上面的那些缺点,大大地提高了性能。
提供2种思路: hash与partition.
一、hash思路
hash就是rowkey前面由一串随机字符串组成,随机字符串生成方式可以由SHA或者MD5等方式生成,只要region所管理的start-end keys范围比较随机,那么就可以解决写热点问题。
long currentId = 1L;
byte [] rowkey = Bytes.add(MD5Hash.getMD5AsHex(Bytes.toBytes(currentId)).substring(0, 8).getBytes(),
Bytes.toBytes(currentId));
假设rowKey原本是自增长的long型,可以将rowkey转为hash再转为bytes,加上本身id 转为bytes,组成rowkey,这样就生成随便的rowkey。那么对于这种方式的rowkey设计,如何去进行预分区呢?
1.取样,先随机生成一定数量的rowkey,将取样数据按升序排序放到一个集合里
2.根据预分区的region个数,对整个集合平均分割,即是相关的splitKeys.
3.HBaseAdmin.createTable(HTableDescriptor tableDescriptor,byte[][] splitkeys)可以指定预分区的splitKey,即是指定region间的rowkey临界值.
如果知道Hbase数据表的key的分布情况,就可以在建表的时候对hbase进行region的预分区。这样做的好处是防止大数据量插入的热点问题,提高数据插入的效率。
步骤:
1.创建split计算器,用于从抽样数据中生成一个比较合适的splitKeys
public class HashChoreWoker implements SplitKeysCalculator{
    //随机取机数目
    private int baseRecord;
    //rowkey生成器
    private RowKeyGenerator rkGen;
    //取样时,由取样数目及region数相除所得的数量.
    private int splitKeysBase;
    //splitkeys个数
    private int splitKeysNumber;
    //由抽样计算出来的splitkeys结果
    private byte[][] splitKeys;

    public HashChoreWoker(int baseRecord, int prepareRegions) {
        this.baseRecord = baseRecord;
        //实例化rowkey生成器
        rkGen = new HashRowKeyGenerator();
        splitKeysNumber = prepareRegions - 1;
        splitKeysBase = baseRecord / prepareRegions;
    }

    public byte[][] calcSplitKeys() {
        splitKeys = new byte[splitKeysNumber][];
        //使用treeset保存抽样数据,已排序过
        TreeSet<byte[]> rows = new TreeSet<byte[]>(Bytes.BYTES_COMPARATOR);
        for (int i = 0; i < baseRecord; i++) {
            rows.add(rkGen.nextId());
        }
        int pointer = 0;
        Iterator<byte[]> rowKeyIter = rows.iterator();
        int index = 0;
        while (rowKeyIter.hasNext()) {
            byte[] tempRow = rowKeyIter.next();
            rowKeyIter.remove();
            if ((pointer != 0) && (pointer % splitKeysBase == 0)) {
                if (index < splitKeysNumber) {
                    splitKeys[index] = tempRow;
                    index ++;
                }
            }
            pointer ++;
        }
        rows.clear();
        rows = null;
        return splitKeys;
    }
}
KeyGenerator及实现
//interface
public interface RowKeyGenerator {
byte [] nextId();
}
//implements
public class HashRowKeyGenerator implements RowKeyGenerator {
private long currentId = 1;
private long currentTime = System.currentTimeMillis();
private Random random = new Random();
public byte[] nextId() {
try {
currentTime += random.nextInt(1000);
byte[] lowT = Bytes.copy(Bytes.toBytes(currentTime), 4, 4);
byte[] lowU = Bytes.copy(Bytes.toBytes(currentId), 4, 4);
return Bytes.add(MD5Hash.getMD5AsHex(Bytes.add(lowU, lowT)).substring(0, 8).getBytes(),
Bytes.toBytes(currentId));
} finally {
currentId++;
}
}
}unit test case测试
@Test
public void testHashAndCreateTable() throws Exception{
        HashChoreWoker worker = new HashChoreWoker(1000000,10);
        byte [][] splitKeys = worker.calcSplitKeys();

        HBaseAdmin admin = new HBaseAdmin(HBaseConfiguration.create());
        TableName tableName = TableName.valueOf("hash_split_table");

        if (admin.tableExists(tableName)) {
            try {
                admin.disableTable(tableName);
            } catch (Exception e) {
            }
            admin.deleteTable(tableName);
        }

        HTableDescriptor tableDesc = new HTableDescriptor(tableName);
        HColumnDescriptor columnDesc = new HColumnDescriptor(Bytes.toBytes("info"));
        columnDesc.setMaxVersions(1);
        tableDesc.addFamily(columnDesc);

        admin.createTable(tableDesc ,splitKeys);

        admin.close();
    }
查看建表结果:执行 scan 'hbase:meta'
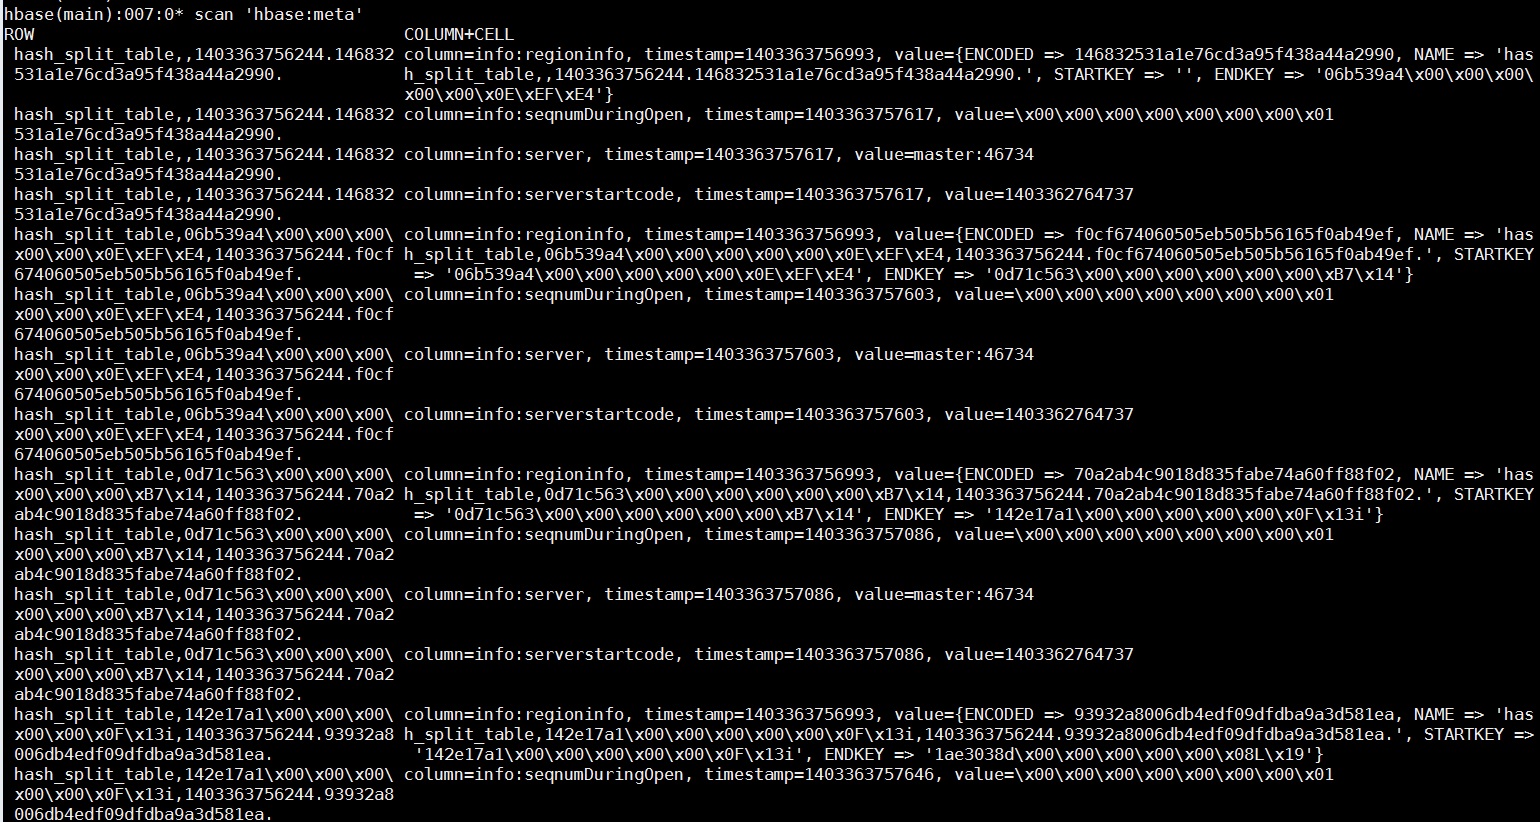
以上我们只是显示了部分region的信息,可以看到region的start-end key 还是比较随机散列的。同样可以查看hdfs的目录结构,的确和预期的38个预分区一致:

以上,就已经按hash方式,预建好了分区,以后在插入数据的时候,也要按照此rowkeyGenerator的方式生成rowkey,有兴趣的话,也可以做些试验,插入些数据,看看数据的分布。
二、partition
partition故名思义,就是分区式,这种分区有点类似于mapreduce中的partitioner,将区域用长整数(Long)作为分区号,每个region管理着相应的区域数据,在rowKey生成时,将id取模后,然后拼上id整体作为rowKey.这个比较简单,不需要取样,splitKeys也非常简单,直接是分区号即可。直接上代码吧:
public class PartitionRowKeyManager implements RowKeyGenerator,
        SplitKeysCalculator {

    public static final int DEFAULT_PARTITION_AMOUNT = 20;
    private long currentId = 1;
    private int partition = DEFAULT_PARTITION_AMOUNT;
    public void setPartition(int partition) {
        this.partition = partition;
    }

    public byte[] nextId() {
        try {
            long partitionId = currentId % partition;
            return Bytes.add(Bytes.toBytes(partitionId),
                    Bytes.toBytes(currentId));
        } finally {
            currentId++;
        }
    }

    public byte[][] calcSplitKeys() {
        byte[][] splitKeys = new byte[partition - 1][];
        for(int i = 1; i < partition ; i ++) {
            splitKeys[i-1] = Bytes.toBytes((long)i);
        }
        return splitKeys;
    }
}
calcSplitKeys方法比较单纯,splitKey就是partition的编号,我们看看测试类:
@Test
    public void testPartitionAndCreateTable() throws Exception{

        PartitionRowKeyManager rkManager = new PartitionRowKeyManager();
        //只预建10个分区
        rkManager.setPartition(10);

        byte [][] splitKeys = rkManager.calcSplitKeys();

        HBaseAdmin admin = new HBaseAdmin(HBaseConfiguration.create());
        TableName tableName = TableName.valueOf("partition_split_table");

        if (admin.tableExists(tableName)) {
            try {
                admin.disableTable(tableName);

            } catch (Exception e) {
            }
            admin.deleteTable(tableName);
        }

        HTableDescriptor tableDesc = new HTableDescriptor(tableName);
        HColumnDescriptor columnDesc = new HColumnDescriptor(Bytes.toBytes("info"));
        columnDesc.setMaxVersions(1);
        tableDesc.addFamily(columnDesc);

        admin.createTable(tableDesc ,splitKeys);

        admin.close();
    }


 946
946

 被折叠的 条评论
为什么被折叠?
被折叠的 条评论
为什么被折叠?
 到【灌水乐园】发言


