


dig命令
dig命令是常用域名解析工具。
如果服务器中没有该命令,手动安装:
[root@cham002 ~]# yum install -y bind-utils
语法: dig [域名]
http、https、tcp
HTTP超文本传输协议(HyperText Transfer Protocol)是互联网上应用最为广泛的一种网络协议。
HTTPS(全称:Hyper Text Transfer Protocol over Secure Socket Layer),是以安全为目标的HTTP通道,简单讲是HTTP的安全版。HTTPS协议是由SSL+HTTP协议构建的可进行加密传输、身份认证的网络协议要比http协议安全。
HTTP默认的端口号为80,HTTPS的端口号为443。
TCP(Transmission Control Protocol 传输控制协议)是一种面向连接的、可靠的、基于字节流的传输层通信协议,由IETF的RFC 793定义。默认监听80端口。
12.17 Nginx负载均衡
Nginx负载均衡即为当代理服务器将自定义的域名解析到多个指定IP时,通过upstream来保证用户可以通过代理服务器正常访问各个IP。
负载均衡配置
配置参数:
[root@cham002 vhost]# pwd
/usr/local/nginx/conf/vhost

[root@cham002 vhost]# vim load.conf

upstream qq
#自定义域名
{
    ip_hash;
 #保证同一个用户始终保持在同一台机器上
    #即当域名指向多个IP时,保证每个用户始终解析到同一IP
    server 61.135.157.156:80;
    server 125.39.240.113:80;
 #指定web服务器的IP
}
server
{
    listen 80;
    server_name www.qq.com;
    location /
    {
        proxy_pass      http://qq;
        proxy_set_header Host   $host;
        proxy_set_header X-Real-IP      $remote_addr;
        proxy_set_header X-Forwarded-For $proxy_add_x_forwarded_for;
    }
}
检测
代理前
[root@cham002 vhost]# curl -x 127.0.0.1:80 www.qq.com
This is the default directory.
使用代理前,会直接解析到默认虚拟主机。
代理后
[root@cham002 vhost]# /usr/local/nginx/sbin/nginx -t
nginx: the configuration file /usr/local/nginx/conf/nginx.conf syntax is ok
nginx: configuration file /usr/local/nginx/conf/nginx.conf test is successful
[root@cham002 vhost]# /usr/local/nginx/sbin/nginx -s reload
使用代理后会解析到代理服务器所指向的IP
[root@cham002 vhost]# dig www.qq.com

; <<>> DiG 9.9.4-RedHat-9.9.4-51.el7_4.1 <<>> www.qq.com
;; global options: +cmd
;; Got answer:
;; ->>HEADER<<- opcode: QUERY, status: NOERROR, id: 31943
;; flags: qr rd ra; QUERY: 1, ANSWER: 3, AUTHORITY: 0, ADDITIONAL: 1

;; OPT PSEUDOSECTION:
; EDNS: version: 0, flags:; udp: 1280
;; QUESTION SECTION:
;www.qq.com.			IN	A

;; ANSWER SECTION:
www.qq.com.		444	IN	A	14.17.32.211
www.qq.com.		444	IN	A	14.17.42.40
www.qq.com.		444	IN	A	59.37.96.63

;; Query time: 2 msec
;; SERVER: 119.29.29.29#53(119.29.29.29)
;; WHEN: 一 1月 08 15:48:42 CST 2018
;; MSG SIZE  rcvd: 87
注意: Nginx不支持代理https,只能代理http,新版本的Nginx可以代理tcp。
12.18 SSL原理
SSL(Secure Sockets Layer 安全套接层)协议,及其继任者TLS(Transport Layer Security传输层安全)协议,是为网络通信提供安全及数据完整性的一种安全协议。
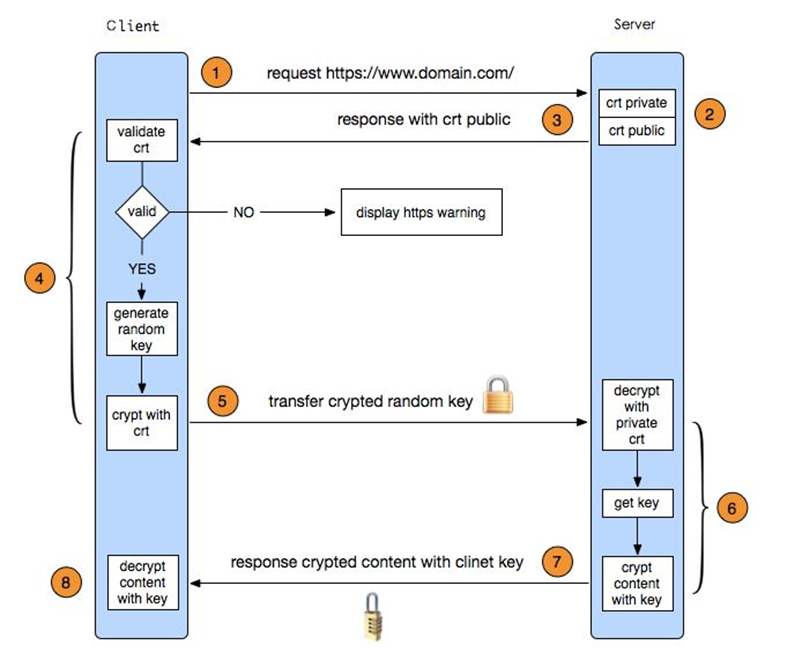
•浏览器发送一个https的请求给服务器;
• 服务器要有一套数字证书,可以自己制作(后面的操作就是阿铭自己制作的证书),也可以向组织申请,区别就是自己颁发的证书需要客户端验证通过,才可以继续访问,而使用受信任的公司申请的证书则不会弹出>提示页面,这套证书其实就是一对公钥和私钥;
• 服务器会把公钥传输给客户端;
• 客户端(浏览器)收到公钥后,会验证其是否合法有效,无效会有警告提醒,有效则会生成一串随机数,并用收到的公钥加密;
• 客户端把加密后的随机字符串传输给服务器;
• 服务器收到加密随机字符串后,先用私钥解密(公钥加密,私钥解密),获取到这一串随机数后,再用这串随机字符串加密传输的数据(该加密为对称加密,所谓对称加密,就是将数据和私钥也就是这个随机字符串>通过某种算法混合在一起,这样除非知道私钥,否则无法获取数据内容);
• 服务器把加密后的数据传输给客户端;
• 客户端收到数据后,再用自己的私钥也就是那个随机字符串解密;
12.19 生成SSL密钥对
SSL证书就是一对公钥和私钥。
创建私钥
[root@cham002 vhost]# cd /usr/local/nginx/conf/
[root@cham002 conf]# openssl
OpenSSL> ^C

[root@cham002 conf]# rpm -qf `which openssl `
openssl-1.0.2k-8.el7.x86_64
#生成SSL密钥
[root@cham002 conf]# openssl genrsa -des3 -out tmp.key 2048
Generating RSA private key, 2048 bit long modulus
................................................................................................................+++
....+++
e is 65537 (0x10001)
Enter pass phrase for tmp.key:
Verifying - Enter pass phrase for tmp.key:
说明: 在此指定密码!
转换key,取消密码:
[root@cham002 conf]# openssl rsa -in tmp.key -out cham.key
Enter pass phrase for tmp.key:
writing RSA key
[root@cham002 conf]# ls
cham.key              fastcgi_params.default  mime.types          nginx.conf.default   uwsgi_params
fastcgi.conf          htpasswd                mime.types.default  scgi_params          uwsgi_params.default
fastcgi.conf.default  koi-utf                 nginx.conf          scgi_params.default  vhost
fastcgi_params        koi-win                 nginx.conf.1        tmp.key              win-utf


删除密钥文件:
[root@cham002 conf]# rm -rvf tmp.key
已删除"tmp.key"
[root@cham002 conf]#
生成证书请求文件
需要拿这个文件和私钥一起生产公钥文件:
[root@cham002 conf]# openssl req -new -key cham.key -out cham.csr
You are about to be asked to enter information that will be incorporated
into your certificate request.
What you are about to enter is what is called a Distinguished Name or a DN.
There are quite a few fields but you can leave some blank
For some fields there will be a default value,
If you enter '.', the field will be left blank.
-----
Country Name (2 letter code) [XX]:china
string is too long, it needs to be less than  2 bytes long
Country Name (2 letter code) [XX]:11
State or Province Name (full name) []:shenzhen
Locality Name (eg, city) [Default City]:shenzhen
Organization Name (eg, company) [Default Company Ltd]:champ
Organizational Unit Name (eg, section) []:cham
Common Name (eg, your name or your server's hostname) []:chamlinux
Email Address []:champinz@163.com

Please enter the following 'extra' attributes
to be sent with your certificate request
A challenge password []:champin
An optional company name []:cham
说明: 该部分内容如果不购买证书可以自定义;如果是正式应用在网站上,需要规范填写对应信息(购买)。
创建公钥:
[root@cham002 conf]# openssl x509 -req -days 365 -in cham.csr -signkey cham.key -out cham.crt
Signature ok
subject=/C=11/ST=shenzhen/L=shenzhen/O=champ/OU=cham/CN=chamlinux/emailAddress=champinz@163.com
Getting Private key


现在看一下,有了crt公钥,key私钥
[root@cham002 conf]# ls cham.  按tab补全就会显示
cham.crt  cham.csr  cham.key
12.20 Nginx配置SSL
[root@cham002 conf]# cd vhost/

server
{
    listen 443;
    server_name cham.com;
    index index.html index.php;
    root /data/wwwroot/cham.com;
    ssl on;
 #开启ssl
    ssl_certificate cham.crt;
 #配置公钥
    ssl_certificate_key cham.key;
 #配置私钥
    ssl_protocols TLSv1 TLSv1.1 TLSv1.2;
#配置协议
}
检测的时候报错了,
[root@cham002 vhost]# /usr/local/nginx/sbin/nginx -t
nginx: [emerg] unknown directive "ssl" in /usr/local/nginx/conf/vhost/ssl.conf:7
nginx: configuration file /usr/local/nginx/conf/nginx.conf test failed
[root@cham002 vhost]# /usr/local/nginx/sbin/nginx -s reload
nginx: [emerg] unknown directive "ssl" in /usr/local/nginx/conf/vhost/ssl.conf:7
未识别ssl配置,需要重新编译Nginx:
[root@cham002 vhost]# cd /usr/local/src/nginx-1.12.1/
[root@cham002 nginx-1.12.1]#
[root@cham002 nginx-1.12.1]# ./configure --help |grep -i ssl
  --with-http_ssl_module             enable ngx_http_ssl_module
  --with-mail_ssl_module             enable ngx_mail_ssl_module
  --with-stream_ssl_module           enable ngx_stream_ssl_module
  --with-stream_ssl_preread_module   enable ngx_stream_ssl_preread_module
  --with-openssl=DIR                 set path to OpenSSL library sources
  --with-openssl-opt=OPTIONS         set additional build options for OpenSSL
[root@cham002 nginx-1.12.1]# ./configure --prefix=/usr/local/nginx  --with-http_ssl_module

[root@cham002 nginx-1.12.1]# echo $?
0

[root@cham002 nginx-1.12.1]#make
[root@cham002 nginx-1.12.1]# echo $?
0
[root@cham002 nginx-1.12.1]# make install
[root@cham002 nginx-1.12.1]# echo $?
0
现在看一看
[root@cham002 nginx-1.12.1]# /usr/local/nginx/sbin/nginx -V
nginx version: nginx/1.12.1
built by gcc 4.8.5 20150623 (Red Hat 4.8.5-16) (GCC)
built with OpenSSL 1.0.2k-fips  26 Jan 2017
TLS SNI support enabled
configure arguments: --prefix=/usr/local/nginx --with-http_ssl_module

[root@cham002 nginx-1.12.1]# /usr/local/nginx/sbin/nginx -t
nginx: the configuration file /usr/local/nginx/conf/nginx.conf syntax is ok
nginx: configuration file /usr/local/nginx/conf/nginx.conf test is successful
[root@cham002 nginx-1.12.1]# /usr/local/nginx/sbin/nginx -s reload


[root@cham002 nginx-1.12.1]# /etc/init.d/nginx restart
Restarting nginx (via systemctl):                          [  确定  ]
[root@cham002 nginx-1.12.1]# netstat -lntp
Active Internet connections (only servers)
Proto Recv-Q Send-Q Local Address           Foreign Address         State       PID/Program name
tcp        0      0 0.0.0.0:80              0.0.0.0:*               LISTEN      6019/nginx: master
tcp        0      0 0.0.0.0:22              0.0.0.0:*               LISTEN      1913/sshd
tcp        0      0 127.0.0.1:25            0.0.0.0:*               LISTEN      2498/master
tcp        0      0 0.0.0.0:443             0.0.0.0:*               LISTEN      6019/nginx: master
tcp        0      0 127.0.0.1:9000          0.0.0.0:*               LISTEN      2501/php-fpm: maste
tcp6       0      0 :::3306                 :::*                    LISTEN      2436/mysqld
tcp6       0      0 :::22                   :::*                    LISTEN      1913/sshd
tcp6       0      0 ::1:25                  :::*                    LISTEN      2498/master
[root@cham002 nginx-1.12.1]#
测试
[root@cham002 nginx-1.12.1]# cd /data/wwwroot/cham.com
[root@cham002 cham.com]# ls
[root@cham002 cham.com]# vim 1.txt
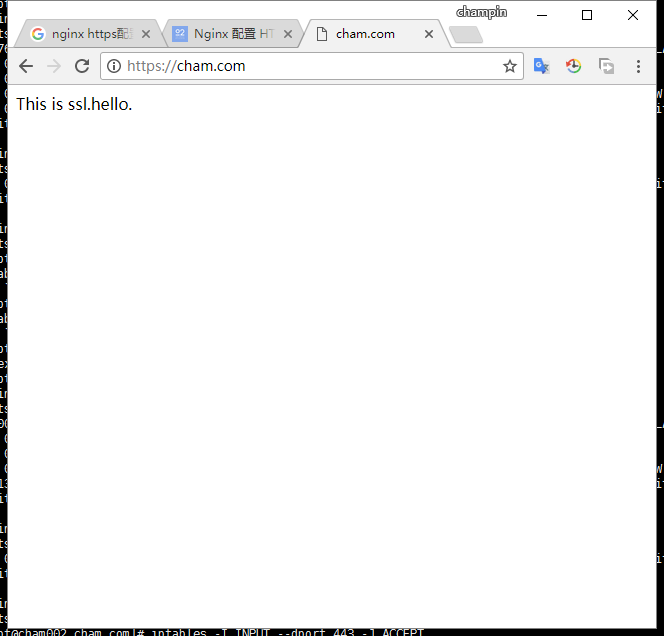
This is ssl.hello.
[root@cham002 cham.com]# mv 1.txt index.html
[root@cham002 cham.com]# ls
index.html
[root@cham002 cham.com]# curl -x127.0.0.1:443 https://cham.com/
curl: (56) Received HTTP code 400 from proxy after CONNECT
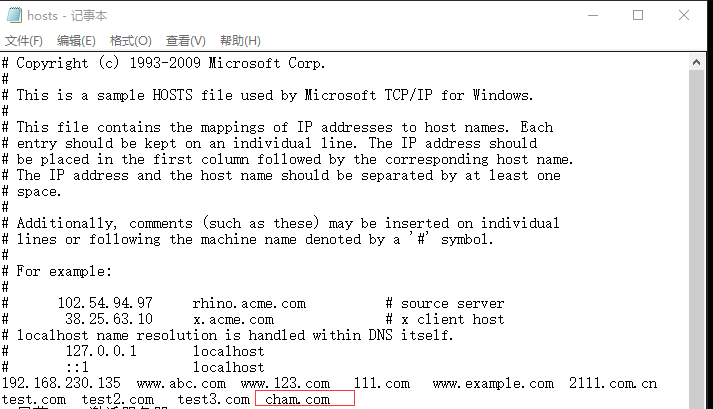
[root@cham002 cham.com]# vim /etc/hosts
[root@cham002 cham.com]# cat !$
cat /etc/hosts
127.0.0.1 localhost localhost.localdomain localhost4 localhost4.localdomain4
::1 localhost localhost.localdomain localhost6 localhost6.localdomain6
192.168.230.150 www.qq123.com
127.0.0.1 cham.com
[root@cham002 cham.com]# curl https://cham.com/
curl: (60) Peer's certificate issuer has been marked as not trusted by the user.
More details here: http://curl.haxx.se/docs/sslcerts.html
curl performs SSL certificate verification by default, using a "bundle"
of Certificate Authority (CA) public keys (CA certs). If the default
bundle file isn't adequate, you can specify an alternate file
using the --cacert option.
If this HTTPS server uses a certificate signed by a CA represented in
the bundle, the certificate verification probably failed due to a
problem with the certificate (it might be expired, or the name might
not match the domain name in the URL).
If you'd like to turn off curl's verification of the certificate, use
the -k (or --insecure) option.
[root@cham002 cham.com]# curl https://cham.com/ -I
curl: (60) Peer's certificate issuer has been marked as not trusted by the user.
More details here: http://curl.haxx.se/docs/sslcerts.html
curl performs SSL certificate verification by default, using a "bundle"
of Certificate Authority (CA) public keys (CA certs). If the default
bundle file isn't adequate, you can specify an alternate file
using the --cacert option.
If this HTTPS server uses a certificate signed by a CA represented in
the bundle, the certificate verification probably failed due to a
problem with the certificate (it might be expired, or the name might
not match the domain name in the URL).
If you'd like to turn off curl's verification of the certificate, use
the -k (or --insecure) option.
[root@cham002 cham.com]#
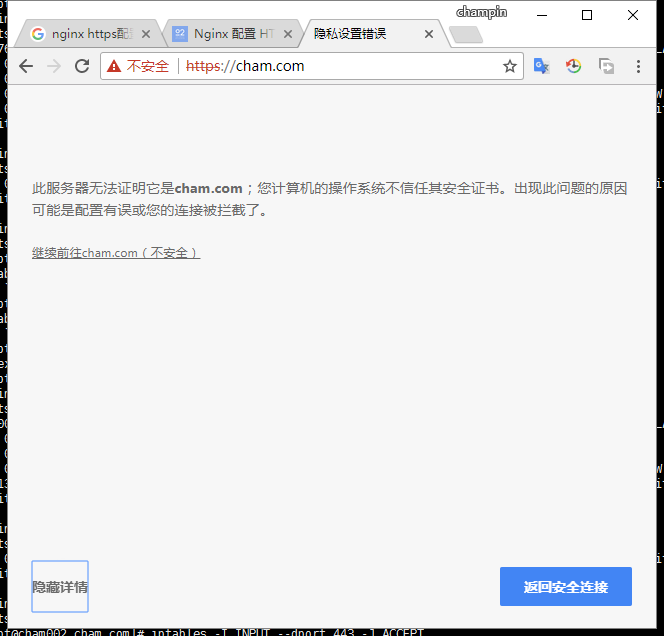
因为该证书是自己创建的,所以提示证书不被信任!!!
使用浏览器检测:
如果用浏览器访问不到呢,你就要看看iptables了(这点要切记)
[root@cham002 cham.com]# iptables -nvL
Chain INPUT (policy ACCEPT 0 packets, 0 bytes)
 pkts bytes target     prot opt in     out     source               destination
 8030 9200K ACCEPT     all  --  *      *       0.0.0.0/0            0.0.0.0/0            state RELATED,ESTABLISHED
    0     0 ACCEPT     icmp --  *      *       0.0.0.0/0            0.0.0.0/0
   11   700 ACCEPT     all  --  lo     *       0.0.0.0/0            0.0.0.0/0
    2   104 ACCEPT     tcp  --  *      *       0.0.0.0/0            0.0.0.0/0            state NEW tcp dpt:22
 1156 96277 REJECT     all  --  *      *       0.0.0.0/0            0.0.0.0/0            reject-with icmp-host-prohibited

Chain FORWARD (policy ACCEPT 0 packets, 0 bytes)
 pkts bytes target     prot opt in     out     source               destination
    0     0 REJECT     all  --  *      *       0.0.0.0/0            0.0.0.0/0            reject-with icmp-host-prohibited

Chain OUTPUT (policy ACCEPT 6552 packets, 1582K bytes)
 pkts bytes target     prot opt in     out     source               destination
简单的方法就是iptables -F 还有就是加一条443的规则iptables -I INPUT -p tcp --dport 443 -j ACCEPT
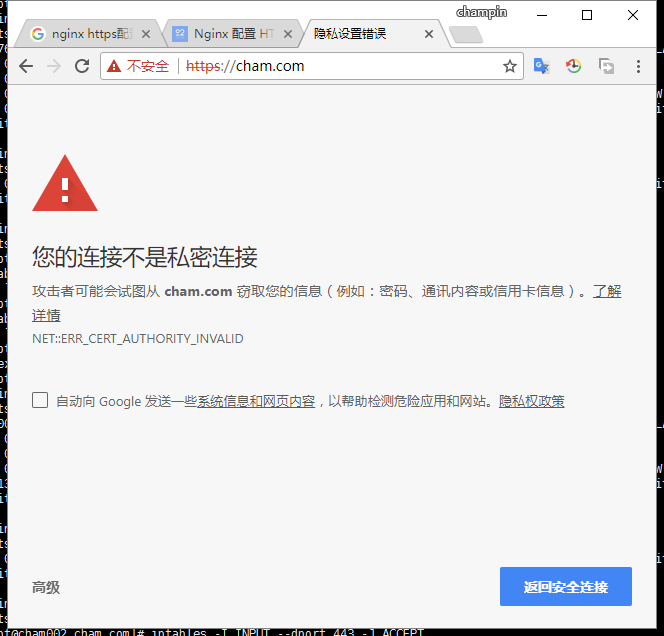 点高级继续
点高级继续


 1143
1143

 被折叠的 条评论
为什么被折叠?
被折叠的 条评论
为什么被折叠?
 到【灌水乐园】发言


