


JsTestDriver是一个JavaScript单元测试工具,易于与持续构建系统相集成并能够在多个浏览器上运行测试轻松实现TDD风格的开发。当在项目中配置好js-test-driver以后,如同junit测试java文件一般,js-test-driver可以直接通过直接运行js文件,来对js文件单元测试。项目地址: http://code.google.com/p/js-test-driver/
JsTestDriver运行原理图(好像是同事画的,在此表示感谢):

Sonar是一个开源平台,用于管理源代码的质量。我们可以把JsTestDriver的测试结果在Sonar上展示出来。项目地址:http://www.sonarsource.org/
- JsTestDriver配置
1.代码布局
source folder,代码路径,通常情况下就是src。
test folder,测试代码路径,例如src-test,unittest。
configuration file,配置文件。JsTestDriver配置文件,默认文件名为jsTestDriver.conf。
2.JsTestDriver文件
依赖包:JsTestDriver.jar, coverage.jar
配置文件:jsTestDriver.conf
启动脚本:shell
3.JsTestDriver配置文件
配置文件是YAML格式,很容易看懂,路径部分支持通配符,与junit完全类似。
server: http://localhost:9876    # JsTestDriver的server地址

load:                            # 源代码路径
  - src/*.js
test:                            # 测试代码路径
  - unittest/*.js

plugin:                          # 这里配置了一个插件,统计测试覆盖率
 - name: "coverage"              # 插件名称
   jar: "lib/coverage.jar"       # 插件jar包路径
module: "com.google.jstestdriver.coverage.CoverageModule“sudo apt-get install lcov更多细节可以参考官方文档:http://code.google.com/p/js-test-driver/wiki/ConfigurationFile
4.JsTestDriver Server配置
下载最新的JsTestDriver.jar,地址:http://code.google.com/p/js-test-driver/downloads/list
启动server,端口9876:
java -jar JsTestDriver-1.3.5.jar --port 9876
会看到两行字:
Capture This Browser
Capture This Browser in strict mode
一般情况下点第一个"Capture This Browser”,这里浏览器就会执行单元测试的代码,记得不要随手关掉哦。如图:
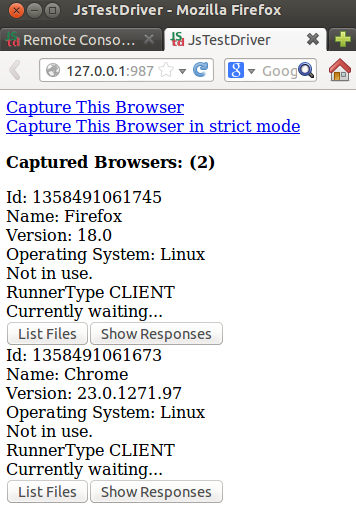
Capture之后的浏览器界面如下:

一些建议,可以使用--browser来制定浏览器,这样就不用手工去Capture了:
java -jar JsTestDriver-1.3.5.jar --port 9876 --browser firefox,chromium-browsernohup java -jar JsTestDriver-1.3.5.jar --port 9876 --browser firefox,chromium-browser &也可以查看帮助获取更多参数:
java -jar JsTestDriver-1.3.5.jar help
 --browser VAR             : The path to the browser executable
 --browserTimeout VAR      : The ms before a browser is declared dead.
 --captureAddress VAL      : The address to capture the browser.
 --captureConsole          : Capture the console (if possible) from the browser
 --config VAL              : Loads the configuration file
 --dryRunFor VAR           : Outputs the number of tests that are going to be
                             run as well as their names for a set of
                             expressions or all to see all the tests
 --help                    : Help
 --port N                  : The port on which to start the JsTestDriver server
 --preloadFiles            : Preload the js files
 --raiseOnFailure VAL      : Whether jstd will throw an exception when a test
                             failure.
 --requiredBrowsers VAR    : Browsers that all actions must be run on.
 --reset                   : Resets the runner
 --server VAL              : The server to which to send the command
 --serverHandlerPrefix VAL : Whether the handlers will be prefixed with jstd
 --sslPort N               : The SSL port on which to start the JsTestDriver
                             server
 --testOutput VAL          : A directory to which serialize the results of the
                             tests as XML
 --tests VAR               : Run the tests specified in the form testCase.testNa
                             me
 --verbose                 : Displays more information during a run

 --plugins VAL[,VAL]       : Comma separated list of paths to plugin jars.
 --config VAL              : Path to configuration file.
 --basePath VAL[,VAL]      : Override the base path(s) in the configuration file. Defaults to the parent directory of the configuration file.
--runnerMode VAL : The configuration of the logging and frequency that the runner reports actions: DEBUG, DEBUG_NO_TRACE, DEBUG_OBSERVE, PROFILE, QUIET (default), INFO官方文档地址:http://code.google.com/p/js-test-driver/wiki/CommandLineFlags
5.运行JsTestDriver单元测试
在JsTestDriver server启动并且Capture浏览器之后,就可以执行测试了:
java -jar JsTestDriver-1.3.5.jar --config jsTestDriver.conf --tests all --testOutput ./testreport/java -jar JsTestDriver-1.3.5.jar --config jsTestDriver.conf --server http://localhost:9876 --tests all --testOutput ./testreport/如果安装了Icov的话,可以生成HTML测试报告:
genhtml ./testreport/jsTestDriver.conf-coverage.dat -o ./testreport/output
- Sonar Runner配置
(这里比较乱,并没有特定根据JsTestDriver来写,其它语言的项目与此类似)
Sonar由3个部分组成:
Database:参数配置和代码质量分析结果。
Web Server:展示分析结果和更改配置。
Client:运行代码质量分析并将结果写至Database。
Web Server和Database配置稍稍麻烦,将在下一篇blog详细写出。在这里主要写Client如何配置运行。
1.下载Sonar Runner
有几种Client可供选择,对外界环境依赖最少的莫过于Sonar Runner。
首先下载Sonar Runner。下载地址:http://docs.codehaus.org/display/SONAR/Installing+and+Configuring+Sonar+Runner
2.环境变量配置
解压到任何一个地址并配置环境变量$SONAR_RUNNER_HOME,将$SONAR_RUNNER_HOME/bin加入PATH。
3.检查Sonar Runner是否配置成功
sonar-runner -h
usage: sonar-runner [options]

Options:
 -h,--help             Display help information
 -X,--debug            Produce execution debug output
-D,--define <arg> Define property4. 配置Sonar Server Databse地址
#----- Default Sonar server
#sonar.host.url=http://localhost:9000

#----- PostgreSQL
#sonar.jdbc.url=jdbc:postgresql://localhost/sonar
#sonar.jdbc.driver=org.postgresql.Driver

#----- MySQL
#sonar.jdbc.url=jdbc:mysql://localhost:3306/sonar?useUnicode=true&characterEncoding=utf8
#sonar.jdbc.driver=com.mysql.jdbc.Driver

#----- Oracle
#sonar.jdbc.url=jdbc:oracle:thin:@localhost/XE
#sonar.jdbc.driver=oracle.jdbc.driver.OracleDriver

#----- Global database settings
#sonar.jdbc.username=sonar
#sonar.jdbc.password=sonar

#----- Default directory layout
#sonar.sources=src/main/java
#sonar.tests=src/test/java
#sonar.binaries=target/classes
数据库密码、地址,都懂。
以上Sonar配置看起来很复杂,但只需要配置一次。 环境变量也可以不用配置,缺点就是每次跑的时候要从server下载很多jar包。
把配置OK的Sonar Runner check-in到代码库中让大家共享,一劳永逸。
5.Sonar Runner项目配置
需要配置sonar-project.properties
# required metadata
sonar.projectKey=my:project                  # 项目key
sonar.projectName=My project                 # 项目显示名称
sonar.projectVersion=1.0                     # 项目版本

# optional description
#sonar.projectDescription=Fake description   # 没什么用

# path to source directories (required)
sonar.sources=srcDir1,srcDir2                # 源代码路径,用英文逗号隔开

# path to test source directories (optional)
sonar.tests=testDir1,testDir2                # 测试代码路径,用英文逗号隔开

# path to project binaries (optional), for example directory of Java bytecode
# sonar.binaries=binDir                      # 没什么用

# optional comma-separated list of paths to libraries. Only path to JAR file and path to directory of classes are supported.
# sonar.libraries=path/to/library/*.jar,path/to/classes/dir,path/to/specific/library/myLibrary.jar,parent/*/*.jar

# The value of the property must be the key of the language.
sonar.language=js                            # 项目语言,重要

# Additional parameters
#sonar.my.property=value                     # 附加参数,依需求而定
官方文档中有多模块,多语言项目配置的介绍。地址: http://docs.codehaus.org/display/SONAR/Analyzing+with+Sonar+Runner
6.分析项目
直接执行:
sonar-runner


 577
577

 被折叠的 条评论
为什么被折叠?
被折叠的 条评论
为什么被折叠?
 到【灌水乐园】发言


