


1 <android.support.design.widget.TabLayout
2    android:id="@+id/tabs"
3    android:layout_width="match_parent"
4    android:layout_height="wrap_content"
5  />
1  TabLayout tabs = (TabLayout) this.findViewById(R.id.tabs);
2  tabs.addTab(tabs.newTab().setText("Tab1"));
3  tabs.addTab(tabs.newTab().setText("Tab2"));
4  tabs.addTab(tabs.newTab().setText("Tab3"));
5  tabs.addTab(tabs.newTab().setText("Tab4"));
6  tabs.addTab(tabs.newTab().setText("Tab5"));

注:如果Tab标签特别多的话,控件是支持自动滑动的,只需要在控件加入 app:tabMode="scrollable" 这个属性即可。
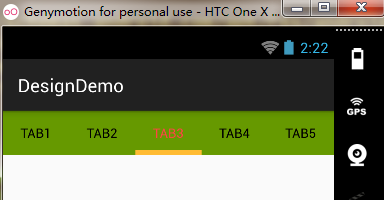
以上简单两步,就可以实现如图效果了。但是这个远远不能满足我们的需要,所以接着往下看。
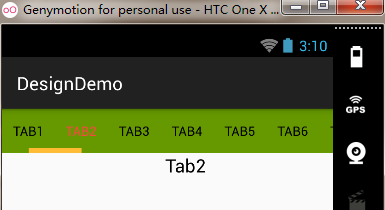
给以上控件添加不同的颜色。如下图效果:
 1 <LinearLayout xmlns:android="http://schemas.android.com/apk/res/android"
 2     xmlns:app="http://schemas.android.com/apk/res-auto"
 3     android:layout_width="match_parent"
 4     android:layout_height="match_parent"
 5     android:orientation="vertical">
 6     <!--
 7         app:tabTextColor  未选中字体颜色
 8         app:tabSelectedTextColor  选中的字体颜色
 9         app:tabIndicatorColor  下标指示器的颜色
10         app:tabIndicatorHeight  下标指示器的高度
11     -->
12     <android.support.design.widget.TabLayout
13         android:id="@+id/tabs"
14         android:layout_width="match_parent"
15         android:layout_height="wrap_content"
16         android:background="@android:color/holo_green_dark"
17         app:tabTextColor="@android:color/black"
18         app:tabSelectedTextColor="@android:color/holo_red_light"
19         app:tabIndicatorColor="@android:color/holo_orange_light"
20         app:tabIndicatorHeight="5dp"
21         />
22 </LinearLayout>
更多的使用是与ViewPager相结合来使用。
效果:Title可以左右滑动切换;同时也可以利用ViewPager左右滑动切换。

代码步骤如下:
1、MainActivity的布局文件,activity_main.xml。
 1 <LinearLayout xmlns:android="http://schemas.android.com/apk/res/android"
 2     xmlns:app="http://schemas.android.com/apk/res-auto"
 3     android:layout_width="match_parent"
 4     android:layout_height="match_parent"
 5     android:orientation="vertical">
 6     <!--
 7         app:tabTextColor  未选中字体颜色
 8         app:tabSelectedTextColor  选中的字体颜色
 9         app:tabIndicatorColor  下标指示器的颜色
10         app:tabIndicatorHeight  下标指示器的高度
11         app:tabMode="scrollable" 横向滚动
12     -->
13     <android.support.design.widget.TabLayout
14         android:id="@+id/tabs"
15         android:layout_width="match_parent"
16         android:layout_height="wrap_content"
17         android:background="@android:color/holo_green_dark"
18         app:tabTextColor="@android:color/black"
19         app:tabSelectedTextColor="@android:color/holo_red_light"
20         app:tabIndicatorColor="@android:color/holo_orange_light"
21         app:tabIndicatorHeight="5dp"
22         app:tabMode="scrollable"
23         />
24     <android.support.v4.view.ViewPager
25         android:id="@+id/viewpager"
26         android:layout_width="match_parent"
27         android:layout_height="match_parent"
28         />
29 </LinearLayout>
2、MainActivity.java
 1 package com.example.com.designdemo;
 2
 3 import android.os.Bundle;
 4 import android.support.design.widget.TabLayout;
 5 import android.support.v4.app.Fragment;
 6 import android.support.v4.view.ViewPager;
 7 import android.support.v7.app.AppCompatActivity;
 8 import java.util.ArrayList;
 9 import java.util.List;
10
12 public class MainActivity extends AppCompatActivity {
14     @Override
15     protected void onCreate(Bundle savedInstanceState) {
16         super.onCreate(savedInstanceState);
17         setContentView(R.layout.activity_main);
20         TabLayout tabs = (TabLayout) this.findViewById(R.id.tabs);
21
22         List<String> titles = new ArrayList<String>();
23         List<Fragment> fragments = new ArrayList<Fragment>();
24         for (int i=0; i<10; i++) {
25             String title = "Tab"+ (i+1);
26             tabs.addTab(tabs.newTab().setText(title));
27             titles.add(title);
28
29             Fragment fragment = new TestOneFragment(title);
30             fragments.add(fragment);
31         }
32
33         ViewPager viewpager = (ViewPager) this.findViewById(R.id.viewpager);
34         TestOneAdapter mAdapter = new TestOneAdapter(getSupportFragmentManager(), titles, fragments);
35         viewpager.setAdapter(mAdapter);
36         tabs.setupWithViewPager(viewpager);
37         tabs.setTabsFromPagerAdapter(mAdapter);
38     }
39
40 }
3、新建一个TestOneFragment.java,添加ViewPager使用。
 1 package com.example.com.designdemo;
 2
 4 import android.os.Bundle;
 5 import android.support.v4.app.Fragment;
 6 import android.view.LayoutInflater;
 7 import android.view.View;
 8 import android.view.ViewGroup;
 9 import android.widget.TextView;
10
12 public class TestOneFragment extends Fragment {
14     public String mTitle = null;
15
16     public TestOneFragment(String title) {
17         this.mTitle = title;
18     }
19
20     @Override
21     public View onCreateView(LayoutInflater inflater, ViewGroup container,
22                              Bundle savedInstanceState) {
23         // Inflate the layout for this fragment
24         View view = inflater.inflate(R.layout.test_one_fragment, container, false);
25
26         TextView txt = (TextView) view.findViewById(R.id.txt);
27         txt.setText(mTitle);
28
29         return view;
30     }
31 }
4、Fragment适配器TestOneAdapter.java
 1 package com.example.com.designdemo;
 2
 3 import android.support.v4.app.Fragment;
 4 import android.support.v4.app.FragmentManager;
 5 import android.support.v4.app.FragmentStatePagerAdapter;
 6 import java.util.List;
 7
 9 public class TestOneAdapter extends FragmentStatePagerAdapter {
10
11     List<String> titles;
12     List<Fragment> fragments;
13
14     public TestOneAdapter(FragmentManager fm, List<String> titles, List<Fragment> fragments) {
15         super(fm);
16         this.titles = titles;
17         this.fragments = fragments;
18     }
19
20     @Override
21     public Fragment getItem(int position) {
22         return fragments.get(position);
23     }
24
25     @Override
26     public int getCount() {
27         return fragments.size();
28     }
29
30     @Override
31     public CharSequence getPageTitle(int position) {
32         return titles.get(position);
33     }
34 }
完整DEMO下载地址:http://download.csdn.net/detail/androidsj/9301597


 242
242


 被折叠的 条评论
为什么被折叠?
被折叠的 条评论
为什么被折叠?
 到【灌水乐园】发言


