


PART I: 搭建环境OPENVINO+Tensorflow1.12.0
I: l_openvino_toolkit_p_2019.1.094
第一步常规安装参考链接:https://docs.openvinotoolkit.org/latest/_docs_install_guides_installing_openvino_linux.html
第二步编译Inference Engine Samples:
cd /PATH/TO/deployment_tools/inference_engine/samples
run ./build_samples.sh
编译后的生成文件路径
/root/inference_engine_samples_build/intel64/Release
II. tensorflow编译
Bazel编译Tensorflow
参考链接:https://blog.csdn.net/chenyuping333/article/details/82108509
(bazel-0.18.0-installer-linux-x86_64.sh)
2. Tensorflow下载连接:https://github.com/tensorflow/tensorflow/tags (tensorflow-1.12.0)
Step 1: cd /PATH/TO/tensorflows
Step2: ./configure (全选No)
Step3: 编译freeze_graph
bazel build tensorflow/python/tools:freeze_graph
可能会遇到的问题:
error:Python.h:No such file or directory
solutions:yum install python34-devel
note:一定将默认python改为python3,缺少numpy文件,yum安装时报错,更改对应文件头部的/usr/bin/python地址为/usr/bin/python2,使用pip3 安装numpy
错误参考链接: https://www.jianshu.com/p/db943b0f1627 https://blog.csdn.net/xjmxym/article/details/73610648
https://www.cnblogs.com/toSeek/p/6192481.html
Step4: 编译transform_graph
bazel build tensorflow/tools/graph_transforms:transform_graph
Step5: 编译summarize_graph
bazel build tensorflow/tools/graph_transforms:summarize_graph
PART II: OPENVINO for Classification
数据集准备:ImageNet val
分别制作六个文件夹每个文件夹内的图片数量依次为1,8,16,32,64,96
形式如下

测试模型:VGG-19,resnet-50,resnet-101,resnet-152,inception-v3,inception-v4
参考链接: https://github.com/vdevaram/deep_learning_utilities_cpu/blob/master/dldt/run_dldt_tf.sh
StepI: 下载预训练的模型(6个)
mkdir pretrainedModels && cd pretrainedModels
wget http://download.tensorflow.org/models/vgg_19_2016_08_28.tar.gz
tar -xvf vgg_19_2016_08_28.tar.gz
wget http://download.tensorflow.org/models/inception_v3_2016_08_28.tar.gz
tar -xvf inception_v3_2016_08_28.tar.gz
wget http://download.tensorflow.org/models/inception_v4_2016_09_09.tar.gz
tar -xvf inception_v4_2016_09_09.tar.gz
wget http://download.tensorflow.org/models/resnet_v1_50_2016_08_28.tar.gz
tar -xvf resnet_v1_50_2016_08_28.tar.gz
wget http://download.tensorflow.org/models/resnet_v1_101_2016_08_28.tar.gz
tar -xvf resnet_v1_101_2016_08_28.tar.gz
wget http://download.tensorflow.org/models/resnet_v1_152_2016_08_28.tar.gz
tar -xvf resnet_v1_152_2016_08_28.tar.gz
解压后的形式如下所示

StepII: 生成对应分类预训练模型的.pb文件
cd /PATH/TO/pretrainedModels
mkdir frozen && mkdir pb
(*不同网络的对应指令有些许不同)
1. python3.6 /PATH/TO/tensorflowModels/research/slim/export_inference_graph.py \
--alsologtostderr \
--model_name=vgg_19 \
--output_file=/PATH/TO/pb/vgg_19.pb \
--labels_offset=1
2. python3.6 /PATH/TO/tensorflowModels/research/slim/export_inference_graph.py \
--alsologtostderr \
--model_name=resnet_v1_50 \
--output_file=/PATH/TO/pb/resnet_v1_50.pb \
--labels_offset=1
3. python3.6 /PATH/TO/tensorflowModels/research/slim/export_inference_graph.py \
--alsologtostderr \
--model_name=resnet_v1_101 \
--output_file=/PATH/TO/pb/resnet_v1_101.pb \
--labels_offset=1
4. python3.6 /PATH/TO/tensorflowModels/research/slim/export_inference_graph.py \
--alsologtostderr \
--model_name=resnet_v1_152 \
--output_file=/PATH/TO/pb/resnet_v1_152.pb \
--labels_offset=1
5. python3.6 /PATH/TO/tensorflowModels/research/slim/export_inference_graph.py \
--alsologtostderr \
--model_name=inception_v3 \
--output_file=/PATH/TO/pb/inception_v3.pb
6. python3.6 /PATH/TO/tensorflowModels/research/slim/export_inference_graph.py \
--alsologtostderr \
--model_name=inception_v4 \
--output_file=/PATH/TO/pb/inception_v4.pb
StepIII: 对生成对应分类预训练模型的.pb文件进行freeze操作
(*若下面指令报错可以使用python3.6 运行对应的freeze_graph.py文件进行生成)
cd /PATH/TO/TensorflowModels
1. bazel-bin/tensorflow/python/tools/freeze_graph \
--input_graph=/PATH/TO/pb/vgg_19.pb \
--input_checkpoint=/PATH/TO/vgg_19.ckpt \
--input_binary=true \
--output_graph=/PATH/TO/frozen/frozen_vgg_19.pb \
--output_node_names=vgg_19/fc8/squeezed
2. bazel-bin/tensorflow/python/tools/freeze_graph \
--input_graph=/PATH/TO/pb/resnet_v1_50.pb \
--input_checkpoint=/PATH/TO/resnet_v1_50.ckpt \
--input_binary=true \
--output_graph=/PATH/TO/frozen/frozen_resnet_v1_50.pb \
--output_node_names=resnet_v1_50/predictions/Reshape_1
3. bazel-bin/tensorflow/python/tools/freeze_graph \
--input_graph=/PATH/TO/pb/resnet_v1_101.pb \
--input_checkpoint=/PATH/TO/resnet_v1_101.ckpt \
--input_binary=true \
--output_graph=/PATH/TO/frozen/frozen_resnet_v1_101.pb \
--output_node_names=resnet_v1_101/predictions/Reshape_1
4. bazel-bin/tensorflow/python/tools/freeze_graph \
--input_graph=/PATH/TO/pb/resnet_v1_152.pb \
--input_checkpoint=/PATH/TO/resnet_v1_152.ckpt \
--input_binary=true \
--output_graph=/PATH/TO/frozen/frozen_resnet_v1_152.pb \
--output_node_names=resnet_v1_152/predictions/Reshape_1
5. bazel-bin/tensorflow/python/tools/freeze_graph \
--input_graph=/PATH/TO/pb/inception_v3.pb \
--input_checkpoint=/PATH/TO/inception_v3.ckpt \
--input_binary=true \
--output_graph=/PATH/TO/frozen/frozen_inception_v3.pb \
--output_node_names=InceptionV3/Predictions/Reshape_1
6. bazel-bin/tensorflow/python/tools/freeze_graph \
--input_graph=/PATH/TO/pb/inception_v4.pb \
--input_checkpoint=/PATH/TO/inception_v4.ckpt \
--input_binary=true \
--output_graph=/PATH/TO/frozen/frozen_inception_v4.pb \
--output_node_names=InceptionV4/Logits/Predictions
StepIV: 生成IR文件
cd /PATH/TO /deployment_tools/model_optimizer
1. python3.6 mo.py --framework tf \
--input_model /PATH/TO/frozen/frozen_vgg_19.pb \
--data_type FP32 \
--output_dir /PATH/TO/frozen/ \
--reverse_input_channels \
--batch 64
(batch大小可选1,8,16,32,64,96)
2. python3.6 mo.py --framework tf \
--input_model /PATH/TO/frozen/frozen_inception_v3.pb \
--data_type FP32 \
--scale 255 \
--reverse_input_channels \
--output_dir /PATH/TO/frozen/ \
--batch 16
3. python3.6 mo.py --framework tf \
--input_model /PATH/TO/frozen/frozen_inception_v4.pb \
--data_type FP32 \
--scale 255 \
--reverse_input_channels \
--output_dir /PATH/TO/frozen/ \
--batch 16
4. python3.6 mo.py --framework tf \
--input_model /PATH/TO/frozen/frozen_resnet_v1_50.pb \
--data_type FP32 \
--output_dir /PATH/TO/frozen/ \
--reverse_input_channels \
--batch 16
5. python3.6 mo.py --framework tf \
--input_model /PATH/TO/frozen/frozen_resnet_v1_101.pb \
--data_type FP32 \
--output_dir /PATH/TO/frozen/ \
--reverse_input_channels \
--batch 16
6. python3.6 mo.py --framework tf \
--input_model /PATH/TO/frozen/frozen_resnet_v1_152.pb \
--data_type FP32 \
--output_dir /PATH/TO/frozen/ \
--reverse_input_channels \
--batch 16
StepV:测试(-ni -niter 迭代100次)
cd /root/inference_engine_samples_build/intel64/Release
./classification_sample \
-i /PATH/TO/frozen/frozen_inception_v3.xml \
-d CPU -ni 100 \
-l /PATH/TO/deployment_tools/inference_engine/samples/intel64/Release/lib/libcpu_extension.so \
-nt 1 \
-i /PATH/TO/val1
./benchmark_app \
-m /PATH/TO /frozen/ frozen_inception_v3.xml \
-d CPU -api async -niter 100 \
-l /PATH/TO/deployment_tools/inference_engine/samples/intel64/Release/lib/libcpu_extension.so -nireq 32 \
-i /PATH/TO/val1
(-nireq单CPU核的数量,通过lscpu指令查看)
(上述输入图片的数量与batch的大小相同,对应前面的val数据集,通过更改不同模型对应的.xml文件来测试不同的模型)
PART III: OPENVINO for Object Detection Test
数据集准备:COCO val2017
分别制作六个文件夹每个文件夹内的图片数量依次为1,8,16,32,64,96
形式如下

Note: Tensorflow Object_Detection API参考:
https://github.com/tensorflow/models/tree/master/research/object_detection
Step I:预训练模型的下载
- mkdir object_detection && cd object_detection && mkdir test_models
- 下载对应的预训练的目标检测模型
模型链接:
解压后的文件格式如下图

Step II: 生成IR文件
参考链接:
(更改SSD,Faster R-CNN,RFCN,Mask R-CNN对应的 .json及pipeline.config文件
对应的.json文件如下
ssd_v2_support.json
faster_rcnn_support.json
rfcn_support.json
mask_rcnn_support.json)
python3.6 mo_tf.py \
--input_model=/PATH/TO/frozen_inference_graph.pb \
--tensorflow_use_custom_operations_config /PATH/TO/deployment_tools/model_optimizer/extensions/front/tf/ssd_v2_support.json \
--tensorflow_object_detection_api_pipeline_config /PATH/TO/pipeline.config \
--reverse_input_channels --batch 16
(batch只针对SSD的大小可调,Faster RCNN 及RFCN只能测试batch为1的情形)
StepIII:测试
For SSD/Faster RCNN/RFCN series
(benchmark_app只适用于SSD)
./benchmark_app \
-m /PATH/TO/frozen_inference_graph.xml \
-d CPU -api async -niter 100 \
-l /PATH/TO/intel64/Debug/lib/libcpu_extension.so \
-nireq 32 -i /PATH/TO /val1/
(-nireq代表单CPU的核数,通过lscpu可以查看,val与batch的大小相对应)
(RFCN, SSD 及 Faster R-CNNs, 测试指令都为object_detection_sample_ssd
***Faster R-CNN/RFCN的只适用于batch=1
)
./object_detection_sample_ssd \
-m /PATH/TO/frozen_inference_graph.xml -d CPU -ni 100 \
-l /PATH/TO/intel64/Debug/lib/libcpu_extension.so -i /PATH/TO /val1/
For Mask R-CNN
参考链接:https://docs.openvinotoolkit.org/latest/_inference_engine_samples_mask_rcnn_demo_README.html
./mask_rcnn_demo \
-m /PATH/TO/frozen_inference_graph.xml -d CPU -ni 100 \
-l /root/inference_engine_samples_build/intel64/Debug/lib/libcpu_extension.so \
-i /PATH/TO/coco_val/val64/
在Mask R-CNN进行batch 值大于16以上时,会出现错误
“segmentation fault”是因为在测试时会生成在当前路径下生成图片,随着batch的增加,内存爆掉。此部分代码可以注释,并不影响正常时间的测量。
注释部分代码如下图。
main.cpp 路径:/opt/intel/openvino_2019.1.0394/deployment_tools/inference_engine/samples/mask_rcnn_demo
此处开始注释
此处结束注释
文件修改后重新进行编译
run ./build_samples.sh
PART IV: OpenVINO for DeepLabV3+
Reference:https://github.com/FionaZZ92/OpenVINO/tree/master/DeeplabV3%2B_MobileNetV2
Tensorflow运行指令(wwen.sh):
echo 1 > /proc/sys/vm/compact_memory
echo 3 > /proc/sys/vm/drop_caches
echo 100 > /sys/devices/system/cpu/intel_pstate/min_perf_pct
echo 0 > /sys/devices/system/cpu/intel_pstate/no_turbo
echo 0 > /proc/sys/kernel/numa_balancing
cpupower frequency-set -g performance
export KMP_BLOCKTIME=0
export KMP_SETTINGS=1
export KMP_AFFINITY=granularity=fine,compact,1,0
export OMP_NUM_THREADS=16
numactl --physcpubind=0-15,32-47 --membind=0 python3.6 demo_multi.py --input_folder ./img --output_folder ./output --logdir ./model > node_2_1.log 2>&1 &
numactl --physcpubind=16-31,48-63 --membind=1 python3.6 demo_multi.py --input_folder ./img --output_folder ./output --logdir ./model > node_2_2.log 2>&1 &
Step1: IR文件的生成
python3.6 mo_tf.py --input_model /home/gsj/deeplab/research/deeplab/model/frozen_inference_graph.pb --data_type FP32 --output_dir /home/gsj/super-resolution/tf_estimator_barebone/models/ --input 0:xception_65/Pad --output aspp0/Relu,aspp1_pointwise/Relu,aspp2_pointwise/Relu,aspp3_pointwise/Relu,ResizeBilinear_1 --input_shape [1,1953,2593,3](根据下一步inference过程,预处理图片对应输出尺寸进行调整,如下图)

Step2: Inference(infer_IE_TF.py位于intel64/Release下)
echo 1 > /proc/sys/vm/compact_memory
echo 3 > /proc/sys/vm/drop_caches
echo 100 > /sys/devices/system/cpu/intel_pstate/min_perf_pct
echo 0 > /sys/devices/system/cpu/intel_pstate/no_turbo
echo 0 > /proc/sys/kernel/numa_balancing
cpupower frequency-set -g performance
export KMP_BLOCKTIME=0
export KMP_SETTINGS=1
export KMP_AFFINITY=granularity=fine,compact,1,0
export OMP_NUM_THREADS=16
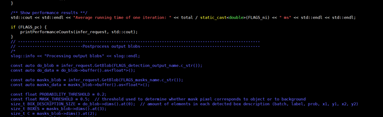
python3.6 infer_IE_TF.py -m /home/gsj/super-resolution/tf_estimator_barebone/models/frozen_inference_graph.xml -i 1.jpg -l lib/libcpu_extension .so
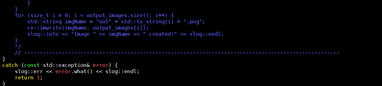
#infer_IE_TF.py代码
#author:fourmi_gsj
from __future__ import print_function
import sys
import os
from argparse import ArgumentParser
import numpy as np
import cv2
import time

import tensorflow as tf
from tensorflow.python.platform import gfile

from openvino.inference_engine import IENetwork,IEPlugin


def build_argparser():
    parser = ArgumentParser()
    parser.add_argument("-m", "--model" ,help="Path to an .xml file with a trained model.",required=True,type=str)
    parser.add_argument("-i", "--input", help="Path to a folder with images or path to an image files", required=True,
                        type=str)
    parser.add_argument("-l", "--cpu_extension",
                        help="MKLDNN (CPU)-targeted custom layers.Absolute path to a shared library with the kernels "
                             "impl.", type=str, default=None)
    parser.add_argument("-pp", "--plugin_dir", help="Path to a plugin folder", type=str, default=None)
    parser.add_argument("-d", "--device",
                        help="Specify the target device to infer on; CPU, GPU, FPGA or MYRIAD is acceptable. Sample "
                             "will look for a suitable plugin for device specified (CPU by default)", default="CPU",
                        type=str)
    parser.add_argument("-nt", "--number_top", help="Number of top results", default=10, type=int)
    parser.add_argument("-pc", "--performance", help="Enables per-layer performance report", action='store_true')

    return parser


def resoze_for_concat(a0,a1,a2,a3,RB):
    iimg_ir = []
    '''
    print('a0:',a0.shape)
    print('a1:',a1.shape)
    print('a2:',a2.shape)
    print('a3:',a3.shape)
    print('RB:',RB.shape)
    resize_aspp0 =np.float32(np.zeros((1,256,123,163)))
    resize_ResizeBilinear_1=np.float32(np.zeros((1,256,123,163)))
    resize_aspp1 =np.float32(np.zeros((1,256,123,163)))
    resize_aspp2 =np.float32(np.zeros((1,256,123,163)))
    resize_aspp3 =np.float32(np.zeros((1,256,123,163)))
    for i in range(256):
        resize_aspp0[0,i]=cv2.resize(a0[0,i],(163,123), interpolation=cv2.INTER_LINEAR)
        resize_ResizeBilinear_1[0,i]=cv2.resize(RB[0,i],(163,123), interpolation=cv2.INTER_LINEAR)
        resize_aspp1[0,i]=cv2.resize(a1[0,i],(163,123), interpolation=cv2.INTER_LINEAR)
        resize_aspp2[0,i]=cv2.resize(a2[0,i],(163,123), interpolation=cv2.INTER_LINEAR)
        resize_aspp3[0,i]=cv2.resize(a3[0,i],(163,123), interpolation=cv2.INTER_LINEAR)
    ResizeBilinear_1=resize_ResizeBilinear_1.transpose((0,2,3,1))
    aspp0=resize_aspp0.transpose((0,2,3,1))
    aspp1=resize_aspp1.transpose((0,2,3,1))
    aspp2=resize_aspp2.transpose((0,2,3,1))
    aspp3=resize_aspp3.transpose((0,2,3,1))
    '''
    ResizeBilinear_1=RB.transpose((0,2,3,1))
    aspp0=a0.transpose((0,2,3,1))
    aspp1=a1.transpose((0,2,3,1))
    aspp2=a2.transpose((0,2,3,1))
    aspp3=a3.transpose((0,2,3,1))
    '''
    print(aspp0.shape)
    print(aspp1.shape)
    print(aspp2.shape)
    print(aspp3.shape)
    print(ResizeBilinear_1.shape)
    '''
    iimg_ir.append(ResizeBilinear_1)
    iimg_ir.append(aspp0)
    iimg_ir.append(aspp1)
    iimg_ir.append(aspp2)
    iimg_ir.append(aspp3)
    return iimg_ir


class _model_preprocess():
    def __init__(self):
        graph = tf.Graph()
        f_handle = gfile.FastGFile("/home/gsj/deeplab/research/deeplab/model/frozen_inference_graph.pb",'rb')
        graph_def = tf.GraphDef.FromString(f_handle.read())
        with graph.as_default():
            tf.import_graph_def(graph_def,name='')
        self.sess = tf.Session(graph=graph)

    def _pre_process(self,image):
        seg_map = self.sess.run('sub_7:0',feed_dict={'ImageTensor:0':[image]})
        #print('The shape of the seg_map is :',seg_map.shape)
        return seg_map

class _model_postprocess():
    def __init__(self):
        graph = tf.Graph()
        f_handle = gfile.FastGFile("/home/gsj/deeplab/research/deeplab/model/frozen_inference_graph.pb",'rb')
        graph_def = tf.GraphDef.FromString(f_handle.read())

        with graph.as_default():
            new_input0=tf.placeholder(tf.float32,shape=(1,123,163,256),name='new_input0')
            new_input1=tf.placeholder(tf.float32,shape=(1,123,163,256),name='new_input1')
            new_input2=tf.placeholder(tf.float32,shape=(1,123,163,256),name='new_input2')
            new_input3=tf.placeholder(tf.float32,shape=(1,123,163,256),name='new_input3')
            new_input4=tf.placeholder(tf.float32,shape=(1,123,163,256),name='new_input4')

            tf.import_graph_def(graph_def,input_map={'ResizeBilinear_1:0':new_input0,'aspp0/Relu:0':new_input1,'aspp1_pointwise/Relu:0':new_input2,'aspp2_pointwise/Relu:0':new_input3,'aspp3_pointwise/Relu:0':new_input4},name='')

        self.sess = tf.Session(graph=graph)
    def _post_process(self,image_ir,image):
        seg_map = self.sess.run('SemanticPredictions:0', feed_dict={'ImageTensor:0': [image], 'new_input0:0': image_ir[0],
                                    'new_input1:0': image_ir[1],'new_input2:0': image_ir[2],'new_input3:0': image_ir[3],
                                    'new_input4:0': image_ir[4]})
        return seg_map


_pre = _model_preprocess()
_post = _model_postprocess()


def main_IE_infer():
    args = build_argparser().parse_args()
    model_xml = args.model
    model_bin = os.path.splitext(model_xml)[0] + ".bin"
    image = cv2.imread(args.input)
    print("The size of the orig image is:",image.shape[0],image.shape[1])

    h_input_size=1360 #the height of the output
    w_input_size=1020 #the width of the output

    h_ratio = 1.0 * h_input_size / image.shape[0]
    w_ratio = 1.0 * w_input_size / image.shape[1]
    shrink_size = (int(w_ratio * image.shape[1]),int(h_ratio*image.shape[0]))
    image = cv2.resize(image,shrink_size, interpolation=cv2.INTER_LINEAR)
    print("The shape of the resized Image is:",image.shape)

    # Plugin initialization for specified device and load extensions library if specified
    plugin = IEPlugin(device=args.device, plugin_dirs=args.plugin_dir)
    if args.cpu_extension and 'CPU' in args.device:
        plugin.add_cpu_extension(args.cpu_extension)
    if args.performance:
        plugin.set_config({"PERF_COUNT": "YES"})

    # Read IR
    net = IENetwork.from_ir(model=model_xml, weights=model_bin)
    #print("the output Info of the net is :",net.outputs)

    input_blob = next(iter(net.inputs))
    print('input_blob is :',input_blob)
    exec_net = plugin.load(network=net)

    img_ir = []
    for itr in range(1):
        now = time.time()
        image_ = _pre._pre_process(image)
        image_ = image_.transpose((0,3,1,2))
        #print("the shape of the Front Net'output:",image_.shape)

        res =exec_net.infer(inputs={input_blob:image_})
        #print(res.keys())
        aspp0 = res['aspp0/Relu']
        aspp1 = res['aspp1_pointwise/Relu']
        aspp2 = res['aspp2_pointwise/Relu']
        aspp3 = res['aspp3_pointwise/Relu']
        ResizeBilinear_1=res['ResizeBilinear_1']

        img_ir = resoze_for_concat(aspp0,aspp1,aspp2,aspp3,ResizeBilinear_1)
        result = _post._post_process(img_ir,image)[0]
    print('time cost:',time.time()-now)
        #print(result)
    result[result!=0]=255

    cv2.imwrite('./result_deeplabv3.jpg', result)
    del net
    del exec_net
    del plugin

if __name__=='__main__':
    sys.exit(main_IE_infer() or 0)
PART V: OpenVINO for Super Resolution
Step 1: tensorflow进行测试
Github: https://github.com/ychfan/tf_estimator_barebone
运行inference程序,查找该模型的输出节点,查找到的节点名称为”clip_by_value”
指令执行路径:/home/gsj/super-resolution/tf_estimator_barebone/
运行相关指令如下:
export KMP_BLOCKTIME=1
export KMP_AFFINITY=granularity=fine,compact,1,0
export OMP_NUM_THREADS=16
numactl -C 0-15,32-47 -m 0 python3.6 -m datasets.div2k --mode wdsr --model-dir /home/gsj/super-resolution/tf_estimator_barebone/models/ --input-dir /home/gsj/super-resolution/tf_estimator_barebone/data/DIV2K_valid_HR/ --output-dir ../output
Step 2:
将文件夹models下的模型相关文件(saved_model.pb, variabels文件夹)进行处理,freeze saved_model.pb文件,生成pruned_saved_model_or_whatever.pb文件
指令执行路径:/home/gsj/super-resolution/tf_inference_demo/tensorflow-1.12.0
相关指令:
bazel-bin/tensorflow/python/tools/freeze_graph --in_graph=/home/gsj/super-resolution/tf_estimator_barebone/models/saved_model.pb --output_graph=/home/gsj/super-resolution/tf_estimator_barebone/models/pruned_saved_model_or_whatever.pb --input_saved_model_dir=/home/gsj/super-resolution/tf_estimator_barebone/models --input_checkpoint=/home/gsj/super-resolution/tf_estimator_barebone/models/variables --output_node_names="clip_by_value" --input_binary=true
Step3:
对生成的pruned_saved_model_or_whatever.pb文件进一步进行压缩变换操作(将模型中的节点操作”Mul”进行常量值替换)生成transform.pb文件,执行时指定输入inputs为”input_tensor”,即模型的输入节点名称。
指令执行路径:/home/gsj/super-resolution/tf_inference_demo/tensorflow-1.12.0
相关指令:
bazel-bin/tensorflow/tools/graph_transforms/transform_graph --in_graph=/home/gsj/super-resolution/tf_estimator_barebone/models/pruned_saved_model_or_whatever.pb --out_graph=/home/gsj/super-resolution/tf_estimator_barebone/models/transform.pb --inputs=input_tensor --outputs=clip_by_value --transforms='fold_constants'
Step4:
生成IR文件(transform.bin,transform.xml,transform.mapping)
文件生成路径:/home/gsj/super-resolution/tf_estimator_barebone/models
指令执行路径: /opt/intel/computer_vision_sdk_2018.5.455/deployment_tools/model_optimizer
相关指令:(PS:input_shape的大小根据待测试的图片大小确定)
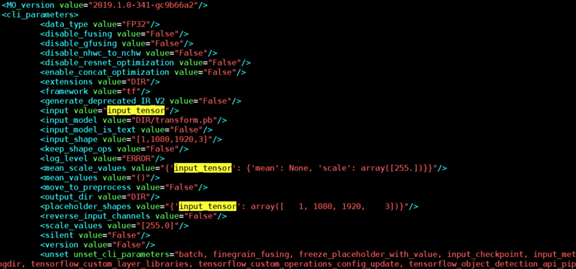
python3.6 mo_tf.py --input_model /home/gsj/super-resolution/tf_estimator_barebone/models/transform.pb --input_shape [1,1080,1920,3] --data_type FP32 --output_dir /home/gsj/super-resolution/tf_estimator_barebone/models/ --scale_values [255.0] --input input_tensor
Step5:修改生成的transform.xml文件
修改两处位置:将以下几处黄色区域即输入节点的名称”input_tensor”更改为0
开头处:
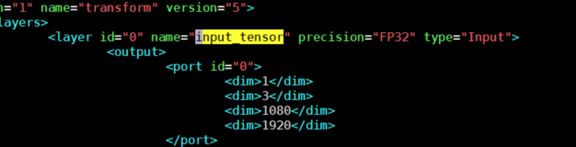
结尾处:
Step 6:执行测试
指令执行路径:
/root/inference_engine_samples_build/intel64/Release
相关指令:
./super_resolution_demo -i /home/gsj/super-resolution/tf_estimator_barebone/va1/0896_1920_1080.png -m /home/gsj/super-resolution/tf_estimator_barebone/models/transform.xml
Step7:OPENVINO图片生成位置
/root/inference_engine_samples_build/intel64/Release/sr_1.png
Step8:tensorflow图片生成位置
/home/gsj/super-resolution/output
-----------------------------------------------我是华丽的分割线--------------------------------------------------------
原生tensorflow测试
Tensorflow 下载地址:https://pypi.org/project/tensorflow/1.12.0/#files
参考前面step1
优化tensorflow测试
- 卸载旧版本tensorflow
- 在当前路径执行:
export PATH=/home/build_gcc72/bin:$PATH
export LD_LIBRARY_PATH=/home/build_gcc72/lib64:$LD_LIBRARY_PATH
- 查看是否为优化的tensorflow, 执行
python3.6 -c "import tensorflow; print(tensorflow.pywrap_tensorflow.IsMklEnabled())"
返回true则代表加载MKL
2. 同step1进行测试


 535
535


 被折叠的 条评论
为什么被折叠?
被折叠的 条评论
为什么被折叠?
 到【灌水乐园】发言


