


欢迎点击「算法与编程之美」↑关注我们!
本文首发于微信公众号:"算法与编程之美",欢迎关注,及时了解更多此系列博客。
通过前面两讲我们知道,客户端的请求会经过一系列的过滤器,最终达到 Servlet,我们深入理解了Tomcat 过滤器的实现机制以及 Servlet 的相关处理。在了解这些之后,我们不禁要问,客户端请求在到达这一系列的过滤器之前发生了什么呢?
1 目标
本次源码分析目标了解客户端请求在StandardWrapperValve 中做了哪些工作。
2 分析方法
根据第一讲的堆栈信息,结合 Intellij Idea 的堆栈视图、断点、单步调试等手段分析源码。
9. atorg.apache.catalina.core.StandardWrapperValve.invoke(StandardWrapperValve.java:199)
3 分析流程
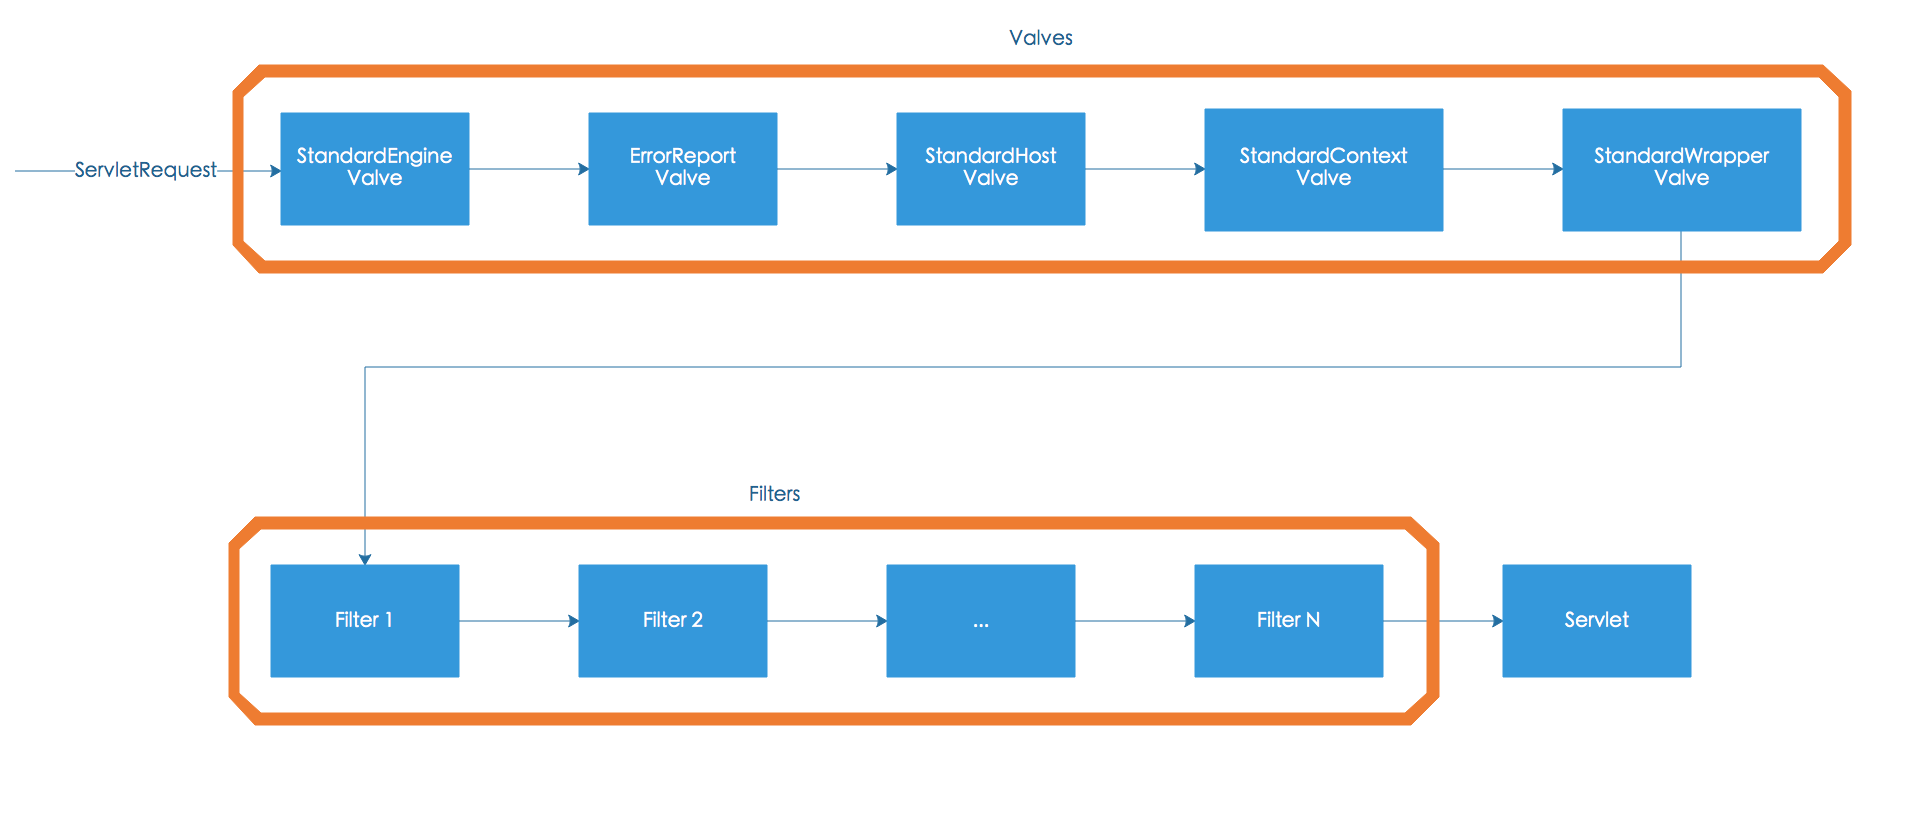
从上图我们可以看到,客户端请求在到达过滤器之前,会经历一系列的 Valve,本讲我们重点分析 StandardWrapperValve。
3.1 ApplicationFilterChain 的初始化
StandardWrapperValue的 invoke()方法中代码较多,但核心的代码是如何实例化 ApplicationFilterChain。
// Create the filter chain for this request
ApplicationFilterChain filterChain =
ApplicationFilterFactory.createFilterChain(request,wrapper, servlet);
通过工厂方式创建ApplicationFilterChain对象,这是一种典型的使用工厂模式来创建对象。我们在进行源码分析的时候,经常会遇到各种设计模式的运用,所以在源码分析工作开始之前,大家务必要熟练的掌握各种经典模式的概念和一般代码编写思路,这样将极大的帮助你更好更快的理解源码。
每一个请求到达 Tomcat 容器的时候,都会经过一系列的 Valve,即都会经过 StandardWrapperValve,而在这个地方都会实例化一个 ApplicationFilterChain 对象,因此这种对象创建的工作是十分频繁的,所以需要一种创建型的设计模式来解决这个问题。
接下来我们就重点来看一下工厂模式是如何创建对象的。
在进行源码分析的时候,我们只关注最核心的流程,其他与核心业务无关的代码,我们将忽略。
filterChain= (ApplicationFilterChain) req.getFilterChain();
if (filterChain == null) {
filterChain = new ApplicationFilterChain();
req.setFilterChain(filterChain);
}
首先查看 req 是否已经有了 filterChain 对象,如果没有则直接实例化,并赋值给 req的属性。
现在我们已经有了一个基本的 filterChain 对象了,接下来就需要对其一些关键属性进行赋值操作。
通过上一讲我们知道Tomcat 的过滤器机制设计的核心就是 filterChain,它管理了所有的过滤器,因此在初始化的时候就需要添加所有的与本请求相关的过滤器信息。这个工作也是 filterChain 初始化的核心所在。
3.2 filterChain添加过滤器
我们在进行过滤器配置的时候,首先进行过滤器名称的定义:
<filter>
<filter-name>sampleFilter</filter-name>
<filter-class>SampleFilter</filter-class>
</filter>
其次是过滤器作用的映射配置,而这种映射配置主要有两种方式,
第一种是 url-pattern 方式,如下所示:
<filter-mapping>
<filter-name>sampleFilter</filter-name>
<url-pattern>/sample</url-pattern>
</filter-mapping>
第二种是 servlet-name 方式,如下所示:
<filter-mapping>
<filter-name>sampleFilter</filter-name>
<servlet-name>helloServlet</servlet-name>
</filter-mapping>
因此在filterChain 中添加过滤器时,核心就是这两种方式的实现,下面将继续介绍Tomcat 是如何实现这两种方式的。
3.2.1 url-pattern 方式
基于 url-pattern 的方式添加过滤器:
// Add the relevant path-mapped filters to this filter chain
for (int i = 0; i < filterMaps.length; i++) {
    if (!matchDispatcher(filterMaps[i],dispatcher)) {
        continue;
    }
    if (!matchFiltersURL(filterMaps[i],requestPath))
        continue;
    ApplicationFilterConfig filterConfig= (ApplicationFilterConfig)
       context.findFilterConfig(filterMaps[i].getFilterName());
    if (filterConfig == null) {
        // FIXME - logconfiguration problem
        continue;
    }
    filterChain.addFilter(filterConfig);
}
核心方法是matchFiltersURL(),将所有符合请求路径的过滤器添加进来。
private static boolean matchFiltersURL(String testPath, StringrequestPath) {

    if (testPath == null)
        return false;

    // Case 1 - Exact Match
    if (testPath.equals(requestPath))
        return true;

    // Case 2 - Path Match("/.../*")
    if (testPath.equals("/*"))
        return true;
    if (testPath.endsWith("/*")) {
        if (testPath.regionMatches(0, requestPath, 0,
                                  testPath.length() - 2)) {
            if (requestPath.length() ==(testPath.length() - 2)){
                return true;
            } else if ('/' ==requestPath.charAt(testPath.length() - 2)) {
                return true;
            }
        }
        return false;
    }

    // Case 3 - Extension Match
    if (testPath.startsWith("*.")) {
        int slash = requestPath.lastIndexOf('/');
        int period = requestPath.lastIndexOf('.');
        if ((slash >= 0) && (period > slash)
            && (period !=requestPath.length() - 1)
            &&((requestPath.length() - period)
                == (testPath.length() - 1))) {
            return (testPath.regionMatches(2, requestPath, period + 1,
                                           testPath.length() - 2));
        }
    }

    // Case 4 - "Default" Match
    return false; // NOTE - Not relevantfor selecting filters

}
以上就是四种情况的匹配,不再详细描述,感兴趣的同学可以深入了解,后面我们会再安排文章介绍。
3.2.2 servlet-name 方式
// Add filters that match on servlet name second
for (int i = 0; i < filterMaps.length; i++) {
    if (!matchDispatcher(filterMaps[i],dispatcher)) {
        continue;
    }
    if (!matchFiltersServlet(filterMaps[i],servletName))
        continue;
    ApplicationFilterConfig filterConfig= (ApplicationFilterConfig)
       context.findFilterConfig(filterMaps[i].getFilterName());
    if (filterConfig == null) {
        // FIXME - logconfiguration problem
        continue;
    }
    filterChain.addFilter(filterConfig);
}

核心方法是 matchFiltersServlet(),如下所示:

private static boolean matchFiltersServlet(FilterMap filterMap,
                                   String servletName) {

    if (servletName == null) {
        return false;
    }
    // Check the specific "*"special servlet name
    else if (filterMap.getMatchAllServletNames()) {
        return true;
    } else {
        String[] servletNames =filterMap.getServletNames();
        for (int i = 0; i < servletNames.length; i++) {
            if (servletName.equals(servletNames[i])){
                return true;
            }
        }
        return false;
    }

}
获得所有过滤器的 servletName,然后遍历匹配到当前 servletName 的过滤器并添加到 filterChain 中。
这里面大家需要注意的是,以上两种方式添加的过滤器有可能会重复,因此 filterChain 在添加的时候也会做重复性添加的检查,另外如果数组容量不够时也会对数组进行扩容操作,具体代码如下。
void addFilter(ApplicationFilterConfig filterConfig) {

    // Prevent the same filter being addedmultiple times
    for(ApplicationFilterConfig filter:filters)
        if(filter==filterConfig)
            return;

    if (n == filters.length) {
        ApplicationFilterConfig[]newFilters =
            new ApplicationFilterConfig[n + INCREMENT];
        System.arraycopy(filters, 0, newFilters, 0, n);
        filters = newFilters;
    }
    filters[n++] = filterConfig;

}
还有一点需要注意的是,在 ApplicationFilterChain 中保存的数组并不是 Filter[],而是ApplicationFilterConfig[],ApplicationFilterConfig 类实现了 FilterConfig 接口,在这个接口中保存了有关过滤器的名字、初始化参数等所有信息,其定义如下所示:
public interface FilterConfig {
    public String getFilterName();
    public ServletContext getServletContext();
    public String getInitParameter(String name);
    public Enumeration<String> getInitParameterNames();
}
4 总结
本讲重点探讨了客户端请求在到达过滤器之前,会经过一系列的 Valve,重点分析了StandardWrapperValve 的执行流程,尤其是 ApplicationFilterChain 的初始化工作。
下一讲我们将分析 StandardContextValve 组件。
欲知后事如何,请持续关注“算法与编程之美”微信公众号,及时了解更多精彩文章。
更多源码分析精彩文章:


 580
580


 被折叠的 条评论
为什么被折叠?
被折叠的 条评论
为什么被折叠?
 到【灌水乐园】发言


