


#Create a restful application with AngularJS and Grails
In this example application, I will create a simple application which basic CRUD operations, and I reused some AngularJS codes of the AngularJS CakePHP Sample.
I assume you have installed the latest JDK 7 and groovy SDK 2.1.9. And also installed Spring Groovy/Grails Toolsuite or an Eclipse based IDE plus Groovy/Grails plugin.
#Create a Grails project
Download a copy of Grails distribution from Grails.org. And extract the files into your local disc.
Add <grails>/bin to the system PATH variable.
Create a project using the following command.
<pre> grails create-app <app name> </pre>
Enter the app folder root, try to run the project in the embeded tomcat server.
<pre> cd <app> grails run-app </pre>
After it is deployed and running, you should see the following like info.
<pre> |Running Grails application |Server running. Browse to http://localhost:8080/angularjs-grails-sample </pre>
If you are using Grails 2.3.2, you maybe encounter a critical bug which will cause the above command failed under Windows system.
<pre> java.lang.instrument ASSERTION FAILED ***: "!errorOutstanding" with message transform method call failed at ../../../src/share/instrument/JPLISAgent.c line: 844 </pre>
This bug had been marked as Blocker priority, and should be fixed in the upcoming 2.3.3 soon.
More info please refer to GRAILS-10756.
In the comments of this issue, there is a solution provided to overcome this barrier temporarily.
Add the following dependency in the BuildConfig.groovy.
<pre> dependencies { // specify dependencies here under either 'build', 'compile', 'runtime', 'test' or 'provided' scopes e.g. // runtime 'mysql:mysql-connector-java:5.1.24' build "org.fusesource.jansi:jansi:1.11" } </pre>
Run grails run-app again, you should see the successful info in browser.

##Explore the generated codes
By default, the generated project use H2 as database, and Hibernate3 for the persistence layer. The Hibernate 4 support is included Grails 2.3 and also is ready in the generated codes.
In the BuildConfig.groovy file.
<pre> runtime ":hibernate:3.6.10.3" // or ":hibernate4:4.1.11.2" </pre>
And in the DataSource.groovy file.
<pre> cache.region.factory_class = 'net.sf.ehcache.hibernate.EhCacheRegionFactory' // Hibernate 3 // cache.region.factory_class = 'org.hibernate.cache.ehcache.EhCacheRegionFactory' // Hibernate 4 </pre>
As you see, if you want to switch to Hibernate4, what is needed to do is only comment the Hibernate 3 facilities, and enable the Hibernate 4 alternatives.
Import this project as a Grails project into your IDE for the next steps.
Code the backend REST API
Create a entity Book.
<pre> grails create-domain-class Book </pre>
This command will generate Book.groovy and BookSpec.groovy test at the same time.
<pre> @Resource(uri='/books') class Book { String title String author Double price static constraints = { title blank:false author blank:false } } </pre>
@Resource is a Grails specific annotation, an entity annotated with it will be exposed as REST resource, the basic CRUD operation is ready for use.
<table> <thead> <tr><td>URL</td><td>HTTP Method</td><td>Description</td></tr> </thead> <tbody> <tr><td>/books.json</td><td>GET</td><td>Get the list of Books</td></tr> <tr><td>/books.json</td><td>POST</td><td>Create a new Book</td></tr> <tr><td>/books/:id.json</td><td>GET</td><td>Get the details of a Book</td></tr> <tr><td>/books/:id.json</td><td>PUT</td><td>Update a Book by id</td></tr> <tr><td>/books/:id.json</td><td>DELETE</td><td>Delete a Book by id</td></tr> </tbody> </table>
Open BootStrap.groovy file, add some initial data.
<pre> def init = { servletContext -> new Book(title:"Java Persistence with Hibernate", author:"Gavin King", price:99.00).save() new Book(title:"Spring Live", author:"Matt Raible", price:29.00).save() } </pre>
Open your browser, navigate to http://localhost:8080/angularjs-grails-sample/books.json.

Grails 2.3 also includes Controller based REST resource producing, which is explained in the official document.
Build the frontend AngularJS pages
I reuse the same app structure and some codes from the AngularJS CakePHP Sample.
Book List
The template code.
<pre> <div ng-controller="BookListCtrl"> <h1 class="page-header">Book List</h1> <table class="table"> <thead> <tr> <th width="25px">ID</th> <th>TITLE</th> <th>PRICE</th> <th>AUTHOR</th> <th width="50px"></th> </tr> </thead> <tbody> <tr ng-repeat="e in books"> <td>{{e.id}}</td> <td>{{e.title}}</td> <td>{{e.price|currency}}</td> <td>{{e.author}}</td> <!-- ng-show="user.id &&user.id==e.user_id" --> <td><a ng-click="editBook($index)" ><i class="icon-pencil"></i> </a> <a ng-click="delBook($index)" ><i class="icon-remove-circle"></i></a></td> </tr> </tbody> </table> <!-- ng-show="user.username" --> <p> <button type="button" class="btn btn-success" ng-click="addBook()"> <b class="icon-plus-sign"></b>Add Book </button> </p> </div> </pre>
The BookListCtrl code.
<pre> as.controller('BookListCtrl', function($scope, $rootScope, $http, $location) { var load = function() { console.log('call load()...'); $http.get($rootScope.appUrl + '/books.json') .success(function(data, status, headers, config) { $scope.books = data; angular.copy($scope.books, $scope.copy); }); } load(); $scope.addBook = function() { console.log('call addBook'); $location.path("/new"); } $scope.editBook = function(index) { console.log('call editBook'); $location.path('/edit/' + $scope.books[index].id); } $scope.delBook = function(index) { console.log('call delBook'); var todel = $scope.books[index]; $http .delete($rootScope.appUrl + '/books/' + todel.id + '.json') .success(function(data, status, headers, config) { load(); }).error(function(data, status, headers, config) { }); } }); </pre>
Add a new Book
The template code.
<pre> <div ng-controller="NewBookCtrl"> <form class="form-horizontal"> <h1 class="page-header">New Book</h1> <fieldset> <div class="control-group"> <label class="control-label" for="title">Title</label> <div class="controls"> <input id="title" type="text" class="input-block-level" required="true" ng-model="book.title"></input> </div> </div> <div class="control-group"> <label class="control-label" for="title">Author</label> <div class="controls"> <input id="title" type="text" class="input-block-level" required="true" ng-model="book.author"></input> </div> </div> <div class="control-group"> <label class="control-label" for="title">Price</label> <div class="controls"> <input id="title" type="number" class="input-block-level" required="true" ng-model="book.price"></input> </div> </div> </fieldset> <div class="form-actions"> <button class="btn btn-primary" ng-click="saveBook()">Add Book</button> </div> </form> </div> </pre>
The NewBookCtrl code.
<pre> as.controller('NewBookCtrl', function($scope, $rootScope, $http, $location) { $scope.book = {}; $scope.saveBook = function() { console.log('call saveBook'); $http .post($rootScope.appUrl + '/books.json', $scope.book) .success(function(data, status, headers, config) { $location.path('/books'); }).error(function(data, status, headers, config) { }); } }); </pre>
###Edit a Book
The template code.
<pre> <div ng-controller="EditBookCtrl"> <form class="form-horizontal"> <h1 class="page-header">Edit Book({{book.id}})</h1> <fieldset> <div class="control-group"> <label class="control-label" for="title">Title</label> <div class="controls"> <input id="title" type="text" class="input-block-level" required="true" ng-model="book.title"></input> </div> </div> <div class="control-group"> <label class="control-label" for="title">Author</label> <div class="controls"> <input id="title" type="text" class="input-block-level" required="true" ng-model="book.author"></input> </div> </div> <div class="control-group"> <label class="control-label" for="title">Price</label> <div class="controls"> <input id="title" type="number" class="input-block-level" required="true" ng-model="book.price"></input> </div> </div> </fieldset> <div class="form-actions"> <button ng-click="updateBook()" class="btn btn-primary">Update Book</button> </div> </form> </div> </pre>
The EditBookCtrl code.
<pre> as.controller('EditBookCtrl', function($scope, $rootScope, $http, $routeParams, $location) { var load = function() { console.log('call load()...'); $http.get($rootScope.appUrl + '/books/' + $routeParams['id'] + '.json') .success(function(data, status, headers, config) { $scope.book = data; angular.copy($scope.book, $scope.copy); }); } load(); $scope.book = {}; $scope.updateBook = function() { console.log('call updateBook'); $http .put($rootScope.appUrl + '/books/' + $scope.book.id + '.json', $scope.book) .success(function(data, status, headers, config) { $location.path('/books'); }).error(function(data, status, headers, config) { }); } }); </pre>
Browse the frontend UI
Open browser, navigate to http://localhost:8080/angularjs-grails-sample/app/index.html#/books.
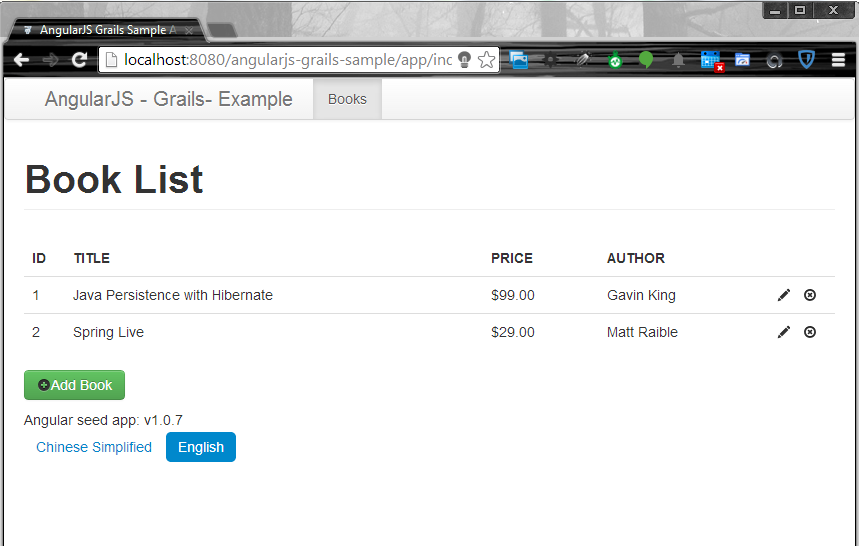
Try add a new Book and edit and delete it.
##Summary
In this example application, Grails was used to produce the backend REST API, it is also simple and stupid work. Currently, I have not added security feature, maybe add it in future.
The code is hosted on https://github.com/hantsy/angularjs-grails-sample/.


 490
490

 被折叠的 条评论
为什么被折叠?
被折叠的 条评论
为什么被折叠?
 到【灌水乐园】发言


