


这是一份使用 Lighthouse 构建 GraphQL 服务器的入门教程。 虽然我们试图保持初学者的友好,但我们建议您熟悉一下 GraphQL 和 Laravel.
GraphQL 是什么?
GraphQL 是一种用于 API 的查询语言,是一个使用基于类型系统来执行查询的服务端运行时(类型系统由你的数据定义)。
GraphQL 为你的 API 提供了一个完整易懂的数据描述,给予客户去指定他们所需要的数据的权利,仅此而已,随着时间的推移,使 API 更容易演化,并支持强大的开发人员工具。
GraphQL Playground
GraphQL 目前只是发布了一个 规范. 这意味着 GraphQL 实际上只是一个详细描述 GraphQL 服务器的行为的内容。
GraphQL 有自己的类型系统,用于定义 API 的模式。 编写模式的语法称为模式定义语言 或简称 SDL.
在下面的一个示例,我们使用 SDL 来定义一个名为 User 的类型及其与另一个类型 Post 的关系。
type User {
id: ID!
name: String!
posts: [Post!]!
}
type Post {
title: String!
author: User!
}
注意,我们只是在 User 和 Post 之间创建了一对多的关系。 User 类型有一个字段 posts,它返回 Post 类型的列表。
我们还通过 author 字段定义了从 Post 到 User 的反向关系。
Lighthouse 是什么?
Lighthouse 可以让任何 Laravel 项目,轻松地提供自己的 GraphQL 服务器。
使用 Lighthouse 构建 GraphQL 服务器的过程可以分为三个步骤:
使用 GraphQL 模式定义语言定义数据的结构
使用 Lighthouses 预先构建的指令来实现您的模式
在需要使用 GraphQL 功能的地方使用扩展 Lighthouse
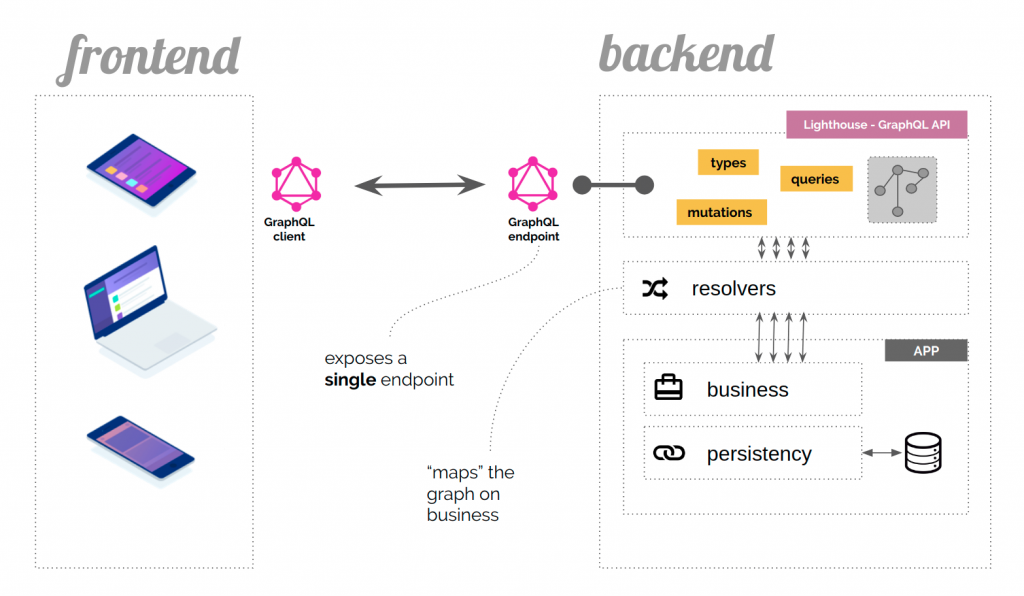
GraphQL 在应用程序中的角色
演示
在这次的演示中,我们将从零开始为一个简单博客创建 GraphQL API:
Laravel
Lighthouse
GraphQL Playground
TIP
安装
创建一个新的 Laravel 项目
TIP
本教程从一个全新的 Laravel 项目开始。 您可以使用现有的项目并直接跳到 安装 Lighthouse, 但您可能需要调整一些东西来适应你现有的应用程序。
假设您正在使用 Laravel 安装程序,请创建一个新项目 (阅读更多关于 安装 Laravel 的知识):
laravel new lighthouse-tutorial
查看 关于数据库配置的 Laravel 文档 并确保设置了一个可以使用的数据库。
运行数据库迁移以创建 users 表:
php artisan migrate
在数据库中植入一些假的用户数据:
php artisan tinker
factory('App\User', 10)->create();
安装 Lighthouse
当然,我们将使用 Lighthouse 作为 GraphQL 服务器。
composer require nuwave/lighthouse
在演示中我们使用 GraphQL Playground 作为 GraphQL 查询的 IDE (在线调试工具)。它就好像 GraphQL 专用的 Postman,拥有很多神奇的功能。
composer require mll-lab/laravel-graphql-playground
然后将默认模式发布到 graphql/schema.graphql.
php artisan vendor:publish --provider="Nuwave\Lighthouse\LighthouseServiceProvider" --tag=schema
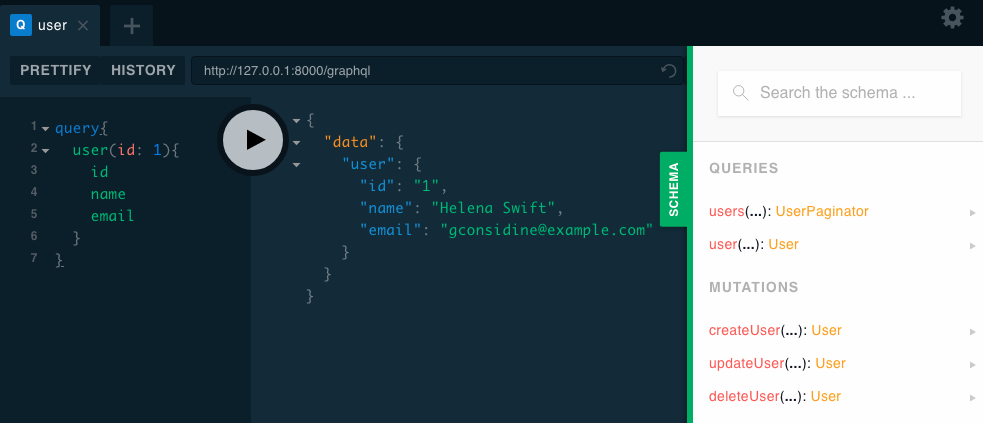
为了确保一切正常,访问 Laravel GraphQL Playground ,默认路由是 /graphql-playground 并尝试下面的查询:
{
user(id: 1) {
id
name
}
}
现在,让我们继续并为我们的博客创建一个 GraphQL API。
数据模型
第一部分将向您展示如何设置模型和数据库迁移并且不包括任何与 GraphQL 或 Lighthouse 相关的细节。
我们的博客遵循一些简单的规则:
用户可以发布多个 post
每个 post 可以有来自匿名用户的多条 comment
我们可以像这样在数据库模式中建立模型。
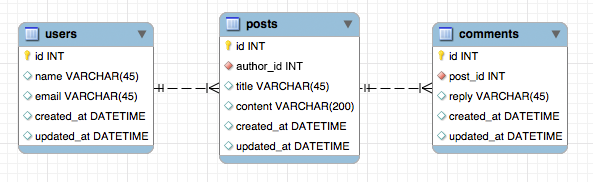
数据库关系图
首先为我们的 posts 和 comments 定义模型和迁移
php artisan make:model -m Post
namespace App;
use Illuminate\Database\Eloquent\Model;
use Illuminate\Database\Eloquent\Relations\HasMany;
use Illuminate\Database\Eloquent\Relations\BelongsTo;
class Post extends Model
{
public function author(): BelongsTo
{
return $this->belongsTo(User::class);
}
public function comments(): HasMany
{
return $this->hasMany(Comment::class);
}
}
use Illuminate\Support\Facades\Schema;
use Illuminate\Database\Schema\Blueprint;
use Illuminate\Database\Migrations\Migration;
class CreatePostsTable extends Migration
{
public function up()
{
Schema::create('posts', function (Blueprint $table) {
$table->increments('id');
$table->unsignedInteger('author_id');
$table->string('title');
$table->string('content');
$table->timestamps();
});
}
public function down()
{
Schema::dropIfExists('posts');
}
}
php artisan make:model -m Comment
namespace App;
use Illuminate\Database\Eloquent\Model;
use Illuminate\Database\Eloquent\Relations\BelongsTo;
class Comment extends Model
{
public function post(): BelongsTo
{
return $this->belongsTo(Post::class);
}
}
use Illuminate\Support\Facades\Schema;
use Illuminate\Database\Schema\Blueprint;
use Illuminate\Database\Migrations\Migration;
class CreateCommentsTable extends Migration
{
public function up()
{
Schema::create('comments', function (Blueprint $table) {
$table->increments('id');
$table->unsignedInteger('post_id');
$table->string('reply');
$table->timestamps();
});
}
public function down()
{
Schema::dropIfExists('comments');
}
}
记得要运行迁移:
php artisan migrate
最后,将 posts 模型添加到 app/User.php
namespace App;
use Illuminate\Notifications\Notifiable;
use Illuminate\Database\Eloquent\Relations\HasMany;
use Illuminate\Foundation\Auth\User as Authenticatable;
class User extends Authenticatable
{
use Notifiable;
protected $fillable = [
'name', 'email', 'password',
];
protected $hidden = [
'password', 'remember_token',
];
public function posts(): HasMany
{
return $this->hasMany(Post::class, 'author_id');
}
}
魔术方法
让我们修改 graphql/schema.graphql 并根据我们创建的有说服力的模型来定义我们的 posts 的模式。
我们添加了两个用于查询文章到底部的 Query 类型下:
type Query {
posts: [Post!]! @all
post(id: Int! @eq): Post @find
}
Lighthouse 知道如何解决查询的方法是基于约定的命名 — 类型名的组合 Post 也是我们模型的名称 — 以及服务器端指令的使用。
@all 返回所有内容的列表 Post 模型
@find 和 @eq 是通过其 ID 组合检索单个 Post
我们还可以通过添加额外的类型定义,明确定义我们的数据模型:
type Query {
posts: [Post!]! @all
post(id: Int! @eq): Post @find
}
type User {
id: ID!
name: String!
email: String!
created_at: DateTime!
updated_at: DateTime!
posts: [Post!]! @hasMany
}
type Post {
id: ID!
title: String!
content: String!
author: User! @belongsTo
comments: [Comment!]! @hasMany
}
type Comment {
id: ID!
reply: String!
post: Post! @belongsTo
}
就像在 Eloquent 中一样, 我们通过 @belongsTo 和 @hasMany 指令来表达类型之间的关系。
最终测试
在你的数据库中插入一些假数据,你可以使用 Laravel seeders 来完成。
访问 /graphql-playground 并尝试以下的查询:
{
posts {
id
title
author {
name
}
comments {
id
reply
}
}
}
您应该可以获取到数据库中所有 posts 的列表,以及全部 comments 和 user 的 name。
希望这个演示为您展示了 GraphQL 的强大功能,以及 Lighthouse 如何轻松地使用 Laravel 来构建自己的服务器。
这里我强推一下 Lighthouse 中文网,提供了同步于 Lighthouse-php 官网的完整版中文文档 :http://lighthouse-php.cn/


 251
251


 被折叠的 条评论
为什么被折叠?
被折叠的 条评论
为什么被折叠?
 到【灌水乐园】发言


