


实验配置步骤参考:
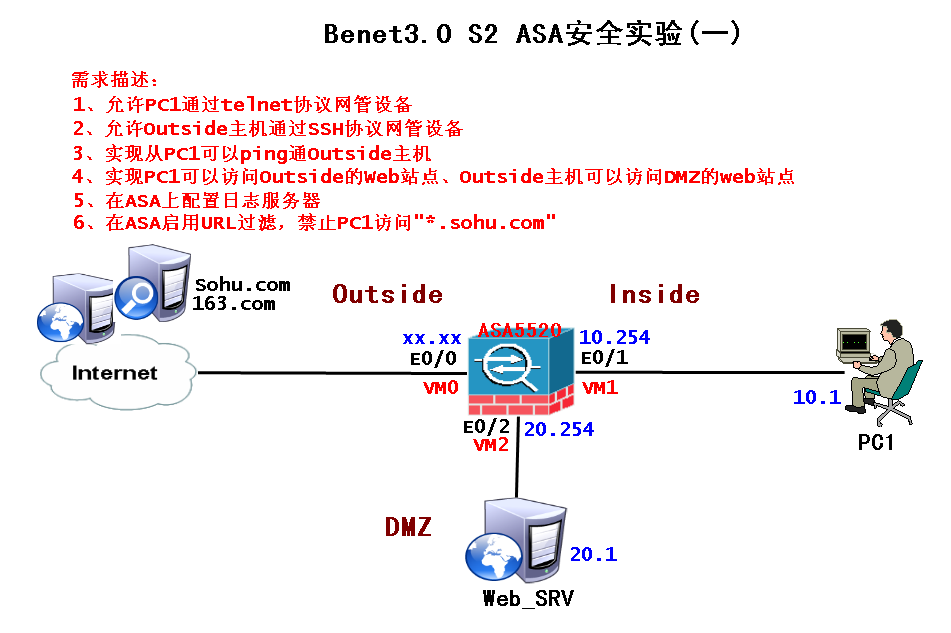
1、初始化ASA设备
ASA(config)# hostname ASA
ASA(config)# domain-name cisco.com
ASA(config)#interface e0/0
ASA(config-if)#nameif outside
ASA(config-if)#sec 0
ASA(config-if)#ip address 172.16.11.11 255.255.0.0
ASA(config-if)#no shutdown
ASA(config)#interface e0/1
ASA(config-if)#nameif inside
ASA(config-if)#sec 100
ASA(config-if)#ip address 192.168.10.254 255.255.255.0
ASA(config-if)#no shutdown
ASA(config)#interface e0/2
ASA(config-if)#nameif dmz
ASA(config-if)#ip address 192.168.20.2 255.255.255.0
ASA(config-if)#sec 50
ASA(config-if)#no shutdown
2、配置ASA静态路由
ASA(config)#route outside 0.0.0.0 0.0.0.0 172.16.1.1
3、配置ASA的telnet、SSH远程管理接入
ASA(config)#telnet 192.168.10.0 255.255.255.0 inside
ASA(config)#crypto key generate rsa modulus 1024
ASA(config)#ssh 0 0 outside
4、配置PAT与Static NAT
ASA(config)#nat (inside) 1 192.168.10.0 255.255.255.0
ASA(config)#global (outside) 1 interface
ASA(config)#static (dmz,outside) tcp interface www 192.168.20.1 www
5、通过配置ACL放行WWW、ICMP流量
ASA(config)#access-list OUT extended permit icmp any any
ASA(config)#access-list OUT extended permit tcp any interface outside eq www
6、配置日志服务器(192.168.10.1)
ASA(config)# logging enable
ASA(config)# logging trap informational
ASA(config)# logging host inside 192.168.10.1
7、ASA启用URL过滤
ASA(config)# regex url1 "\.sohu\.com"---".sohu.com"
----------------------------------------------------------------------------------
ASA(config)# access-list tcp_filter permit tcp 192.168.10.0 255.255.255.0 any eq www
ASA(config)# class-map tcp_filter_class
ASA(config-cmap)# match access-list tcp_filter
-------------------------------------------------------------------------
ASA(config)# class-map type inspect http http_class--------把字符串划分类
ASA(config-cmap)# match request header host regex url1
-------------------------------------------------------------------------
ASA(config)# policy-map type inspect http http_url_policy-----带http检测类型的策略映射
ASA(config-pmap)# class http_class
ASA(config-pmap-c)# drop-connection log
----------------------------------------------------------------------------
ASAconfig)# policy-map inside_http_url_policy ---标准的策略映射
ASA(config-pmap)# class tcp_filter_class
ASA(config-pmap-c)# inspect http http_url_policy
ASA(config)# service-policy inside_http_url_policy interface inside
8、测试
--------------------------------------------------------------------
Cisco ASA命令介绍:
一、基本配置
1、显示ASA版本信息
ciscoasa# show version
2、配置主机名
ciscoasa(config)# hostname asa802
3、配置域名
asa802(config)# domain-name asadomain.com
4、配置密码
a、配置特权密码
asa802(config)# enable password asa802
b、配置远程登陆(telnet、SSH)密码
asa802(config)# passwd cisco
5、配置接口
a、配置接口IP地址
asa802(config-if)# ip address 192.168.1.1 255.255.255.0
b、配置接口名字
asa802(config-if)# nameif name
c、配置接口安级级别
asa802(config-if)# security-level number
6、查看接口信息
asa802(config-if)# show run interface(不必要在特权下)
7、查看IP信息
asa802(config-if)# show ip address(show ip)
8、配置静态路由
asa802(config)# route interface-name network mask next-hop-address
9、查看路由表
asa802# show route
10、配置远程管理接入
a、配置Telnet接入----明文传输
asa802(config)# telnet {network|ip-address} mask interface-name
注:ASA不允许telnet流量从安全级别为0的接口进入
b、配置SSH(安全的telnet加密传输)接入(3个步骤)
步骤1:配置主机名和域名
步骤2:生成RSA密钥对(公钥和私钥)
asa802(config)# crypto key generate rsa modulus 1024
步骤3:配置防火墙允许SSH接入
asa802(config)# ssh 192.168.0.0 255.255.255.0 inside
asa802(config)# ssh 0 0 outside
配置空闲超时时间与版本(可选)
asa802(config)# ssh timeout 30
asa802(config)# ssh version 2
c、配置ASDM(ASA安全设备管理器)接入
asa802(config)# http server enable
asa802(config)# http 192.168.0.0 255.255.255.0 inside
asa802(config)# asdm p_w_picpath disk0:/asdm-602.bin
asa802(config)# username benet password cisco privilege 15
11、配置网络地址转换(NAT)
a、配置PAT(2个步骤)---把多个私网地址转换成1个公网地址,多对少的转换
步骤1:定义什么流量需要被转换
asa802(config)# nat (interface_name) nat-id local-ip mask
步骤2:定义全局地址池(也可转到外部接口)
asa802(config)# global (interface_name) nat-id {global-ip [-global-ip] |interface}
b、配置Static
asa802(config)# static (real_interface,mapped_interface) mapped_ip real_ip
注:从低到高需要通过ACL放行相应的流量
c、查看NAT的转换条目
asa802(config)#show xlate
12、配置ACL
a、标准ACL
asa802(config)#access-list acl_name standard {permit | deny} ip_addr mask
b、扩展ACL
asa802(config)# access-list acl_name extended {permit | deny} protocol src_ip_addr src_mask dst_ip_addr dst_mask [operator port]
c、将ACL应用到接口
asa802(config)# access-group acl_name {in | out} interface interface_name
12、清空当前ASA相关协议配置
asa802(config)#clear config route|static|nat|global
13、清空当前ASA所有配置
asa802(config)#clear config all
--------------------------------------------------------
二、ASA的高级应用
1、配置URL(统一资源定位符)过滤(4个步骤)
步骤1:定义Regex(正则表达式)-定义URL匹配的字符串
asa802(config)# regex url1 "\.sohu\.com"---".sohu.com"
步骤2:创建class-map(类映射)-识别传输流量,分类流量
asa802(config)# access-list tcp_filter permit tcp 192.168.10.0 255.255.255.0 any eq www
asa802(config)# class-map tcp_filter_class
asa 802(config-cmap)# match access-list tcp_filter
-------------------------------------------------------------------------------------------------
asa802(config)# class-map type inspect http http_class--------把字符串划分类
asa802(config-cmap)# match request header host regex url1
步骤3:创建policy-map(策略映射)-针对不同的类执行不同的操作
asa802(config)# policy-map type inspect http http_url_policy-----带http检测类型的策略映射
asa802(config-pmap)# class http_class
asa802(config-pmap-c)# drop-connection log ---同时产生日志信息
-----------------------------------------------------------------------------------------------------
asa802(config)# policy-map inside_http_url_policy ---标准的策略映射
asa802(config-pmap)# class tcp_filter_class
asa802(config-pmap-c)# inspect http http_url_policy
步骤4:应用policy-map应用接口上
asa802(config)# service-policy inside_http_url_policy interface inside
2、配置日志管理服务器(三种方式)
第一种:本地Buffer保存日志
asa802(config)# logging enable
asa802(config)# logging buffered informational
第二种:配置ASDM日志
asa802(config)# logging enable
asa802(config)# logging asdm informational
第三种:配置日志服务器
asa802(config)# logging enable
asa802(config)# logging trap informational
asa802(config)# logging host inside 192.168.10.1
3、配置ASA安全特性
a、基本威胁检测
asa802(config)# threat-detection basic-threat
b、防范IP分***
asa802(config)# fragment chain 1
c、启用IDS(***检测系统)功能(可选)
转载于:https://blog.51cto.com/gaoxingliang/800405


 4876
4876


 被折叠的 条评论
为什么被折叠?
被折叠的 条评论
为什么被折叠?
 到【灌水乐园】发言


