


当老师的人总是喜欢出难题,丁点儿大的西亚斯还还做了个什么的苹果实验室,也就20台机器,从采购到现在一年多的时间里,跟本没用几次。这次项目整合还必须要把采用mac os的机器加入到windows 2003的域进行整合,还是死任务不做成不行,郁闷找了n多资料就没有一个能说明白的,想用虚机作个os的系统,但是x86的机器确怎么也读不出来os的系统盘,郁闷至极。明天只好再想想办法了,据说有个老外会用apple的系统,校方说如果需要会让他来给我当助手,郁闷,老子的四级可是考了四次才过,想当年英语口语拿了个全班倒数第一,这不是骂人嘛。无奈只好自己想办法了
下面的这篇文章或许会对有同样困难的同志有所帮助
感谢苹果在OS X操作系统中改进了网络连接能力,使得管理员们面对将Mac机与Windows网络连接的问题时不再像以前那么头疼了。不过这其中仍然存在一些问题需要管理员们解决,比如文件共享以及在Mac系统上为Windows用户创建账户、配置打印机共享、应用Macintosh文件服务等。
Macintosh系统又重新出现在企业网络中了。与以往复杂的AppleTalk配置以及在Windows网络中安装各种协议相比,新的Apple Macintosh OS X系统可以让管理员方便将Mac系统连接到Windows网络中。
当然,要在实际应用中将OS X加入到Windows网络,还需要管理员进行一些手动设置,比如配置Windows域,或者工作组成员等。以下是管理员需要注意的将Macintosh OS X系统加入Windows网络时需要注意的十个要点。
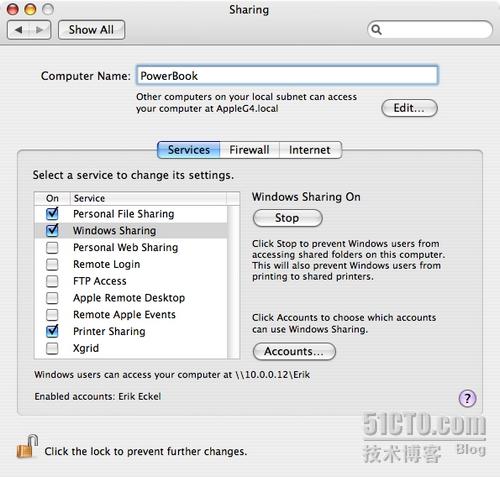
1:Mac系统上要允许Windows Sharing功能
当将Macintosh OS X系统加入Windows网络时,Macintosh系统上必须允许Windows共享。否则Windows系统将无法访问到Macintosh系统中的共享资源。
当将Macintosh OS X系统加入Windows网络时,Macintosh系统上必须允许Windows共享。否则Windows系统将无法访问到Macintosh系统中的共享资源。
要在Macintosh 系统上开启Windows共享功能,首先打开System Preferences,然后从Internet & Network区域选择Sharing。接着选择Windows Sharing复选框。如图A所示:
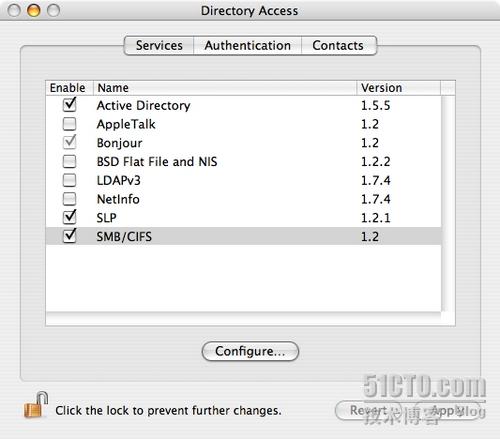
2: Mac的默认工作组名需要修改
如果直接将Macintosh OS X连接到Windows工作组,可能并不能一次成功。因为Windows系统中的工作组名和Mac系统中的工作组名可能并不相同。比如很多Windows系统默认的工作组名都是MSHome或Workgroup,同时,网络管理员也有可能修改了Windows的工作组名。因此,要让Mac系统成功连接到Windows工作组,需要对Mac系统的工作组名进行修改。
如果直接将Macintosh OS X连接到Windows工作组,可能并不能一次成功。因为Windows系统中的工作组名和Mac系统中的工作组名可能并不相同。比如很多Windows系统默认的工作组名都是MSHome或Workgroup,同时,网络管理员也有可能修改了Windows的工作组名。因此,要让Mac系统成功连接到Windows工作组,需要对Mac系统的工作组名进行修改。
要将Macintosh OS X系统中的工作组名修改为与Windows网络一致的工作组名,用户需要通过Mac的Finder找到Applications文件夹,打开Utilities文件夹,然后双击Directory Access。点击锁形图标并输入管理员密码,激活配置功能。选择SMB/CIFS项(如图B所示),然后点击Configure按钮。在显示出来的Directory Access窗口中,输入新的工作组名称,并点击OK。
3:必须在Mac系统上创建Windows用户账户
在Windows用户通过网络访问Mac系统资源前,管理员需要先在Mac系统上为这些用户创建可以访问资源的本地账户。要在Mac系统上为Windows用户创建账户,你需要先打开System Preferences然后在System区域选择Accounts。
在Windows用户通过网络访问Mac系统资源前,管理员需要先在Mac系统上为这些用户创建可以访问资源的本地账户。要在Mac系统上为Windows用户创建账户,你需要先打开System Preferences然后在System区域选择Accounts。
同样,你需要点击锁形图标并输入管理员账户和密码,以便激活配置功能。接着点击加号,创建新的用户账户。Windows用户需要在这里输入自己的用户名和对应的密码(下一项中详细说明),以便能够访问Macintosh OS X系统资源。
4:使用多种方式访问Mac资源
当Macintosh系统中的资源被设置为共享,并且在系统中建立了相应的帐户后,Windows用户就可以使用这些账户访问Mac系统中的资源了。并且访问Mac资源的方式有多种。
当Macintosh系统中的资源被设置为共享,并且在系统中建立了相应的帐户后,Windows用户就可以使用这些账户访问Mac系统中的资源了。并且访问Mac资源的方式有多种。
Windows用户可以使用Add A Network Place Wizard(通过在网络面板中点击Add A Network Place启动)添加Mac资源。另一种更好的方式是打开My Network Places、Windows Explorer或IE,然后输入Mac系统的IP地址以及自己的帐户名。
下面我们以管理员的账户访问IP地址为10.0.0.2的Mac系统上的资源,操作如下:
\\10.0.0.2\Administrator
Mac系统会提示Windows用户输入用户名和密码,按提示输入后,就可以在Windows窗口中看到Mac系统上的共享资源了。
5:Mac的打印和传真应用
Macintosh系统可以通过Print & Fax控制台(如图C所示)共享连接在Mac系统上的打印机给Windows用户。Print & Fax控制台位于Mac系统中的System Preferences下的硬件应用部分。
Macintosh系统可以通过Print & Fax控制台(如图C所示)共享连接在Mac系统上的打印机给Windows用户。Print & Fax控制台位于Mac系统中的System Preferences下的硬件应用部分。

要让Windows用户可以通过连接在Macintosh系统上的打印机打印资料,只需要点击Sharing按钮,然后在列表中选择希望共享的打印机即可。你还可以让Windows用户通过连接在Mac系统上的传真机来发送传真,只需要在窗口下方的“Let Others Send Faxes Through This Computer”前打勾即可。
虽然Windows用户可能还要在系统中安装该打印机的驱动程序,但是这种共享方式也算是实现了不同操作系统间的打印通信工作。
6:在存在OS 9的网络中必须安装SBS服务器才能实现File Services For Macintosh
在加入到由Windows小型企业服务器(SBS)支持的域环境时,管理员尤其需要谨慎。如果还有OS X之前的版本在运行,那么这种配置工作将变得很复杂。
在加入到由Windows小型企业服务器(SBS)支持的域环境时,管理员尤其需要谨慎。如果还有OS X之前的版本在运行,那么这种配置工作将变得很复杂。
如果必须使用Apple的OS 9系统,那么在小型企业服务器上必须开启File Services For Macintosh服务。在windows服务器的控制面板中打开Add/Remove Windows Components应用,在Other Network File And Print Services中选择File Services For Macintosh。
7:File Services For Macintosh需要Microsoft UAM
要通过File Services For Macintosh进行连接,每个Mac系统上都必须安装微软的用户认证模块(User Authentication Module,UAM)。通过Microsoft的网站Mac OS 9或OS X的管理员可以下载到对应的UAM。
要通过File Services For Macintosh进行连接,每个Mac系统上都必须安装微软的用户认证模块(User Authentication Module,UAM)。通过Microsoft的网站Mac OS 9或OS X的管理员可以下载到对应的UAM。
OS X的管理员可以通过.pkg安装程序来安装UAM,OS 9的管理则只能将下载后的MS UAM 5.0文件从MSUAM_for_Classic文件夹拷贝到Mac系统文件夹下的AppleShare文件夹中。
8: File Services For Macintosh需要重新创建Windows共享
要在网络中支持File Services For Macintosh,现有的Windows系统上的共享文件夹需要重新创建。Windows管理员可以通过Windows Manage应用访问Shared Folders并重新创建共享。现有的文件夹或数据不需要重新创建。
要在网络中支持File Services For Macintosh,现有的Windows系统上的共享文件夹需要重新创建。Windows管理员可以通过Windows Manage应用访问Shared Folders并重新创建共享。现有的文件夹或数据不需要重新创建。
要为了Mac客户端重新创建共享,管理员需要右键点击Shares(在共享文件夹控制台中),选择Share A Folder Wizard,然后点击New Share。在“Name, Description, and Settings”窗口(图D所示)中选中Apple Macintosh Users。然后完成在Share A Folder Wizard中完成各项设置.
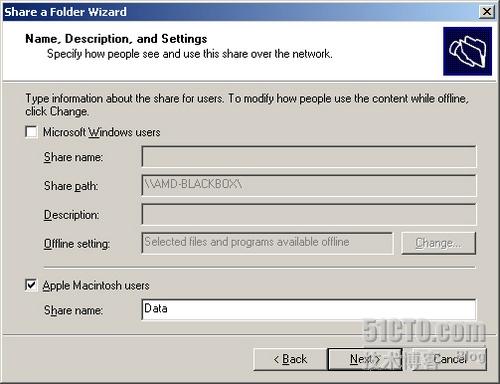
图D:重新建立共享时,选择Apple Macintosh Users复选框并输入新共享的名称等
9:OS X 10.3及以后版本可以通过Samba接入SBS网络
对于Macintosh OS X 10.3或更高版本,有一种更为简单的接入Windows服务器域的方法。在这种情况下,你可以通过Windows SMB连接方法是用Mac系统访问Windows系统中的资源。不过,由于Samba是为了更好的网络性能,而不是File Services For Macintosh而开发的,因此要将Mac系统连接到Windows SBS 2003上,你需要改变服务器的默认域策略(Default Domain Policy)。同时还需要修改SMB的签名策略。
对于Macintosh OS X 10.3或更高版本,有一种更为简单的接入Windows服务器域的方法。在这种情况下,你可以通过Windows SMB连接方法是用Mac系统访问Windows系统中的资源。不过,由于Samba是为了更好的网络性能,而不是File Services For Macintosh而开发的,因此要将Mac系统连接到Windows SBS 2003上,你需要改变服务器的默认域策略(Default Domain Policy)。同时还需要修改SMB的签名策略。
通过建立新的GPO(而不是编辑默认域策略)也可以实现该目的。新的GPO必须禁用Microsoft Network Server: Digitally Sign Communications (Always)设置。一旦创建了新的GPO,并禁用了SMB签名,别忘了开启命令行窗口输入gpupdate /force 命令来应用这一新策略。
10: SBS.local域名需要Mac系统上的DNS升级
由于较早版本的Apple OS X(OS X 10.3及更早版本)在加入到SBS域的过程中涉及到.local内部域名会出现DNS问题,因此OS X 10.3以及更早版本的系统必须进行大范围的DNS更改。早先的Mac系统是用Apple的Rendezvous,在.local内部域名中使用多播DNS服务。由此出现了问题。
由于较早版本的Apple OS X(OS X 10.3及更早版本)在加入到SBS域的过程中涉及到.local内部域名会出现DNS问题,因此OS X 10.3以及更早版本的系统必须进行大范围的DNS更改。早先的Mac系统是用Apple的Rendezvous,在.local内部域名中使用多播DNS服务。由此出现了问题。
如果不愿意在每台Mac系统上配置新的DNS,并建立独立播发的DNS解决方案,最有效的方法就是将系统升级到OS X 10.4(如果Mac系统不是很多的话),或者翻回头采用File Services For Macintosh(如果Mac系统数量较多,并且没有严重的网络延迟问题)。
mac os与windows网络相连的一些知识(二)
2007-03-21 13:31
|
和各个论坛的高手讨论的好几天了,最后终于得出结论,mac os理论上是不可以加入windows域的,但是可以通过ldap协议以域用户身份互访共享文件夹,共享网络打印机。但是也有人说可以实现但是需要一个中间服务器,叫做NIS服务器,起到一个windows域以及macos桥梁的作用。
这是我在apple网站上查到的关于windows域及mac os的一篇英文文章,希望能对这方面感兴趣的大侠们一点儿帮助。在此要感谢金敏胤同志提供的帮助
Directory
Access
1.5
Help
Configuring Access to an Active Directory Domain -------------------------------------------------------------------------------- Using the Active Directory plug-in listed in Directory Access, you can configure Mac?OS?X to access basic user account information in an Active Directory domain on a Windows server. The Active Directory plug-in generates all attributes required for Mac?OS?X authentication. No changes to the Active Directory schema are required. Yet the Active Directory plug-in detects and accesses standard Mac?OS?X record types and attributes, such as the attributes required for Mac?OS?X client management, if the Active Directory schema has been extended to include them. Important:?? An advanced option of the Active Directory plug-in allows you to map the Mac?OS?X unique user ID (UID) attribute to an appropriate attribute that has been added to the Active Directory schema. If you change the setting of this mapping option at a later date, users may lose access to previously created files. In Directory Access, click Services. If the lock icon is locked, click it and type the name and password of an administrator. Select Active Directory in the list of services, then click Configure. Enter the DNS names of the servers that host the Active Directory forest and domain of which the computer you're configuring will be a member. The administrator of the Active Directory domain can tell you the names of the forest and domain. If you have a single forest with a single domain, enter the same name for forest and domain. Enter the Computer ID, which is the name that the computer you're configuring has been assigned in the Active Directory domain. If you're not sure what name to enter, ask the Active Directory domain administrator. Click Bind, authenticate as a user who has rights to set up a connection to the Active Directory domain, and click OK. Name and Password:??You may be able to authenticate by entering the name and password of your Active Directory user account, or the Active Directory domain administrator may have to provide a name and password. OU:??Enter the organizational unit (OU) for the computer you're configuring. Optionally, set the advanced options. If the advanced options are hidden, click Show Advanced Options. "Cache last user logon for offline operation":?? Select this option to enable the use of offline credentials without modifying the Active Directory schema. This is considered the default setting for users logging in to the computer. An equivalent capability is provided by managed client settings in an Open Directory domain and most LDAP directory domains. If a user account has actual managed client settings, then this option is ignored. "Authenticate in multiple domains":?? Select this option to allow users from any domain within the forest to authenticate on this computer. If this option is unchecked, a list of specific domains within the forest will be presented when you configure a custom Authentication search policy so that you can add domains individually to the search policy. "Prefer this domain server":?? Select this option to specify the DNS name of the server whose Active Directory domain you want used by default. If the server becomes unavailable in the future, the Active Directory plug-in automatically falls back to another nearby server in the forest. If this option is unselected, the Active Directory plug-in automatically determines the closest Active Directory domain in the forest. "Map UID to attribute":??If the Active Directory schema has been extended to store a unique UID (unique user ID) for each user-usually because the Active Directory server has already been configured to support UNIX computers-you can specify the attribute that stores the UID. If this option is unselected, a UID is automatically generated based on Active Directory's standard GUID attribute. "Allow administration by":??Select this option to specify a list of groups whose members are allowed to do administrative tasks on this computer (for example, install software). Use commas to separate group names in the list. For security, group names must be qualified by the domain name they are from (for example, ADSDomain Admins,IL2Domain Admins). This option is useful if you have desktop administrators who need administrative access but are not domain administrators. If you want the computer to access the Active Directory domain you just configured, you must make sure Active Directory is enabled in the Services pane. In addition, you must add the Active Directory domain to a custom search policy in the Authentication or Contacts pane of Directory Access. If you selected "Authenticate in multiple domains" in step 7, adding the Active Directory forest to a custom Authentication search policy enables this computer to authenticate users from any domain in the forest. If you deselected "Authenticate in multiple domains," you can add domains individually to the search policy. Other help topics have instructions for enabling Active Directory service and defining custom search policies. Note: Certain links that this article refers to may not be available in this context; please consult the relevant product Help guide page on your computer for full access to these links. |
转载于:https://blog.51cto.com/54lihui/331994


 3744
3744

 被折叠的 条评论
为什么被折叠?
被折叠的 条评论
为什么被折叠?
 到【灌水乐园】发言


