原文地址:http://my.oschina.net/lianshunke/blog/200411
heartbeat + pacemaker + postgres_streaming_replication
说明:
该文档用于说明以hearbeat+pacemaker的方式实现PostgreSQL流复制自动切换。注意内容包括有关hearbeat/pacemaker知识总结以及整个环境的搭建过程和问题处理。
一、介绍
Heartbeat
自3版本开始,heartbeat将原来项目拆分为了多个子项目(即多个独立组件),现在的组件包括:heartbeat、cluster-glue、resource-agents。
各组件主要功能:
heartbeat:属于集群的信息层,负责维护集群中所有节点的信息以及各节点之间的通信。
cluster-glue:包括LRM(本地资源管理器)、STONITH,将heartbeat与crm(集群资源管理器)联系起来,属于一个中间层。
resource-agents:即各种资源脚本,由LRM调用从而实现各个资源的启动、停止、监控等。
Heartbeat内部组件关系图:

Pacemaker
Pacemaker,即Cluster Resource Manager(CRM),管理整个HA,客户端通过pacemaker管理监控整个集群。
常用的集群管理工具:
(1)基于命令行
crm shell/pcs
(2)基于图形化
pygui/hawk/lcmc/pcs
Hawk:http://clusterlabs.org/wiki/Hawk
Lcmc:http://www.drbd.org/mc/lcmc/
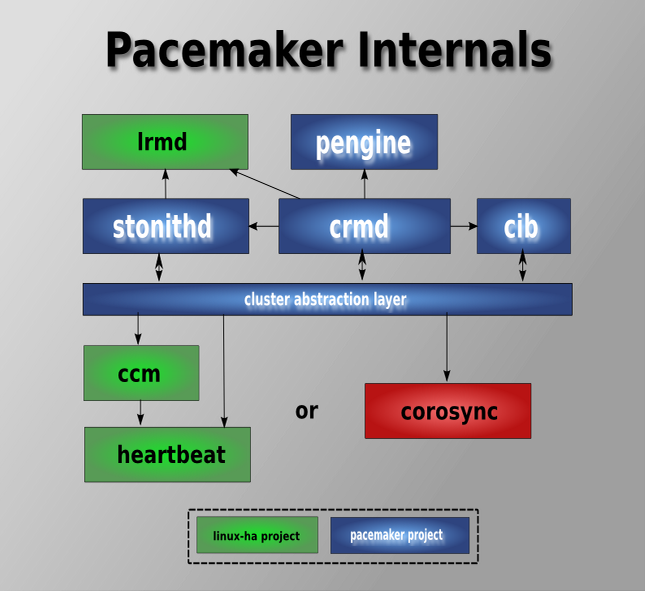
Pacemaker内部组件、模块关系图:
二、环境
2.1 OS
2 | CentOS release 6.4 (Final) |
6 | Linux node1 2.6.32-358.el6.x86_64 |
2.2 IP
node1:
eth0 192.168.100.161/24 GW 192.168.100.1 ---真实地址
eth1 2.2.2.1/24 ---心跳地址
eth2 192.168.2.1/24 ---流复制地址
node2:
eth0 192.168.100.162/24 GW 192.168.100.1 ---真实地址
eth1 2.2.2.2/24 ---心跳地址
eth2 192.168.2.2/24 ---流复制地址
虚拟地址:
eth0:0 192.168.100.163/24 ---vip-master
eth0:0 192.168.100.164/24 ---vip-slave
eth2:0 192.168.2.3/24 ---vip-rep
2.3 软件版本
02 | heartbeat-devel-3.0.3-2.3.el5 |
03 | heartbeat-debuginfo-3.0.3-2.3.el5 |
04 | heartbeat-3.0.3-2.3.el5 |
05 | heartbeat-libs-3.0.3-2.3.el5 |
06 | heartbeat-devel-3.0.3-2.3.el5 |
07 | heartbeat-3.0.3-2.3.el5 |
08 | heartbeat-debuginfo-3.0.3-2.3.el5 |
09 | heartbeat-libs-3.0.3-2.3.el5 |
12 | pacemaker-libs-1.0.12-1.el5.centos |
13 | pacemaker-1.0.12-1.el5.centos |
14 | pacemaker-debuginfo-1.0.12-1.el5.centos |
15 | pacemaker-debuginfo-1.0.12-1.el5.centos |
16 | pacemaker-1.0.12-1.el5.centos |
17 | pacemaker-libs-1.0.12-1.el5.centos |
18 | pacemaker-libs-devel-1.0.12-1.el5.centos |
19 | pacemaker-libs-devel-1.0.12-1.el5.centos |
22 | resource-agents-1.0.4-1.1.el5 |
25 | cluster-glue-libs-1.0.6-1.6.el5 |
26 | cluster-glue-libs-1.0.6-1.6.el5 |
27 | cluster-glue-1.0.6-1.6.el5 |
28 | cluster-glue-libs-devel-1.0.6-1.6.el5 |
PostgreSQL Version:9.1.4
三、安装
3.1 设置YUM源
3.2 安装heartbeat/pacemaker
安装libesmtp:
安装pacemaker corosync:
通过命令查看资源脚本:
02 | AoEtarget AudibleAlarm CTDB ClusterMon Delay Dummy EvmsSCC |
03 | Evmsd Filesystem HealthCPU HealthSMART ICP IPaddr IPaddr2 |
04 | IPsrcaddr IPv6addr LVM LinuxSCSI MailTo ManageRAID ManageVE |
05 | Pure-FTPd Raid1 Route SAPDatabase SAPInstance SendArp ServeRAID |
06 | SphinxSearchDaemon Squid Stateful SysInfo SystemHealth VIPArip VirtualDomain |
07 | WAS WAS6 WinPopup Xen Xinetd anything apache |
08 | conntrackd controld db2 drbd eDir88 exportfs fio |
09 | iSCSILogicalUnit iSCSITarget ids iscsi jboss ldirectord mysql |
10 | mysql-proxy nfsserver nginx o2cb oracle oralsnr pgsql |
11 | pingpingd portblock postfix proftpd rsyncd scsi2reservation |
12 | sfex syslog-ng tomcat vmware |
禁止开机启动:
3.3 安装PostgreSQL
安装目录为/opt/pgsql
{安装过程略}
为postgres用户配置环境变量:
01 | [postgres@node1 ~]$ cat.bash_profile |
05 | if[ -f ~/.bashrc ]; then |
12 | exportPATH=/opt/pgsql/bin:$PATH:$HOME/bin |
13 | exportPGDATA=/opt/pgsql/data |
16 | exportLD_LIBRARY_PATH=/opt/pgsql/lib:$LD_LIBRARY_PATH |
四、配置
4.1 hosts设置
4.2 配置heartbeat
创建配置文件:
修改配置:
02 | logfile /var/log/ha-log |
4.3 生成密钥
4 | 512 bytes (512 B) copied, 0.00032444 s, 1.6 MB/s |
4.4同步配置
4.5 下载替换脚本
pgsql脚本过旧,不支持配置pgsql.crm中设置的一些参数,需要从网上下载并替换pgsql
下载地址:
https://github.com/ClusterLabs/resource-agents
修改ocf-shellfuncs:
if [ -z "$OCF_ROOT" ]; then
# : ${OCF_ROOT=@OCF_ROOT_DIR@}
: ${OCF_ROOT=/usr/lib/ocf}
Fi
pgsql资源脚本特性:
●主节点失效切换
master宕掉时,RA检测到该问题并将master标记为stop,随后将slave提升为新的master。
●异步与同步切换
如果slave宕掉或者LAN中存在问题,那么当设置为同步复制时包含写操作的事务将会被终止,也就意味着服务将停止。因此,为防止服务停止RA将会动态地将同步转换为异步复制。
●初始启动时自动识别新旧数据
当两个或多个节点上的Pacemaker同时初始启动时,RA通过每个节点上最近的replay location进行比较,找出最新数据节点。这个拥有最新数据的节点将被认为是master。当然,若在一个节点上启动pacemaker或者该节点上的pacemaker是第一个被启动的,那么它也将成为master。RA依据停止前的数据状态进行裁定。
●读负载均衡
由于slave节点可以处理只读事务,因此对于读操作可以通过虚拟另一个虚拟IP来实现读操作的负载均衡。
4.6 启动heartbeat
启动:
检测状态:
03 | Last updated: Fri Jan 24 08:02:54 2014 |
05 | Current DC: node2 (43a4f083-c5d3-4c66-a387-b05d79b5dd89) - partition with quorum |
06 | Version: 1.0.12-unknown |
07 | 2 Nodes configured, unknown expected votes |
08 | 0 Resources configured. |
11 | Online: [ node1 node2 ] |
{heartbeat启动成功}
测试:
禁用stonith,创建一个虚拟ip资源vip
08 | > opstart timeout="60s"interval="0s"on-fail="stop"\ |
09 | > opmonitor timeout="60s"interval="10s"on-fail="restart"\ |
10 | > opstop timeout="60s"interval="0s"on-fail="block" |
03 | Last updated: Fri Jan 24 08:23:09 2014 |
05 | Current DC: node2 (43a4f083-c5d3-4c66-a387-b05d79b5dd89) - partition with quorum |
06 | Version: 1.0.12-unknown |
07 | 2 Nodes configured, unknown expected votes |
08 | 1 Resources configured. |
11 | Online: [ node1 node2 ] |
13 | vip (ocf::heartbeat:IPaddr2): Started node1 |
{vip资源在node1上运行}
2 | PING 192.168.100.90 (192.168.100.90) 56(84) bytes of data. |
3 | 64 bytes from 192.168.100.90: icmp_seq=1 ttl=64 time=0.060 ms |
4 | 64 bytes from 192.168.100.90: icmp_seq=2 ttl=64 time=0.111 ms |
5 | 64 bytes from 192.168.100.90: icmp_seq=3 ttl=64 time=0.123 ms |
模拟node1故障
05 | Last updated: Fri Jan 24 08:22:22 2014 |
07 | Current DC: node2 (43a4f083-c5d3-4c66-a387-b05d79b5dd89) - partition with quorum |
08 | Version: 1.0.12-unknown |
09 | 2 Nodes configured, unknown expected votes |
10 | 1 Resources configured. |
16 | vip (ocf::heartbeat:IPaddr2): Started node2 |
{node2顺利接管资源vip}
重新恢复node1
05 | Last updated: Fri Jan 24 08:23:09 2014 |
07 | Current DC: node2 (43a4f083-c5d3-4c66-a387-b05d79b5dd89) - partition with quorum |
08 | Version: 1.0.12-unknown |
09 | 2 Nodes configured, unknown expected votes |
10 | 1 Resources configured. |
13 | Online: [ node1 node2 ] |
15 | vip (ocf::heartbeat:IPaddr2): Started node1 |
{node1顺利收回vip资源的接管权}
删除资源:
4.7 配置流复制
在node1/node2上配置postgresql.conf/pg_hba.conf:
04 | wal_level = hot_standby |
06 | archive_command = 'test ! -f /opt/archivelog/%f && cp %p /opt/archivelog/%f' |
12 | host replication postgres 192.168.2.0/24 trust |


 5729
5729

 被折叠的 条评论
为什么被折叠?
被折叠的 条评论
为什么被折叠?
 到【灌水乐园】发言


