Qt 3D教程(二)初步显示3D的内容

Qt3D教程(二)初步显示3D的内容

       前一篇很easy,全然就没有牵涉到3D的内容,它仅仅是我们搭建3D应用的基本框架而已,而这一篇。我们将要利用它来初步地显示3D的内容了!

本次目的是将程序中间的内容替换成3D的视图,而这一切也只是十几行代码。要不我们来试一试吧!

蒋彩阳原创文章,首发地址:http://blog.csdn.net/gamesdev/article/details/47131099。欢迎同行前来探讨。

       首先我们须要对我们的MainWindow.cpp文件进行改动,在此基础上加入一些内容:

#include <QQmlAspectEngine>
#include <QRenderAspect>
#include <QInputAspect>
#include <QQmlContext>
#include <QWindow>

#include "MainWindow.h"
#include "ui_MainWindow.h"

class View3D: public QWindow
{
public:
    View3D( QScreen* targetScreen = Q_NULLPTR ): QWindow( targetScreen )
    {
        setSurfaceType( QSurface::OpenGLSurface );

        QSurfaceFormat format;
        format.setSamples( 4 );
        setFormat( format );

        create( );
    }
};


Settings::Settings( QObject* parent ): QObject( parent )
{
    m_showModel = true;
}

void Settings::setShowModel( bool showModel )
{
    if ( m_showModel == showModel ) return;
    m_showModel = showModel;
    emit showModelChanged( );
}

MainWindow::MainWindow(QWidget *parent) :
    QMainWindow(parent),
    ui(new Ui::MainWindow)
{
    ui->setupUi(this);

    using namespace Qt3D;
    using namespace Qt3D::Quick;
    // 创建一个3D的视图
    // 1
    View3D* view3D = new View3D;

    // 2
    QQmlAspectEngine* engine = new QQmlAspectEngine( this );
    engine->aspectEngine( )->registerAspect( new QRenderAspect );
    engine->aspectEngine( )->registerAspect( new QInputAspect );

    // 3
    QVariantMap data;
    data.insert( QStringLiteral( "surface" ),
                 QVariant::fromValue( static_cast<QSurface*>( view3D ) ) );
    data.insert( QStringLiteral( "eventSource" ),
                 QVariant::fromValue( view3D ) );
    engine->aspectEngine( )->setData( data );

    // 4
    engine->qmlEngine( )->rootContext( )->setContextProperty( "_settings", &m_settings );

    // 5
    engine->aspectEngine( )->initialize( );
    engine->setSource( QUrl( "qrc:/qml/main.qml" ) );

    QVBoxLayout* l = qobject_cast<QVBoxLayout*>( ui->centralwidget->layout( ) );
    l->insertWidget( 0, QWidget::createWindowContainer( view3D ) );
}

MainWindow::~MainWindow()
{
    delete ui;
}

void MainWindow::on_showModelButton_clicked()
{
    bool show = m_settings.showModel( );
    show = !show;
    ui->showModelButton->setText( show? "隐藏模型": "显示模型" );
    m_settings.setShowModel( show );
}

       这里我们使用了QWindow来替代我们以前使用的QWidget,而且使用了QWidget:: createWindowContainer()函数来将QWindow的内容嵌入QWidget框架中;紧接着我们在构造函数中创建了QQmlAspectEngine类实例,而且注冊了QRenderAspect和QInputAspect。随后我们使用一个QVariantMap数据结构,将surface以及eventSource以键值对的形式存储起来供QAspectEngine使用。接着作为可选的内容,我们为了让C++这一部分控制QML。我们定义了一个Settings类,而且将m_settings注入QML环境作为上下文变量;最后我们使用initialize()函数初始化QAspectEngine,而且指定了我们须要展示的场景数据:main.qml。

       此外。当button按下的时候,我们能够通过改变m_settings的属性从而控制我们是否想要显示模型。

       同一时候我们还必须在main.qml中作一些设置:

import Qt3D 2.0
import Qt3D.Renderer 2.0

Entity
{
    id: root

    Camera
    {
        id: camera
        position: Qt.vector3d( 0.0, 20.0, 100.0 )
        projectionType: CameraLens.PerspectiveProjection
        fieldOfView: 45
        aspectRatio: 16.0 / 9.0
        nearPlane : 0.1
        farPlane : 1000.0
        upVector: Qt.vector3d( 0.0, 1.0, 0.0 )
        viewCenter: Qt.vector3d( 0.0, 20.0, 0.0 )
    }

    components: FrameGraph
    {
        ForwardRenderer
        {
            clearColor: Qt.rgba( 0.2, 0, 0, 1 )
            camera: camera
        }
    }

    Entity
    {
        Mesh
        {
            id: chestMesh
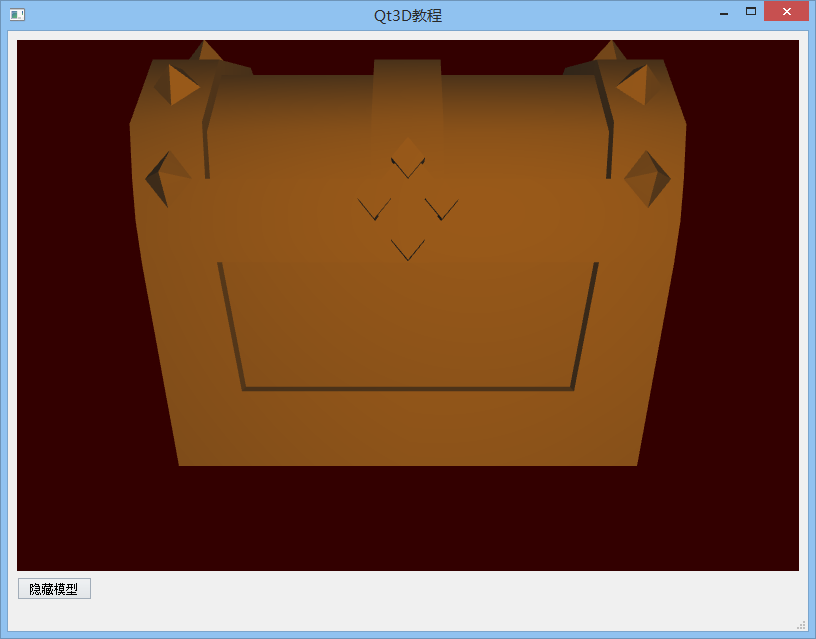
            source: "qrc:/assets/Chest.obj"
            enabled: _settings.showModel
        }

        components: [ chestMesh ]
    }

    Configuration
    {
        controlledCamera: camera
    }
}


       如上面所看到的,我们在名为root的Entity中定义了一个摄像机、一个实体。另一些必要的设置。

同一时候我们通过绑定_settings.showModel来控制Mesh的显示或者隐藏。

本次教程的代码均在我的github中,感兴趣的同行们能够通过git clone或者是直接下载我的git项目来获取到本套教程的全部源码。

  • 0
    点赞
  • 1
    收藏
    觉得还不错? 一键收藏
  • 0
    评论
This directory contains the Qt3D project for Qt5: * Qt3D QML bindings and * Qt3D C++ APIs Building Qt3D ================== Qt5 is a rapidly changing bleeding edge environment. This branch is our initial support for it and thus is also rapidly changing and bleeding edge. This branch is experimental, and unsupported. This information is provided for advanced use only. No guarantees about API stability or even if this works at all are supplied, use at your own risk. First fetch the Qt5 source tree and Qt3D master branch: cd ~/depot git clone ssh://codereview.qt-project.org:29418/qt/qt5.git cd qt5 ./init-repository --codereview-username \ --module-subset=qtbase,qtsvg,qtdeclarative,qttools,qtxmlpatterns,qtdoc,qlalr,qtrepotools,qtqa,qtlocation,qt3d git submodule foreach "git fetch gerrit && git reset --hard gerrit/master" cd qt3d scp -p -P 29418 codereview.qt-project.org:hooks/commit-msg .git/hooks/ git fetch gerrit git checkout --track -b master gerrit/master If you are reading this file then somehow you probably already got this far anyway. Now build Qt5, which will also build Qt3D as a module: cd ~/build mkdir qt5 cd qt5 ~/depot/qt5/configure -developer-build -opensource -confirm-license -no-webkit -no-phonon -nomake tests \ -nomake examples -declarative -opengl -svg && make -j 4 What's in Qt3D ================== Directory structure: src/threed/ This is the main library of the Qt3D project, containing abstractions for cross-platform GL, shaders, lighting models, and so on. src/plugins/ Scene format loading plugins. src/imports/ QML import plugins. util/ Various utilities that are useful when working with Qt3D. examples/ Some examples of using Qt3D QML bindings and Qt3D C++ API. demos/ Some more complex demos of using Qt3D QML bindings and Qt3D C++ API. tests/auto/qml3d/ Unit tests for the QML bindings. tests/auto/threed/ Unit tests for the C++ API doc/ Documentation. devices/symbian/ Symbian deployment file Documentation ============= The documentation can be generated with "make docs". It will be placed into "doc/html" in the build directory. Packages ======== This section is only for those developing Qt3D. Read on to discover how the building of packages works. This section is also important if you want to change how the structure of the Qt3D pro files work. To build Qt3D, run: qmake && make The .pro files will cause the toolchain to place the libraries, QML files and meshes of Qt3D directly into place, as part of the compile process. The files go into the bin/ directory, and the executables can be run directly from there. If you are doing a developer build, plugins will be installed in such a way that Qt will find them. After building the tree the install step is invoked using the INSTALL_ROOT environment export to cause the installation rules to place all the files into a sandboxed install tree, ready for packaging: INSTALL_ROOT=tmp make install Examples ======== Some examples require assimp library to parse the content. Go to http://assimp.sourceforge.net/ and build and install the assimp library. Then configure Qt3D to include assimp and run qmake && make.

“相关推荐”对你有帮助么?

  • 非常没帮助
  • 没帮助
  • 一般
  • 有帮助
  • 非常有帮助
提交
评论
添加红包

请填写红包祝福语或标题

红包个数最小为10个

红包金额最低5元

当前余额3.43前往充值 >
需支付:10.00
成就一亿技术人!
领取后你会自动成为博主和红包主的粉丝 规则
hope_wisdom
发出的红包
实付
使用余额支付
点击重新获取
扫码支付
钱包余额 0

抵扣说明:

1.余额是钱包充值的虚拟货币,按照1:1的比例进行支付金额的抵扣。
2.余额无法直接购买下载,可以购买VIP、付费专栏及课程。

余额充值