写给自己 :linux运维,自己动手趟一遍
目前越来越多的人都开始使用centos7了,就像win7超越xp一样,新技术永远是越来越让人慢慢接受的。为了快速布暑,全部使用yum安装。
环境
监控服务器:192.168.88.21
被监控客户端:192.168.88.22
关闭防火墙(全部服务器)
#systemctl stop firewalld
#systemctl disable firewalld
#setenforce 0
#sed -i 's/SELINUX=enforcing/SELINUX=disabled/g' /etc/selinux/config
更新时间同步(全部服务器)
#yum install ntpdate
#ntpdate cn.pool.ntp.org
#echo "*/5 * * * * /usr/sbin/ntpdate cn.pool.ntp.org" >>/var/spool/cron/root
安装epel源(全部服务器)
#yum install epel-release
-----------------------------------------------------------------------
服务器端安装(192.168.88.21)
#yum install mariadb-server mariadb  //默认数据库
#yum install httpd php php-gd      //apache+php环境
#yum install nagios nagios-plugins-all nagios-plugins-nrpe nrpe

#systemctl start mariadb
#mysql_secure_installation  //初始化数据库
设置nagios访问用户名和密码,使用默认nagiosadmin和默认保存位置,省心
#htpasswd -c /etc/nagios/passwd nagiosadmin 回车,设置密码
#systemctl start mariadb
#systemctl start httpd
#systemctl start nagios
登陆http://192.168.88.21/nagios/ 输入之前设置的用户名 nagiosadmin 及密码,就可以登入了。
----------------------------------------------------------------------
监控服务器端(192.168.88.21) 配置
添加nrpe的定义
#vi /etc/nagios/objects/commands.cfg
# 'check_nrpe' command definition
define command{
command_name check_nrpe
command_line $USER1$/check_nrpe -H $HOSTADDRESS$ -c $ARG1$
}
# 'check_nrpe_memory' command definition
define command{
        command_name check_nrpe_memory
        command_line $USER1$/check_nrpe -H $HOSTADDRESS$ -c check_mem
}
新建监控主机配置文件
#vi /etc/nagios/objects/hosts.cfg
define host{
        use linux-server
        host_name 192.168.88.22
        alias 192.168.88.22
        address 192.168.88.22
}
新建监控服务配置文件
#vi /etc/nagios/objects/services.cfg
define service {
        use local-service
        host_name 192.168.88.22
        service_description check-host-alive
        check_command check-host-alive
}
define service {
        use generic-service
        host_name 192.168.88.22
        service_description Disk Partition
        check_command check_nrpe!check_disk
}
define service {
        use generic-service
        host_name 192.168.88.22
        service_description load
        check_command check_nrpe!check_load
}
define service {
        use generic-service
        host_name 192.168.88.22
        service_description memory
        check_command check_nrpe_memory
}
define service {
        use generic-service
        host_name 192.168.88.22
        service_description swap
        check_command check_nrpe!check_swap
}
#nagios -v /etc/nagios/nagios.cfg  检测配置文件是否正确
#systemctl restart nagios 重启一下 nagios
----------------------------------------------------------------------
监控客户端安装(192.168.88.22):
安装被监控的插件及nrpe
#yum install nagios-plugins-nrpe nrpe nagios-plugins-all
配置nrpe
#vi /etc/nagios/nrpe.cfg
allowed_hosts=127.0.0.1,192.168.88.21   #允许被服务器监控

command[check_disk]=/usr/lib64/nagios/plugins/check_disk -w 20% -c 10%
command[check_swap]=/usr/lib64/nagios/plugins/check_swap -w 20% -c 10%
command[check_iostat]=/usr/lib64/nagios/plugins/check_iostat -d sda -w 1000 -c 2000
command[check_mem]=/usr/lib64/nagios/plugins/check_mem -w 80 -c 70

#echo 'nrpe:192.168.88.21' >>/etc/hosts.allow
check_iostat所需要命令
#yum install sysstat bc
check_mem和check_iostat这二个检测插件,
请看附件下载,并解压到/usr/lib64/nagios/plugins 目录下
记得加执行权限
#chmod +x check_iostat check_mem
启动nrpe
#systemctl start nrpe
---------------------------------------------------
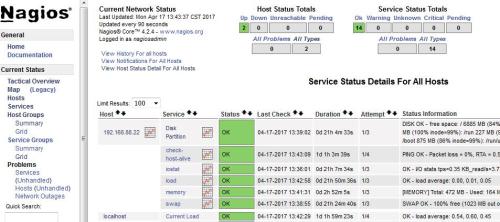
打开浏览器,查看一下,是否能正常监控到数据了:
转载于:https://blog.51cto.com/shenfly231/1916641


 63
63


 被折叠的 条评论
为什么被折叠?


