#安装 CUDA 及 cuDNN 需要确定自己电脑是否是 N卡 并且显卡支持版本在下面的列表中(具体也可去官网查看),如果不是就跳过该步骤。
https://developer.nvidia.com/cuda-gpus 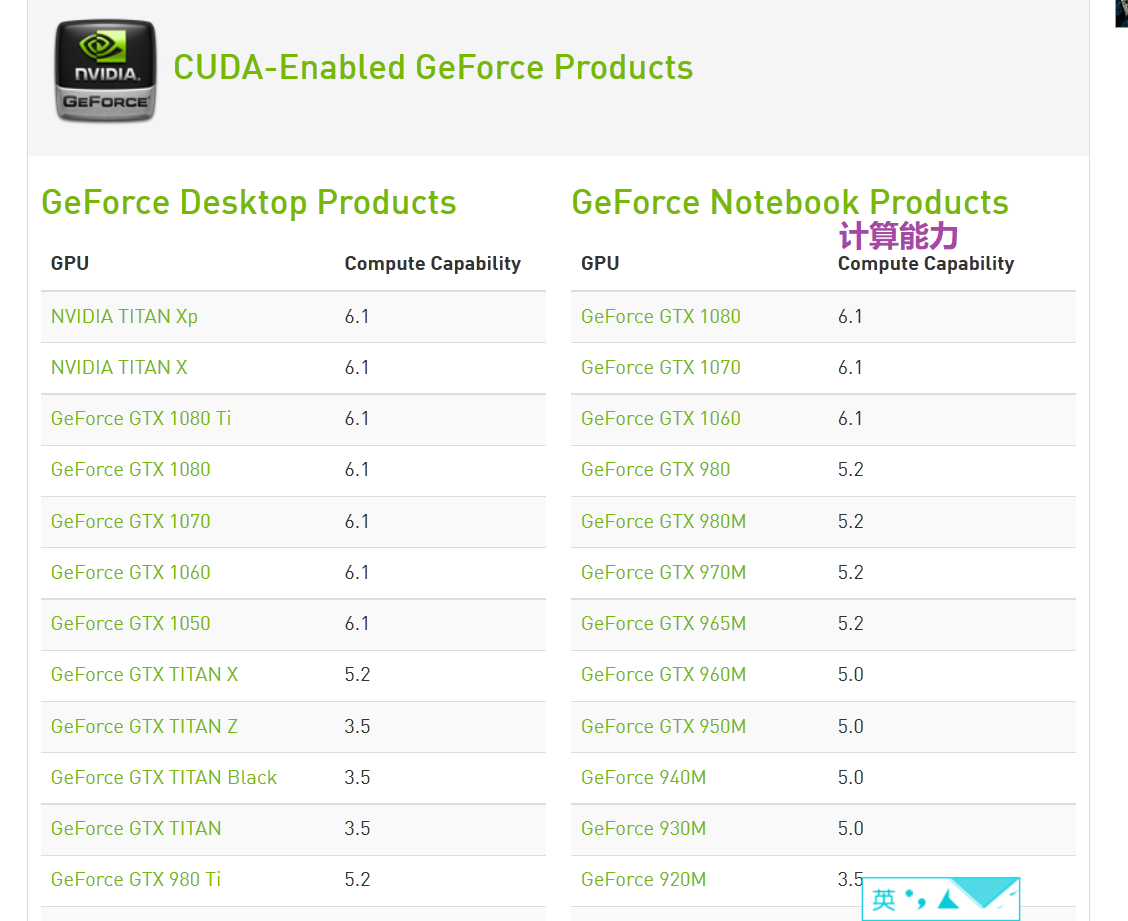
https://developer.nvidia.com/cuda-downloads CUDA CUDA™是一种由NVIDIA推出的通用并行计算架构,该架构使GPU能够解决复杂的计算问题。 https://developer.nvidia.com/cudnn cuDNN 专门为深度神经网络设计的基于 CUDA 的加速库。 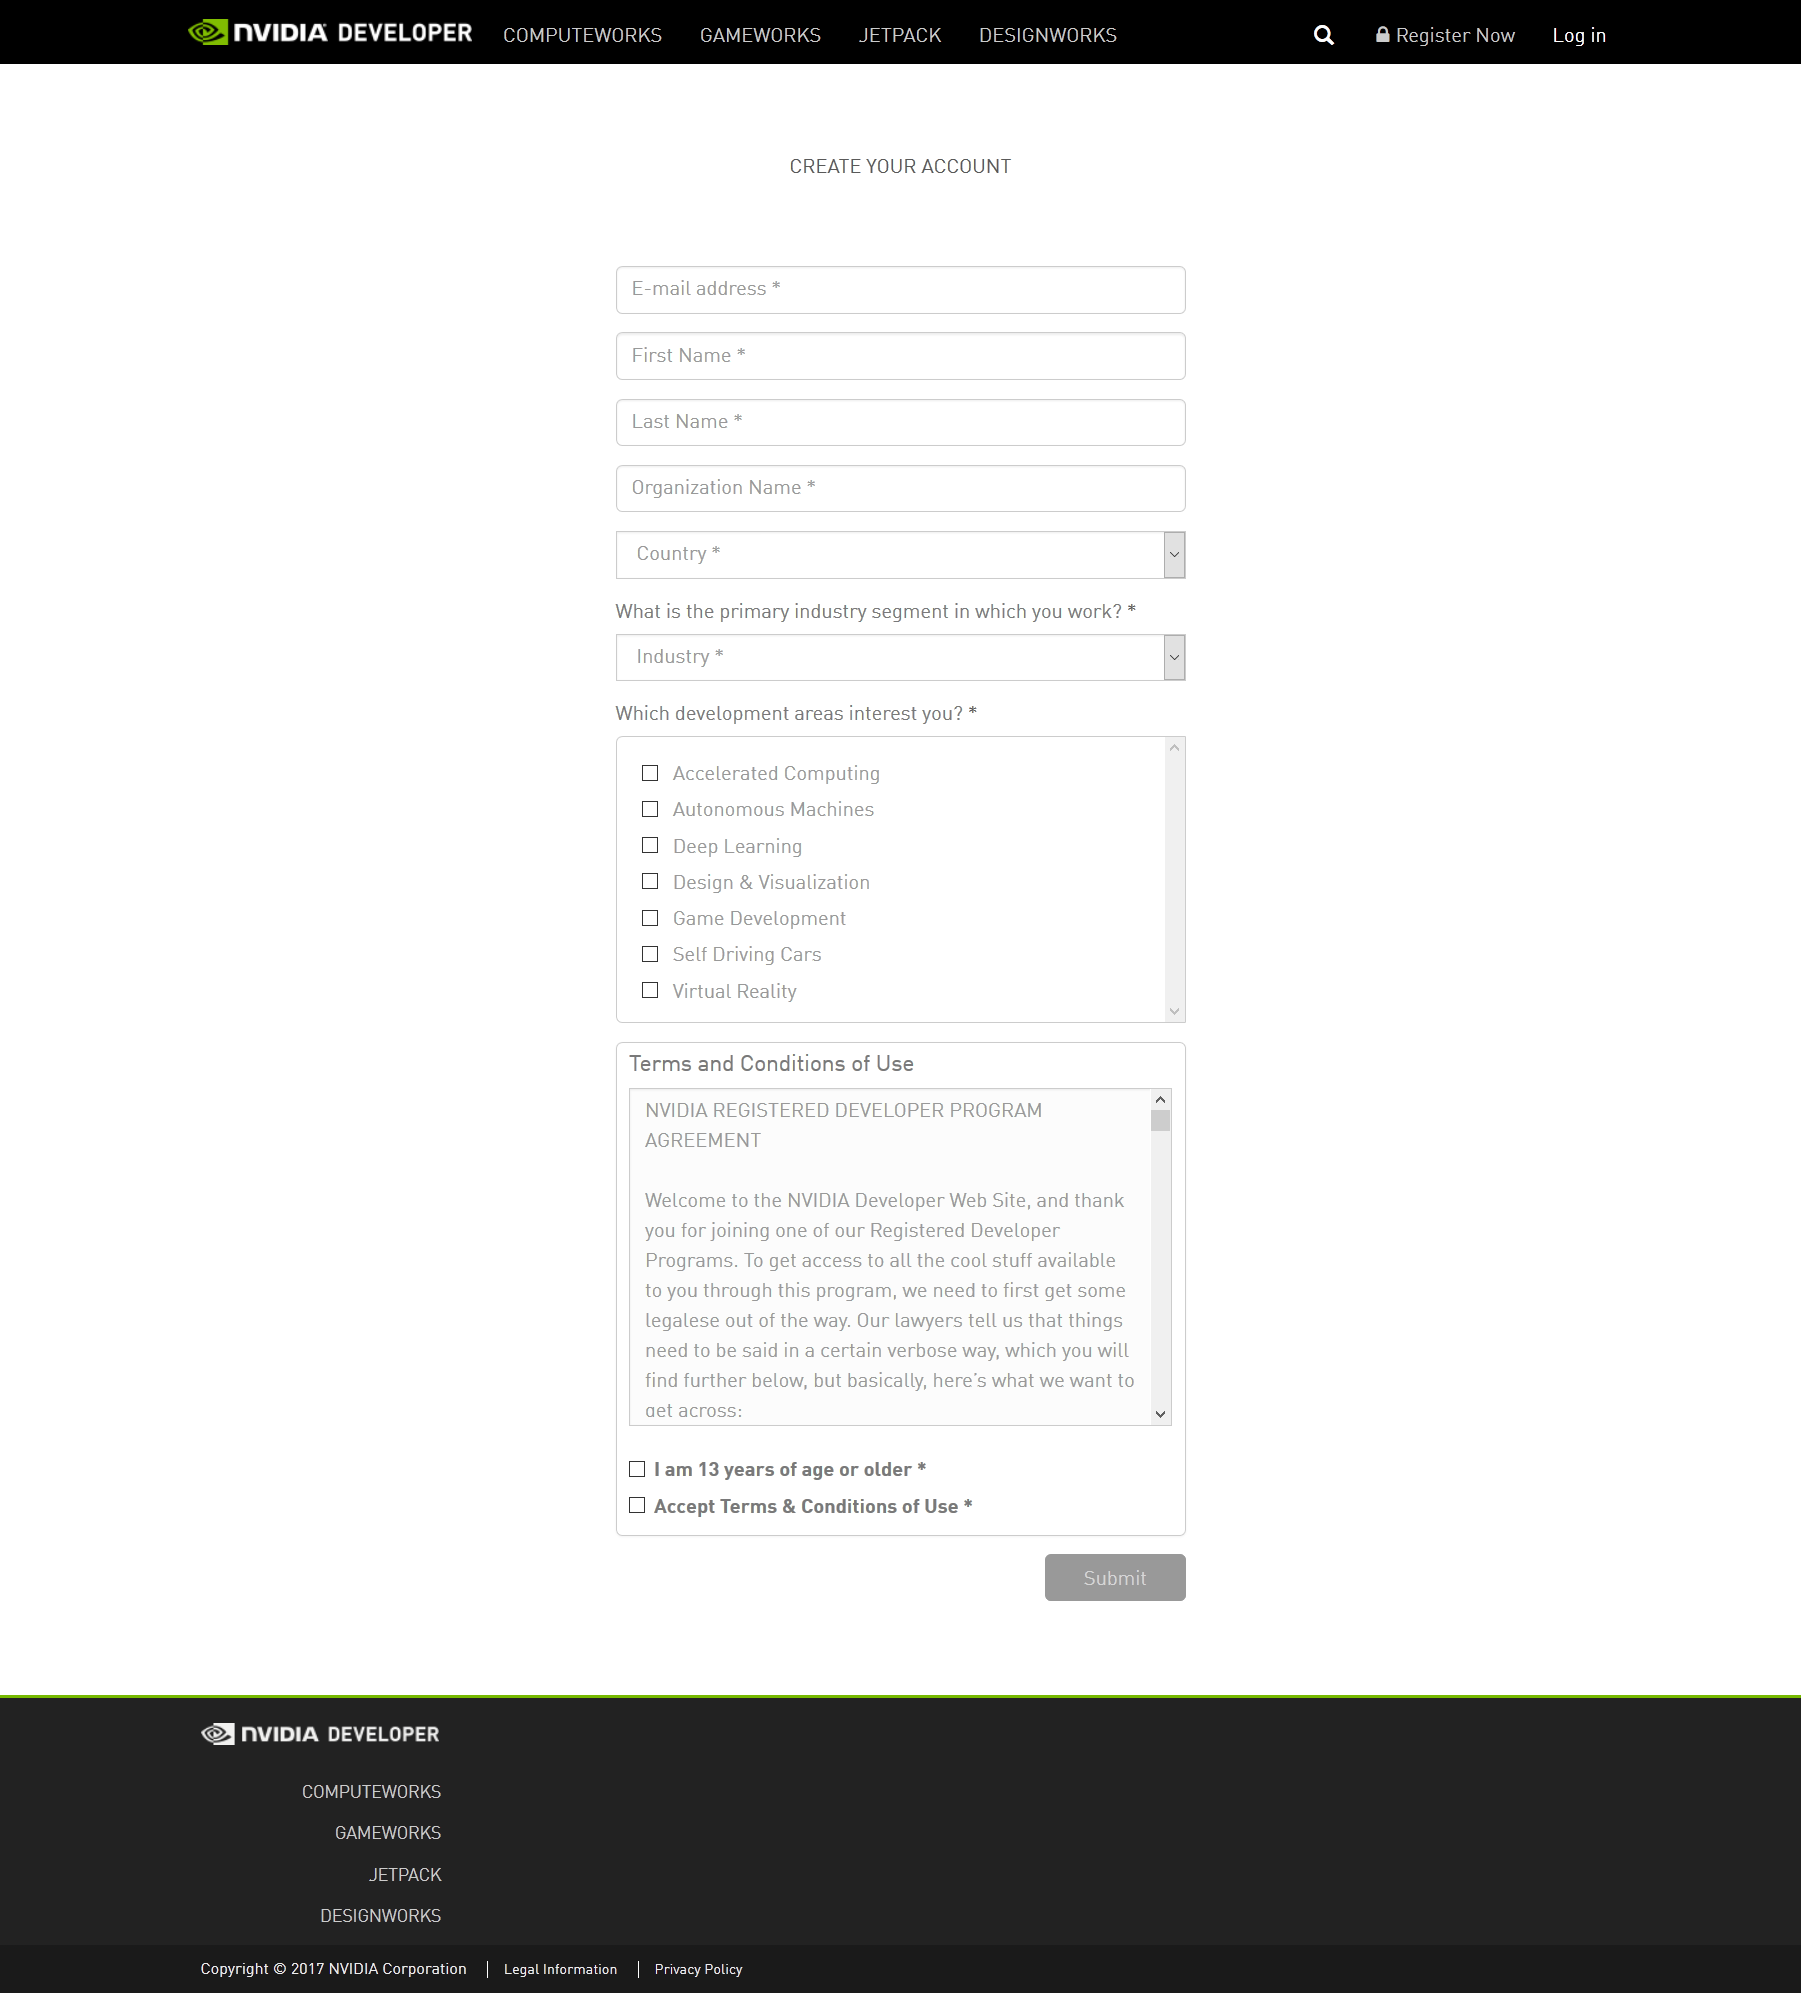
cuDNN安装说明 #安装 TensorFlow TensorFlow 需要 Python3.5.X 版本(大于 3.5.1) 我已经安装 3.6 所以为了多环境方便使用 Anaconda 安装 TensorFlow。 可以到 https://www.continuum.io/downloads/ 下载对应的版本后进行安装,安装完成后:
C:\Users\zylia>conda create -n TensorFlow python=3.5
Fetching package metadata ...........
Solving package specifications: .

Package plan for installation in environment E:\Anaconda3\envs\TensorFlow:

The following NEW packages will be INSTALLED:

    pip:            9.0.1-py35_1
    python:         3.5.3-3
    setuptools:     27.2.0-py35_1
    vs2015_runtime: 14.0.25123-0
    wheel:          0.29.0-py35_0

Proceed ([y]/n)? y

python-3.5.3-3 100% |###############################| Time: 0:05:20 100.51 kB/s
setuptools-27. 100% |###############################| Time: 0:00:07 101.84 kB/s
wheel-0.29.0-p 100% |###############################| Time: 0:00:01 121.63 kB/s
pip-9.0.1-py35 100% |###############################| Time: 0:00:16 106.15 kB/s
#
# To activate this environment, use:
# > activate TensorFlow
#
# To deactivate this environment, use:
# > deactivate TensorFlow
#
# * for power-users using bash, you must source
#
C:\Users\zylia>activate TensorFlow
//如果没有安装 CUDA 使用 pip install --upgrade tensorflow 命令
(TensorFlow) C:\Users\zylia> pip install --upgrade tensorflow-gpu
#测试 安装完成后进行测试:
E:\Anaconda3\envs\TensorFlow\python.exe D:/PycharmProjects/TensorFlow/Test.py
Traceback (most recent call last):
  File "E:\Anaconda3\envs\TensorFlow\lib\site-packages\tensorflow\python\pywrap_tensorflow_internal.py", line 18, in swig_import_helper
    return importlib.import_module(mname)
  File "E:\Anaconda3\envs\TensorFlow\lib\importlib\__init__.py", line 126, in import_module
    return _bootstrap._gcd_import(name[level:], package, level)
  File "<frozen importlib._bootstrap>", line 986, in _gcd_import
  File "<frozen importlib._bootstrap>", line 969, in _find_and_load
  File "<frozen importlib._bootstrap>", line 958, in _find_and_load_unlocked
  File "<frozen importlib._bootstrap>", line 666, in _load_unlocked
  File "<frozen importlib._bootstrap>", line 577, in module_from_spec
  File "<frozen importlib._bootstrap_external>", line 919, in create_module
  File "<frozen importlib._bootstrap>", line 222, in _call_with_frames_removed
ImportError: DLL load failed: 找不到指定的模块。

During handling of the above exception, another exception occurred:

Traceback (most recent call last):
  File "E:\Anaconda3\envs\TensorFlow\lib\site-packages\tensorflow\python\pywrap_tensorflow.py", line 41, in <module>
    from tensorflow.python.pywrap_tensorflow_internal import *
  File "E:\Anaconda3\envs\TensorFlow\lib\site-packages\tensorflow\python\pywrap_tensorflow_internal.py", line 21, in <module>
    _pywrap_tensorflow_internal = swig_import_helper()
  File "E:\Anaconda3\envs\TensorFlow\lib\site-packages\tensorflow\python\pywrap_tensorflow_internal.py", line 20, in swig_import_helper
    return importlib.import_module('_pywrap_tensorflow_internal')
  File "E:\Anaconda3\envs\TensorFlow\lib\importlib\__init__.py", line 126, in import_module
    return _bootstrap._gcd_import(name[level:], package, level)
ImportError: No module named '_pywrap_tensorflow_internal'

During handling of the above exception, another exception occurred:

Traceback (most recent call last):
  File "D:/PycharmProjects/TensorFlow/Test.py", line 1, in <module>
    import tensorflow as tf
  File "E:\Anaconda3\envs\TensorFlow\lib\site-packages\tensorflow\__init__.py", line 24, in <module>
    from tensorflow.python import *
  File "E:\Anaconda3\envs\TensorFlow\lib\site-packages\tensorflow\python\__init__.py", line 51, in <module>
    from tensorflow.python import pywrap_tensorflow
  File "E:\Anaconda3\envs\TensorFlow\lib\site-packages\tensorflow\python\pywrap_tensorflow.py", line 52, in <module>
    raise ImportError(msg)
ImportError: Traceback (most recent call last):
  File "E:\Anaconda3\envs\TensorFlow\lib\site-packages\tensorflow\python\pywrap_tensorflow_internal.py", line 18, in swig_import_helper
    return importlib.import_module(mname)
  File "E:\Anaconda3\envs\TensorFlow\lib\importlib\__init__.py", line 126, in import_module
    return _bootstrap._gcd_import(name[level:], package, level)
  File "<frozen importlib._bootstrap>", line 986, in _gcd_import
  File "<frozen importlib._bootstrap>", line 969, in _find_and_load
  File "<frozen importlib._bootstrap>", line 958, in _find_and_load_unlocked
  File "<frozen importlib._bootstrap>", line 666, in _load_unlocked
  File "<frozen importlib._bootstrap>", line 577, in module_from_spec
  File "<frozen importlib._bootstrap_external>", line 919, in create_module
  File "<frozen importlib._bootstrap>", line 222, in _call_with_frames_removed
ImportError: DLL load failed: 找不到指定的模块。

During handling of the above exception, another exception occurred:

Traceback (most recent call last):
  File "E:\Anaconda3\envs\TensorFlow\lib\site-packages\tensorflow\python\pywrap_tensorflow.py", line 41, in <module>
    from tensorflow.python.pywrap_tensorflow_internal import *
  File "E:\Anaconda3\envs\TensorFlow\lib\site-packages\tensorflow\python\pywrap_tensorflow_internal.py", line 21, in <module>
    _pywrap_tensorflow_internal = swig_import_helper()
  File "E:\Anaconda3\envs\TensorFlow\lib\site-packages\tensorflow\python\pywrap_tensorflow_internal.py", line 20, in swig_import_helper
    return importlib.import_module('_pywrap_tensorflow_internal')
  File "E:\Anaconda3\envs\TensorFlow\lib\importlib\__init__.py", line 126, in import_module
    return _bootstrap._gcd_import(name[level:], package, level)
ImportError: No module named '_pywrap_tensorflow_internal'


Failed to load the native TensorFlow runtime.

See https://www.tensorflow.org/install/install_sources#common_installation_problems

for some common reasons and solutions.  Include the entire stack trace
above this error message when asking for help.

Process finished with exit code 1
这是由于 CUDA 版本升级,CUDNN 升级为 cudnn64_6.dll,将 cuda\bin 加入 PATH 并且复制一份该 dll 改名为 cudnn64_5.dll 即可。
2017-06-01 17:48:32.402786: W c:\tf_jenkins\home\workspace\release-win\device\gpu\os\windows\tensorflow\core\platform\cpu_feature_guard.cc:45] The TensorFlow library wasn't compiled to use SSE instructions, but these are available on your machine and could speed up CPU computations.
2017-06-01 17:48:32.403261: W c:\tf_jenkins\home\workspace\release-win\device\gpu\os\windows\tensorflow\core\platform\cpu_feature_guard.cc:45] The TensorFlow library wasn't compiled to use SSE2 instructions, but these are available on your machine and could speed up CPU computations.
2017-06-01 17:48:32.403602: W c:\tf_jenkins\home\workspace\release-win\device\gpu\os\windows\tensorflow\core\platform\cpu_feature_guard.cc:45] The TensorFlow library wasn't compiled to use SSE3 instructions, but these are available on your machine and could speed up CPU computations.
2017-06-01 17:48:32.403991: W c:\tf_jenkins\home\workspace\release-win\device\gpu\os\windows\tensorflow\core\platform\cpu_feature_guard.cc:45] The TensorFlow library wasn't compiled to use SSE4.1 instructions, but these are available on your machine and could speed up CPU computations.
2017-06-01 17:48:32.404366: W c:\tf_jenkins\home\workspace\release-win\device\gpu\os\windows\tensorflow\core\platform\cpu_feature_guard.cc:45] The TensorFlow library wasn't compiled to use SSE4.2 instructions, but these are available on your machine and could speed up CPU computations.
2017-06-01 17:48:32.404748: W c:\tf_jenkins\home\workspace\release-win\device\gpu\os\windows\tensorflow\core\platform\cpu_feature_guard.cc:45] The TensorFlow library wasn't compiled to use AVX instructions, but these are available on your machine and could speed up CPU computations.
2017-06-01 17:48:32.405161: W c:\tf_jenkins\home\workspace\release-win\device\gpu\os\windows\tensorflow\core\platform\cpu_feature_guard.cc:45] The TensorFlow library wasn't compiled to use AVX2 instructions, but these are available on your machine and could speed up CPU computations.
2017-06-01 17:48:32.405527: W c:\tf_jenkins\home\workspace\release-win\device\gpu\os\windows\tensorflow\core\platform\cpu_feature_guard.cc:45] The TensorFlow library wasn't compiled to use FMA instructions, but these are available on your machine and could speed up CPU computations.
2017-06-01 17:48:33.651581: I c:\tf_jenkins\home\workspace\release-win\device\gpu\os\windows\tensorflow\core\common_runtime\gpu\gpu_device.cc:887] Found device 0 with properties:
name: GeForce GTX 960M
major: 5 minor: 0 memoryClockRate (GHz) 1.176
pciBusID 0000:01:00.0
Total memory: 2.00GiB
Free memory: 1.65GiB
2017-06-01 17:48:33.652016: I c:\tf_jenkins\home\workspace\release-win\device\gpu\os\windows\tensorflow\core\common_runtime\gpu\gpu_device.cc:908] DMA: 0
2017-06-01 17:48:33.652197: I c:\tf_jenkins\home\workspace\release-win\device\gpu\os\windows\tensorflow\core\common_runtime\gpu\gpu_device.cc:918] 0:   Y
2017-06-01 17:48:33.652404: I c:\tf_jenkins\home\workspace\release-win\device\gpu\os\windows\tensorflow\core\common_runtime\gpu\gpu_device.cc:977] Creating TensorFlow device (/gpu:0) -> (device: 0, name: GeForce GTX 960M, pci bus id: 0000:01:00.0)
b'Hello, TensorFlow!'
这样就安装成功了 #第一个小示例
import tensorflow as tf
import numpy as np
import matplotlib.pylab as plt

# 使用 TensorFlow 定义一个随机数构成的 2 * 20 的矩阵,并将其赋给变量 a
a = tf.random_normal([2, 20])
# a 是一个 Tensor("random_normal:0", shape=(2, 20), dtype=float32) 对象
sess = tf.Session()
out = sess.run(a)
"""
out 是一个 Numpy 数组,是类似下面结构的二维数组(具体数值随机生成可能有所差别)
[[ 1.12049484 -1.74728727  0.45890146  0.36703163 -0.15883297 -0.75236785
  -0.92546529  0.52383661 -0.76638812 -1.83311749  1.89417374 -1.08472025
  -0.45552248  0.15569194  0.31735975  0.01950244 -1.07766128 -0.79500329
  -0.8666485   0.39396518]
 [-1.57124853 -0.08938342 -0.55253559 -1.17106044  0.40585777  0.39375332
   1.37915421  0.19739513 -0.75434619  0.15933491 -0.75306702 -1.60337615
  -1.46187127  0.92681426  0.59408826  0.44740802 -1.06977224 -0.42683071
  -0.09084698  0.63764465]]
"""
x, y = out
# 将数组中的元素分别赋值给 x、y

# 使用 matplotlib.pylab 绘制一个散点图 x 对应横轴 y 对应竖轴
# 其实就是取出 x y 种索引相同的两个数后分别当做 横轴和竖轴显示成一个点
plt.scatter(x, y)
#显示绘制的图像
plt.show()
显示效果如下图所示: 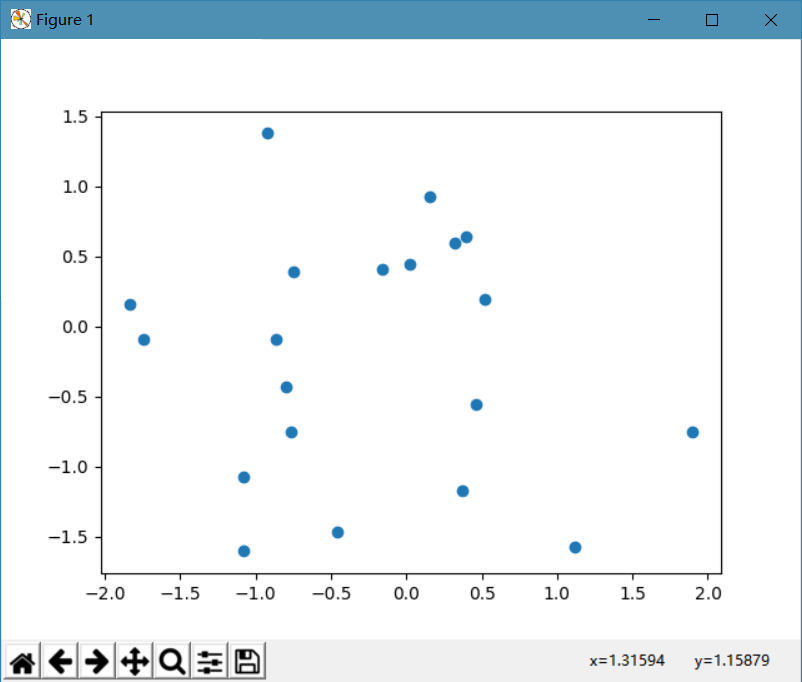
#第一个完整数据流图
import tensorflow as tf

a = tf.constant(5, name="input_a")
b = tf.constant(3, name="input_b")
# tf.mul 被弃用 需要使用 tf.multiply
c = tf.multiply(a, b, name="mul_c")
d = tf.add(a, b, name="add_d")
e = tf.add(c, d, name="add_e")
# 上面的代码只是建立了一个数据流图,并不会进行计算

# Session 对象在运行时负责对数据流图进行监督,并且是运行数据流图的主要接口 还有一个 InteractiveSession
sess = tf.Session()
result = sess.run(e)

# a = {Tensor} Tensor("input_a:0", shape=(), dtype=int32)
# b = {Tensor} Tensor("input_b:0", shape=(), dtype=int32)
# c = {Tensor} Tensor("mul_c:0", shape=(), dtype=int32)
# d = {Tensor} Tensor("add_d:0", shape=(), dtype=int32)
# e = {Tensor} Tensor("add_e:0", shape=(), dtype=int32)
# result 为 23

# SummaryWriter 改为 tf.summary.FileWriter
# 在 Pycharm 测试的时候发现 run 无法生成数据 可能是 Pycharm 的 bug
writer = tf.summary.FileWriter('./graph_data', graph=sess.graph)

# 关闭以释放资源
writer.close()
sess.close()
其相当于下图的数据流图: 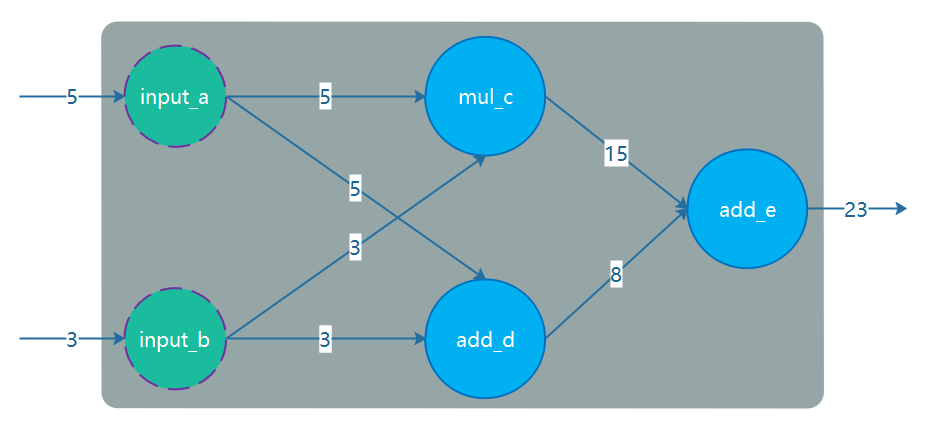
我们保存一下上面代码中的图信息,使用 TensorBoard 来检查下是否是我们想象的数据流图的情况,在上面的代码中:
# 在早期版本下面的方法为 tf.train.SummaryWriter 改为 tf.summary.FileWriter
# 在 Pycharm 测试的时候发现 run 无法生成数据 可能是 Pycharm 的 bug
writer = tf.summary.FileWriter('./graph_data', graph=sess.graph)
这块儿的代码就是用于生成图信息文件的(与计算无关,只是计算可以去掉该部分代码),执行完成后会生成一个文件:

然后在命令行中执行:
(E:\Anaconda3\envs\TensorFlow) D:\PycharmProjects\TensorFlow>tensorboard --logdir="my_graph"
Starting TensorBoard b'47' at http://0.0.0.0:6006
在浏览器中访问 localhost:6006 然后选择菜单中的 GRAPHS:
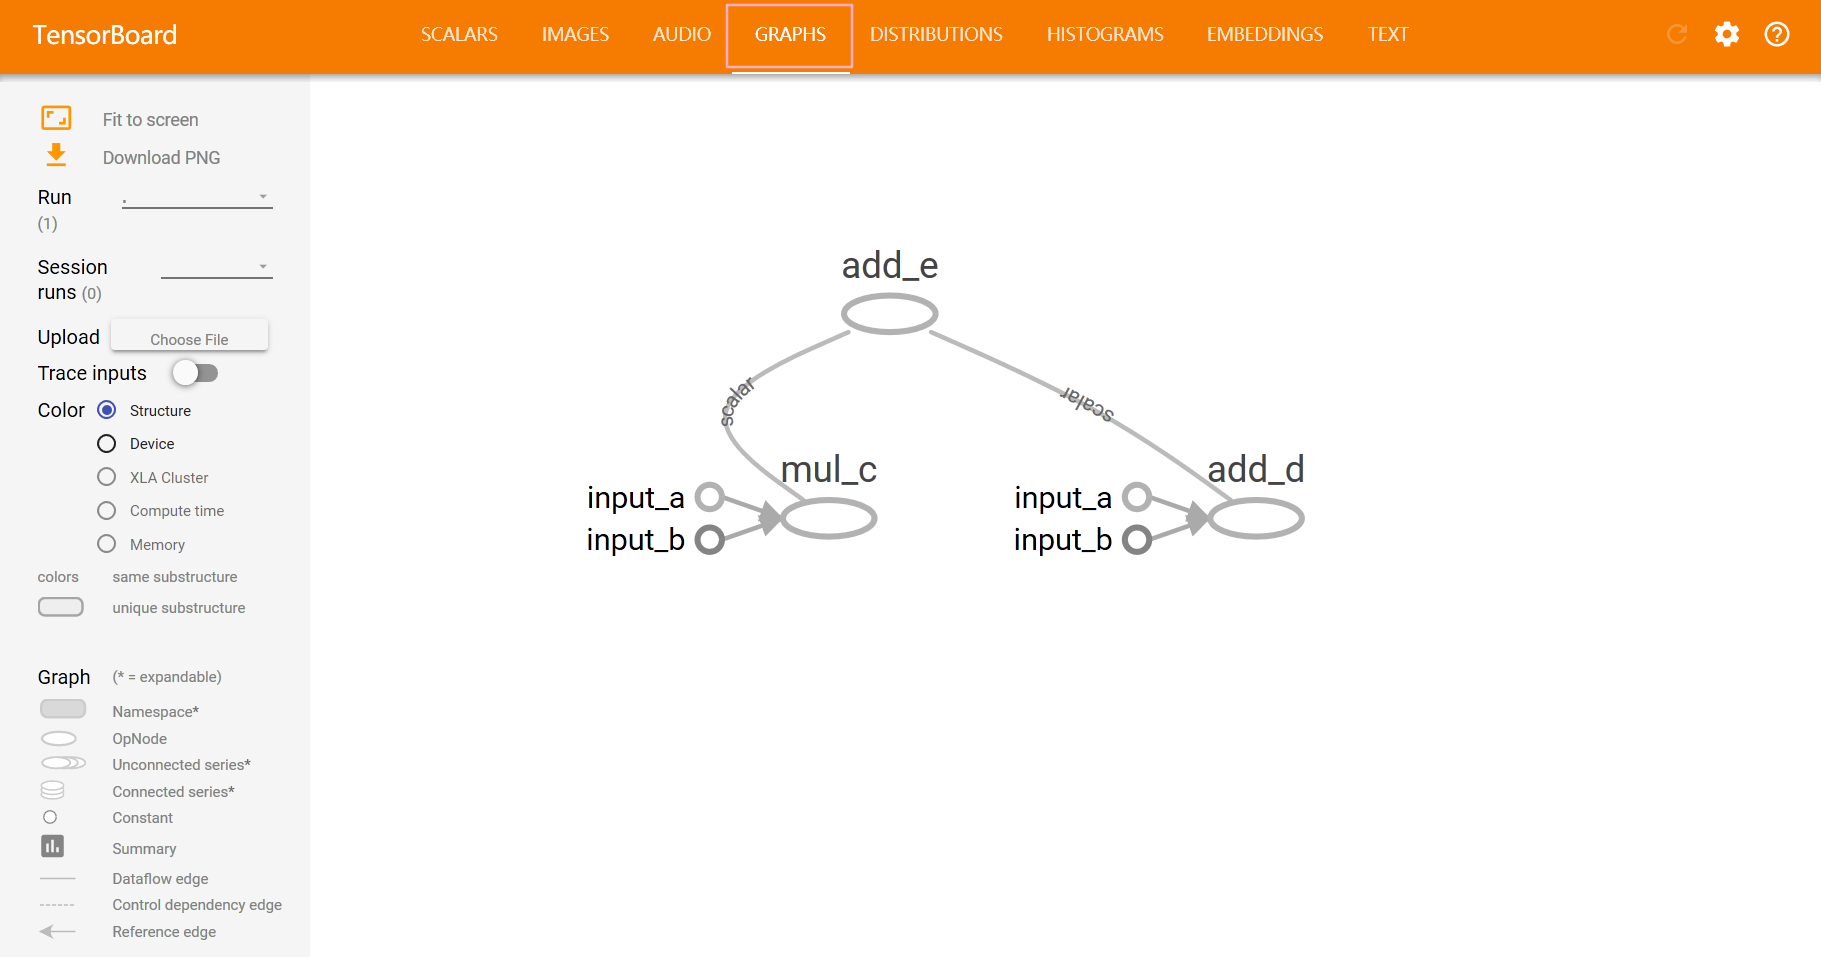
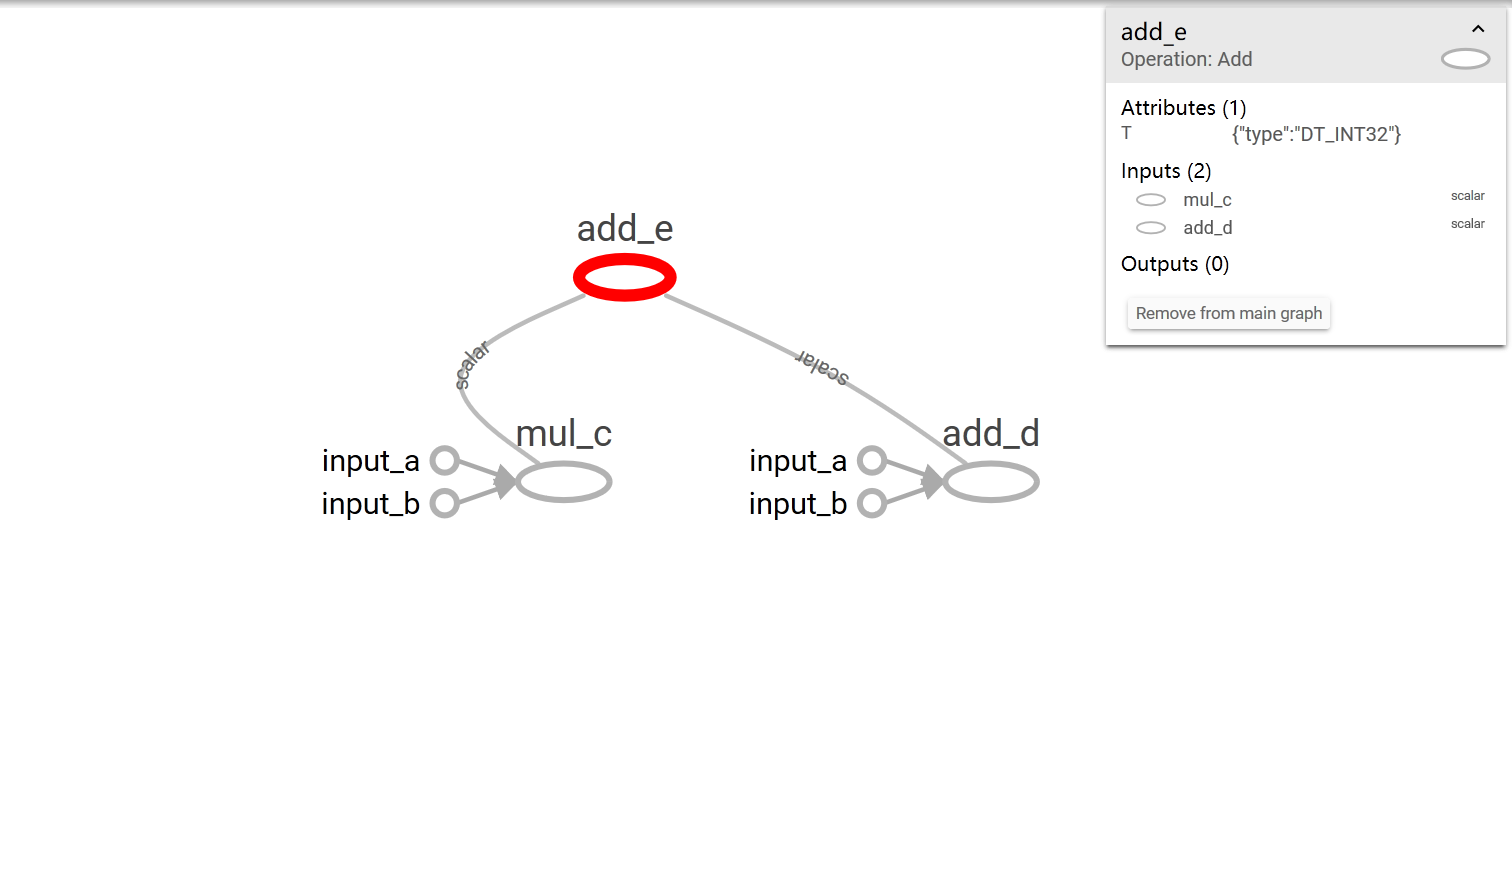
可以看到和我们自己画的图逻辑上是相同的。在该页面中可以点击图查看相关依赖等信息:


 9254
9254


 被折叠的 条评论
为什么被折叠?


