


学习目标
1.【掌握】静态单元格应用
2.【掌握】动态原型应用
3.【理解】UITableViewHeaderFooterView
一、静态单元格应用
这个案例的目的是了解静态单元格的使用场合及操作方式,在一些情况下使用静态单元格会更加方便和快捷。我们需要了解静态单元格的一些特性及设置方式。案例效果图如下:

静态单元格只支持UITableViewController,所以先将之前的viewController删除。拖入UITableViewController,设置Size属性。再选择UITableView并设置属性Content属性为Static Cells:

Dynamin ProtoTypes:动态单元格,通过代码进行设置
Static Cells:静态单元格,通过界面进行设置,固定的。
设置每一组cell的数量:默认每一组有三个cell,修改每一组cell的数量。

设置cell的高度:Cell的高度也就是tableview的row height属性。
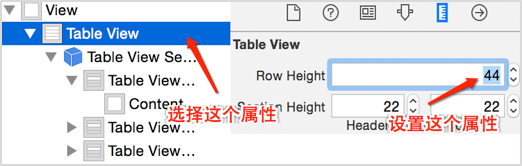
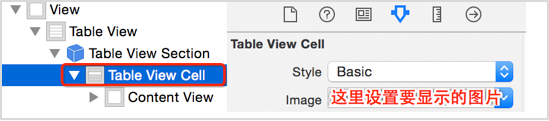
设置cell的显示样式:这里的样式和代码创建cell的系统提供的样式类似,不过多了一个Custom自定义。

设置cell的图片:给Cell设置图片,也就是Cell的image属性赋值。
设置cell的文本:

完成上面的操作后我们可以添加任意组(sections),设置对应组的行数(rows)。
需要注意的是,当我们删除原有控制器,创建新控制器后需要将新控制器设为初始显示的控制器。也就是勾选Is Initial View Controller,否则启动模拟器看不到界面。如下图所示:

二、动态原型应用
上面演示了静态单元格的使用,下面接着演示动态原型的使用,也就是UITableView的Content属性中的Dynamic protoTypes。设置这个属性后,我们可以通过代码根据原型动态创建Cell。下面来看看一个应用管理的案例,案例效果图如下:

首先,创建项目,导入素材图片和plist文件。

创建模型类,加载plist文件中的数据封装模型,并返回模型数组。
JFApp.h
|
1
2
3
4
5
6
7
8
9
10
11
12
13
14
15
|
#import <Foundation/Foundation.h>
@interface
JFApp
: NSObject
@property
(
copy
,
nonatomic
)
NSString
*size
;
@property
(
copy
,
nonatomic
)
NSString
*download
;
@property
(
copy
,
nonatomic
)
NSString
*name
;
@property
(
copy
,
nonatomic
)
NSString
*icon
;
//快速创建模型
-
(
instancetype
)
initWithDictionary
:
(
NSDictionary
*
)
dict
;
+
(
instancetype
)
appWithDictionary
:
(
NSDictionary
*
)
dict
;
//返回模型数组
+
(
NSArray
*
)
apps
;
@end
|
JFApp.m
|
1
2
3
4
5
6
7
8
9
10
11
12
13
14
15
16
17
18
19
20
21
22
23
24
25
26
27
28
|
#import "JFApp.h"
@implementation
JFApp
//快速创建模型
-
(
instancetype
)
initWithDictionary
:
(
NSDictionary
*
)
dict
{
if
(
self
=
[
super
init
]
)
{
[
self
setValuesForKeysWithDictionary
:dict
]
;
}
return
self
;
}
+
(
instancetype
)
appWithDictionary
:
(
NSDictionary
*
)
dict
{
return
[
[
self
alloc
]
initWithDictionary
:dict
]
;
}
//返回模型数组
+
(
NSArray
*
)
apps
{
NSArray
*array
=
[
NSArray
arrayWithContentsOfFile
:
[
[
NSBundle
mainBundle
]
pathForResource
:
@"apps_full.plist"
ofType
:nil
]
]
;
NSMutableArray
*arrayM
=
[
NSMutableArray
array
]
;
for
(
NSDictionary
*dict
in
array
)
{
JFApp
*app
=
[
JFApp
appWithDictionary
:dict
]
;
[
arrayM
addObject
:app
]
;
}
return
arrayM
;
}
@end
|
在Main.storyboard中修改size为4.7,拖入一个全屏的UITableView控件,再拖入一个UITableViewCell 控件到UITableView中,并拖入Cell的子控件。Cell的高度也就是tableview的rowheight属性,tableview的 content属性默认就是Dynamic prototypes(动态原型),所以无需更改。

创建Cell封装类,并指定Cell的Class属性为我们创建的封装类JFAppCell。
 指定Class后即可进行属性连线,一般属性连线我们都封装在类扩展(匿名分类,也叫延展)里,而不是.h文件中。
 设置Cell的重用标识符(Identifier), 并在类中定义一个模型属性和快速创建Cell的方法并实现。点击下载按钮后,会弹出一个提示,弹出的提示不会跟随tableview滚动,所以需要添加这 个提示View到tableview的父视图中。这样就必须访问控制器,所以我们使用代理来完成这个操作,让控制器成为代理对象,替Cell完成点击事 件。

JFAppCell.h
|
1
2
3
4
5
6
7
8
9
10
11
12
13
14
15
16
17
18
19
20
21
22
23
24
|
#import <UIKit/UIKit.h>
@class
JFApp
;
@class
JFAppCell
;
//定义一个代理
@protocol
JFAppCellDelegate
<NSObject>
@
required
-
(
void
)
downloadButtonDidClick
:
(
JFAppCell
*
)
appCell
;
@end
@interface
JFAppCell
: UITableViewCell
//为子控件赋值的模型属性
@property
(
strong
,
nonatomic
)
JFApp
*app
;
//代理属性
@property
(
weak
,
nonatomic
)
id
<JFAppCellDelegate>
delegate
;
//快速创建cell的方法
+
(
instancetype
)
appCellWithDictionary
:
(
UITableView
*
)
tableView
;
@end
|
JFAppCell.m
|
1
2
3
4
5
6
7
8
9
10
11
12
13
14
15
16
17
18
19
20
21
22
23
24
25
26
27
28
29
30
31
32
33
34
35
36
37
38
39
40
41
42
43
44
45
46
47
48
49
50
51
|
#import "JFAppCell.h"
#import "JFApp.h"
@interface
JFAppCell
(
)
@property
(
weak
,
nonatomic
)
IBOutlet
UIImageView
*iconView
;
@property
(
weak
,
nonatomic
)
IBOutlet
UILabel
*nameView
;
@property
(
weak
,
nonatomic
)
IBOutlet
UILabel
*messageView
;
@property
(
weak
,
nonatomic
)
IBOutlet
UIButton
*downloadView
;
//下载按钮的点击事件
-
(
IBAction
)
downloadButtonDidClick
;
@end
@implementation
JFAppCell
//下载按钮的点击事件
-
(
IBAction
)
downloadButtonDidClick
{
//点击下载按钮后禁用下载按钮
self
.
downloadView
.
enabled
=
NO
;
//弹出下载信息,弹出View是添加View到Tableview的父容器中,这里无法访问到。所以得用代理
if
(
[
self
.
delegate
respondsToSelector
:
@selector
(
downloadButtonDidClick
:
)
]
)
{
[
self
.
delegate
downloadButtonDidClick
:self
]
;
}
}
//快速创建cell的方法
+
(
instancetype
)
appCellWithDictionary
:
(
UITableView
*
)
tableView
{
//用cell重用标识符创建cell,这一步前必须在Cell中设置他的Identifier属性
JFAppCell
*cell
=
[
tableView
dequeueReusableCellWithIdentifier
:
@"app"
]
;
return
cell
;
}
//重写set方法为Cell的子控件赋值
-
(
void
)
setApp
:
(
JFApp
*
)
app
{
_app
=
app
;
//图标
self
.
iconView
.
image
=
[
UIImage
imageNamed
:app
.
icon
]
;
//名称
self
.
nameView
.
text
=
app
.
name
;
//下载信息
self
.
messageView
.
text
=
[
NSString
stringWithFormat
:
@"大小:%@M | 下载量:%@万"
,
app
.
size
,
app
.
download
]
;
}
@end
|
在控制器对tableview进行控件连线,然后懒加载模型数组,并实现数据源方法和Cell的代理方法。最终实现我们的需求,具体控制器中的代码如下:
ViewController.m
|
1
2
3
4
5
6
7
8
9
10
11
12
13
14
15
16
17
18
19
20
21
22
23
24
25
26
27
28
29
30
31
32
33
34
35
36
37
38
39
40
41
42
43
44
45
46
47
48
49
50
51
52
53
54
55
56
57
58
59
60
61
62
63
64
65
66
67
68
69
70
71
72
73
74
75
76
77
78
79
80
81
82
83
84
85
86
87
88
89
90
91
92
93
|
#import "ViewController.h"
#import "JFApp.h"
#import "JFAppCell.h"
@interface
ViewController
(
)
<
UITableViewDataSource
,
JFAppCellDelegate
>
@property
(
weak
,
nonatomic
)
IBOutlet
UITableView
*tableView
;
@property
(
strong
,
nonatomic
)
NSArray
*apps
;
@end
@implementation
ViewController
//隐藏顶部状态栏
-
(
BOOL
)
prefersStatusBarHidden
{
return
YES
;
}
-
(
void
)
viewDidLoad
{
[
super
viewDidLoad
]
;
self
.
tableView
.
dataSource
=
self
;
}
//懒加载
-
(
NSArray
*
)
apps
{
if
(
_apps
==
nil
)
{
_apps
=
[
JFApp
apps
]
;
}
return
_apps
;
}
//每组一共有多少行数据
-
(
NSInteger
)
tableView
:
(
UITableView
*
)
tableView
numberOfRowsInSection
:
(
NSInteger
)
section
{
return
self
.
apps
.
count
;
}
//创建cell
-
(
UITableViewCell
*
)
tableView
:
(
UITableView
*
)
tableView
cellForRowAtIndexPath
:
(
NSIndexPath
*
)
indexPath
{
//获取当前数据模型
JFApp
*app
=
self
.
apps
[
indexPath
.
row
]
;
//创建cell
JFAppCell
*cell
=
[
JFAppCell
appCellWithDictionary
:tableView
]
;
//指定Cell的代理对象
cell
.
delegate
=
self
;
//为Cell赋值
cell
.
app
=
app
;
return
cell
;
}
//实现Cell的代理方法,在下载按钮被点击后触发
-
(
void
)
downloadButtonDidClick
:
(
JFAppCell
*
)
appCell
{
//创建提示Label
UILabel
*downMessage
=
[
[
UILabel
alloc
]
init
]
;
//计算并设置frame
CGFloat
downW
=
200
;
CGFloat
downH
=
20
;
CGFloat
downX
=
(
self
.
view
.
frame
.
size
.
width
-
downW
)
/
2
;
CGFloat
downY
=
(
self
.
view
.
frame
.
size
.
height
-
downH
)
/
2
;
downMessage
.
frame
=
CGRectMake
(
downX
,
downY
,
downW
,
downH
)
;
//设置一些属性
downMessage
.
text
=
[
NSString
stringWithFormat
:
@"%@正在下载..."
,
appCell
.
app
.
name
]
;
downMessage
.
backgroundColor
=
[
UIColor
grayColor
]
;
downMessage
.
textAlignment
=
NSTextAlignmentCenter
;
downMessage
.
alpha
=
0
;
//添加到self.view中
[
self
.
view
addSubview
:downMessage
]
;
//以动画形式弹出提示并隐藏,最终移除
[
UIView
animateWithDuration
:
1
animations
:
^
{
downMessage
.
alpha
=
0.7
;
}
completion
:
^
(
BOOL
finished
)
{
dispatch_after
(
dispatch_time
(
DISPATCH_TIME_NOW
,
(
int64_t
)
(
1
*
NSEC_PER_SEC
)
)
,
dispatch_get_main_queue
(
)
,
^
{
[
UIView
animateWithDuration
:
1
animations
:
^
{
downMessage
.
alpha
=
0
;
}
completion
:
^
(
BOOL
finished
)
{
[
downMessage
removeFromSuperview
]
;
}
]
;
}
)
;
}
]
;
}
@end
|
三、UITableViewHeaderFooterView
UITableViewHeaderFooterView是一个定义列表头部视图、列表尾部视图的类,HeaderFooterView一般是用在列表的头部,显示不同的分组状态信息。我们通过QQ分组来演示自定义HeaderFooterView的方法,下面是完成后的效果图:

导入素材和plist文件,从下图可以看出,我们需要创建嵌套模型,也就是每一个组好友和每一个好友都需要封装模型。

先封装单个好友模型,是否是vip定义为BOOL类型。
JFFriend.h
|
1
2
3
4
5
6
7
8
9
10
11
12
13
|
#import <Foundation/Foundation.h>
@interface
JFFriend
: NSObject
@property
(
copy
,
nonatomic
)
NSString
*icon
;
@property
(
copy
,
nonatomic
)
NSString
*intro
;
@property
(
copy
,
nonatomic
)
NSString
*name
;
@property
(
assign
,
nonatomic
,
getter
=
isVip
)
BOOL
vip
;
//快速创建模型数组
-
(
instancetype
)
initWithDictionary
:
(
NSDictionary
*
)
dict
;
+
(
instancetype
)
friendWithDictionary
:
(
NSDictionary
*
)
dict
;
@end
|
JFFriend.m
|
1
2
3
4
5
6
7
8
9
10
11
12
13
14
15
|
#import "JFFriend.h"
@implementation
JFFriend
//快速创建模型数组
-
(
instancetype
)
initWithDictionary
:
(
NSDictionary
*
)
dict
{
if
(
self
=
[
super
init
]
)
{
[
self
setValuesForKeysWithDictionary
:dict
]
;
}
return
self
;
}
+
(
instancetype
)
friendWithDictionary
:
(
NSDictionary
*
)
dict
{
return
[
[
self
alloc
]
initWithDictionary
:dict
]
;
}
@end
|
然后再封装一组好友的模型,因为好友分组是有收起、展开两种状态的,所以定义一个BOOL类型来存储好友组的状态。
JFFriendGroup.h
|
1
2
3
4
5
6
7
8
9
10
11
12
13
14
15
16
17
|
#import <Foundation/Foundation.h>
@interface
JFFriendGroup
: NSObject
@property
(
strong
,
nonatomic
)
NSArray
*friends
;
@property
(
copy
,
nonatomic
)
NSString
*name
;
@property
(
assign
,
nonatomic
)
int
online
;
//是否陈列出好友列表,默认不陈列
@property
(
assign
,
nonatomic
,
getter
=
isDisplay
)
BOOL
display
;
//快速创建组模型
-
(
instancetype
)
initWithDictionary
:
(
NSDictionary
*
)
dict
;
+
(
instancetype
)
friendGroupWithDictionary
:
(
NSDictionary
*
)
dict
;
//返回组模型数组
+
(
NSArray
*
)
friendGroups
;
@end
|
JFFriendGroup.m
|
1
2
3
4
5
6
7
8
9
10
11
12
13
14
15
16
17
18
19
20
21
22
23
24
25
26
27
28
29
30
31
32
33
34
35
36
|
#import "JFFriendGroup.h"
#import "JFFriend.h"
@implementation
JFFriendGroup
//快速创建组模型
-
(
instancetype
)
initWithDictionary
:
(
NSDictionary
*
)
dict
{
if
(
self
=
[
super
init
]
)
{
[
self
setValuesForKeysWithDictionary
:dict
]
;
//这样赋值后friends数组中是字典,需要转模型
NSMutableArray
*arrayM_temp
=
[
NSMutableArray
array
]
;
for
(
NSDictionary
*dict_temp
in
self
.
friends
)
{
JFFriend
*myFriend
=
[
JFFriend
friendWithDictionary
:dict_temp
]
;
[
arrayM
_
temp
addObject
:myFriend
]
;
}
self
.
friends
=
arrayM_temp
;
}
return
self
;
}
+
(
instancetype
)
friendGroupWithDictionary
:
(
NSDictionary
*
)
dict
{
return
[
[
self
alloc
]
initWithDictionary
:dict
]
;
}
//返回组模型数组
+
(
NSArray
*
)
friendGroups
{
NSArray
*array
=
[
NSArray
arrayWithContentsOfFile
:
[
[
NSBundle
mainBundle
]
pathForResource
:
@"friends.plist"
ofType
:nil
]
]
;
NSMutableArray
*arrayM
=
[
NSMutableArray
array
]
;
for
(
NSDictionary
*dict
in
array
)
{
JFFriendGroup
*friendGroup
=
[
JFFriendGroup
friendGroupWithDictionary
:dict
]
;
[
arrayM
addObject
:friendGroup
]
;
}
return
arrayM
;
}
@end
|
封装Cell类,这里的Cell是指好友而不是分组。也就是每一个Cell显示一个好友的信息,所以我们定义的模型属性是好友模型而不是好友分组模型。并且这里使用系统提供的Cell样式已经能够满足我们的需求,所以无需再手动创建。具体Cell类代码入下:
JFFriendCell.h
|
1
2
3
4
5
6
7
8
9
10
|
#import <UIKit/UIKit.h>
@class
JFFriend
;
@interface
JFFriendCell
: UITableViewCell
@property
(
strong
,
nonatomic
)
JFFriend
*myFriend
;
//快速创建cell
+
(
instancetype
)
friendCellWithTableView
:
(
UITableView
*
)
tableView
;
@end
|
JFFriendCell.m
|
1
2
3
4
5
6
7
8
9
10
11
12
13
14
15
16
17
18
19
20
21
22
23
24
25
26
27
28
29
30
31
32
33
34
35
|
#import "JFFriendCell.h"
#import "JFFriend.h"
@implementation
JFFriendCell
//快速创建cell
+
(
instancetype
)
friendCellWithTableView
:
(
UITableView
*
)
tableView
{
static
NSString
*ID
=
@"myFriend"
;
//从缓存中创建Cell
JFFriendCell
*cell
=
[
tableView
dequeueReusableCellWithIdentifier
:ID
]
;
if
(
cell
==
nil
)
{
//系统自带的样式已经能够满足我们的需求,所以无需手动创建,直接使用合适系统提供的cell样式
cell
=
[
[
JFFriendCell
alloc
]
initWithStyle
:UITableViewCellStyleSubtitle
reuseIdentifier
:ID
]
;
}
return
cell
;
}
//重写set方法为Cell赋值
-
(
void
)
setMyFriend
:
(
JFFriend
*
)
myFriend
{
_myFriend
=
myFriend
;
//为Cell赋值
self
.
imageView
.
image
=
[
UIImage
imageNamed
:myFriend
.
icon
]
;
self
.
textLabel
.
text
=
myFriend
.
name
;
self
.
detailTextLabel
.
text
=
myFriend
.
intro
;
//如果是vip则昵称是红色
if
(
myFriend
.
isVip
)
{
self
.
textLabel
.
textColor
=
[
UIColor
redColor
]
;
}
}
@end
|
封装好模型和Cell后我们就可以在控制器进行调用了,先显示出数据,再根据我们的需求进行修改。我们的QQ列表整个都是tableview,所以不用使用ViewController,直接使用TableviewController。在Main.storyboard中删除原有的ViewController拖入一个TableviewController。

然后再修改ViewController.h的继承父类为UITableViewController,才能设置新的控制器所属Class为这个类。
|
1
2
3
4
5
|
#import <UIKit/UIKit.h>
//修改继承的父类为UITableViewController
@interface
ViewController
: UITableViewController
@end
|
设置UITableViewController的Class属性为ViewController,我们也可以新创建一个类继承自UITableViewController,然后在这里设置Class为我们新创建的那个类。
 在控制器中懒加载数据,实现数据源方法显示出数据。因为我们Main.storyboard中使用的是TableViewController,所以无需手动遵守数据源、代理协议和手动指定数据源对象、代理对象。
ViewController.m
|
1
2
3
4
5
6
7
8
9
10
11
12
13
14
15
16
17
18
19
20
21
22
23
24
25
26
27
28
29
30
31
32
33
34
35
36
37
38
39
40
41
42
43
44
45
46
47
48
49
50
51
52
53
54
55
56
57
58
59
60
61
62
63
64
|
#import "ViewController.h"
#import "JFFriendGroup.h"
#import "JFFriendCell.h"
#import "JFFriend.h"
@interface
ViewController
(
)
@property
(
strong
,
nonatomic
)
NSArray
*friendGroups
;
@end
@implementation
ViewController
//隐藏状态栏
-
(
BOOL
)
prefersStatusBarHidden
{
return
YES
;
}
-
(
void
)
viewDidLoad
{
[
super
viewDidLoad
]
;
}
//懒加载
-
(
NSArray
*
)
friendGroups
{
if
(
_friendGroups
==
nil
)
{
_friendGroups
=
[
JFFriendGroup
friendGroups
]
;
}
return
_friendGroups
;
}
//一共多少组,每一个小组就是一组
-
(
NSInteger
)
numberOfSectionsInTableView
:
(
UITableView
*
)
tableView
{
return
self
.
friendGroups
.
count
;
}
//每组多少行
-
(
NSInteger
)
tableView
:
(
UITableView
*
)
tableView
numberOfRowsInSection
:
(
NSInteger
)
section
{
//获取组模型
JFFriendGroup
*friendGroup
=
self
.
friendGroups
[
section
]
;
return
friendGroup
.
friends
.
count
;
}
//创建Cell
-
(
UITableViewCell
*
)
tableView
:
(
UITableView
*
)
tableView
cellForRowAtIndexPath
:
(
NSIndexPath
*
)
indexPath
{
//获取组模型
JFFriendGroup
*friendGroup
=
self
.
friendGroups
[
indexPath
.
section
]
;
//获取单个好友模型
JFFriend
*myFriend
=
friendGroup
.
friends
[
indexPath
.
row
]
;
//创建cell
JFFriendCell
*cell
=
[
JFFriendCell
friendCellWithTableView
:tableView
]
;
//为Cell赋值
cell
.
myFriend
=
myFriend
;
return
cell
;
}
@end
|
完成后的效果为:

数据已经显示出来了,但是没有进行分组。如果我们使用系统自带的分组样式,是无法满足需求的。比如整个分组头部可以点击,并且带小图标,说明这整个分组头部是一个按钮,并且按钮上还有一个Label用来显示在线人数。
下面开始自定义ViewHeaderFooterView,创建一个类并继承自UITableViewHeaderFooterView类。headerView点击后会展开列表,也就是会刷新tableview,这个操作在headerView中是无法完成的(不能将控制器做参数传递)。所以我们通过代理来完成,让控制器成为headerView的代理对象,并实现对应的代理方法来完成这个需求。
JFHeaderView.h
|
1
2
3
4
5
6
7
8
9
10
11
12
13
14
15
16
17
18
19
20
|
#import <UIKit/UIKit.h>
@class
JFFriendGroup
;
@class
JFHeaderView
;
@protocol
JFHeaderViewDelegate
<NSObject>
-
(
void
)
headerViewButtonDidClick
:
(
JFHeaderView
*
)
headerView
;
@end
@interface
JFHeaderView
: UITableViewHeaderFooterView
//返回一个headerView
+
(
instancetype
)
headerViewWithTableView
:
(
UITableView
*
)
tableView
;
@property
(
strong
,
nonatomic
)
JFFriendGroup
*friendGroup
;
//headerView的代理属性
@property
(
weak
,
nonatomic
)
id
<JFHeaderViewDelegate>
delegate
;
@end
|
JFHeaderView.m
|
1
2
3
4
5
6
7
8
9
10
11
12
13
14
15
16
17
18
19
20
21
22
23
24
25
26
27
28
29
30
31
32
33
34
35
36
37
38
39
40
41
42
43
44
45
46
47
48
49
50
51
52
53
54
55
56
57
58
59
60
61
62
63
64
65
66
67
68
69
70
71
72
73
74
75
76
77
78
79
80
81
82
83
84
85
86
87
88
89
90
91
92
93
94
95
96
97
98
99
100
101
|
#import "JFHeaderView.h"
#import "JFFriendGroup.h"
@interface
JFHeaderView
(
)
@property
(
weak
,
nonatomic
)
UIButton
*btn
;
//headerView按钮
@property
(
weak
,
nonatomic
)
UILabel
*lbl
;
//在线人数
@end
@implementation
JFHeaderView
//返回一个headerView
+
(
instancetype
)
headerViewWithTableView
:
(
UITableView
*
)
tableView
{
static
NSString
*headerID
=
@"header"
;
JFHeaderView
*headerView
=
[
tableView
dequeueReusableHeaderFooterViewWithIdentifier
:headerID
]
;
if
(
headerView
==
nil
)
{
headerView
=
[
[
JFHeaderView
alloc
]
initWithReuseIdentifier
:headerID
]
;
}
return
headerView
;
}
//重写initWithReuseIdentifier:方法创建自定义headerView
-
(
instancetype
)
initWithReuseIdentifier
:
(
NSString
*
)
reuseIdentifier
{
if
(
self
=
[
super
initWithReuseIdentifier
:reuseIdentifier
]
)
{
UIButton
*btn
=
[
[
UIButton
alloc
]
init
]
;
[
btn
setBackgroundImage
:
[
UIImage
imageNamed
:
@"buddy_header_bg"
]
forState
:UIControlStateNormal
]
;
[
btn
setBackgroundImage
:
[
UIImage
imageNamed
:
@"buddy_header_bg_highlighted"
]
forState
:UIControlStateHighlighted
]
;
[
btn
setImage
:
[
UIImage
imageNamed
:
@"buddy_header_arrow"
]
forState
:UIControlStateNormal
]
;
btn
.
contentHorizontalAlignment
=
UIControlContentHorizontalAlignmentLeft
;
btn
.
contentEdgeInsets
=
UIEdgeInsetsMake
(
0
,
10
,
0
,
0
)
;
btn
.
titleEdgeInsets
=
UIEdgeInsetsMake
(
0
,
10
,
0
,
0
)
;
[
btn
setTitleColor
:
[
UIColor
blackColor
]
forState
:UIControlStateNormal
]
;
btn
.
imageView
.
contentMode
=
UIViewContentModeCenter
;
btn
.
imageView
.
clipsToBounds
=
NO
;
//添加到headerView
[
self
addSubview
:btn
]
;
self
.
btn
=
btn
;
[
self
.
btn
addTarget
:self
action
:
@selector
(
headerViewButtonDidClick
)
forControlEvents
:UIControlEventTouchUpInside
]
;
UILabel
*lbl
=
[
[
UILabel
alloc
]
init
]
;
//文本右对齐
lbl
.
textAlignment
=
NSTextAlignmentRight
;
[
self
addSubview
:lbl
]
;
self
.
lbl
=
lbl
;
}
return
self
;
}
//按钮单击事件
-
(
void
)
headerViewButtonDidClick
{
self
.
friendGroup
.
display
=
!
self
.
friendGroup
.
isDisplay
;
if
(
[
self
.
delegate
respondsToSelector
:
@selector
(
headerViewButtonDidClick
:
)
]
)
{
[
self
.
delegate
headerViewButtonDidClick
:self
]
;
}
}
//当一个新的headerView已经添加到某个父控件中的时候调用这个方法
-
(
void
)
didMoveToSuperview
{
if
(
self
.
friendGroup
.
isDisplay
)
{
self
.
btn
.
imageView
.
transform
=
CGAffineTransformMakeRotation
(
M_PI_2
)
;
}
else
{
self
.
btn
.
imageView
.
transform
=
CGAffineTransformMakeRotation
(
0
)
;
}
}
//重写set方法为headerView赋值
-
(
void
)
setFriendGroup
:
(
JFFriendGroup
*
)
friendGroup
{
_friendGroup
=
friendGroup
;
//设置组名
[
self
.
btn
setTitle
:friendGroup
.
name
forState
:UIControlStateNormal
]
;
//设置在线人数
self
.
lbl
.
text
=
[
NSString
stringWithFormat
:
@"%d / %lu"
,
friendGroup
.
online
,
friendGroup
.
friends
.
count
]
;
}
//当将这个控件真正添加到父控件的时候,会调用这个方法设置当前控件的所有子控件的frame
-
(
void
)
layoutSubviews
{
[
super
layoutSubviews
]
;
self
.
btn
.
frame
=
CGRectMake
(
0
,
0
,
self
.
frame
.
size
.
width
,
self
.
frame
.
size
.
height
)
;
self
.
lbl
.
frame
=
CGRectMake
(
300
,
0
,
60
,
44
)
;
}
@end
|
在控制器中遵守JFHeaderViewDelegate代理协议并实现代理方法,实现单组数据刷新。
ViewController.m
|
1
2
3
4
5
6
7
8
9
10
11
12
13
14
15
16
17
18
19
20
21
22
23
24
25
26
27
28
29
30
31
32
33
34
35
36
37
38
39
40
41
42
43
44
45
46
47
48
49
50
51
52
53
54
55
56
57
58
59
60
61
62
63
64
65
66
67
68
69
70
71
72
73
74
75
76
77
78
79
80
81
82
83
84
85
86
87
88
89
90
91
92
93
94
95
96
97
98
99
100
|
#import "ViewController.h"
#import "JFFriendGroup.h"
#import "JFFriendCell.h"
#import "JFFriend.h"
#import "JFHeaderView.h"
@interface
ViewController
(
)
<JFHeaderViewDelegate>
@property
(
strong
,
nonatomic
)
NSArray
*friendGroups
;
@end
@implementation
ViewController
//隐藏状态栏
-
(
BOOL
)
prefersStatusBarHidden
{
return
YES
;
}
-
(
void
)
viewDidLoad
{
[
super
viewDidLoad
]
;
//设置headerView的高度
self
.
tableView
.
sectionHeaderHeight
=
50
;
}
//懒加载
-
(
NSArray
*
)
friendGroups
{
if
(
_friendGroups
==
nil
)
{
_friendGroups
=
[
JFFriendGroup
friendGroups
]
;
}
return
_friendGroups
;
}
//一共多少组,每一个小组就是一组
-
(
NSInteger
)
numberOfSectionsInTableView
:
(
UITableView
*
)
tableView
{
return
self
.
friendGroups
.
count
;
}
//每组多少行
-
(
NSInteger
)
tableView
:
(
UITableView
*
)
tableView
numberOfRowsInSection
:
(
NSInteger
)
section
{
//获取组模型
JFFriendGroup
*friendGroup
=
self
.
friendGroups
[
section
]
;
//是否展开好友
if
(
friendGroup
.
isDisplay
)
{
return
friendGroup
.
friends
.
count
;
}
else
{
return
0
;
}
}
//创建Cell
-
(
UITableViewCell
*
)
tableView
:
(
UITableView
*
)
tableView
cellForRowAtIndexPath
:
(
NSIndexPath
*
)
indexPath
{
//获取组模型
JFFriendGroup
*friendGroup
=
self
.
friendGroups
[
indexPath
.
section
]
;
//获取单个好友模型
JFFriend
*myFriend
=
friendGroup
.
friends
[
indexPath
.
row
]
;
//创建cell
JFFriendCell
*cell
=
[
JFFriendCell
friendCellWithTableView
:tableView
]
;
//为Cell赋值
cell
.
myFriend
=
myFriend
;
return
cell
;
}
//创建headerView
-
(
UIView
*
)
tableView
:
(
UITableView
*
)
tableView
viewForHeaderInSection
:
(
NSInteger
)
section
{
JFFriendGroup
*friendGroup
=
self
.
friendGroups
[
section
]
;
JFHeaderView
*headerView
=
[
JFHeaderView
headerViewWithTableView
:tableView
]
;
//存储组
headerView
.
tag
=
section
;
//指定控制器为代理
headerView
.
delegate
=
self
;
headerView
.
friendGroup
=
friendGroup
;
return
headerView
;
}
//点击headerView按钮的时候触发
-
(
void
)
headerViewButtonDidClick
:
(
JFHeaderView
*
)
headerView
{
NSIndexSet
*indexSet
=
[
NSIndexSet
indexSetWithIndex
:headerView
.
tag
]
;
//刷新指定组
[
self
.
tableView
reloadSections
:indexSet
withRowAnimation
:UITableViewRowAnimationFade
]
;
}
|
关于重用:
UITableViewHeaderFooterView与UITableViewCell在滑动屏幕时都可以根据标志进行重用,而在不滑动而只进行reloadData等刷新数据操作时,两者有不同表现:UITableViewHeaderFooterView将不能根据标志重用(即系统不会将其放入缓冲区),会创建新的视图代替旧的。UITableViewCell能根据标志重用。所以在自定义UITableViewHeaderFooterView首尾视图时,要注意刷新数据时对视图的处理。


 1631
1631

 被折叠的 条评论
为什么被折叠?
被折叠的 条评论
为什么被折叠?
 到【灌水乐园】发言


