ActiveX is only supported by IE - the other browsers use a plugin architecture called NPAPI.
However, there's a cross-browser plugin framework called Firebreath that you might find useful.
http://stackoverflow.com/questions/7022568/activexobject-in-firefox-or-chrome-not-ie
但是chrome和firefox均宣布以后不再支持NPAPI,替代方案是Native Client:https://developer.chrome.com/native-client
项目地址:https://code.google.com/p/nativeclient/但是NACL目前还不支持IE。
在Windows下搭建NaCl开发平台
//
Firebreath解决方法:https://groups.google.com/forum/#!topic/firebreath-dev/QzKD_56U07A
I finally found a solution to make it working !
youtube视频:https://www.youtube.com/watch?v=am6wA7MSztc
Firebreath浏览器开发指南:http://itindex.net/detail/47019-firebreath-%E6%B5%8F%E8%A7%88%E5%99%A8-%E6%8F%92%E4%BB%B6
http://blog.csdn.net/z6482/article/details/7486921
Firebreath activex DEMO:https://github.com/firebreath/FBAXExample
How is an ActiveX wrapper created with FireBreath?
NPAPI开发详解,Windows版 http://mozilla.com.cn/thread-21666-1-1.html
本文通过多图组合,详细引导初学者开发NPAPI的浏览器插件。
如需测试开发完成的插件请参考http://mozilla.com.cn/kb/dev/A.88/
1. 准备工作
开发工具
本例使用的是visual studio 2008 英文版,下图是关于信息
Windows SDK
本例使用Windows7操作系统 这里下载SDK
NPAPISDK
本例使用的是Firefox4.0.1提供的SDK。
首先,从这里下载mozilla源码。然后,解压firefox-4.0.1.source.tar.bz2文件。
将 \firefox-4.0.1.source\mozilla-2.0\modules\plugin 目录解压缩出来,里面有我们开发NPAPI插件所需的所有资源。
为了方便大家使用,--这里--提供plugin.rar的下载。
本例将plugin目标解压到D:\code\下(后面统一使用绝对路径,以避免异意)
2. 创建Plugin
本着“有图有真相”的原则,下面将连续多图并配文字一步步创建、调试Plugin。图中画红圈的代表需要填写或者需要选择的地方。
创建项目
新建项目
Name项一定要以 np开头,为了将来适应不同操作系统,最好全小写,不要太长,尽量控制在8字符内。
本例定义为 npdemo
Location项定义到 plugin\sdk\samples以便项目属性中用相对路径引用NPAPI的SDK
本例定义为 d:\code\plugin\sdk\samples

向导
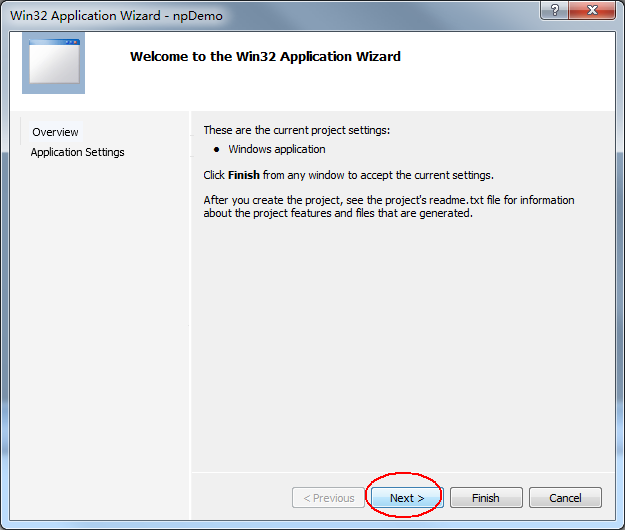
选择 Application type为 DLL
选择 Empty project

添加文件
首先,添加NPAPI SDK中的Common文件

一共3个文件

然后,添加def文件

命名最好与项目一致
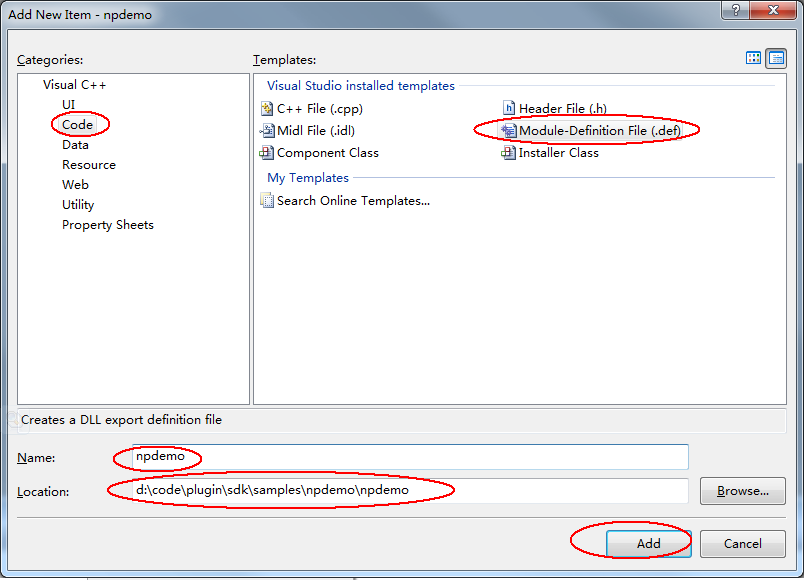
编辑npdemo.def为
- LIBRARY "npdemo"
- EXPORTS
- NP_GetEntryPoints @1
- NP_Initialize @2
- NP_Shutdown @3
现在,添加资源

选择 Version
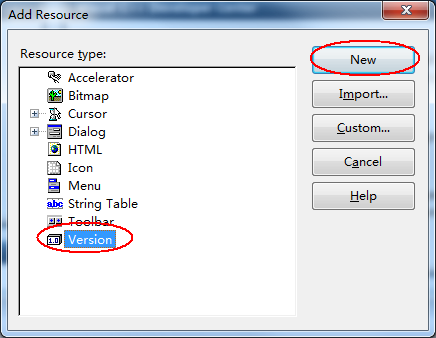
自动生成了 resource.h和 npdemo.rc。由于要在版本信息中加项,所以手工 npdemo.rc

选择“Y”

在图中的BLOCK中添加。注意! BLOCK 一定要是" 040904e4"这里顺便说一下,MIMEType是plugin的唯一标示,需要自己定义复制代码
- VALUE "MIMEType", "application/demo-plugin"
通常的格式是"application/“+ [plugin name]
本例中定义为"application/demo-plugin"

下图是rc文件数据项与plugin数据项(about:plugins 中)的对应关系
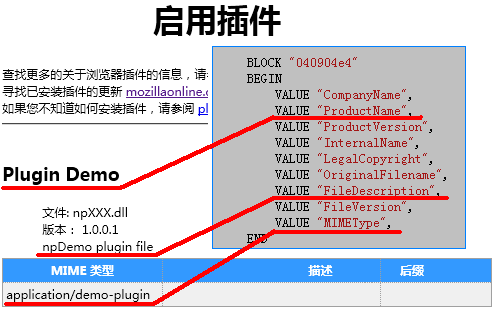
下面添加最关键的部分:Plugin实现类


类名可以随便起,本例命名为CPlugin
但是一定要继承自nsPluginInstanceBace

修改Plugin.h
- #pragma once
- #include "pluginbase.h"
- class CPlugin : public nsPluginInstanceBase
- {
- private:
- NPP m_pNPInstance;
- NPBool m_bInitialized;
- public:
- CPlugin(NPP pNPInstance);
- ~CPlugin();
- NPBool init(NPWindow* pNPWindow) { m_bInitialized = TRUE; return TRUE;}
- void shut() { m_bInitialized = FALSE; }
- NPBool isInitialized() { return m_bInitialized; }
- };
修改Plugin.cpp
其中实现了4个全局函数
- #include "plugin.h"
- // functions /
- NPError NS_PluginInitialize()
- {
- return NPERR_NO_ERROR;
- }
- void NS_PluginShutdown()
- {
- }
- nsPluginInstanceBase * NS_NewPluginInstance(nsPluginCreateData * aCreateDataStruct)
- {
- if(!aCreateDataStruct)
- return NULL;
- CPlugin * plugin = new CPlugin(aCreateDataStruct->instance);
- return plugin;
- }
- void NS_DestroyPluginInstance(nsPluginInstanceBase * aPlugin)
- {
- if(aPlugin)
- delete (CPlugin *)aPlugin;
- }
- // CPlugin /
- CPlugin::CPlugin(NPP pNPInstance) : nsPluginInstanceBase(),
- m_pNPInstance(pNPInstance),
- m_bInitialized(FALSE)
- {
- }
- CPlugin::~CPlugin()
- {
- }
打开项目属性
修改字符集设置为“ Use Multi-Byte Character Set”

添加搜索目录 “ ....\include”和“ ........\base\public”

添加预编译宏 X86

3、注册、测试
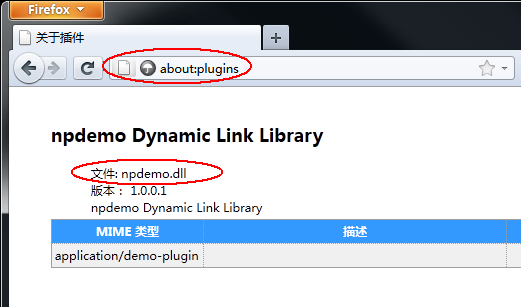
本例编译后,在D:\code\plugin\sdk\samples\npdemo\Debug生成npdemo.dll
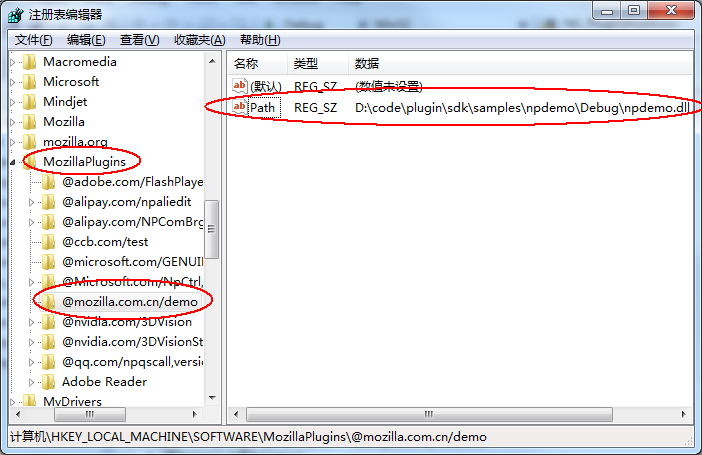
打开注册表,在 HKEY_CURRENT_USER\SOFTWARE\MozillaPlugins下新建子项 @mozilla.com.cn/demo
并新建字符串数据“ Path”设值为 D:\code\plugin\sdk\samples\npdemo\Debug\npdemo.dll
打开火狐浏览器 在地址栏输入“about:plugins” 如果在plugin列表中有本例的npdemo.dll及说明我们的plugin示例已经成功完成
简单的测试页面:
- <HTML>
- <HEAD>
- </HEAD>
- <BODY>
- <embed type="application/demo-plugin">
- </BODY>
- </HTML>
如果在实际部署中使用安装文件安装plugin,并用注册表的方式注册。那么就 不需要重启火狐 ,只要在页面中执行 navigator.plugins.refresh(false); 然后刷新页面即可使用刚安装的plugin


 2万+
2万+


 被折叠的 条评论
为什么被折叠?


