


关于UIButton的事件枚举有许多,平时用的少所以很多的都不是很清楚,今天了解了下,看了以前的代码,觉得在UIButton选中时操作写了许多冗余代码,而忽略了UIButton一个很重要的属性,如下:
- typedef NS_OPTIONS(NSUInteger, UIControlState) {
- UIControlStateNormal = 0,
- UIControlStateHighlighted = 1 << 0, // used when UIControl isHighlighted is set
- UIControlStateDisabled = 1 << 1,
- UIControlStateSelected = 1 << 2, // flag usable by app (see below)
- #ifndef SDK_HIDE_TIDE
- UIControlStateFocused NS_ENUM_AVAILABLE_IOS(9_0) = 1 << 3, // Applicable only when the screen supports focus
- #endif
- UIControlStateApplication = 0x00FF0000, // additional flags available for application use
- UIControlStateReserved = 0xFF000000 // flags reserved for internal framework use
- };
中的UIControlStateSelected表示是否选中,NO表示未选中,YES表示选中;
1.这是之前写的:
创建UIButton,通过for 循环去创建
- //顶部view的初始化
- - (void)initTopView{
- topView = [[UIView alloc] initWithFrame:CGRectMake(0, 0, kScreen_width, 40)];
- topFrame = topView.frame;
- topView.backgroundColor = [UIColor whiteColor];
- topView.alpha = .8;
- NSArray *titleArr = @[@"人气",@"价格",@"桌数",@"优惠"];
- for (int i = 0; i < titleArr.count; i ++) {
- UIButton *btn = [UIButton buttonWithType:UIButtonTypeCustom];
- [btn setTitle:titleArr[i] forState:UIControlStateNormal];
- [btn setImage:[UIImage imageNamed:@"ph"] forState:UIControlStateNormal];
- [btn setTitleColor:[UIColor grayColor] forState:UIControlStateNormal];
- [btn setBackgroundImage:[UIImage imageNamed:@"button1"] forState:UIControlStateNormal];
- btn.titleLabel.font = [UIFont systemFontOfSize:12];
- btn.showsTouchWhenHighlighted = YES;
- btn.frame = CGRectMake(10 + i * ((kScreen_width - 50)/4 + 10) , 10, (kScreen_width - 50)/4, 25);
- //设置tag值
- btn.tag = i + 100;
- [btn addTarget:self action:@selector(choose:) forControlEvents:UIControlEventTouchUpInside];
- [topView addSubview:btn];
- }
- [self.view addSubview:topView];
- }
添加响应事件:
- //人气、价格、作品数、优惠
- - (void)choose:(UIButton *)sender{
- for (int i = 0; i < 4; i++) {
- UIButton *btn = (UIButton *)[[sender superview]viewWithTag:100 + i];
- [btn setSelected:NO];
- if (!btn.selected) {
- [btn setImage:[UIImage imageNamed:@"ph"] forState:UIControlStateNormal];
- [btn setTitleColor:[UIColor grayColor] forState:UIControlStateNormal];
- [btn setBackgroundImage:[UIImage imageNamed:@"button1"] forState:UIControlStateNormal];
- }
- }
- UIButton *button = (UIButton *)sender;
- [button setSelected:YES];
- [button setImage:[UIImage imageNamed:@"pho"] forState:UIControlStateNormal];
- [button setTitleColor:[UIColor colorWithRed:170.0/255 green:107.0/255 blue:208.0/255 alpha:1] forState:UIControlStateNormal];
- [button setBackgroundImage:[UIImage imageNamed:@"button2"] forState:UIControlStateNormal];
- }
这种是最简单的,相对也是最繁琐的,多了很多不必要的冗余代码,下面就让我们看看改进的;
2.通过使用UIButton自己的一个selected属性和normal属性重构的,如下所示:
- -(void)initUIButtonView{
- _titleArr = @[@"人气",@"价格",@"桌数",@"优惠"];
- for (int i = 0; i < _titleArr.count; i ++) {
- UIButton *btn = [UIButton buttonWithType:UIButtonTypeCustom];
- btn.frame = CGRectMake(10 + i * ((kScreen_width - 50)/4 + 10) , 20, (kScreen_width - 50)/4, 25);
- [btn setTitle:_titleArr[i] forState:UIControlStateNormal];
- btn.titleLabel.font = [UIFont systemFontOfSize:12];
- btn.showsTouchWhenHighlighted = YES;
- //设置tag值
- btn.tag = i + 100;
- btn.selected = NO;
- [btn addTarget:self action:@selector(choose:) forControlEvents:UIControlEventTouchUpInside];
- [btn setTitleColor:[UIColor grayColor] forState:UIControlStateNormal];
- [btn setImage:[UIImage imageNamed:@"ph"] forState:UIControlStateNormal];
- [btn setBackgroundImage:[UIImage imageNamed:@"button1"] forState:UIControlStateNormal];
- [btn setTitleColor:[UIColor colorWithRed:170.0/255 green:107.0/255 blue:208.0/255 alpha:1] forState:UIControlStateSelected];
- [btn setImage:[UIImage imageNamed:@"pho"] forState:UIControlStateSelected];
- [btn setBackgroundImage:[UIImage imageNamed:@"button2"] forState:UIControlStateSelected];
- [self.view addSubview:btn];
- }
- }
在创建的时候就给定了正常时候UIButton的样式,和选中UIButton时的按钮颜色,注意这里设置了默认的selected = NO;和UIControlStateSelected
在给定按钮选择事件,设置对应selected的状态值,如下所示:
- //人气、价格、作品数、优惠
- - (void)choose:(UIButton *)sender{
- for (int i = 0; i < _titleArr.count; i++) {
- UIButton *btn = (UIButton *)[[sender superview]viewWithTag:100 + i];
- [btn setSelected:NO];
- }
- UIButton *button = (UIButton *)sender;
- [button setSelected:YES];
- }
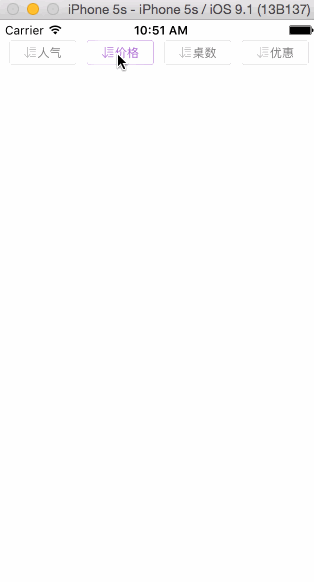
这样看上去,第二种方法,是不是比第一种方法更简单明了,去除了相关的冗余代码的,效果如下所示
注:改进,上面的我们可以在不同的按钮上面切换状态,但在同一个按钮上面点击多次状态不会改变,针对上述问题做了些许的改动,其实主要是在点击事件里面,判断当前按钮的状态去改变,代码如下:
- //人气、价格、作品数、优惠
- - (void)choose:(UIButton *)sender{
- for (int i = 0; i < _titleArr.count; i++) {
- UIButton *btn = (UIButton *)[[sender superview]viewWithTag:100 + i];
- //选中当前按钮时
- if (sender.tag == btn.tag) {
- sender.selected = !sender.selected;
- }else{
- [btn setSelected:NO];
- }
- }
- }
效果图如下所示:


 5418
5418

 被折叠的 条评论
为什么被折叠?
被折叠的 条评论
为什么被折叠?
 到【灌水乐园】发言


