最近两天在鼓捣Spring Cloud Bus消息总线的刷新机制问题,探索的路程总是坎坷的,一些坑是逃不掉的,总算将其大概了解和配置成功了一番,总体来说还是不错的,下面和大家分享一下吧。
Spring cloud bus通过轻量消息代理连接各个分布的节点,用在广播状态的变化(例如配置变化)或者其他的消息指令,本质是利用了MQ的广播机制在分布式的系统中传播消息,目前常用的有Kafka和RabbitMQ。下面说下使用bus后的两种架构,来看看两者之间的不同:
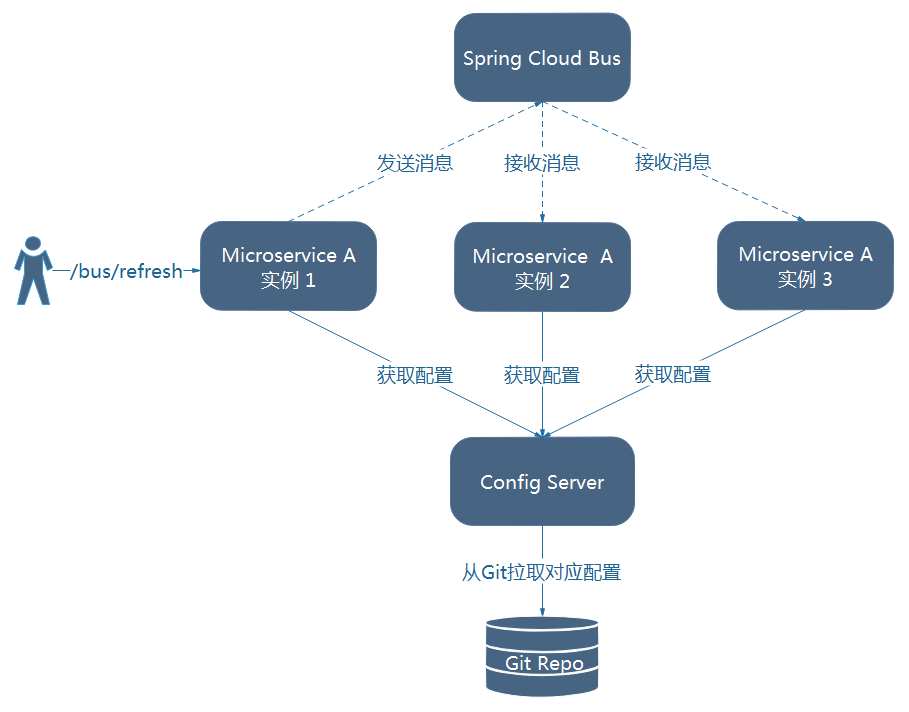
(1)利用消息总线触发一个客户端/bus/refresh,而刷新所有客户端的配置:
(2)使用Config Server的/bus/refresh端点,而刷新所有客户端的配置:
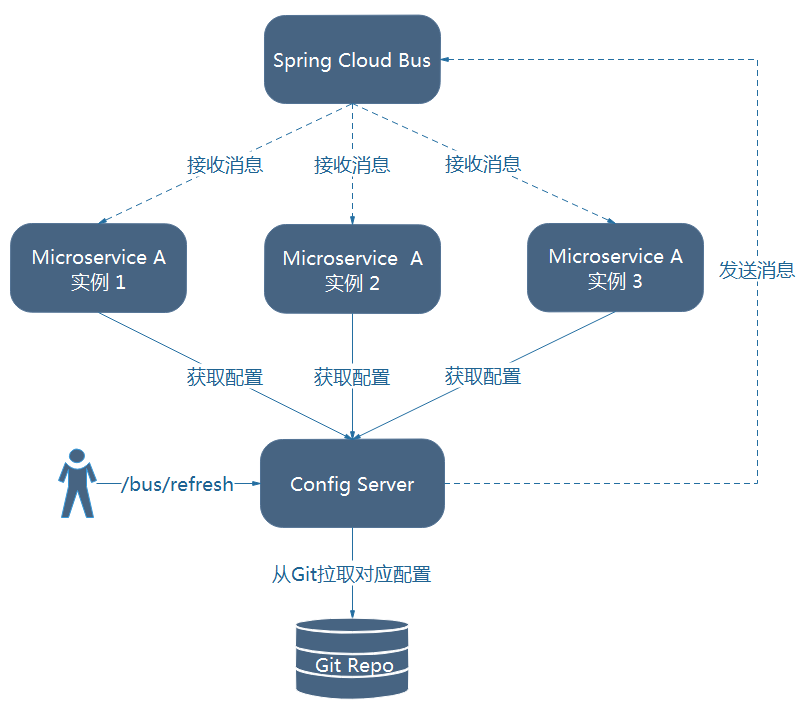
上面两张图都可以实现消息自动刷新的功能,但唯一的不同在于一个更利于操作、更加优雅。图二的架构显然更加适合,图一不适合的原因如下:
- 打破了微服务的职责单一性。微服务本身是业务模块,它本不应该承担配置刷新的职责。
- 破坏了微服务各节点的对等性。
- 有一定的局限性。例如,微服务在迁移时,它的网络地址常常会发生变化,此时如果想要做到自动刷新,那就不得不修改WebHook的配置。
所以下面我们按照图二的架构进行配置吧。
一、环境和工具准备
开发环境:Windows
开发工具:Eclipse_oxygen、Maven、Git(本地仓库和远程仓库)、rabbitMq
(1)rabbitMq下载安装
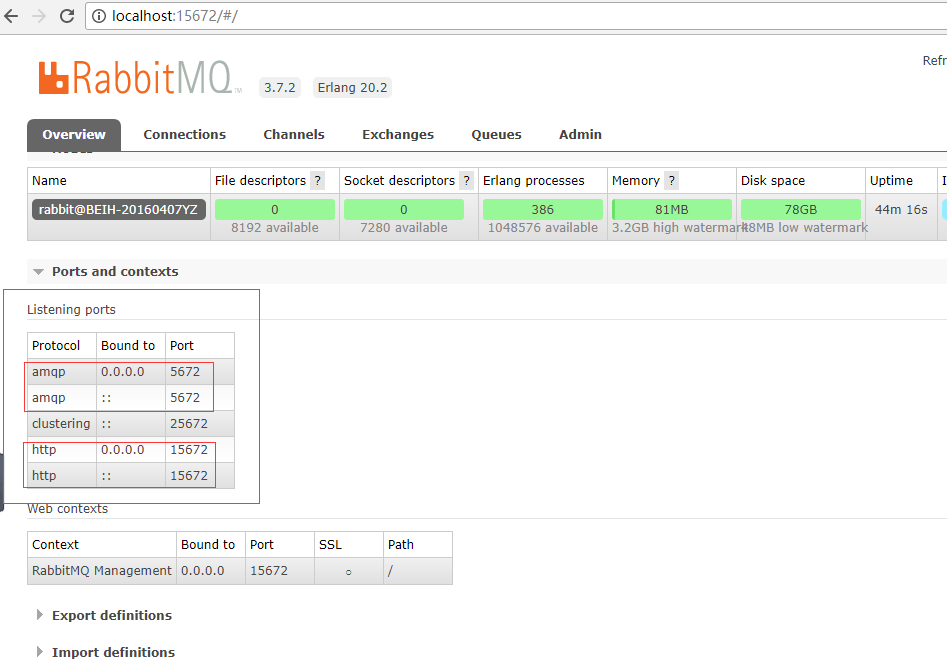
下载地址:http://www.rabbitmq.com/,这里需要注意的是:rabbitMq的http访问地址是http://localhost:15672/,注意端口是15672,安装成功后,可以使用默认用户登录:
username=guest
userpassword=guest
登录成功后可以看到里面有一项叫Listening ports,其中端口5672就是接下来配置文件中需要用到的,而不是15672,如下图所示:
(2)Git下载安装、本地仓库和远程仓库配置
各操作系统下载地址:https://git-scm.com/downloads
Windows下载地址:http://gitforwindows.org/
Git详细教程地址:http://blog.csdn.net/free_wind22/article/details/50967723
远程gitHub账号注册地址:https://github.com/
当然,在安装配置以上工具时,可能会出现一些小状况,不过问题不大,有问题可以提出来,大家一起看看解决。
二、服务搭建
(1) 这里我添加了服务注册,大家可以根据自己需要,服务EurekaServer的创建我就不多说,相信大家应该不陌生了,如果不清楚的可以参考:https://my.oschina.net/u/3747963/blog/1593462。
(2)config-server创建
具体创建过程可以参考:https://my.oschina.net/u/3747963/blog/1594729
<dependency>
	<groupId>org.springframework.cloud</groupId>
	<artifactId>spring-cloud-starter-eureka</artifactId>
</dependency>
<dependency>
	<groupId>org.springframework.boot</groupId>
	<artifactId>spring-boot-starter-actuator</artifactId>
</dependency>
<dependency>
	<groupId>org.springframework.cloud</groupId>
	<artifactId>spring-cloud-starter-bus-amqp</artifactId>
</dependency>这里spring-cloud-starter-bus-amqp是对消息总线的支持,spring-boot-starter-actuator是监控,spring-cloud-starter-eureka是服务注册(如果没有创建服务注册就不必添加)。
2、application.properties配置:
spring.application.name=config-server
server.port=8888
eureka.client.serviceUrl.defaultZone=http://localhost:8761/eureka/

#配置git仓库地址
spring.cloud.config.server.git.uri=https://github.com/CycoolRisk/testgit/
#配置仓库路径
#spring.cloud.config.server.git.searchPaths=respo
#配置仓库的分支
spring.cloud.config.label=master
#访问git仓库的用户名(公共仓库可不填)
#spring.cloud.config.server.git.username=
#访问git仓库的用户密码(公共仓库可不填)
#spring.cloud.config.server.git.password=

management.security.enabled=false
#RabbitMq的地址、端口,用户名、密码
spring.rabbitmq.host=localhost
spring.rabbitmq.port=5672
spring.rabbitmq.username=guest
spring.rabbitmq.password=guest配置中注意spring.rabbitmq.port=5672,https://github.com/CycoolRisk/testgit/是我创建的公共的远程仓库,可以放心使用,也可以自己新建。
(3)config-client创建
同config-server创建,具体创建过程可以参考:https://my.oschina.net/u/3747963/blog/1594729。
1、pom.xml添加依赖项:
<dependency>
	<groupId>org.springframework.boot</groupId>
	<artifactId>spring-boot-starter-web</artifactId>
</dependency>
<dependency>
    <groupId>org.springframework.cloud</groupId>
    <artifactId>spring-cloud-starter-eureka</artifactId>
</dependency>
<dependency>
    <groupId>org.springframework.cloud</groupId>
    <artifactId>spring-cloud-starter-bus-amqp</artifactId>
</dependency>
<dependency>
    <groupId>org.springframework.boot</groupId>
    <artifactId>spring-boot-starter-actuator</artifactId>
</dependency>同样加上必要的消息总线的支持依赖包,spring-cloud-starter-eureka是服务注册(如果没有创建服务注册就不必添加)。
2、application.properties配置:
spring.application.name=test-rabbitmq
server.port=8889

#配置服务中心网址
spring.cloud.config.uri=http://localhost:8888/
#dev开发环境配置文件,test测试环境,pro正式环境
spring.cloud.config.profile=dev
#远程仓库的分支
spring.cloud.config.label=master

#服务注册地址
eureka.client.serviceUrl.defaultZone=http://localhost:8761/eureka/
#是否从配置中心读取文件
spring.cloud.config.discovery.enable=true
#配置中心的servieId,即服务名
spring.cloud.config.discovery.serviceId=config-server

management.security.enabled=false
#RabbitMq的地址、端口,用户名、密码
spring.rabbitmq.host=localhost
spring.rabbitmq.port=5672
spring.rabbitmq.username=guest
spring.rabbitmq.password=guest
这里和上面的配置大同小异。
3、Application.java代码:
@SpringBootApplication
@RestController
@EnableDiscoveryClient
@RefreshScope
public class ConfigClientApplication{
   public static void main(String[] args){
      SpringApplication.run(ConfigClientApplication.class, args);
   }

   @Value("${foo}")
   String foo;
   @RequestMapping(value="/hi")
   public String hi() {
		return foo;
   }
}省略import。这里要注意@RefreshScope注解,千万不能忘了,不然后面的刷新会出现问题,使用该注解的类,会在接到SpringCloud配置中心配置刷新的时候,自动将新的配置更新到该类对应的字段中。类里的方法的写法是对配置信息的读取,可参考:https://my.oschina.net/u/3747963/blog/1594729。
4、运行Application:
依次运行config-server,config-client,如果有eureka-server服务注册的话先运行该项。运行成功后先访问 http://localhost:8888/test-rabbitmq/dev,读取配置信息,结果如下
{"name":"test-rabbitmq","profiles":["dev"],"label":null,"version":"6f41772ba693825d1f5db40bc8071aecf6f762f1",
"state":null,"propertySources":[{"name":"https://github.com/CycoolRisk/testgit/test-rabbitmq.properties",
"source":{"foo":"foo version 15"}}]}
接着访问 http://localhost:8889/hi,结果如下:
foo version 15(4)bus/refresh刷新
这里可以使用上面安装的Git工具,点击 Git Bash,在弹出的命令界面进入本地仓库中需要修改的配置信息目录,如下:
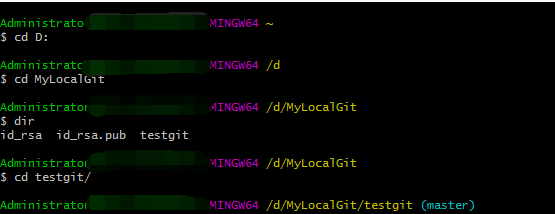
打开配置信息test-rabbitmq.properties,修改foo值为20,并提交到本地和同步到远程服务仓库,在修改完值后操作命令界面,即完成提交,如下:
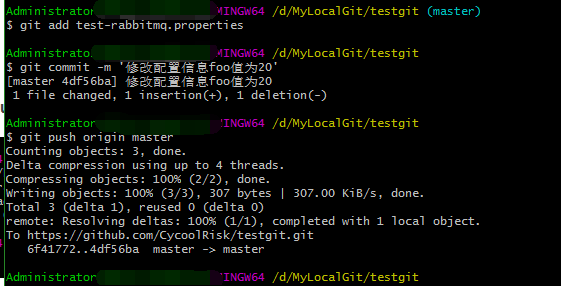
最后,发送post请求,执行命令 curl -X POST http://localhost:8888/bus/refresh,如下:

此时访问 http://localhost:8889/hi,可以看到值已经更新了:
foo version 20通过上面的操作,基本完成了消息自动刷新,当然可以多创建几个config-client,来查看是否全部更新,好了,以上是我的一些理解,希望大家喜欢。
源码下载地址:https://github.com/CycoolRisk/testgit


 509
509

 被折叠的 条评论
为什么被折叠?


