


运维开发笔记整理-基于类的视图(CBV)
作者:尹正杰
版权声明:原创作品,谢绝转载!否则将追究法律责任。
一.FBV与CBV
1>.什么是FBV
FBC(function base views)就是在视图里使用函数处理请求。在之前django的学习中,我们一直使用的是这种方式,所以不在赘述。
2>.什么是CBV
CBV(class base views)就是在视图里使用类处理请求。
Python是一个面向对象的编程语言,如果只用函数来开发,有很多面向对象的有限就错失了(比如封装,继承和多态)。所以Django在后来加入来Class-Based-View。可以让我们用类写Vie。这样做的有点主要有下面两种:
第一:提高类代码的复用性,可以使用面向对象的技术,比如多继承。
第二:可以用不同的函数针对不同的HTTP方法处理,而不是通过很多if判断,提高代码的可读性。
二.使用class-based views
1>.编写login.html登录页面
<html lang="en" style="visibility: visible; display: block;">
<head>
    <meta charset="utf-8">
    <title>登录 - 北京硬核聚视科技有限公司运维平台</title>
    <meta name="viewport" content="width=device-width, initial-scale=1.0">
    <link rel="shortcut icon" type="image/png" href="/static/cms/img/logo/影视大全@25x25px.png">
    <link type="text/css" rel="stylesheet" property="stylesheet" href="/static/cms/css/bootstrap3.css">
</head>
<body class="Fill">
<nav class="navbar navbar-default">
    <div class="navbar-inner">
        <div class="navbar-header">
            <a class="navbar-brand brand" data-event-category="Top Nav Menu" data-event="Product Logo"
               href="https://www.cnblogs.com/yinzhengjie/" title="北京硬核聚视科技有限公司: 主页"><img
                    src="/static/cms/img/logo/AGGRX.png"></a>
            <span class="hidden productName">北京硬核聚视科技有限公司</span>
        </div>

        <!-- Be sure to leave the brand out there if you want it shown -->
        <ul class="nav navbar-nav pull-right">
            <li role="presentation">
                <a>加入我们</a></li>
            <li role="presentation">
                <a>帮助</a></li>
        </ul>

    </div>
</nav>


<div class="" id="main-page-content">
    <!--[if lte IE 8]>
<style scoped="scoped">
.WarningOldIE{
    margin: 10px;
    background: #ecc;
    color: #611;
    border: 2px solid;
    padding: 10px;
    font-family: sans-serif;
    font-size: 14px;
}
</style>

<div class="WarningOldIE">
    <p>您使用的浏览器不受支持。</p>
    <p>北京硬核聚视科技有限公司 在 <a href="http://www.google.com/chrome/">Google Chrome</a>、<a href="http://www.apple.com/safari/">Apple Safari</a>、<a href="http://getfirefox.com/">Mozilla Firefox</a> 或 <a href="http://www.microsoft.com/windows/internet-explorer/">Microsoft Internet Explorer 9 及更高版本中可获得最佳体验。</a></p>
</div>
<![endif]-->
    <style>
        html {
            display: none;
            visibility: hidden;
        }
    </style>

    <link type="text/css" rel="stylesheet" property="stylesheet" href="/static/cms/css/LoginForm.css?v=5.15.1">

    <div class="LoginContainer">
        <h1 class="hidden">登录</h1>
        <!--[if lte IE 8]>
<style scoped="scoped">
.cui-login-form {
  display: none;
}
.license-message {
  display: none;
}
</style>
<![endif]-->
        <form class="cui-login-form" action="#" method="POST" >
            <div class="session-expired hidden">
                <h1>由于不活动而自动注销</h1>
                <p class="bold">您现在已注销帐户。</p>
                <p>您大约有 30 分钟 没有任何活动,为了您的安全,北京硬核聚视科技有限公司 自动注销了您的帐户。请在下面重新登录以继续操作。
                </p></div>

            <div class="control-group ">
                <input type="text" placeholder="用户名"  name="yzj_username">
                <input type="password" placeholder="密码"  name="yzj_password">
                <input type="hidden"  name="returnUrl" value="">
                <div title="选中此复选框将使您在两周内或明确注销之前保持登录状态。" class="checkbox"><label><input type="checkbox"
                                                                                        name="_spring_security_remember_me">保留我的信息</label>
                </div>
                <button type="submit" class="btn btn-primary" name="submit">登录</button>
            </div>
        </form><!-- .cui-login-form -->
    </div><!-- LoginContainer -->
</div>

</body>
</html>
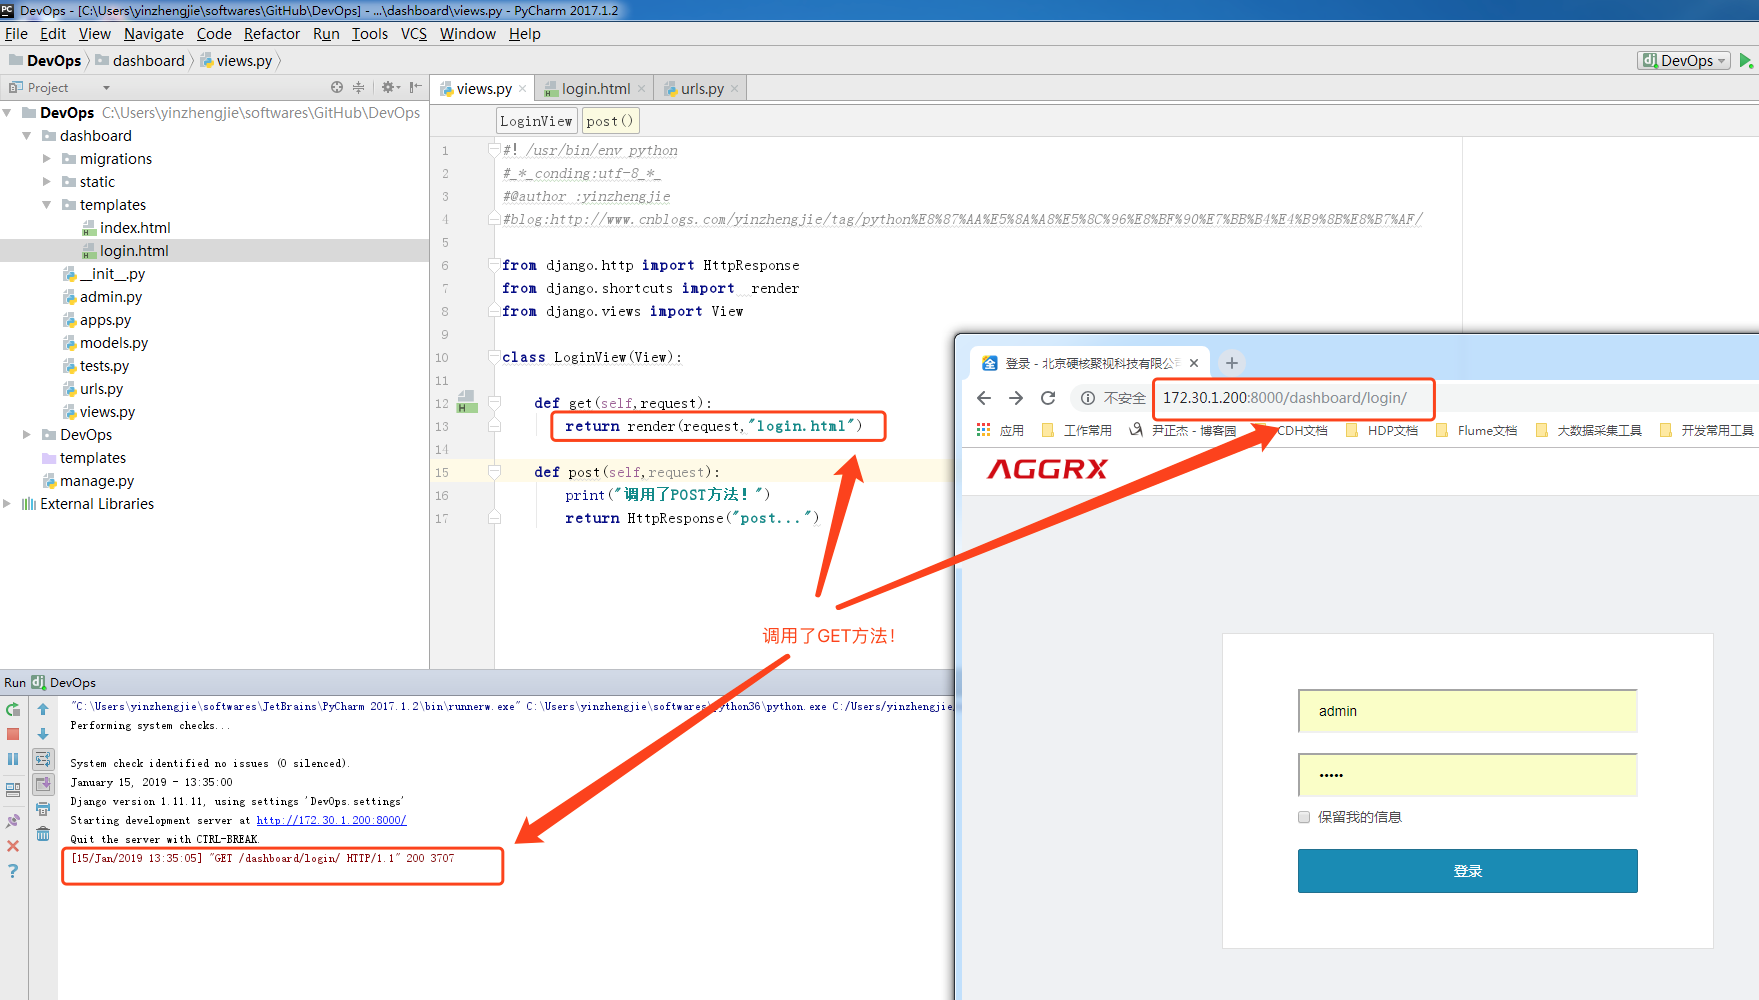
2>.编写视图函数
#!/usr/bin/env python
#_*_conding:utf-8_*_
#@author :yinzhengjie
#blog:http://www.cnblogs.com/yinzhengjie/tag/python%E8%87%AA%E5%8A%A8%E5%8C%96%E8%BF%90%E7%BB%B4%E4%B9%8B%E8%B7%AF/

from django.http import HttpResponse
from django.shortcuts import  render
from django.views import View

class LoginView(View):

    def get(self,request):
        return render(request,"login.html")

    def post(self,request):
        print("调用了POST方法!")
        return HttpResponse("post...")
3>.编写url函数
#!/usr/bin/env python
#_*_conding:utf-8_*_
#@author :yinzhengjie
#blog:http://www.cnblogs.com/yinzhengjie/tag/python%E8%87%AA%E5%8A%A8%E5%8C%96%E8%BF%90%E7%BB%B4%E4%B9%8B%E8%B7%AF/

from django.conf.urls import url
from . import  views

urlpatterns = [
    url(r"^login/",views.LoginView.as_view()),
]
Django的url是将一个请求分配给可调用的函数的,而不是一个class。针对这个问题,class-based view提供了一个as_view()静态方法(也就是类方法),调用这个方法,会创建一个类的实例,然后通过实例调用dispatch()方法,dispatch()方法会根据request的method的不同调用相应的方法来处理request(如get() , post()等)。到这里,这些方法和function-based view差不多了,要接收request,得到一个response返回。如果方法没有定义,会抛出HttpResponseNotAllowed异常。
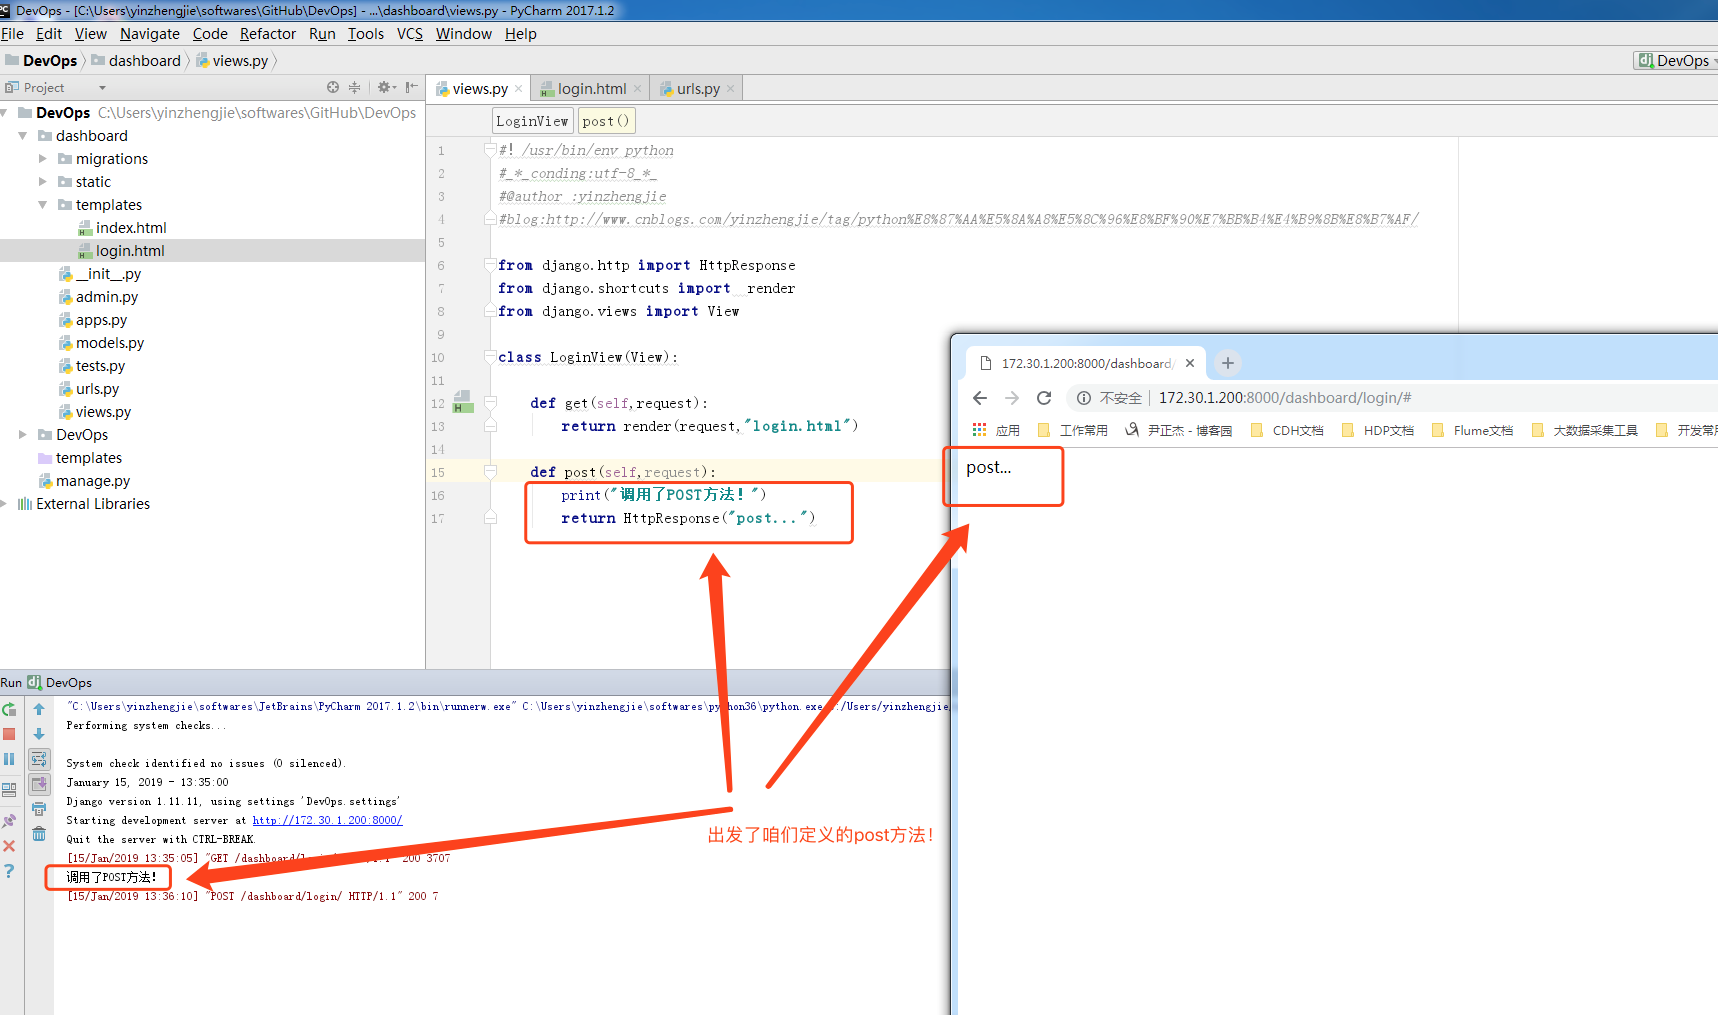
我们随意输入一些字符串,会发送post请求,如下:
三.View源码分析
基于类的视图:
视图是一个可调用的对象,它接收一个请求然后返回一个响应,这个可调用对象可以不只 是函数,Django提供一些可以用作视图的类。
基于类的视图使用Python 对象实现视图,它提供除函数视图之外的另外一种方式。
class View(object):
    """
    Intentionally simple parent class for all views. Only implements
    dispatch-by-method and simple sanity checking.
    """

    http_method_names = ['get', 'post', 'put', 'patch', 'delete', 'head', 'options', 'trace']

    def __init__(self, **kwargs):
        """
        Constructor. Called in the URLconf; can contain helpful extra
        keyword arguments, and other things.
        """
        # Go through keyword arguments, and either save their values to our
        # instance, or raise an error.
        for key, value in six.iteritems(kwargs):
            setattr(self, key, value)

    @classonlymethod
    def as_view(cls, **initkwargs):
        """
        Main entry point for a request-response process.
        """
        for key in initkwargs:
            if key in cls.http_method_names:
                raise TypeError("You tried to pass in the %s method name as a "
                                "keyword argument to %s(). Don't do that."
                                % (key, cls.__name__))
            if not hasattr(cls, key):
                raise TypeError("%s() received an invalid keyword %r. as_view "
                                "only accepts arguments that are already "
                                "attributes of the class." % (cls.__name__, key))

        def view(request, *args, **kwargs):
            self = cls(**initkwargs)
            if hasattr(self, 'get') and not hasattr(self, 'head'):
                self.head = self.get
            self.request = request
            self.args = args
            self.kwargs = kwargs
            return self.dispatch(request, *args, **kwargs)
        view.view_class = cls
        view.view_initkwargs = initkwargs

        # take name and docstring from class
        update_wrapper(view, cls, updated=())

        # and possible attributes set by decorators
        # like csrf_exempt from dispatch
        update_wrapper(view, cls.dispatch, assigned=())
        return view

    def dispatch(self, request, *args, **kwargs):
        # Try to dispatch to the right method; if a method doesn't exist,
        # defer to the error handler. Also defer to the error handler if the
        # request method isn't on the approved list.
        if request.method.lower() in self.http_method_names:
            handler = getattr(self, request.method.lower(), self.http_method_not_allowed)
        else:
            handler = self.http_method_not_allowed
        return handler(request, *args, **kwargs)

    def http_method_not_allowed(self, request, *args, **kwargs):
        logger.warning(
            'Method Not Allowed (%s): %s', request.method, request.path,
            extra={'status_code': 405, 'request': request}
        )
        return http.HttpResponseNotAllowed(self._allowed_methods())

    def options(self, request, *args, **kwargs):
        """
        Handles responding to requests for the OPTIONS HTTP verb.
        """
        response = http.HttpResponse()
        response['Allow'] = ', '.join(self._allowed_methods())
        response['Content-Length'] = '0'
        return response

    def _allowed_methods(self):
        return [m.upper() for m in self.http_method_names if hasattr(self, m)]

四.使用Mixin
下图引用自:https://www.cnblogs.com/yuanchenqi/articles/8715364.html。
我觉得要理解django的class-based-view(以下简称cbv),首先要明白django引入cbv的目的是什么。在django1.3之前,generic view也就是所谓的通用视图,使用的是function-based-view(fbv),亦即基于函数的视图。有人认为fbv比cbv更pythonic,窃以为不然。python的一大重要的特性就是面向对象。而cbv更能体现python的面向对象。cbv是通过class的方式来实现视图方法的。class相对于function,更能利用多态的特定,因此更容易从宏观层面上将项目内的比较通用的功能抽象出来。关于多态,不多解释,有兴趣的同学自己Google。总之可以理解为一个东西具有多种形态(的特性)。cbv的实现原理通过看django的源码就很容易明白,大体就是由url路由到这个cbv之后,通过cbv内部的dispatch方法进行分发,将get请求分发给cbv.get方法处理,将post请求分发给cbv.post方法处理,其他方法类似。怎么利用多态呢?cbv里引入了mixin的概念。Mixin就是写好了的一些基础类,然后通过不同的Mixin组合成为最终想要的类。

所以,理解cbv的基础是,理解Mixin。Django中使用Mixin来重用代码,一个View Class可以继承多个Mixin,但是只能继承一个View(包括View的子类),推荐把View写在最右边,多个Mixin写在左边。
五.类视图登陆验证
from django.contrib.auth.decorators import login_required
from django.utils.decorators import method_decorator


class FooView(View):
  @method_decorator(login_required)
  def get(request, *args, **kwargs):
    return HttpResponse("hello world")


 822
822


 被折叠的 条评论
为什么被折叠?
被折叠的 条评论
为什么被折叠?
 到【灌水乐园】发言


