


NFS介绍
• NFS是Network File System的缩写
• NFS(Network File System)即网络文件系统,是FreeBSD支持的文件系统中的一种,它允许网络中的计算机之间通过TCP/IP网络共享资源。在NFS的应用中,本地NFS的客户端应用可以透明地读写位于远端NFS服务器上的文件,就像访问本地文件一样。
• NFS最早由Sun公司开发,分2,3,4三个版本,2和3由Sun起草开发,4.0开始Netapp公司参与并主导开发,最新为4.1版本
• NFS数据传输基于RPC协议,RPC为Remote Procedure Call的简写。
• NFS应用场景是:A,B,C三台机器上需要保证被访问到的文件是一样的,A共享数据出来,B和C分别去挂载A共享的数据目录,从而B和C访问到的数据和A上的一致
• 它最大的功能就是可以透过网络,让不同的机器、不同的操作系统、可以彼此分享个别的档案 (share files)。所以,你也可以简单的将他看做是一个文件服务器 (file server) 呢!这个 NFS 服务器可以让你的 PC 来将网络远程的 NFS 服务器分享的目录,挂载到本地端的机器当中, 在本地端的机器看起来,那个远程主机的目录就好像是自己的一个磁盘分区槽一样 (partition)!使用上面相当的便利!
• NFS 文件系统维护指令:/usr/sbin/exportfs
这个是维护 NFS 分享资源的指令,我们可以利用这个指令重新分享 /etc/exports 变更的目录资源、将 NFS Server 分享的目录卸除或重新分享等等,这个指令是 NFS 系统里面相当重要的一个喔!至于指令的用法我们在底下会介绍。
• 分享资源的登录档:/var/lib/nfs/*tab
在 NFS 服务器的登录文件都放置到 /var/lib/nfs/ 目录里面,在该目录下有两个比较重要的登录档, 一个是 etab ,主要记录了 NFS 所分享出来的目录的完整权限设定值;另一个 xtab 则记录曾经链接到此 NFS 服务器的相关客户端数据。
• 要配置NFS 服务器,在服务器端主要配置 /etc/exports 文件。
• nfs 协议用于实现Unix (/linux)主机之间的文件系统共享。
- 客户端查询服务器分享资源的指令:/usr/sbin/showmount
这是另一个重要的 NFS 指令。exportfs 是用在 NFS Server 端,而 showmount 则主要用在 Client 端。这个 showmount 可以用来察看 NFS 分享出来的目录资源喔!
当客户端有 NFS 档案存取需求时,他会如何向服务器端要求数据呢?
- 客户端会向服务器端的 RPC (port 111) 发出 NFS 档案存取功能的询问要求;
- 服务器端找到对应的已注册的 NFS daemon 埠口后,会回报给客户端;
- 客户端了解正确的埠口后,就可以直接与 NFS daemon 来联机。
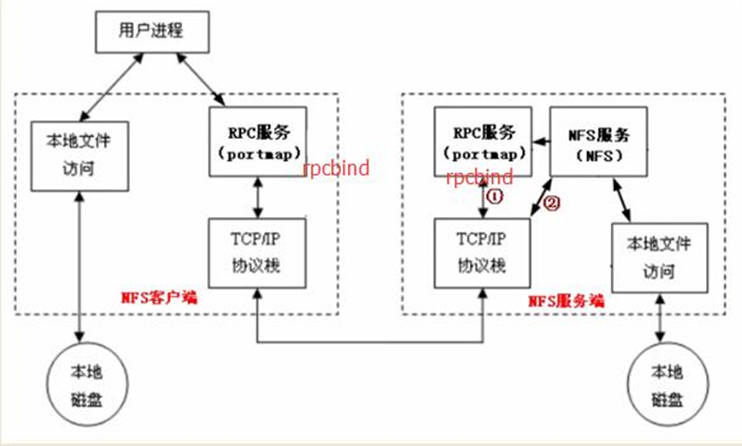
NFS工作原理:
客户端NFS和服务端NFS通讯过程:
1.首先服务器端启动RPC服务,并开启111端口
2.启动NFS服务,并向RPC注册端口信息
3.客户端启动RPC(portmap服务),向服务端的RPC(portmap)服务请求服务端的NFS端口
4.服务端的RPC(portmap)服务反馈NFS端口信息给客户端。
5.客户端通过获取的NFS端口来建立和服务端的NFS连接并进行数据的传输。
简图:

当客户端有 NFS 档案存取需求时,他会如何向服务器端要求数据呢?
- 客户端会向服务器端的 RPC (port 111) 发出 NFS 档案存取功能的询问要求;
- 服务器端找到对应的已注册的 NFS daemon 埠口后,会回报给客户端;
- 客户端了解正确的埠口后,就可以直接与 NFS daemon 来联机。
NFS 的各项功能都必须要向 RPC 来注册,NFS 在服务器所监听的 IP 等等,而客户端才能够透过 RPC 的询问找到正确对应的埠口, 也就是说,NFS 必须要有 RPC 存在时才能成功的提供服务,因此我们称 NFS 为 RPC server 的一种。
NFS
主要配置文件:/etc/exports
分享资源的登录档:/var/lib/nfs/*tab
NFS 文件系统维护指令:/usr/sbin/exportfs
端查询服务器分享资源的指令:/usr/sbin/showmount,exportfs 是用在 NFS Server 端,而 showmount 则主要用在 Client 端。这个 showmount 可以用来察看 NFS 分享出来的目录资源
NFS架构

NFS原理图
组成
NFS体系至少有两个主要部分:
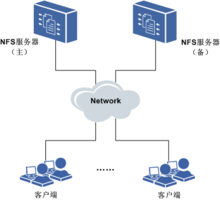
一台NFS服务器和若干台客户机,如右图所示。
客户机通过TCP/IP网络远程访问存放在NFS服务器上的数据。
在NFS服务器正式启用前,需要根据实际环境和需求,配置一些NFS参数。
配置
NFS的配置过程相对简单。这个过程只需要对/etc/rc.conf文件作一些简单修改。
1 在NFS服务器这端,确认/etc/rc.conf 文件里头以下开关都配上了:
rpcbind_enable="YES"
nfs_server_enable="YES"
mountd_flags="-r"
只要NFS服务被置为enable,mountd 就能自动运行。
2 在客户端一侧,确认下面这个开关出现在 /etc/rc.conf里头:
nfs_client_enable="YES"
/etc/exports文件指定了哪个文件系统 NFS应该输出(有时被称为“共享”)。 /etc/exports里面每行指定一个输出的文件系统和哪些机器可以访问该文件系统。在指定机器访问权限的同时,访问选项开关也可以被指定。
NFS(简化版)部署:
1.查看系统信息

2.NFS安装需要两个安装包:
(1)nfs-utils: NFS的主程序,包含rpc.nfsd rpc.mount两个deamons
(2)rpcbind:是一个管理RPC连接的程序,类似的管理工具为portmap。
3.查看系统中是否安装了NFS软件包:
# - i是忽略大小写

4.yum安装nfs、rpcbind软件包

启动rpcbind:

用netstat–lnt来查看系统中启用的端口:

提示:如果portmap服务没有启动,我们通过rpcinfo –p(rpc informationRPC信息)Localhost检查时,会报错。

NFS启动命令:

配置NFS开机启动:

5.配置NFS服务
#/etc/exports 默认这个里面的内容是空的,这个是nfs的配置文件。
格式:<NFS共享目录> [ 客户端1选项] [ 客户端2 选项]
配置实例:
(1)/tmp/share 10.0.0.0/24(rw,sync)
(2)/home/sharedir 10.0.0.0/24(rw,sync,all_squash,anonuid=2000,anongid=2000)
注意:修改完配置之后要重新reload一下。/etc/init.d/nfs reload
nfs配置好之后,我们可以通过cat /var/lib/nfs/etab来查看,nfs配置的参数。/var/lib/nfs/rmtab从这个文件中我们可以看到,有哪些客户端挂载了nfs共享目录。这个两个文件是比较重要的。
6.客户端挂载
查看服务器端的共享信息:-e或--exports显示NFS服务器的输出清单

在客户端挂载服务器共享出来的目录:
mount -t type device dir
-t, --types vfstype 指定要挂载的文件系统类型

挂载目录卸载:

重新启动客户端之后,我们要重新去挂载nfs用以下方式来实现:
把mount–t nfs 10.10.10.163:/sharedir /home/sharedir这条命令写到/etc/rc.local中,让它开机就执行。
NFS服务端安装配置
要准备两台机器,一台服务端01,一台客户端02。
• yum install -y nfs-utils rpcbind
• vim /etc/exports //加入如下内容
/home/nfstestdir 192.168.133.0/24(rw,sync,all_squash,anonuid=1000,anongid=1000)
NFS选项 功能描述 NFS选项 功能描述
ro 只读共享 rw 可读可写共享
sync 同步写操作 async 异步写操作
wdelay 延迟写操作 root_squash 屏蔽远程root权限
no_root_squash不屏蔽远程root权限all_squash 屏蔽所有的远程用户权限
• 保存配置文件后,执行如下准备操作
systemctl stop firewalld #关闭防护墙
• mkdir /home/nfstestdir #创建共享目录/home/nfstestdir
• chmod 777 /home/nfstestdir
• systemctl start rpcbind #启动rpcbind服务
• systemctl start nfs
• systemctl enable rpcbind #重启服务
• systemctl enable nfs
• exportfs -r #配置生效
• rpcinfo -p localhost #查看 RPC 服务的注册状况
•showmount -e localhost 在 server 端先自我测试一下是否可以联机
•
•
•
实例:
查看系统有没有安装NFS
[root@localhost  ]# rpm -qa | grep  rpcbind
[root@localhost ]# rpm -qa | grep nfs
在服务端01上安装,
[root@localhost-01 ~ ]# yum install -y nfs-utils rpcbind
在客户端02上也安装,
[root@localhost-02 ~ ]# yum install -y nfs-utils rpcbind
安装软件包,完成之后,编辑/etc/exports 。里面的IP地址是要指定共享这个目录的机器。
[root@localhost-01 ]# vi /etc/exports
/home/nfstestdir 192.168.133.0/24(rw,sync,all_squash,anonuid=1000,anongid=1000)
启动NFS服务,
[root@localhost-01 ~ ]# mkdir /home/nfstestdir
[root@localhost-01 ~ ]# chmod 777 /home/nfstestdir
[root@localhost-01 ~ ]# netstat -lnpt #查看rpcbind有没有启动
[root@localhost-02 ~ ]# netstat -lnpt #查看rpcbind有没有启动
[root@localhost-02 ~ ]# ps aux |grep rpc #在查看一下rpcbind有没有启动
[root@localhost-01 ~ ]# systemctl stop firewalld #关闭防护墙
[root@localhost-02 ~ ]# systemctl stop firewalld #关闭防护墙
[root@localhost-01 ~ ]# getenforce #查看防护墙状态
[root@localhost-01 ~ ]# setenforce 0 #暂时关闭防护墙
[root@localhost-02 ~ ]# setenforce 0 #暂时关闭防护墙
[root@localhost-01 ~ ]# mkdir /home/nfstestdir
[root@localhost-01 ]# systemctl start nfs #启动nfs 服务
[root@localhost-01 ]# ps aux |grep nfs #有没有启动nfs
[root@localhost-01 ]# systemctl start rpcbind #启动rpcbind 服务
[root@localhost-01 ]# ps aux |grep rpcbind #有没有启动rpcbind
[root@localhost-01 ]# systemctl enable rpcbind
[root@localhost-01 ]# systemctl enable nfs
[root@localhost-01 ]# cat /etc/exports
/home/nfstestdir 192.168.133.0/24(rw,sync,all_squash,anonuid=1000,anongid=1000)
NFS配置选项
• rw 读写
• ro 只读
• sync 同步模式,内存数据实时写入磁盘
• async 非同步模式
• no_root_squash 客户端挂载NFS共享目录后,root用户不受约束,权限很大
• root_squash 与上面选项相对,客户端上的root用户收到约束,被限定成某个普通用户
• all_squash 客户端上所有用户在使用NFS共享目录时都被限定为一个普通用户
• anonuid/anongid 和上面几个选项搭配使用,定义被限定用户的uid和gid
客户端挂载
• yum install -y nfs-utils
• showmount -e 192.168.133.130 //该ip为NFS服务端ip #这个IP地址是服务端01的
• mount -t nfs 192.168.133.130:/home/nfstestdir /mnt
• df -h
• touch /mnt/aminglinux.txt
• ls -l /mnt/aminglinux.txt //可以看到文件的属主和属组都为1000
exportfs命令
• 常用选项
• -a 全部挂载或者全部卸载
• -r 重新挂载
• -u 卸载某一个目录
• -v 显示共享目录
• 以下操作在服务端上
•vim /etc/exports //增加
/tmp/ 192.168.133.0/24(rw,sync,no_root_squash)
• exportfs -arv //不用重启nfs服务,配置文件就会生效
• 以下操作在客户端
• mkdir /aminglinux
• mount -t nfs -onolock 192.168.133.130:/tmp /aminglinux
• touch /aminglinux/test.txt
• ls -l !$
• -oremount,nfsvers=3
实例:
[root@localhost-02 ~ ]# showmount -e 192.168.133.130
Export list for 192.168.133.130 :
/home/nfstestdir 192.168.133.0/24 #共享的目录/home/nfstestdir,共享给的机器192.168.133.0/24
[root@localhost-02 ~ ]# mount -t nfs 192.168.133.130:/home/nfstestdir /mnt
[root@localhost-02 ~ ]# df -h #查看最后一行是挂载的共享目录和IP地址 /home/nfstestdir 192.168.133.0/24
[root@localhost-02 ~ ]# cd /mnt/
[root@localhost-02 ~ ]# touch wang.lll
[root@localhost-02 ~ ]#ls -l
[root@localhost-01 ~ ]#ls -l /home/nfstestdir/ #查看有没有更新
[root@localhost-01 ~ ]# mkdir /aminglinux
[root@localhost-01 ~ ]# mount -t nfs -onolock 192.168.133.130:/tmp /aminglinux
[root@localhost-01 ~ ]# touch /aminglinux/test.txt
[root@localhost-01 ~ ]# ls -l !$
重启NFS服务:B,C上挂载的目录先卸载下来,
![]()
[root@localhost-02 ~ ]# cd /mnt
[root@localhost-02 mnt ]# id mysql
uid=1000(mysql)  gid=1000(mysql)  组=1000(mysql)
[root@localhost-02 mnt ]# umount /mnt
[root@localhost-02 ~ ]# cd
[root@localhost-02 ~ ]# umount /mnt
[root@localhost-02 ~ ]# cd
[root@localhost-01 ~ ]# exportfs -arv #让配置文件重新生效
exporting 192.168.133.130:/home/nfstestdir
[root@localhost-01 ~ ]# vim /etc/exports #验证一下
/home/nfstestdir 192.168.133.0/24(rw,sync,all_squash,anonuid=1000,anongid=1000)
/tmp 192.168.133.132(rw,sync,no_root_squash)
[root@localhost-01 ~ ]# exportfs -arv #再执行一次
[root@localhost-02 ~ ]# !shown #查看设置的是否生效
[root@localhost-02 ~ ]# mount -t nfs 192.168.133.132:/tmp/ /mnt/
[root@localhost-02 ~ ]# df -h
[root@localhost-01 ~ ]# ls /tmp/
[root@localhost-02 ~ ]# ls /tmp/
[root@localhost-02 ~ ]# vim /tmp/1212.txt
[root@localhost-02 ~ ]# vi !$
[root@localhost-02 ~ ]# ls -l /tmp/
[root@localhost-01 ~ ]# ls -l /tmp/
[root@localhost-01 ~ ]# exportfs -arv
[root@localhost-02 ~ ]# exportfs -arv
客户端文件属主属组nobody
• NFS 4版本会有该问题
• 客户端挂载共享目录后,不管是root用户还是普通用户,创建新文件时属主、属组为nobody
• 客户端挂载时加上 -o nfsvers=3 #指定版本为3
• 客户端和服务端都需要
• vim /etc/idmapd.conf //
• 把“#Domain = local.domain.edu” 改为 “Domain = xxx.com” (这里的xxx.com,随意定义吧),然后再重启rpcidmapd服务(rpcidmapd默认不存在的)
实例:
[root@localhost-02 mnt]# mount -t nfs -o nfsvers=3 192.168.133.130:/home/nfstestdir /mnt
[root@localhost-02 ~ ]# mount -t nfs -oremount nfsvers=3 192.168.133.130:/home/nfstestdir /mnt
mount.nfs: an incorrect mount option was specified
[root@localhost-02 mnt ]# cd
[root@localhost-02 ~ ]# umount /mnt/
[root@localhost-02 ~ ]# mount -t nfs -oremount,nfsvers=3 192.168.133.130:/home/nfstestdir /mnt
[root@localhost-02 ~ ]# df -h
[root@localhost-02 ~ ]# dmount -t nfs -oremount,nfsvers=3 192.168.133.130:/home/nfstestdir /mnt #再挂载一次
[root@localhost-02 ~ ]# df -h
[root@localhost-02 ~ ]# vim /etc/idmapd.conf
• 把“#Domain = local.domain.edu” 改为 “Domain = xxx.com” (这里的xxx.com,随意定义吧)
[root@localhost-02 ]# systemctl start rpcbind #启动rpcbind 服务
常见问题:
1、当yum安装很慢时,执行以下命令
[root@localhost ~ ]# cd /etc/yum.repos.d/
[root@localhost-02 yum.repos.d ]# ls
[root@localhost-02 yum.repos.d ]# mv epel-repo epel-repo.1
[root@localhost-02 yum.repos.d ]# yum install -y 包名 #重新安装
2、不能通信?说明网络不通,原因:一、rpcbind服务没有开启,没有监听111端口,二、使用命令。!net查看111端口有没有被监听。如果有111端口。说明防护墙没关。
![]()
3、服务端上export的新增配置,明明是192.168.133.132;为什么客户端上可以使用192.168.133.130进行挂载?
132是客户端的IP,130是服务端的IP,配置文件上的就是要指定客户端IP,就是那些IP可以挂载
mount就是要通过从服务端挂载到客户端,所以使用的mount -t [服务端IP];
4、服务端的文件是有rw权限的,但在客户端不能写?服务端:

客户端:客户端写不了?

答:服务端的 /home/nfstestdir 给一个777权限
5、始终连不上。。
[root@centos7 ~]# showmount -e 10.211.55.16
clnt_create: RPC: Port mapper failure - Unable to receive: errno 111 (Connection refused)
答:ip能通吗?
查rpcbind服务起开没。
还要查看下iptables规则。
注意:
/etc/exports文件中的/home/nfstestdir 192.168.192.140(rw,sync,all_squash,anonuid=1000,anongid=1000)
ip与(rw之间不能有空格, 否则客户端挂载的目录会变成只读..
链接:
NFS文件系统详解 : http://blog.51cto.com/zlyang/1637164
Linux NFS服务器的安装与配置 : http://blog.51cto.com/zlyang/1627640
NFS网络文件系统 : http://www.azureyun.com/1934-2/
使用Samba或NFS实现文件共享 : https://www.linuxprobe.com/chapter-12.html
CentOS 6.X 上安装配置 NFS 目录共享 : https://juejin.im/post/5b690953e51d451757329df7
Linux NFS配置 远程共享 : http://blog.chinaunix.net/uid-25266990-id-2954478.html
centos配置nfs服务详细步骤(centos开启nfs服务) : https://www.jb51.net/os/RedHat/155286.html
CentOS 6.3 NFS的安装配置、启动及mount挂载方法 : https://www.jb51.net/os/RedHat/77993.html
nfs 配置的简单例子 : https://www.jb51.net/os/RedHat/8907.html
轻松挂载远程目录 | sshfs : https://www.jianshu.com/p/a6919d094577
Linux下挂载远程磁盘 | nfs : https://www.jianshu.com/p/cc2893b2a8b8
nfs客户端挂载出错 mount.nfs access denied by server while mounting : http://blog.51cto.com/zhaochj/1719640
NFS部署应用实例 : http://blog.51cto.com/liangey/1625167
搭建企业级NFS网络文件共享服务[一] : https://www.cnblogs.com/ftl1012/p/9291543.html
搭建企业级NFS网络文件共享服务[二] : https://www.cnblogs.com/ftl1012/p/9291596.html
企业级NFS网络文件共享服务_【all】 : https://www.cnblogs.com/ftl1012/p/nfs.html
记一次负载均衡+NFS博客站点搭建的总结 荐 : http://blog.51cto.com/11010461/2132959
NFS的常用挂载参数 : http://blog.51cto.com/zhengkangkang/1873938
NFS服务器搭建之/etc/exports文件配置权限参数 : http://blog.51cto.com/zhengkangkang/1873779


 396
396


 被折叠的 条评论
为什么被折叠?
被折叠的 条评论
为什么被折叠?
 到【灌水乐园】发言


