


一、安装cv2
sudo apt-get install python-opencv opencv-data二、 Haar特征分类器
Haar特征分类器就是一个XML文件,该文件中会描述人体各个部位的Haar特征值。包括人脸、眼睛、嘴唇等等。
Haar特征分类器存放目录:OpenCV安装目录中的data/haarcascades目录下,通过apt安装的Haar特征分类器如下:
$ ll /usr/share/opencv/haarcascades/
总用量 19504
drwxr-xr-x 2 root root    4096 6月   2 22:01 ./
drwxr-xr-x 4 root root    4096 6月   2 22:01 ../
-rw-r--r-- 1 root root 1095035 9月  19  2014 haarcascade_eye_tree_eyeglasses.xml
-rw-r--r-- 1 root root  506314 9月  19  2014 haarcascade_eye.xml
-rw-r--r-- 1 root root  837462 9月  19  2014 haarcascade_frontalface_alt2.xml
-rw-r--r-- 1 root root 3644763 9月  19  2014 haarcascade_frontalface_alt_tree.xml
-rw-r--r-- 1 root root  919871 9月  19  2014 haarcascade_frontalface_alt.xml
-rw-r--r-- 1 root root 1254733 9月  19  2014 haarcascade_frontalface_default.xml
-rw-r--r-- 1 root root  636650 9月  19  2014 haarcascade_fullbody.xml
-rw-r--r-- 1 root root  323227 9月  19  2014 haarcascade_lefteye_2splits.xml
-rw-r--r-- 1 root root  531497 9月  19  2014 haarcascade_lowerbody.xml
-rw-r--r-- 1 root root  358385 9月  19  2014 haarcascade_mcs_eyepair_big.xml
-rw-r--r-- 1 root root  410204 9月  19  2014 haarcascade_mcs_eyepair_small.xml
-rw-r--r-- 1 root root  312877 9月  19  2014 haarcascade_mcs_leftear.xml
-rw-r--r-- 1 root root  777721 9月  19  2014 haarcascade_mcs_lefteye.xml
-rw-r--r-- 1 root root  719806 9月  19  2014 haarcascade_mcs_mouth.xml
-rw-r--r-- 1 root root 1585210 9月  19  2014 haarcascade_mcs_nose.xml
-rw-r--r-- 1 root root  324727 9月  19  2014 haarcascade_mcs_rightear.xml
-rw-r--r-- 1 root root 1383113 9月  19  2014 haarcascade_mcs_righteye.xml
-rw-r--r-- 1 root root 1522737 9月  19  2014 haarcascade_mcs_upperbody.xml
-rw-r--r-- 1 root root 1125633 9月  19  2014 haarcascade_profileface.xml
-rw-r--r-- 1 root root  324586 9月  19  2014 haarcascade_righteye_2splits.xml
-rw-r--r-- 1 root root  281945 9月  19  2014 haarcascade_smile.xml
-rw-r--r-- 1 root root 1046387 9月  19  2014 haarcascade_upperbody.xml
Haar特征值反映了图像的灰度变化情况。例如:脸部的一些特征能由矩形特征简单的描述,如:眼睛要比脸颊颜色要深,鼻梁两侧比鼻梁颜色要深,嘴巴比周围颜色要深等。
三、opencv api
要想使用opencv,就必须先知道其能干什么,怎么做。于是API的重要性便体现出来了。就本例而言,使用到的函数很少,也就普通的读取图片,灰度转换,显示图像,简单的编辑图像罢了。
读取图片:
import cv2
image = cv2.imread(imagepath)
灰度转换
灰度转换的作用就是:转换成灰度的图片的计算强度得以降低。
import cv2
gray = cv2.cvtColor(image,cv2.COLOR_BGR2GRAY)
画图
opencv 的强大之处的一个体现就是其可以对图片进行任意编辑,处理。
下面的这个函数最后一个参数指定的就是画笔的大小。
import cv2
cv2.rectangle(image,(x,y),(x+w,y+w),(0,255,0),2)
显示图像
编辑完的图像要么直接的被显示出来,要么就保存到物理的存储介质。
import cv2
cv2.imshow("Image Title",image)
获取人脸识别训练数据
看似复杂,其实就是对于人脸特征的一些描述,这样opencv在读取完数据后很据训练中的样品数据,就可以感知读取到的图片上的特征,进而对图片进行人脸识别。
import cv2
face_cascade = cv2.CascadeClassifier(r'./haarcascade_frontalface_default.xml')
我们可以在刚才的/usr/share/opencv/haarcascades/目录下复制,也可以到opencv在GitHub上共享出来的具有普适的训练好的数据。
训练数据参考地址:
https://github.com/opencv/opencv/tree/master/data/haarcascades
四、探测人脸
说白了,就是根据训练的数据来对新图片进行识别的过程。
import cv2

# 探测图片中的人脸

faces = face_cascade.detectMultiScale(
   gray,
   scaleFactor = 1.15,
   minNeighbors = 5,
   minSize = (5,5),
   # flags = cv2.cv.CV_HAAR_SCALE_IMAGE
)
我们可以随意的指定里面参数的值,来达到不同精度下的识别。返回值就是opencv对图片的探测结果的体现。
处理人脸探测的结果
结束了刚才的人脸探测,我们就可以拿到返回值来做进一步的处理了。但这也不是说会多么的复杂,无非添加点特征值罢了。
import cv2

print ("发现{0}个人脸!".format(len(faces)))

for(x,y,w,h) in faces:
   cv2.rectangle(image,(x,y),(x+w,y+w),(0,255,0),2)
五、实例
# coding:utf-8

import sys
reload(sys)
sys.setdefaultencoding('utf8')

"""
opencv实现人脸识别
参考:
1、https://github.com/opencv/opencv/tree/master/data/haarcascades
2、http://www.cnblogs.com/hanson1/p/7105265.html

"""

import cv2

# 待检测的图片路径
imagepath="nba.jpg"

image = cv2.imread(imagepath)
gray = cv2.cvtColor(image,cv2.COLOR_BGR2GRAY)


'''
# 获取人脸识别训练数据

对于人脸特征的一些描述,opencv在读取完数据后很据训练中的样品数据,
就可以感知读取到的图片上的特征,进而对图片进行人脸识别。
xml数据下载,
参考:https://github.com/opencv/opencv/tree/master/data/haarcascades
'''
face_cascade = cv2.CascadeClassifier(r'./haarcascade_frontalface_default.xml')

# 探测人脸
# 根据训练的数据来对新图片进行识别的过程。
faces = face_cascade.detectMultiScale(
  gray,
  scaleFactor = 1.15,
  minNeighbors = 5,
  minSize = (5,5),
  #flags = cv2.HAAR_SCALE_IMAGE
)

# 我们可以随意的指定里面参数的值,来达到不同精度下的识别。返回值就是opencv对图片的探测结果的体现。

# 处理人脸探测的结果
print ("发现{0}个人脸!".format(len(faces)))
for(x,y,w,h) in faces:
    cv2.rectangle(image,(x,y),(x+w,y+w),(0,255,0),2)
    # cv2.circle(image,((x+x+w)/2,(y+y+h)/2),w/2,(0,255,0),2)

cv2.imshow("image",image)
cv2.waitKey(0)
cv2.destroyAllWindows()
nba.jpg

运行:
/home/mymotif/PycharmProjects/py2/venv/bin/python /home/mymotif/PycharmProjects/py2/OpencvDemo/FaceRecognition3.py
发现5个人脸!

opencv2.4自带的训练数据集不能识别歪头的人脸:

上图只能识别到3个人脸、高圆圆的脸不能被识别。
六、识别眼睛
代码:
import cv2

face_cascade = cv2.CascadeClassifier("./haarcascade_frontalface_default.xml")
eye_cascade = cv2.CascadeClassifier('./haarcascade_eye.xml')

img = cv2.imread("gyy.jpg")
gray = cv2.cvtColor(img, cv2.COLOR_BGR2GRAY)

faces = face_cascade.detectMultiScale(gray, 1.3, 5)
for (x, y, w, h) in faces:
    cv2.rectangle(img, (x, y), (x + w, y + h), (255, 0, 0), 2)
    roi_gray = gray[y:y + h, x:x + w]
    roi_color = img[y:y + h, x:x + w]
    eyes = eye_cascade.detectMultiScale(roi_gray)
    for (ex, ey, ew, eh) in eyes:
        cv2.rectangle(roi_color, (ex, ey), (ex + ew, ey + eh), (0, 255, 0), 2)

cv2.imwrite('./mygyy.jpg',img,)
cv2.imshow('img', img)
cv2.waitKey(0)
cv2.destroyAllWindows()
haarcascade_eye.xml也是到/usr/share/opencv/haarcascades/haarcascade_eye.xml拷贝
图片gyy.jpg

识别后的输出图像:

七、使用dlib库:
安装:
pip install dlib -i http://mirrors.aliyun.com/pypi/simple --trusted-host mirrors.aliyun.com
pip install scikit-image -i http://mirrors.aliyun.com/pypi/simple --trusted-host mirrors.aliyun.com
获得训练模型数据:
wget http://dlib.net/files/dlib_face_recognition_resnet_model_v1.dat.bz2
wget http://dlib.net/files/shape_predictor_68_face_landmarks.dat.bz2
解压后得到:dlib_face_recognition_resnet_model_v1.dat shape_predictor_68_face_landmarks.dat
图片放在当前目录的faces字目录下:(这里还是选择刚才的两个高圆圆的图片)
代码:
# -*- coding: utf-8 -*-
import sys
import dlib
import cv2
import os
import glob

current_path = os.getcwd()  # 获取当前路径
predictor_path = current_path + "/shape_predictor_68_face_landmarks.dat"
face_rec_model_path = current_path + "/dlib_face_recognition_resnet_model_v1.dat"
faces_folder_path = current_path + "/faces/"

detector = dlib.get_frontal_face_detector()
shape_predictor = dlib.shape_predictor(predictor_path)
face_rec_model = dlib.face_recognition_model_v1(face_rec_model_path)

for img_path in glob.glob(os.path.join(faces_folder_path, "*.jpg")):
    print("Processing file: {}".format(img_path))
    # opencv 读取图片,并显示
    img = cv2.imread(img_path, cv2.IMREAD_COLOR)
    # opencv的bgr格式图片转换成rgb格式
    b, g, r = cv2.split(img)
    img2 = cv2.merge([r, g, b])

    dets = detector(img, 1)
    print("Number of faces detected: {}".format(len(dets)))

    for index, face in enumerate(dets):
        print('face {}; left {}; top {}; right {}; bottom {}'.format(index, face.left(), face.top(), face.right(),
                                                                     face.bottom()))

        shape = shape_predictor(img2, face)
        for i, pt in enumerate(shape.parts()):
            # print('Part {}: {}'.format(i, pt))
            pt_pos = (pt.x, pt.y)
            cv2.circle(img, pt_pos, 2, (255, 0, 0), 1)
        # print(type(pt))
        # print("Part 0: {}, Part 1: {} ...".format(shape.part(0), shape.part(1)))
        cv2.namedWindow(img_path + str(index), cv2.WINDOW_AUTOSIZE)
        cv2.imshow(img_path + str(index), img)

        face_descriptor = face_rec_model.compute_face_descriptor(img2, shape)
        print(face_descriptor)

k = cv2.waitKey(0)
cv2.destroyAllWindows()
运行:
/home/mymotif/PycharmProjects/py3/venv/bin/python /home/mymotif/PycharmProjects/py3/OpencvDemo/my_face_recogniton.py
Processing file: /home/mymotif/PycharmProjects/py3/OpencvDemo/faces/gyy1.jpg
Number of faces detected: 1
face 0; left 882; top 263; right 1067; bottom 449
-0.0483386
0.0642314
0.0178262
-0.0981393
-0.0779463
-0.0190407
-0.114124
-0.100423
0.198235
-0.190211
0.201627
-0.067576
-0.214567
-0.0459527
-0.0700421
0.235604
-0.224163
-0.133473
-0.00837546
0.0453571
0.10593
0.0495415
0.00145196
0.0944103
-0.147758
-0.379802
-0.118948
-0.0943016
-0.0831719
-0.0928893
-0.056411
-0.00276677
-0.215875
0.012246
-0.0187255
0.0910732
-0.0118009
-0.135734
0.145041
0.0294265
-0.317408
0.0788514
0.0801222
0.229386
0.177284
-0.02889
-0.023172
-0.184772
0.131815
-0.202003
0.0180767
0.107235
0.00899576
0.0738147
-0.00104804
-0.127833
0.0595942
0.055453
-0.218403
-0.0495955
0.0918939
-0.0630638
0.00674465
-0.085031
0.214224
0.136124
-0.103138
-0.213774
0.114235
-0.200385
-0.0333368
0.097574
-0.137866
-0.220082
-0.314378
-0.0176723
0.359342
0.158017
-0.149572
0.0898535
-0.0545548
-0.0260494
0.123918
0.187599
0.0874474
0.0822608
-0.08947
0.121238
0.245235
-0.0906047
0.00395961
0.245709
0.000479682
0.0534236
0.0253183
0.0535567
-0.131623
0.0448699
-0.167833
0.0202485
0.00356966
0.0573345
-0.00770366
0.108081
-0.118261
0.154299
0.0260983
-0.0771554
-0.000934142
0.00323957
-0.0830713
-0.0674233
0.112363
-0.204241
0.206463
0.0895691
0.105521
0.137374
0.0653715
0.101483
-0.0899707
-0.0802419
-0.25596
0.0233222
0.0824334
-0.00693377
0.152646
-0.0199983
Processing file: /home/mymotif/PycharmProjects/py3/OpencvDemo/faces/test4.jpg
Number of faces detected: 3
face 0; left 395; top 229; right 469; bottom 304
-0.0988664
0.048496
0.0813543
-0.0736195
-0.0942228
0.0032015
-0.0784712
-0.140092
0.148023
-0.155402
0.194108
-0.122472
-0.215433
-0.0399598
-0.0161014
0.274297
-0.192938
-0.185728
-0.00599857
-0.011494
0.0060483
0.030032
0.00117194
0.0387218
-0.146583
-0.368584
-0.10408
-0.0457135
0.0399213
-0.0533899
-0.0794408
0.113138
-0.154588
0.00266361
0.0876036
0.128795
0.0435768
-0.0717672
0.16417
-0.0217247
-0.350172
0.0575342
0.147782
0.220721
0.163306
-0.00274782
-0.0327829
-0.123796
0.133254
-0.18155
0.0209899
0.109461
0.0750638
0.0643394
0.0194818
-0.113998
0.0491887
0.114272
-0.184809
0.00673969
0.148274
-0.0938207
0.0828621
-0.0428219
0.149263
0.0814369
-0.0748463
-0.216592
0.0969583
-0.187433
-0.0458523
0.0790301
-0.131091
-0.17473
-0.342388
-0.0389232
0.279971
0.137306
-0.170495
0.069681
0.0771673
-0.00652196
0.160557
0.170534
0.00563351
0.0234403
-0.0729826
-0.0303393
0.299512
-0.0442706
0.02613
0.224762
-0.00290189
0.0561322
0.0203004
0.0755418
-0.0914146
-0.0200946
-0.186422
-0.0145382
-0.0748814
0.0254317
0.00721188
0.145599
-0.174427
0.136221
-0.025984
-0.0142172
-0.038722
0.0747609
-0.0158525
-0.0779426
0.104799
-0.180098
0.149694
0.204879
0.066853
0.071752
0.10381
0.0555899
-0.0214644
-0.0167952
-0.146917
-0.0375687
0.101923
-0.0989679
0.0786321
0.0145748
face 1; left 308; top 191; right 370; bottom 253
-0.149421
0.0616718
0.0362965
-0.0617903
-0.146191
-0.0797556
-0.0774453
-0.177168
0.0942377
-0.142629
0.166453
-0.092947
-0.142821
-0.000994129
-0.0590028
0.233962
-0.141498
-0.17029
-0.0319282
-0.0139761
0.000810018
0.0754154
-0.00380202
0.0470185
-0.0569914
-0.307509
-0.102662
0.00757185
0.010358
-0.00472956
-0.0666247
0.0946666
-0.146259
0.000289478
0.142935
0.154655
0.0131867
-0.0961621
0.15731
-0.00215754
-0.314809
0.0595511
0.146763
0.251002
0.169142
-0.0483152
-0.00399528
-0.156568
0.125763
-0.104141
0.000570131
0.0890914
0.0490971
0.0385323
-0.0266333
-0.171317
0.0301388
0.101585
-0.166328
-0.0605374
0.160652
-0.0984514
-0.0293067
-0.115507
0.154995
0.14277
-0.114472
-0.304773
0.0890835
-0.197033
-0.0668158
0.0609518
-0.130604
-0.128933
-0.28416
-0.038836
0.32476
0.0844695
-0.106544
0.0841079
0.0399805
-0.00171018
0.0663677
0.17373
-0.0296159
0.0820644
-0.05002
-0.0164905
0.244094
-0.0151611
-0.0237233
0.156815
-0.0258629
0.0354715
0.0355896
0.0742327
-0.0978799
0.0276261
-0.135611
-0.00417638
-0.0693399
-0.0793489
0.037774
0.13619
-0.196459
0.181001
-0.0485227
0.0521253
-0.039504
0.0304076
-0.0199444
-9.96152e-05
0.0839915
-0.209121
0.186505
0.148444
0.105267
0.130304
0.129849
0.0661706
-0.0130953
0.0306435
-0.177086
-0.043577
0.0343773
-0.0636448
0.107852
0.057779
face 2; left 218; top 205; right 280; bottom 267
-0.017493
0.060574
0.0578422
-0.0643662
-0.139444
-0.00791988
-0.070132
-0.19442
0.135096
-0.109004
0.193884
-0.137014
-0.211302
-0.0183564
-0.0459481
0.221942
-0.182917
-0.166506
-0.0216431
0.000302647
0.0392684
0.0180574
0.0377515
0.0540802
-0.120962
-0.370934
-0.0800279
-0.0480057
-0.0427685
-0.0561858
-0.0103498
0.0822695
-0.170343
1.81158e-05
0.102211
0.0519025
0.0373706
-0.132603
0.179557
-0.0498449
-0.325647
0.0253009
0.137485
0.201935
0.139056
-0.0148587
-0.0320961
-0.154025
0.135642
-0.107881
-0.00295924
0.117831
0.0228244
0.0247388
0.00323467
-0.1206
0.0485418
0.113158
-0.146824
-0.0199666
0.146678
-0.0957777
0.00178426
-0.142043
0.169817
0.0642549
-0.0902346
-0.236666
0.0458137
-0.147218
-0.0808575
0.0433071
-0.163552
-0.179603
-0.278671
-0.0795986
0.323049
0.107706
-0.232585
0.0470083
0.0335911
0.0345082
0.13872
0.205882
0.0598899
0.0691282
-0.068083
-0.0173357
0.231348
-0.0784156
-0.00467037
0.275148
-0.0599612
0.0412973
0.00770311
0.0228475
-0.117365
0.0877744
-0.144568
-0.0178396
0.0174616
0.0426217
0.0504592
0.134407
-0.191432
0.123855
-0.0344182
0.0603214
0.0604899
0.0252593
-0.0207476
-0.100298
0.128771
-0.225229
0.145072
0.150581
0.0658378
0.0922226
0.0739489
0.097722
-0.00631394
0.0167592
-0.218039
0.00697374
0.0802616
-0.0688083
0.0655065
-0.00485452
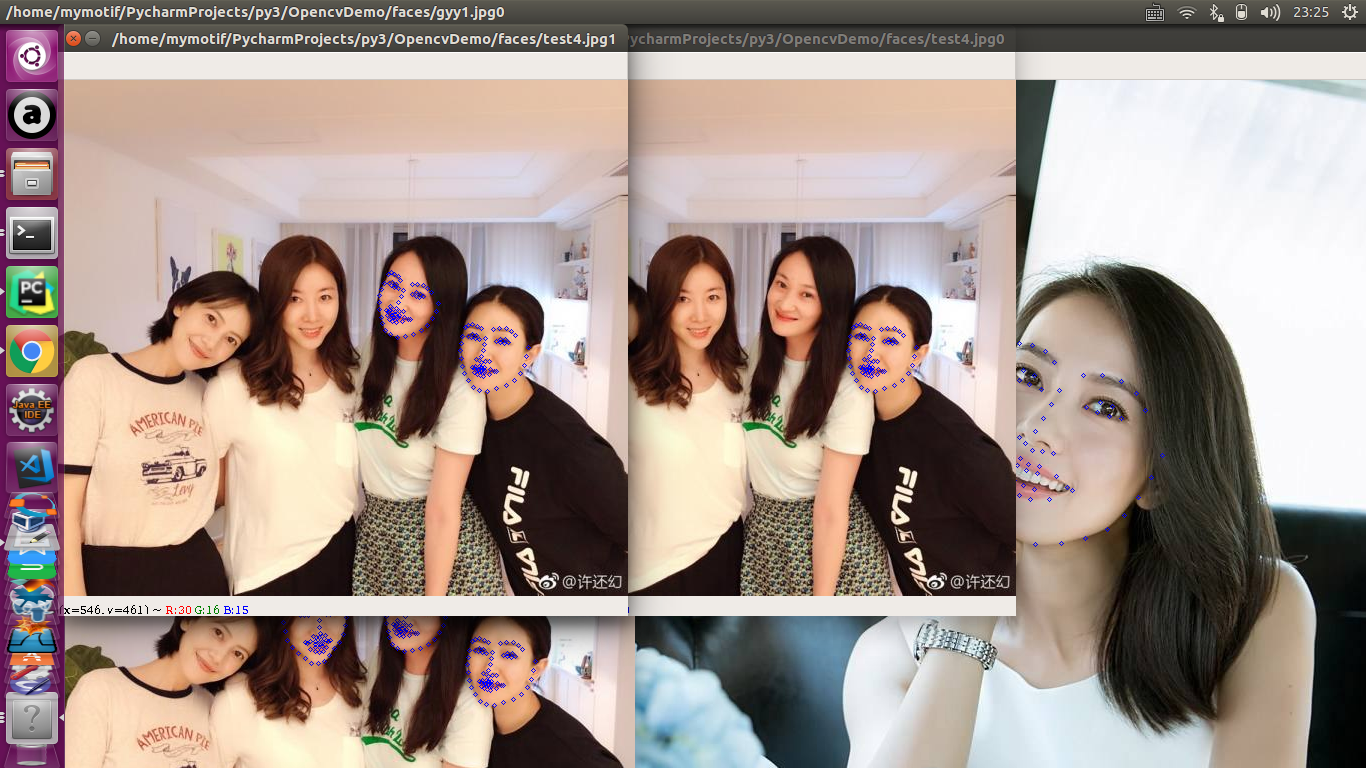
歪头的还是没有被识别。
dlib另一更清晰的列子(把识别后图片存到res_imgs子目录)
# _*_ coding: utf-8 _*_


import cv2
import numpy as np
import dlib


def rect_to_bb(rect):
    """
    :param rect: dlib 脸部区域检测输出
    :return: 返回一个矩形坐标
    """
    x = rect.left()
    y = rect.top()
    w = rect.right() - x
    h = rect.bottom() - y
    return x, y, w, h


def shape_to_np(shape, dtype="int"):
    """

    :param shape: dlib脸部特征检测的输出
    :param dtype:
    :return:
    """
    coords = np.zeros((68, 2), dtype=dtype)
    for i in range(0, 68):
            coords[i] = (shape.part(i).x, shape.part(i).y)

    return coords


def resize(image, width=1200):
    """

    :param image: 要检测的图片
    :param width:
    :return:
    """
    r = width * 1.0 / image.shape[1]
    dim = (width, int(image.shape[0] * r))
    resized = cv2.resize(image, dim, interpolation=cv2.INTER_AREA)
    return resized


def detect(image_file):
    """

    :param image_file: image_file_path
    :return:
    """
    count = 0
    image = cv2.imread('./faces/'+image_file)
    # image = resize(image, width=1200)
    gray = cv2.cvtColor(image, cv2.COLOR_BGR2GRAY)

    detector = dlib.get_frontal_face_detector()
    rects = detector(gray, 1)

    predictor = dlib.shape_predictor("shape_predictor_68_face_landmarks.dat")

    for (i, rect) in enumerate(rects):
        count += 1
        shape = predictor(gray, rect)

        shape = shape_to_np(shape)

        (x, y, w, h) = rect_to_bb(rect)

        cv2.rectangle(image, (x, y), (x + w, y + h), (0, 255, 0), 2)
        for (x, y) in shape:
            cv2.circle(image, (x, y), 1, (0, 0, 255), -1)
    cv2.imwrite('./res_imgs/detect_res_'+image_file, image)
    return './res_imgs/detect_res_'+image_file, count


if __name__ == '__main__':
    detect('test4.jpg')
八、使用face_recognition
安装
pip install face_recognition -i http://mirrors.aliyun.com/pypi/simple --trusted-host mirrors.aliyun.com下载源码:
git clone https://github.com/ageitgey/face_recognition把要识别的图片gyy.jpg复制到下面目录下
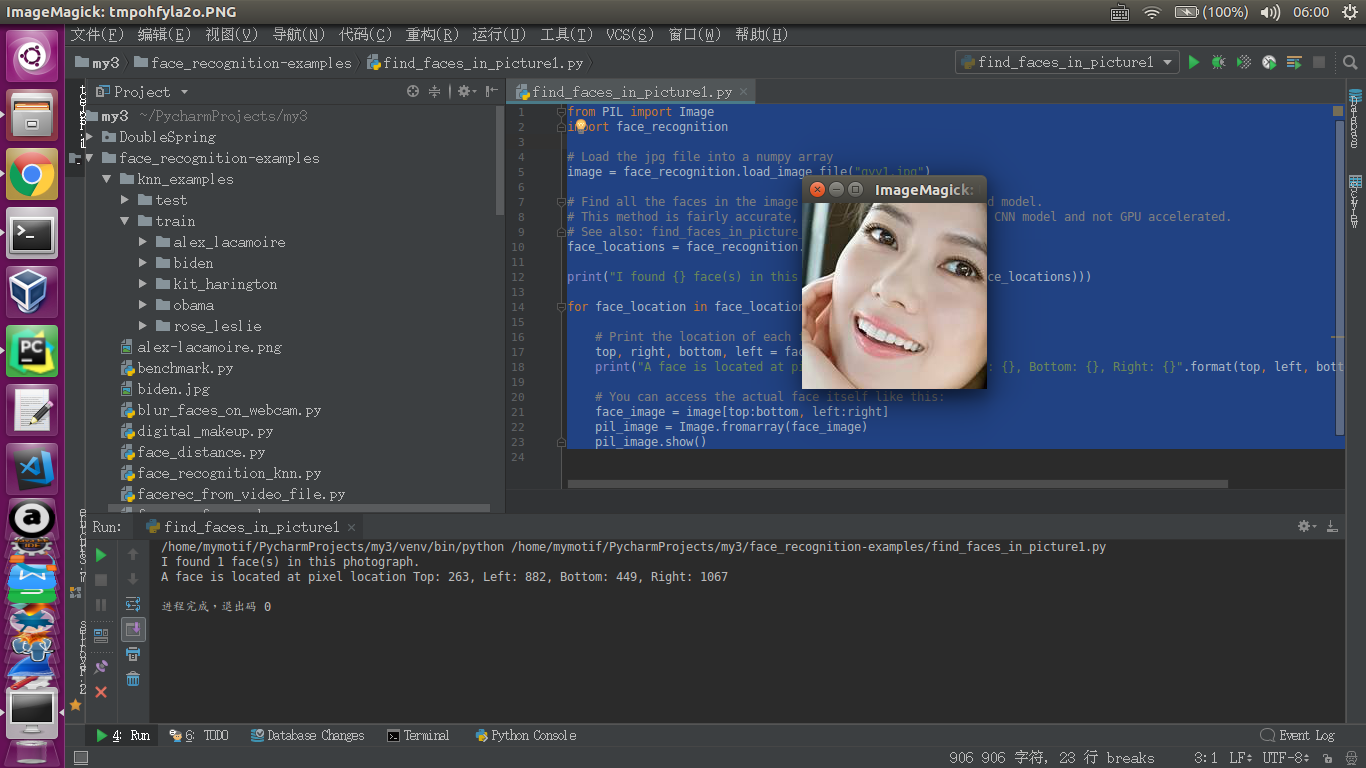
~/face_recognition/examples将find_faces_in_picuture.py中的图片文件名,原先是biden的,改成高圆圆的图片名,修改后保存为find_faces_in_picuture1.py:
from PIL import Image
import face_recognition

# Load the jpg file into a numpy array
image = face_recognition.load_image_file("gyy.jpg")

# Find all the faces in the image using the default HOG-based model.
# This method is fairly accurate, but not as accurate as the CNN model and not GPU accelerated.
# See also: find_faces_in_picture_cnn.py
face_locations = face_recognition.face_locations(image)

print("I found {} face(s) in this photograph.".format(len(face_locations)))

for face_location in face_locations:

    # Print the location of each face in this image
    top, right, bottom, left = face_location
    print("A face is located at pixel location Top: {}, Left: {}, Bottom: {}, Right: {}".format(top, left, bottom, right))

    # You can access the actual face itself like this:
    face_image = image[top:bottom, left:right]
    pil_image = Image.fromarray(face_image)
    pil_image.show()
运行结果:
/home/mymotif/PycharmProjects/my3/venv/bin/python /home/mymotif/PycharmProjects/my3/face_recognition-examples/find_faces_in_picture1.py
I found 1 face(s) in this photograph.
A face is located at pixel location Top: 263, Left: 882, Bottom: 449, Right: 1067

进程完成,退出码 0
ps:
把find_faces_in_picuture1.py和图片gyy.jpg移到其它目录执行会出错:
Traceback (most recent call last):
  File "/home/mymotif/PycharmProjects/my3/OpencvDemo/find_faces_in_picture1.py", line 5, in <module>
    image = face_recognition.load_image_file("gyy.jpg")
AttributeError: module 'face_recognition' has no attribute 'load_image_file'

进程完成,退出码 1
为什么必须要在~/face_recognition/examples下做,还没找到出错原因和解决方法,求指点。(经测试大部分目录只有find_faces_in_picuture1.py和gyy.jpg两个文件可以运行,有些会产生上述错误,换个新目录试试)
face_recognition:可以做到两张人脸对比参考:
应用一个基于Python的开源人脸识别库,face_recognition


 532
532


 被折叠的 条评论
为什么被折叠?
被折叠的 条评论
为什么被折叠?
 到【灌水乐园】发言


