


Microsoft released Exchange Server 2010 in October 2009, and this new version of Exchange Server contains a lot of compelling new features such as the new High Availability, the facility to store your Exchange databases on JBOD (Just a Bunch of Disks), the archiving option and the new Outlook Web App. Oh, and do not forget the new Windows Mobile 6.5 and its new mail client.
If you have an Exchange Server 2003 environment you may want to skip Exchange Server 2007 and move directly to Exchange Server 2010. The easiest way to achieve this is to integrate Exchange Server 2010 into the existing Exchange Server 2003 environment, a so called intra-organizational migration. This is also known as transitioning from Exchange Server 2003 to Exchange Server 2010. But what does it take and what issues might arise? This is part 1 of a series of two about moving from Exchange Server 2003 to Exchange Server 2010 and in this document I’ll show you what’s needed before you start moving mailboxes from Exchange Server 2003 to Exchange Server 2010.
Exchange Server 2003
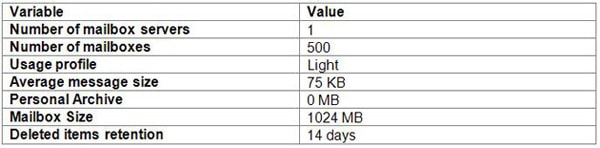
Suppose we have a fictitious company called Inframan, which is a consulting company specializing in bridges, tunnels, buildings etc. Inframan has approximately 500 employees, 50 employees are working in the office, 450 employees are working ‘in the field’. Employees within the office have their own desktop which connects to an Exchange 2003 Mailbox Server using Outlook 2003 and Outlook 2007. Employees outside the office connect to the office using their company laptop with Outlook 2007 and Outlook Anywhere and with Windows Mobile devices. When needed they can use their PC at home to use Outlook Web Access to access their mailbox. Typical usage profile is “light”, approximately 25 messages are received per day and 10 messages are sent per day, per user that is. Behind the firewall is an ISA Server 2006 acting as a reverse proxy to publish all Exchange Services to the Internet. Inframan’s environment will look something like this:
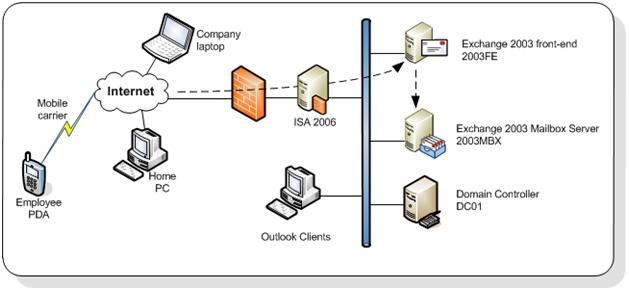
Inframan is using only one namespace for accessing all services from the Internet: webmail.inframan.nl. This is used for Outlook Web Access, Outlook Anywhere and Windows Mobile devices.
Recently Inframan has been thinking about upgrading to Exchange Server 2007, but they decided to move directly to Exchange Server 2010.
Coexistence with Exchange Server 2010
Exchange Server 2010 can easily coexist in a Exchange Server 2003 organization as long as the Exchange Server 2010 prerequisites are met:
- The Active Directory forest needs to be in Windows Server 2003 forest functionality mode;
- All domains that contain Exchange recipients need to be in Windows Server 2003 domain native mode;
- The Global Catalog Servers and the Active Directory Schema Master need to be at a minimum level of Windows Server 2003 SP1 (which equals to Windows Server 2003 R2);
- The Exchange 2003 organization needs to be running in ‘native mode’;
- Link State updates on all Exchange Server 2003 servers need to be disabled according to Microsoft knowledge base article KB 123456.
Be careful when upgrading your Active Directory Domain Controllers since not all versions are supported to run with Exchange Server 2003. For a complete overview check the Microsoft Technet Site:
http://technet.microsoft.com/en-us/library/ee338574.aspx.
Inframan will build two new Exchange Server 2010 servers, one combined Hub Transport Server / Client Access Server and one dedicated Mailbox Server. These Servers will be installed in the same Windows Server 2003 Active Directory domain as the Exchange Server 2003 organization. This will greatly improve the ease of moving mailbox from Exchange Server 2003 to Exchange Server 2010.
Moving from Exchange Server 2003 to Exchange Server 2010 in the same Active Directory forest is called transitioning. Building a new Active Directory forest with a new Exchange Server 2010 organization and moving mailboxes from the old Active Directory to the new Active Directory is called migrating.
The interim messaging environment, where both Exchange Server 2003 and Exchange Server 2010 coexist in the same Active Directory domain will look like this:
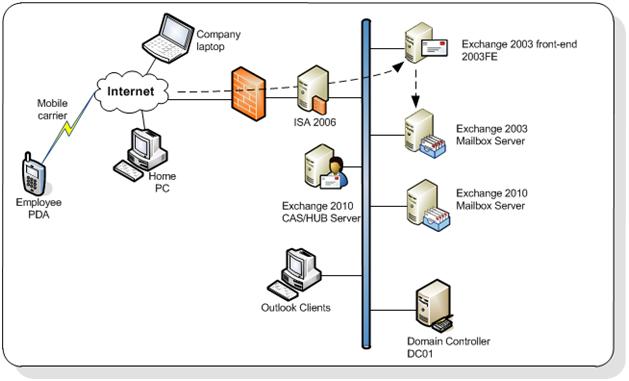
In Exchange Server 2007 Internet clients could connect to the Exchange Server 2007 Client Access Server while the mailbox was still on Exchange Server 2003. The Client Access Server retrieves the data out of the mailbox and sends it back to the Internet client. In Exchange Server 2010 this has changed. When a client connects to Exchange Server 2010, it actually connects to the Exchange Server 2010 Client Access Server and if the mailbox is still on the Exchange Server 2003 Mailbox Server then the client is redirected to the Exchange Server 2003 front-end server. This front-end server then handles the connection request. This automatically means the namespaces of the Exchange environment will change. For Inframan this means that the following namespaces are used:
- https://webmail.inframan.nl – This is used by all Internet clients that connect to the Exchange environment. This name is not different than in the Exchange Server 2003 namespace, but it will now point to the Exchange Server 2010 Client Access Server;
- https://autodiscover.inframan.nl – This is used by Outlook 2007 and (Outlook 2010) clients for autodiscover purposes;
- https://legacy.inframan.nl – This will be the new namespace for the Exchange Server 2003 front-end server. This automatically means that the namespace for the Exchange Server 2003 front-end server is going to change!
The servers that will hold the Exchange Server 2010 server roles have the following prerequisites:
- The servers need to be running on Windows Server 2008 or Windows Server 2008 R2;
- .Net framework 3.5 with SP1 needs to be installed;
- PowerShell 2.0 needs to be installed;
- Office 2007 Filter packs needs to be installed for the Hub Transport Server role and the Mailbox Server role;
Make sure that after installing Windows on the servers that they are up-to-date with the latest hotfixes and service packs.
The first step for Exchange Server 2010 Server is to upgrade the Active Directory schema to contain the Exchange Server 2010 extensions. This is achieved by using the Exchange Server 2010 setup application followed by a number of parameter:
Setup.com /PrepareLegecyExchangePermissions – Exchange Server 2003 uses the Recipient Update Service to stamp the user with the appropriate Exchange attributes during provisioning. This is replaced in Exchange Server 2010 by E-Mail Address Policies. The /PrepareLegacyExchangePermissions parameter changes security settings so that both the Recipient Update Service and E-mail Address Policies can coexist in the same Active Directory;
Setup.com /PrepareSchema – This command upgrades the Active Directory schema to include the Exchange Server 2010 extensions. This can be checked by using ADSIEDit and checking the value of the UpperRange parameter of the CN=ms-Exch-Schema-Version-Pt object in the Schema. This should have one of the following values:
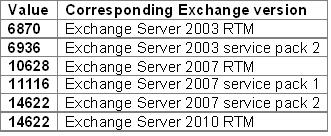
Note that the value is the same in Exchange Server 2007 service pack 2 and in Exchange Server 2010 RTM – this is because Exchange Server 2007 service pack 2 will install the Exchange Server 2010 schema extensions.
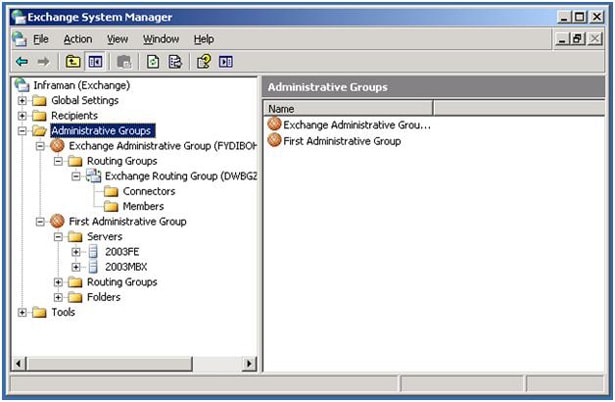
Setup.com /PrepareAD – This command upgrades the Exchange organization, which is stored in the configuration partition in Active Directory to support Exchange Server 2010. In Exchange Server 2003 information is stored in the “First Administrative Group” or perhaps more if you created additional Administrative Groups. The Exchange Server 2010 setup application will create a new Administrative Group called “Exchange Administrative Group (FYDIBOHF23SPDLT)” where all Exchange Server 2010 configuration information is stored. This will be visible in the Exchange Server 2003 System Manager:
Setup.com /PrepareDomain – This is the last step in preparing the Active Directory and will create all necessary groups in the domain being prepared.
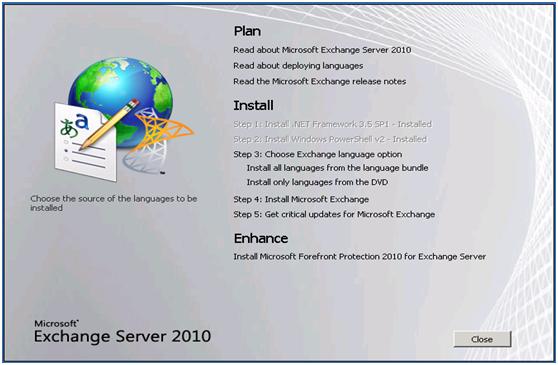
When Active Directory is fully prepared we can continue with installing the first Exchange Server 2010 server in the environment. For our example, this has to be the combined Hub Transport and Client Access Server. Start the graphical setup program (setup.exe) and download the Language File bundle if needed. If you select “install only languages from the DVD” only the language setting of your DVD (for example English or French) will be available. This is used not only for the language of the Exchange Server, but also the available language settings for the clients being used.
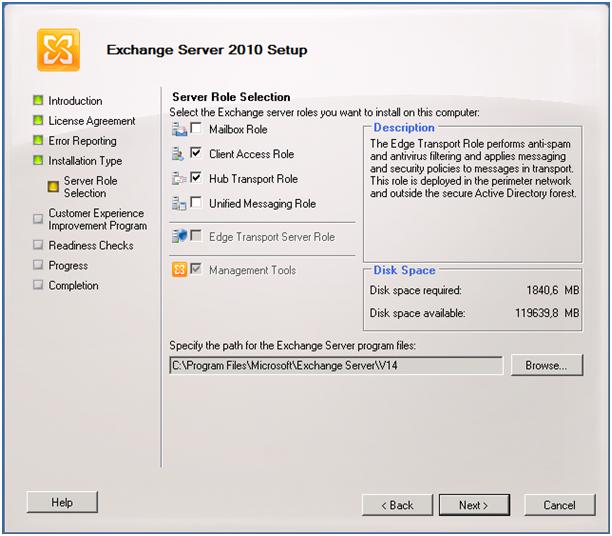
During the installation of the combined Hub Transport and Client Access Server a so called ‘custom setup’ will be used. This means we can select which server roles will be installed. In the Inframan example the following needs to be selected during setup:
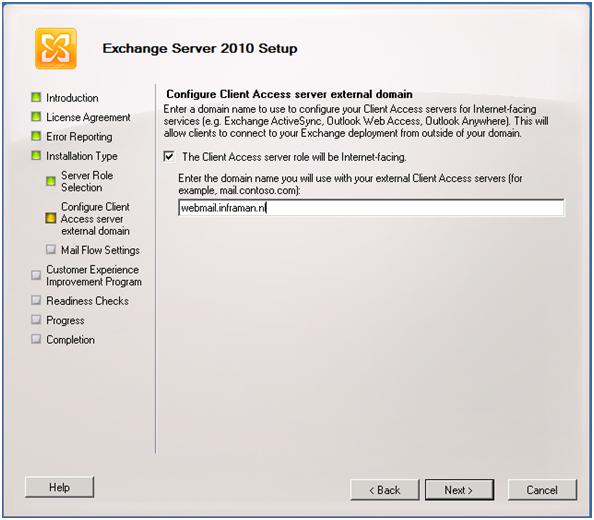
When continuing the setup application a window will be shown asking if this Client Access Server is Internet facing and if so, what the external domain will be. This is an important step because it configures the Client Access Server automatically with the appropriate settings. Check the “The Client Access server will be Internet-facing” option and enter the external domain name. This is “webmail.inframan.nl” in our example.
Exchange Server 2003 uses Routing Groups to determine the proper way to route messages while Exchange Server 2010 uses Active Directory sites for routing. These are not compatible with each other so a legacy Routing Group Connector will be created within Exchange Server 2010. This legacy connector connects Exchange Server 2010 with Exchange Server 2003 so messages can be sent between the two Exchange versions. During setup of the first Hub Transport Server an Exchange Server 2003 Hub Server needs to be selected. This is the server the legacy Routing Group Connector will connect to:
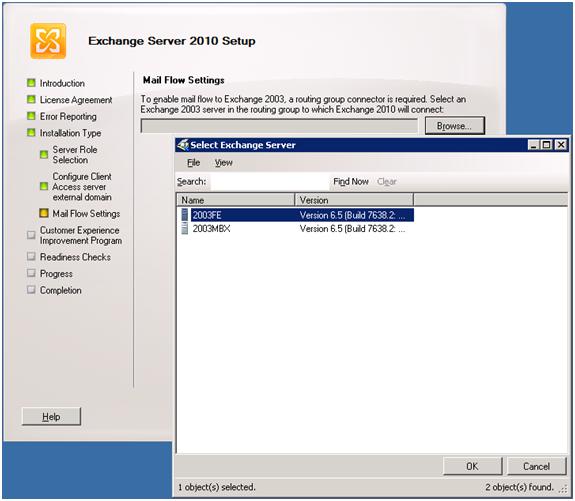
Note that this choice can be changed and/or added to after setup is complete.
Now finish the setup wizard and install the Client Access and Hub Transport Server roles on this server.
It is also possible to use the command line setup application to setup the above mentioned configuration. Open a command prompt, navigate to the installation media and enter the following command:
Setup.com /mode:install /roles:ht,ca,mt /ExternalCASServerDomain:
webmail.inframan.nl /LegacyRoutingServer:2003FE.inframan.local
webmail.inframan.nl /LegacyRoutingServer:2003FE.inframan.local
Mailbox Storage Design
Before installing the Exchange Server 2010 Mailbox Server role a proper storage design has to be made. Microsoft has recently released the new storage calculator, which is now called the “Exchange 2010 Mailbox Server Role Requirements Calculator” and can be downloaded here:
The Requirements Calculator needs to be used for a proper storage design. The following variables are used in the Requirements Calculator for our example:
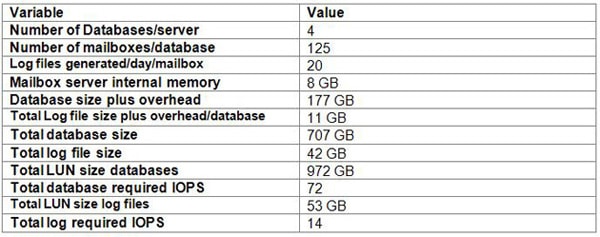
The Requirements Calculator will show the following results:
An interesting part of Exchange Server 2010 is the database technology. Microsoft has made significant changes to the database structure to lower the disk performance requirements. It should be sufficient to run the Mailbox databases and its accompanying log files from SATA disks.
In the Requirements Calculator there’s the possibility to enter the disk configuration. For the new Inframan Mailbox server 7.200 RPM SATA disks with a capacity of 500 GB will be used for storing the databases and 7.200 RPM SATA disks with a capacity of 250GB will be used for storing the log files. This disk configuration is not exactly a high end configuration, but it is by far the most cost effective solution.
The Requirements Calculator contains a tab called “Storage Design”. When using the above mentioned values the Calculator recommends a RAID1/0 configuration with 6 SATA disks for storing the Mailbox Databases and a RAID1/0 configuration with 2 SATA disks for storing the Log Files.
Installing the Mailbox Server role
When the storage solution has been properly designed and implemented the Exchange Server 2010 Mailbox Server role can be installed. As with the Client Access and Hub Transport Server roles make sure you download the Language Pack during setup. Select a ‘custom setup’ and select only the Mailbox Server role when you get to the ‘Server Role selection’ window as shown in Figure 5. Finish the setup wizard and install the Mailbox Server role. After installation of the 2
nd server the organization is ready to be configured and we can prepare for start moving mailboxes from Exchange Server 2003 to Exchange Server 2010.
Configuring the Exchange Server 2010 servers
When both Exchange servers are installed it is time to configure the Exchange environment properly before Exchange Server 2010 can be used and mailboxes can be moved. The following needs to be configured:
- Relocate the Mailbox Databases on the new storage solution;
- Unified Communications certificate on the Client Access Server;
- New server certificate on the Exchange 2003 front-end server;
- OWA 2010 needs to be configured for use with Exchange Server 2003;
- Public Folder replication.
- A send and receive connector also have to be configured, but I will describe this in the next article when the mail flow will be changed from Exchange Server 2003 to Exchange Server 2010.
Relocate the Mailbox Databases
On the new Mailbox Server there are two drives, from a hardware perspective configured as outlined before. These drives are F:\ for the Mailbox Databases and the Public Folder database and drive G:\ for the Log Files.
To change the location of the Mailbox Database open the Exchange Management Console and navigate to the Database Management, which can be found in the Organization Configuration. Right click the database and select “Move Database Path”. Change the Database file path to a directory on drive F:\ and change the Log folder path to a directory on drive G:\. Repeat this step for the Public Folder database.
If needed create new databases and locate the new database file on drive F:\ and the accompanying log files on driver G:\
Unified Communications Certificate
On the Exchange Server 2010 Client Access Server a new 3
rd party Unified Communications certificate needs to be installed. According to Microsoft knowledge base article 929395 (
http://support.microsoft.com/kb/929395) the following Certificate Authorities are supported for use with Unified Communications certificates:
- Entrust - http://www.entrust.net/microsoft/
- Digicert - http://www.digicert.com/unified-communications-ssl-tls.htm
- Comodo - http://www.comodo.com/msexchange
However, most SSL Certificate Authorities can generate UC/SAN certificates that will work just fine. New in Exchange Server 2010 is the possibility to request certificates using the Exchange Management Console. Open the Exchange Management Console and select the Server Configuration in the navigation pane. Select the Exchange Server 2010 Client Access Server and create a new certificate request. For our environment we have to use the following domain names in our certificate:
- Webmail.inframan.nl
- Autodiscover.inframan.nl
- Legacy.inframan.nl
During the coexistence phase Internet clients will connect to the Exchange Server 2010 Client Access Server while their mailbox is still on Exchange Server 2003. The client request will then be redirected to the old Exchange Server 2003 front-end server. This server will therefore get a new FQDN (Fully Qualified Domain Name) and thus need a new certificate. This new FQDN will be legacy.inframan.nl.
OWA Configuration
During installation of the Exchange Server 2010 Client Access Server all settings have been configured for use on the Internet. The only thing that needs to be configured is the coexistence information for Outlook Web App. The Client Access Server needs to be configured in case a mailbox is still on Exchange Server 2003 and the client needs to be redirected to the Exchange Server 2003 front-end server.
On an Exchange Server 2010 server enter the following Management Shell Command:
Set-OWAVirtualDirectory <CASHUB01>\OWA ‘
-ExternalURL https://webmail.inframan.nl/OWA ‘
-Exchange2003URL https://legacy.inframan.nl/exchange
-ExternalURL https://webmail.inframan.nl/OWA ‘
-Exchange2003URL https://legacy.inframan.nl/exchange
This will make sure that when a user connects to Exchange Server 2010 Client Access Server for Outlook Web Access and the mailbox is still on Exchange 2003 the client will be redirected to the old Exchange Server 2003 front-end server.
Public Folder Replication
During installation of the Mailbox Server a new Exchange Server 2010 Mailbox Database will be automatically created. After installation you have to make sure that this database is moved from the default location to an alternate location for recovery and performance reasons.
A new Public Folder database will also be automatically created on the new Mailbox Server. The hierarchy, which is the structure of all Public Folders will be automatically replicated between all Public Folder Databases in the entire organization. The content replication of the Public Folders will have to be configured manually though.
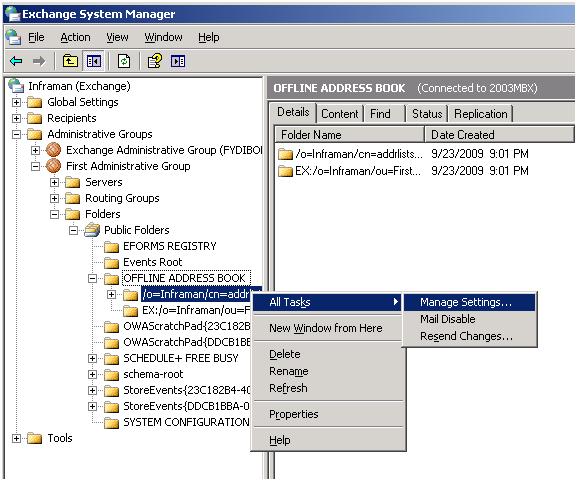
To replicate the Offline Address Book and Free/Busy folders from Exchange Server 2003 to Exchange Server 2010 open the Exchange System Manager on the Exchange Server 2003 server and navigate to the System Folders in the ‘Folders’ folder in the First Administrative Group Navigate to the first Offline Address Book folder, right click it and select “All Tasks…”. The next is to select “Manage Settings”.
If you want to toggle between the System Folders and the normal Public Folders, navigate to the Public Folders, right click the Public Folders and select “View System Folders” or “View Public Folders”.
The “Manage Public Folder Settings wizard” will appear. Click Next on the Welcome page and select the “Modify lists of replica servers”. Follow the wizard and add the Exchange Server 2010 Mailbox Server role as a new replica. When finished, the folder and all its subfolders will be replicated to the Exchange Server 2010 Public Folder database. Repeat this step for the second Offline Address Book folder and the Schedule+ Free Busy folder.
Note: When the “Manage Settings” option is not available you can select “Properties” and select the replication tab to add the Exchange Server 2010 Public Folder Database.
Note: replication of public folders can take quite some time.
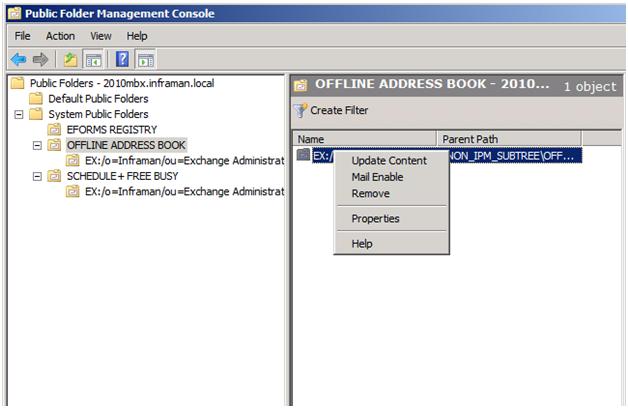
The (default) Public Folder that are located on the Exchange Server 2010 Mailbox Server should be replicated to the Exchange Server 2003 Mailbox Server. To accomplish this logon to the Exchange Server 2010 Mailbox Server, open the Exchange Management Console and navigate to the Tools node. Under the Tools node open the Public Folder Management Console.
Right click the Offline Address Book in the results pane, select Properties and click the Replication tab.
Add the Exchange Server 2003 Mailbox Server to the replica list, the contents will now be replicated to the Exchange Server 2003 Mailbox Server. Be aware that Public Folder replication is a low priority mechanism, so it takes some time before both Public Folder databases are in sync.
Repeat these steps for the Schedule+ Free/Busy folder.
Summary part I
In this first article out of a series of 2 I explained what steps are needed before you can start moving mailboxes from Exchange Server 2003 to Exchange Server 2010. In this article the Active Directory was upgraded, two servers with Exchange Server 2010 were installed, certificates were installed and the Public Folder replication was setup.
In the next article I will cover the actual movement of the mailboxes and the steps that are needed to decommission the Exchange 2003 servers like moving the Offline Address Book generation server and conversion of Recipient Policies and Address Books. Stay tuned!
转载于:https://blog.51cto.com/elanxu/248962


 1194
1194

 被折叠的 条评论
为什么被折叠?
被折叠的 条评论
为什么被折叠?
 到【灌水乐园】发言


