


第一部分:关于VMware
the network bridge on device vmnet0 is not running
1.打开"本地连接"的属性窗口
the network bridge on device vmnet0 is not running
1.打开"本地连接"的属性窗口
2.点击"安装"->"服务"->"添加..."->"从磁盘安装"->"选择X:\Program Files\VMware\VMware Workstation\netbridge.inf(每人的目录可能不
同,自己找吧)"->"确定"
3.这时属性窗口里面应该有"vmware bridge protocol",点击"属性",在窗口里面输入"0",确定,重新启动机器,ok了
关闭x windows 不让随系统启动
找到/etc/inittab这个文件,然后打开,找到这么一行:
id:5:initdefault.
把5改成3保存,重新启动
id:5:initdefault.
把5改成3保存,重新启动
系统采用的软件版本
ftp软件到linux中的时候注意要使用BIN方式传送,否则容易出错的。
ftp得到下面的文件
httpd-2.2.4.tar.gz
mysql-4.1.22.tar.gz
php-4.4.6.tar.gz
net-snmp-5.2.3.tar.gz
cacti-0.8.6f.tar.gz
cacti-cactid-0.8.6f.tar.gz
rrdtool-1.0.50.tar.gz
rrdtool-1.2.23.tar.gz
--------------------------------------------
第二部分 安装服务器的基本三样 数据库mysql apache php
cacti-0.8.6f.tar.gz
cacti-cactid-0.8.6f.tar.gz
rrdtool-1.0.50.tar.gz
rrdtool-1.2.23.tar.gz
--------------------------------------------
第二部分 安装服务器的基本三样 数据库mysql apache php
一、先安装最简单的mysql
mysql整整折腾了两天,重新安装了系统,可能与命令执行的顺序有很大的关系!下面详细记录一下安装的步骤
mysql整整折腾了两天,重新安装了系统,可能与命令执行的顺序有很大的关系!下面详细记录一下安装的步骤
root]#cd /usr/local/
tar -zxvf /usr/local/tools/mysql-4.1.22.tar.gz
将在local下产生一个mysql-4.1.22-pc-linux-i686...的文件夹,执行命令
将在local下产生一个mysql-4.1.22-pc-linux-i686...的文件夹,执行命令
root@host local]#ln -s mysql-standard-4.0.12-pc-linux-i686 mysql 做个链接
root local]#
groupadd mysql 创建用户组
useradd -g mysql mysql 创建用户mysql
为什么老安装不成功 ,问题关键就在这里,访问mysql要一个专门的用户,而且必须给相应的访问权限,这里我们就设置root和mysql有权限访问。
用户在一开始的时候已经建好,所以直接初始化表 (注意:必须先执行本步骤后才能进行以下步骤)就可以了:
#cd mysql
[root@test mysql]#cp support-files/my-medium.cnf /etc/my.cnf
[root@test mysql]#cp support-files/my-medium.cnf /etc/my.cnf
如果是root登陆,则必须使用--user=mysql ,这个在mysql的install-bin里说了,以前没有仔细看。 以下:
[root@test mysql]#./scripts/mysql_install_db --user=mysql
installing all prepared tables
fill help tables
installing all prepared tables
fill help tables
skip
初试化表并且规定用mysql用户来访问初始化表以后就开始给mysql和root用户设定访问权限, 我们先到安装mysql的目录:
/usr/local/mysql ×目录是必须的,因为修改的是这个目录下的档案。
然后设置权限
然后设置权限
chown -R root . 设定root能访问 /usr/local/mysql
chown -R mysql data
chgrp -R mysql . 设定mysql组能够访问 /usr/local/mysql
设置完成后,基本上就装好了,好了,我们运行一下我们的mysql:
/usr/local/mysql/bin/mysqld_safe --user=mysql &
如果没有问题的话,应该会出现类似这样的提示:
[1] 42264
Starting mysqld daemon with databases from | /app/mysql/var | /usr/local/mysql/data
这个时候mysql会建立一个/tmp/mysql.sock,可以先等会儿不要急着按enter。这个socket file是动态生成的,不可以被移动,复制,没它
mysql是启动不了的。
这就证明你安装成功了
自启动 将手工启动命令加上全路径 加入到下面的文件当中
[root@weiming mysql]# vi /etc/rc.d/rc.local
/usr/local/mysql/bin/mysqld_safe --user=mysql &
------------------------------------------------------------------------------------------------------------
------------------下面的执行就能测试mysql是否安装成功了——————————
5.
建立mysql的root帐号密码:
[root@host mysql]# /usr/local/mysql/bin/mysqladmin -u root password '123456'
建立mysql的root帐号密码:
[root@host mysql]# /usr/local/mysql/bin/mysqladmin -u root password '123456'
[root@host mysql]#
如果要更改密码执行:
[root@host mysql]# /usr/local/mysql/bin/mysqladmin -u root -p password '1234'
enter password:
[root@host mysql]#
enter password:
[root@host mysql]#
说明好了。
#为了安全
到这个时候mysql的root 密码是1234,不要高错了
#为了安全
到这个时候mysql的root 密码是1234,不要高错了
二、安装需要编译的新版apache2.*
1.
因为目前有所谓的这个动态函数库,因此,在安装apache时,请特别要向apache声明php模块使用动态函数库的模式。
[root@weiming root]# cd /usr/local/
[root@weiming local]# tar -zxvf /usr/local/tools/httpd-2.2.4.tar.gz
[root@weiming local]# cd httpd-2.2.44
[root@weiming httpd-2.0.55]# ./configure --prefix=/usr/local/apache2 --enable-so --enable-rewrite 建立一个apache2的目录!!
#--prefix=/安装的路径
--enable-so 这是在宣告使用动态函数库,特别重要!
--enable-rewrite 这是预防用的,先设置一下。
2.
开始编译与安装:
[root@weiming httpd-2.0.55]#make; make install
#应该不会有什么问题了
开始编译与安装:
[root@weiming httpd-2.0.55]#make; make install
#应该不会有什么问题了
3.
确定启动状态:
[root@weiming httpd-2.0.55]# /usr/local/apache2/bin/apachectl start
[root@weiming httpd-2.0.55]# netstat -utl
tcp 0 0 *:http *:* LISTEN
同样把/usr/local/apache2/bin/apachectl start放在/etc/rc.d/rc.local内,开机时启动apache。
确定启动状态:
[root@weiming httpd-2.0.55]# /usr/local/apache2/bin/apachectl start
[root@weiming httpd-2.0.55]# netstat -utl
tcp 0 0 *:http *:* LISTEN
同样把/usr/local/apache2/bin/apachectl start放在/etc/rc.d/rc.local内,开机时启动apache。
说明:由于安装fc4的时候开启了firewall,选择了ssh,这样就可以使用ssh来登陆。
结果安装mysql完了,apahce完了,打不开
[url]http://192.168.16.108[/url] 查了半天不知道什么原因,仔细考虑了一下,和以前不同的就是开了防火
墙,那么问题就是处在这里了! 由于不太会设置firewall,于是全部晴空ip tables 命令为 #ip tables -F
然后测试网页就可以打开了!!!
但是重新启动系统后,又不行了,所以只能修改firewall
cd /etc/sysconfig/
vi iptables
vi iptables
Firewall configuration written by system-config-securitylevel
# Manual customization of this file is not recommended.
*filter
:INPUT ACCEPT [0:0]
:FORWARD ACCEPT [0:0]
:OUTPUT ACCEPT [0:0]
:RH-Firewall-1-INPUT - [0:0]
-A INPUT -j RH-Firewall-1-INPUT
-A FORWARD -j RH-Firewall-1-INPUT
-A RH-Firewall-1-INPUT -i lo -j ACCEPT
-A RH-Firewall-1-INPUT -p icmp --icmp-type any -j ACCEPT
-A RH-Firewall-1-INPUT -p 50 -j ACCEPT
-A RH-Firewall-1-INPUT -p 51 -j ACCEPT
-A RH-Firewall-1-INPUT -p udp --dport 5353 -d 224.0.0.251 -j ACCEPT
-A RH-Firewall-1-INPUT -p udp -m udp --dport 631 -j ACCEPT
-A RH-Firewall-1-INPUT -m state --state ESTABLISHED,RELATED -j ACCEPT
-A RH-Firewall-1-INPUT -m state --state NEW -m tcp -p tcp --dport 22 -j ACCEPT
-A RH-Firewall-1-INPUT -m state --state NEW -m tcp -p tcp --dport 80 -j ACCEPT 本条是增加的。
-A RH-Firewall-1-INPUT -j REJECT --reject-with icmp-host-prohibited
COMMIT
就ok了。
三、安装php了
1.
[root@weiming root]#cd /usr/local/
[root@weiming local]# tar -zxvf /usr/local/tools/php-4.4.1.tar.gz
将在/usr/local/下产生一个php-4.4.1的目录
[root@weiming local]# cd php-4.4.1
×××××
[root@weiming php-4.4.1]# ./configure --prefix=/usr/local/php4 --with-apxs2=/usr/local/apache2/bin/apxs --with-config-file-
path=/usr/local/php/etc --with-mysql=/usr/local/mysql
上面的命令都是连续写的
===========如果在安装linux的时候关闭了sel的话,下面就不会出现这个提示的==================
一开始执行这一句的时候,出现:configure:error:cannot find output from lex;giving up 查找说需要先运行
root@weiming php-4.4.1]#touch lex.yy.c
就很顺利的下去了
======================================================
一开始执行这一句的时候,出现:configure:error:cannot find output from lex;giving up 查找说需要先运行
root@weiming php-4.4.1]#touch lex.yy.c
就很顺利的下去了
======================================================
#--with-apxs2=/usr/local/apache2/bin/apxs 这是apache2专用的选项,请针对你的主机设置
--with-mysql 这是针对mysql的安装路径,这几个是同一行的.
...skipping
+--------------------------------------------------------------------+
| License: |
| This software is subject to the PHP License, available in this |
| distribution in the file LICENSE. By continuing this installation |
| process, you are bound by the terms of this license agreement. |
| If you do not agree with the terms of this license, you must abort |
| the installation process at this point. |
+--------------------------------------------------------------------+
| *** NOTE *** |
| The default for register_globals is now OFF! |
| |
| If your application relies on register_globals being ON, you |
| should explicitly set it to on in your php.ini file. |
| Note that you are strongly encouraged to read |
| [url]http://www.php.net/manual/en/security.globals.php[/url] |
| about the implications of having register_globals set to on, and |
| avoid using it if possible. |
+--------------------------------------------------------------------+
+--------------------------------------------------------------------+
| License: |
| This software is subject to the PHP License, available in this |
| distribution in the file LICENSE. By continuing this installation |
| process, you are bound by the terms of this license agreement. |
| If you do not agree with the terms of this license, you must abort |
| the installation process at this point. |
+--------------------------------------------------------------------+
| *** NOTE *** |
| The default for register_globals is now OFF! |
| |
| If your application relies on register_globals being ON, you |
| should explicitly set it to on in your php.ini file. |
| Note that you are strongly encouraged to read |
| [url]http://www.php.net/manual/en/security.globals.php[/url] |
| about the implications of having register_globals set to on, and |
| avoid using it if possible. |
+--------------------------------------------------------------------+
Thank you for using PHP.
2.开始编译与安装:
[root@weiming php-4.4.1]# make
...skipping
Build complete.
(It is safe to ignore warnings about tempnam and tmpnam). 请注意waring可以忽略的。
[root@weiming php-4.4.1]#make install
[root@weiming php-4.4.1]# make
...skipping
Build complete.
(It is safe to ignore warnings about tempnam and tmpnam). 请注意waring可以忽略的。
[root@weiming php-4.4.1]#make install
[root@weiming php-4.4.1]# cp php.ini-dist /usr/local/lib/php.ini
将主要的 php 设定档 php.ini-dist 拷贝成 /usr/local/lib/php.ini 这个档案,
这是因为 apache 或其它程序执行 php 时需要到 usr/local/lib/ 中去使用这档案。
3.启动apache当中的php选项:
[root@weiming php-4.4.1]# vi /usr/local/apache2/conf/httpd.conf
#找到下面2行
LoadModule php4_module modules/libphp4.so #大约在231行 ××××我的在53行,已经存在不需要更改
AddType application/x-httpd-php .php #在847行自行增加 ××××××××在307行增加
[root@weiming php-4.4.1]# vi /usr/local/apache2/conf/httpd.conf
#找到下面2行
LoadModule php4_module modules/libphp4.so #大约在231行 ××××我的在53行,已经存在不需要更改
AddType application/x-httpd-php .php #在847行自行增加 ××××××××在307行增加
4.
重新启动apache:
[root@weiming php-4.4.1]# /usr/local/apache2/bin/apachectl restart
重新启动apache:
[root@weiming php-4.4.1]# /usr/local/apache2/bin/apachectl restart
===============开始安装linux的时候取消了sel的安全,所以不会出现下面的问题了=========
××××××出现:/usr/local/apache/bin/apachectl start Syntax error on line 232 of /usr/local/apache/conf/httpd.conf: Cannot
load /usr/local/apache/modules/libphp4.so into server: /usr/local/apache/modules/libphp4.so: cannot restore segment prot
after reloc: Permission denied 按照下面的方法解决:
Fedora Core 2开始就了SELinux (Security-Enhanced Linux )这个东西,不过在 FC2下是默认不打开的,从FC3开始就默认打开了,但是打开
了是很安全,但是很多操作也不能操作了。使用vi/gedit/kate/bluefish任何的文本编辑工具打开 /etc/selinux/config,找到这段:
找到这段:
# This file controls the state of SELinux on the system.
# SELINUX= can take one of these three values:
# enforcing - SELinux security policy is enforced.
# permissive - SELinux prints warnings instead of enforcing.
# disabled - SELinux is fully disabled.
SELINUX=enforcing
# This file controls the state of SELinux on the system.
# SELINUX= can take one of these three values:
# enforcing - SELinux security policy is enforced.
# permissive - SELinux prints warnings instead of enforcing.
# disabled - SELinux is fully disabled.
SELINUX=enforcing
把 SELINUX=enforcing 注释掉:#SELINUX=enforcing ,然后新加一行为:
SELINUX=premission
=====================
保存,关闭。
SELINUX=premission
=====================
保存,关闭。
还是不行,重新启动系统,出现 打开192.168.16.108 出现fc4自带的apache,重新启动apache2 出现提示
#/usr/local/apache2/bin/httpd
(98)Address already in use: make_sock: could not bind to address 0.0.0.0:80
no listening sockets available, shutting down
Unable to open logs
(98)Address already in use: make_sock: could not bind to address 0.0.0.0:80
no listening sockets available, shutting down
Unable to open logs
查看
[url]http://192.168.0.15:80[/url]
端口被现有的apache占用
并且每次机器启动时都会自动启动,删除apache自动启动
以为不太清楚fc4下的apache的位置以及版本,所以进入下面
#cd /etc/init.d
#rm httpd
#reboot
结果问题解决了!!! 看了fc4自带的也式apache2的。
============================================================================================================
端口被现有的apache占用
并且每次机器启动时都会自动启动,删除apache自动启动
以为不太清楚fc4下的apache的位置以及版本,所以进入下面
#cd /etc/init.d
#rm httpd
#reboot
结果问题解决了!!! 看了fc4自带的也式apache2的。
============================================================================================================
5.
测试php是否正常工作;
[root@weiming php-4.4.1]# cd /usr/local/apache2/htdocs
[root@weiming php-4.4.1]# vi test.php
<?
phpinfo();
?>
保存,重新启动apahce2
#以我的测试主机为例,ip是192.168.16.108,地址栏中输入
[url]http://192.168.16.108/test.php[/url]
呵呵,看到了那熟悉的php测试页了吧:-)
呵呵,看到了那熟悉的php测试页了吧:-)
mysql 测试页
vi /usr/local/apache/htdocs/mysqltest.html
内容为
<html>
<body>
<?
$link=mysql_connect('localhost','root');
mysql_select_db('mysql');
$str="select * from user;";
$result=mysql_query($str,$link);
$show=mysql_num_rows($result);
mysql_close($link);
for ($i=0;$i < $show;$i++)
{
$arr[$i]=mysql_fetch_array($result);
};
?>
<table align=center border=1>
<tr align=center>
<td>Host</td>
<td>User</td>
<td>Password</td>
</tr>
<?for ($i=0;$i<$show;$i++){?>
<tr>
<td><?echo $arr[$i][Host]?></td>
<td><?echo $arr[$i][User]?></td>
重新启动apache2,然后在地址栏打开
[url]http://192.168.16.108/mysqltest.html[/url]
可以看到mysql的测试了。
可以看到mysql的测试了。
到这里,服务器就算假设好了。下面就是安装cacti的相关软件了
第三部分 cacti相关软件的安装
第一 ,rrdtool的安装
rrdtool-1.0.50版本,不用安装支持库文件,1.2.x 版的rrdtool繪圖不再使用GD,而使用libart及freetype等功能
來畫圖,所以,我個人在用起來時,感覺速度上較1.0.x版慢了許多,如果你在意速度的話,建議還是使用 rrdtool 1.0.x , Cacti-0.86d 都有支援
來畫圖,所以,我個人在用起來時,感覺速度上較1.0.x版慢了許多,如果你在意速度的話,建議還是使用 rrdtool 1.0.x , Cacti-0.86d 都有支援
.
全部的安装命令
[root@localhost local]#tar -zxvf /usr/local/tools/rrdtool-1.0.50.tar.tar
[root@localhost local]#cd rrdtool-1.0.50
[root@localhost local rrdtool-1.0.50]#./configure --prefix=/usr/local/rrdtool
[root@localhost local]#tar -zxvf /usr/local/tools/rrdtool-1.0.50.tar.tar
[root@localhost local]#cd rrdtool-1.0.50
[root@localhost local rrdtool-1.0.50]#./configure --prefix=/usr/local/rrdtool
过了一会,出现
-----------------------
config is DONE!
Type'make'to compile the software and use'make install'to install everything to:/usr/local/rrdtool.
-----------------------
config is DONE!
Type'make'to compile the software and use'make install'to install everything to:/usr/local/rrdtool.
if you want to install the perl
modules in site-perl,try'make site-perl-install'.
....that wishlist is NO JOKE. if you find rrdtool usrful make me happy .go to [url]http://people.ee.ethz.ch/oetiker/wish[/url] and place
modules in site-perl,try'make site-perl-install'.
....that wishlist is NO JOKE. if you find rrdtool usrful make me happy .go to [url]http://people.ee.ethz.ch/oetiker/wish[/url] and place
an order.
-------------------------------------------------------------
-------------------------------------------------------------
[root@localhost local rrdtool-1.0.50]#make
[root@localhost local rrdtool-1.0.50]#make install
[root@localhost local rrdtool-1.0.50]#make install
成功安裝後,可執行rrdtool 指令看看,是否有下列訊息
[root@test local]#/usr/local/rrdtool/bin/rrdtool
RRDtool 1.0.50 Copyright 1997-2004 by Tobias Oetiker
Usage: rrdtool [options] command command_optionsValid commands: create,
update, updatev, graph, dump, restore,last, first, info, fetch, tune, resize, xport
update, updatev, graph, dump, restore,last, first, info, fetch, tune, resize, xport
RRDtool is distributed under the Terms of the GNU General Public License Version 2. (
[url]www.gnu.org/copyleft/gpl.html[/url])
For more information read the RRD manpages
如果出现,说明安装成工了。
第二步,安装snmp
cd /usr/local
[root@test local]#tar -zxvf /usr/local/tools/net-snmp-5.2.3.tar.gz
[root@test local]#./configure --prefix=/usr/local/net-snmp --enable-developer
[root@test local]#tar -zxvf /usr/local/tools/net-snmp-5.2.3.tar.gz
[root@test local]#./configure --prefix=/usr/local/net-snmp --enable-developer
加入--enable-developer 是为了支持cactid的,但是目前没有采用cactid
[root@test local]#make
[root@test local]#make install
[root@test local]#make install
编译,安装过程中出现过waring,error,继续。
完了后运行命令
[root@test local]#/usr/local/net-snmp/bin/snmpwalk -c public 10.77.97.14
snmpwalk:No securityName specified
snmpwalk:No securityName specified
这个是由于默认采用v3版本,需要安全验证,所以可以使用底版本的来测试
[root@test local]#/usr/local/net-snmp/bin/snmpwalk -v1 -c public 10.77.97.14
能得到数据,说明snmp安装正常
第三步,安装cacti
cp /usr/local/tools/cacti-0.8.6f.tar.gz /usr/local/apache2/htdocs/
cd /usr/local/apache2/htdocs
[root@etst htdocs]#tar -zxvf cacti-0.8.6f.tar.gz
[root@etst htdocs]#mv cacti-0.8.6f cacti
cd /usr/local/apache2/htdocs
[root@etst htdocs]#tar -zxvf cacti-0.8.6f.tar.gz
[root@etst htdocs]#mv cacti-0.8.6f cacti
可以不使用cactid,而用cmd.php===========但是说cactid的执行效率比cmd.php好很多倍的,所以选择cactid
第四步,安装cacti-cactid
CACTID 的安装需要以下支持:
net-snmp-devel (需要编译安装net-snmp时添加--enable-developer选项)
mysql
mysql-devel (mysql源文件编译安装后默认支持)
openssl-devel (redhat9.0默认安装)
因此需要检查是否具备安装的环境。
/usr/local/ tar -zxvf cacti-cactid-0.8.6f-1.tar.gz
cd cacti-cactid-0.8.6-f1# ./configure --with-snmp=/usr/local/net-snmp/ ;make
这个时候此目录下你将看到cactid 和cactid.conf
/usr/local/cacti-cactid# mkdir /usr/local/cactid
/usr/local/cacit-cactid-0.8.6-f1# cp cactid cactid.conf /usr/local/cactid/
cactid就安装好了
/usr/local/ tar -zxvf cacti-cactid-0.8.6f-1.tar.gz
cd cacti-cactid-0.8.6-f1# ./configure --with-snmp=/usr/local/net-snmp/ ;make
这个时候此目录下你将看到cactid 和cactid.conf
/usr/local/cacti-cactid# mkdir /usr/local/cactid
/usr/local/cacit-cactid-0.8.6-f1# cp cactid cactid.conf /usr/local/cactid/
cactid就安装好了
第五步,配置cacti 配置中主要涉及到权限的问题,所以凡是涉及到cactiuser用户的地方,都给予其读写权限!!
1,产生一个cacti的数据库
[root@test]#/usr/local/mysql/bin/mysqladmin --u root -p create cacti
password:×××××× 要求输入密码123456
password:×××××× 要求输入密码123456
[]#/usr/local/mysql/bin/mysql -u root -p
[]#password
[]#******
welcome to the mysql monitor.commands end with; or\g.
your mysql connection id is 26 to server version: 4.1.22
type 'type' or '\h'for help.type '\c' to clear the buffer.
[]#password
[]#******
welcome to the mysql monitor.commands end with; or\g.
your mysql connection id is 26 to server version: 4.1.22
type 'type' or '\h'for help.type '\c' to clear the buffer.
mysql>grant all on cacti.* to root;
query ok, 0 rows affected (0.06sec)
query ok, 0 rows affected (0.06sec)
mysql>grant all on cacti.* to
root@localhost;
query ok, 0 rows affected (0.06sec)
query ok, 0 rows affected (0.06sec)
mysql>grant all on cacti.* to cactiusr;
query ok, 0 rows affected (0.06sec)
query ok, 0 rows affected (0.06sec)
mysql>grant all on cacti.* to
cactiusr@localhost;
query ok, 0 rows affected (0.06sec)
query ok, 0 rows affected (0.06sec)
mysql>set password for
cactiuser@localhost=password('cactiuser');
query ok, 0 rows affected (0.06sec)
query ok, 0 rows affected (0.06sec)
2,导入cacti.sql这个数据库
[root@test local]#/usr/local/mysql/bin/mysql cacti -u root -p < /usr/local/apache2/htdocs/cacti/cacti.sql
password:******
password:******
[root@test local]#/usr/local/mysql/bin/mysql -u root -p mysql 进入数据库mysql
mysql> GRANT ALL ON cacti.* TO
cactiuser@localhost IDENTIFIED BY 'cactiuser';
mysql> flush privileges;
mysql> flush privileges;
建立用户 ,并且赋予对目录rra的权力
[root@test]#useradd cactiuser
[root@etst]#chown -R cactiuser /usr/local/apache2/htdocs/cacti/rra
[root@etst]#chown -R cactiuser /usr/local/apache2/htdocs/cacti/log
3,查看php的配置文件,确认配置正确
vi /usr/local/apache2/htdocs/cacti/include/config.php
$database_type = “mysql”;
$database_default = “cactidb”;
$database_hostname = “localhost”;
$database_username = “cactiuser”;
$database_password = “cactiuser”;
$database_default = “cactidb”;
$database_hostname = “localhost”;
$database_username = “cactiuser”;
$database_password = “cactiuser”;
第六步,下面就是编辑定时任务了。
crontab 位置 /etc/ 而用户产生的cron位于/var/spool/cron/
cron的日志位于/var/log/cron 可以用vi查看
crontab 位置 /etc/ 而用户产生的cron位于/var/spool/cron/
cron的日志位于/var/log/cron 可以用vi查看
[root@test]# cd /etc
在弄自动执行的时候搞了好长时间,现在写出具体的步骤,下面的很重要,编写对于cactiuser的cron,必须以cactiuser来执行之。
很多不能自动执行的都是这个问题。cronb不是cactiuser用户创建的!下面注意用户的变更
[cactiuser@test]#cd /etc
[cactiuser@test etc]# crontab -e
no crontab for cactiuser - using an empty one
[cactiuser@test etc]# crontab -e
no crontab for cactiuser - using an empty one
*/5 * * * * /usr/local/php4/bin/php /usr/local/apache2/htdocs/cacti/poller.php > /dev/null 2>&1
~
~
~
~
~
~
~
~
~
~保存退出
中间一长行是新增加的
crontab: installing new crontab
[cactiuser@test]# su root
[root@test etc]# crontab -u cactiuser -l 这里就可以查看出用户cactiusr的cronb了。
*/5 * * * * cactiusr /usr/local/php4/bin/php /usr/local/apache2/htdocs/cacti/poller.php > /dev/null 2>&1
[root@test]#killall crond
[root@test]#crond start
[root@test]#crond start
-----到这里就应根可以了-------------------
第十步 完成配置。
vi /usr/local/apahce2/conf/httpd.conf
找到 DirectoryIndex index.html index.html.var 在后面加入 index.htm index.php
保存退出,重新启动apache 因为我们增加php,所以首页要支持php的了。
地址栏输入
[url]http://192.168.16.108/cacti/[/url]就出现了cacti的页面了。
开始配置默认用户名密码admin/admin更改默认密码
更改设置:
snmpwalk Binary Path /usr/local/net-snmp/bin/snmpwalk
snmpget Binary Path /usr/local/net-snmp/bin/snmpget
RRDTool Binary Path /usr/local/rrdtool/bin/rrdtool
PHP Binary Path /usr/local/php4/bin/php
Cacti Log File Path /usr/local/httpd/htdocs/cacti/log/cacti.log
Cactid Poller File Path /usr/local/cactid/cactid
-------------------添加设备,等一会就能出图了---------------------
------排错-------------------
[url]http://10.38.3.5/cacti[/url] 时候出现下面的错误
Warning: mysql_connect() [function.mysql-connect]: Client does not support authentication protocol requested by server;
consider upgrading MySQL client in /usr/local/apache2/htdocs/cacti/lib/adodb/drivers/adodb-mysql.inc.php on line 339
网上查找,说是认证协议的问题,进入mysql后重新对每个用户设置一下密码就ok了
mysql> set password for
'cactiuser'@'localhost'=old_password('cactiuser');
Query OK, 0 rows affected (0.00 sec)
Query OK, 0 rows affected (0.00 sec)
mysql> set password for
'root'@'localhost'=old_password('123456');
Query OK, 0 rows affected (0.00 sec)
Query OK, 0 rows affected (0.00 sec)
mysql> exit
Bye
Bye
-------------------下面为排错过程-------------------------------
增加设备,可以SNMP到,但是不出现图象,只是一个红×,然后运行
/usr/local/php4/bin/php /usr/local/apache2/htdocs/cacti/poller.php
/usr/local/php4/bin/php /usr/local/apache2/htdocs/cacti/poller.php
图象几出来了 ,但是没有数据显示!!是不是poller.php没有自动执行??
网上查找说是将cacti目录读写权限给cactiuser
查看cacti目录的权限
drwxr-xr-x 11 1000 users 4096 Jun 30 2005 cacti
查看cacti目录的权限
drwxr-xr-x 11 1000 users 4096 Jun 30 2005 cacti
于是更改 chown -R cacti
drwxr-xr-x 11 cactiuser users 4096 Jun 30 2005 cacti
查看这些目录,特别是rra 必须是cactiuser能读写的才可以
这个时候每隔5分钟手动执行
[root@test etc]# /usr/local/php4/bin/php /usr/local/apache2/htdocs/cacti/poller.php
[root@test etc]# /usr/local/php4/bin/php /usr/local/apache2/htdocs/cacti/poller.php
查看生成的rra文件 是否取到数据
[root@test etc]# /usr/local/rrdtool/bin/rrdtool fetch /usr/local/apache2/htdocs/cacti/rra/off_traffic_in_11.rrd AVERAGE
timestamp traffic_out traffic_in
timestamp traffic_out traffic_in
1175645100: nan nan
.
.
.
1175694000: nan nan
1175694300: nan nan
1175694600: nan nan
1175720100: nan nan
1175720400: 4.5239193878e+04 9.5334806122e+04
1175720700: 4.4871998223e+04 9.6902754466e+04
1175721000: nan nan
.
.
1175729700: nan nan
1175730000: nan nan
1175730300: 7.8620931034e+04 1.6441344335e+05
1175730600: 7.7566945636e+04 1.4432470044e+05
1175730900: 6.9826201565e+04 1.3622941426e+05
1175731200: 6.9826201565e+04 1.3622941426e+05
1175731500: 7.5456780826e+04 1.4221566716e+05
1175731800: nan nan
以上可见,一旦手动执行poller.php 就可以取道数据,看来问题还是出在了自动执行的,crontab的问题。
.
.
.
1175694000: nan nan
1175694300: nan nan
1175694600: nan nan
1175720100: nan nan
1175720400: 4.5239193878e+04 9.5334806122e+04
1175720700: 4.4871998223e+04 9.6902754466e+04
1175721000: nan nan
.
.
1175729700: nan nan
1175730000: nan nan
1175730300: 7.8620931034e+04 1.6441344335e+05
1175730600: 7.7566945636e+04 1.4432470044e+05
1175730900: 6.9826201565e+04 1.3622941426e+05
1175731200: 6.9826201565e+04 1.3622941426e+05
1175731500: 7.5456780826e+04 1.4221566716e+05
1175731800: nan nan
以上可见,一旦手动执行poller.php 就可以取道数据,看来问题还是出在了自动执行的,crontab的问题。
---------------------------------------------查看目录、文件的权限-----------------------------------------------------
[root@test ~]# cd /usr/local/apache2/htdocs/
[root@test htdocs]# ls -l
drwxr-xr-x 11 cactiuser users 4096 Jun 30 2005 cacti
[root@test htdocs]# cd cacti
[root@test cacti]# ls -l
total 776
-rw-r--r-- 1 cactiuser users 5892 Jun 30 2005 about.php
-rw-r--r-- 1 cactiuser users 4773 Jun 30 2005 auth_changepassword.php
-rw-r--r-- 1 cactiuser users 6171 Jun 30 2005 auth_login.php
-rw------- 1 cactiuser users 170639 Jun 30 2005 cacti.sql
-rw-r--r-- 1 cactiuser users 13108 Jun 30 2005 cdef.php
-rw-r--r-- 1 cactiuser users 15843 Jun 30 2005 cmd.php
-rw-r--r-- 1 cactiuser users 5917 Jun 30 2005 color.php
-rw-r--r-- 1 cactiuser users 17516 Jun 30 2005 data_input.php
-rw-r--r-- 1 cactiuser users 28158 Jun 30 2005 data_queries.php
-rw-r--r-- 1 cactiuser users 43730 Jun 30 2005 data_sources.php
-rw-r--r-- 1 cactiuser users 26823 Jun 30 2005 data_templates.php
drwxr-xr-x 5 cactiuser users 4096 Jun 30 2005 docs
-rw-r--r-- 1 cactiuser users 6110 Jun 30 2005 gprint_presets.php
-rw-r--r-- 1 cactiuser users 3423 Jun 30 2005 graph_p_w_picpath.php
-rw-r--r-- 1 cactiuser users 10438 Jun 30 2005 graph.php
-rw-r--r-- 1 cactiuser users 6318 Jun 30 2005 graph_settings.php
-rw-r--r-- 1 cactiuser users 11757 Jun 30 2005 graphs_items.php
-rw-r--r-- 1 cactiuser users 30676 Jun 30 2005 graphs_new.php
-rw-r--r-- 1 cactiuser users 46433 Jun 30 2005 graphs.php
-rw-r--r-- 1 cactiuser users 10091 Jun 30 2005 graph_templates_inputs.php
-rw-r--r-- 1 cactiuser users 17359 Jun 30 2005 graph_templates_items.php
-rw-r--r-- 1 cactiuser users 19176 Jun 30 2005 graph_templates.php
-rw-r--r-- 1 cactiuser users 13531 Jun 30 2005 graph_view.php
-rw-r--r-- 1 cactiuser users 30855 Jun 30 2005 host.php
-rw-r--r-- 1 cactiuser users 14232 Jun 30 2005 host_templates.php
drwxr-xr-x 2 cactiuser users 4096 Jun 30 2005 p_w_picpaths
drwxr-xr-x 6 cactiuser users 4096 Apr 4 15:11 include
-rw-r--r-- 1 cactiuser users 2271 Jun 30 2005 index.php
drwxr-xr-x 2 cactiuser users 4096 Jun 30 2005 install
drwxr-xr-x 3 cactiuser users 4096 Jun 30 2005 lib
-rw-r--r-- 1 cactiuser users 15141 Jun 30 2005 LICENSE
drwxr-xr-x 2 cactiuser users 4096 Apr 4 16:08 log
-rw-r--r-- 1 cactiuser users 1796 Jun 30 2005 logout.php
-rw-r--r-- 1 cactiuser users 9247 Jun 30 2005 poller.php
-rw-r--r-- 1 cactiuser users 72 Jun 30 2005 README
drwxr-xr-x 5 cactiuser users 4096 Jun 30 2005 resource
drwxr-xr-x 2 cactiuser users 4096 Apr 5 16:05 rra
-rw-r--r-- 1 cactiuser users 6619 Jun 30 2005 rra.php
drwxr-xr-x 2 cactiuser users 4096 Jun 30 2005 scripts
-rw-r--r-- 1 cactiuser users 6758 Jun 30 2005 script_server.php
-rw-r--r-- 1 cactiuser users 353 Jun 30 2005 script_server.pl
-rw-r--r-- 1 cactiuser users 4832 Jun 30 2005 settings.php
-rw-r--r-- 1 cactiuser users 6813 Jun 30 2005 templates_export.php
-rw-r--r-- 1 cactiuser users 5843 Jun 30 2005 templates_import.php
-rw-r--r-- 1 cactiuser users 17443 Jun 30 2005 tree.php
-rw-r--r-- 1 cactiuser users 28117 Jun 30 2005 user_admin.php
-rw-r--r-- 1 cactiuser users 10912 Jun 30 2005 utilities.php
[root@test cacti]# cd rra
[root@test rra]# ls -l
total 600
-rw-rw-r-- 1 cactiuser cactiuser 94660 Apr 6 13:25 by_traffic_in_14.rrd
-rw-rw-r-- 1 cactiuser cactiuser 94660 Apr 6 13:25 by_traffic_in_15.rrd
-rw-r--r-- 1 cactiuser cactiuser 94660 Apr 6 13:25 off_traffic_in_11.rrd
-rw-r--r-- 1 cactiuser cactiuser 94660 Apr 6 13:25 off_traffic_in_12.rrd
-rw-r--r-- 1 cactiuser cactiuser 94660 Apr 6 13:25 off_traffic_in_13.rrd
-rw-r--r-- 1 cactiuser cactiuser 94660 Apr 6 13:25 off_traffic_in_16.rrd
[root@test rra]#
[root@test cron]# cd /var/spool/cron/
[root@test cron]# ls -l
total 4
-rw------- 1 root cactiuser 96 Apr 5 15:18 cactiuser
[root@test cron]#
[root@test cron]# ls -l
total 4
-rw------- 1 root cactiuser 96 Apr 5 15:18 cactiuser
[root@test cron]#
[root@test etc]# ls -l crontab
-rwxrwxrwx 1 cactiuser root 256 Apr 5 08:42 crontab
查看crond执行情况产生的,crond日志
vi /var/log/cron
Apr 6 13:50:17 test crond[1968]: (CRON) STARTUP (V5.0)
Apr 6 13:50:17 test crond[1968]: (*system*) BAD FILE MODE (/etc/crontab)
Apr 6 13:50:17 test anacron[1975]: Anacron 2.3 started on 2007-04-06
Apr 6 13:50:17 test anacron[1975]: Will run job `cron.daily' in 65 min.
Apr 6 13:50:17 test anacron[1975]: Jobs will be executed sequentially
Apr 6 13:52:52 test crontab[2277]: (root) LIST (cactiuser)
Apr 6 13:55:02 test crond[2298]: (cactiuser) CMD (/usr/local/php4/bin/php /usr/local/apache2/htdocs/cacti/poller.php >
/dev/null 2>&1)
Apr 6 14:00:01 test crond[2423]: (cactiuser) CMD (/usr/local/php4/bin/php /usr/local/apache2/htdocs/cacti/poller.php >
Apr 6 14:00:01 test crond[2423]: (cactiuser) CMD (/usr/local/php4/bin/php /usr/local/apache2/htdocs/cacti/poller.php >
/dev/null 2>&1)
注意:
其实,这样做的监控就可以了,但是由于设备的流量较大,如果5分钟采样的话,画出的图一点都不准,而且流量上不去,所以蒋cronb的时间改为1分钟,这样采集间隔是1分钟,而画图的间隔时间是5分钟。呵呵。就可以了。
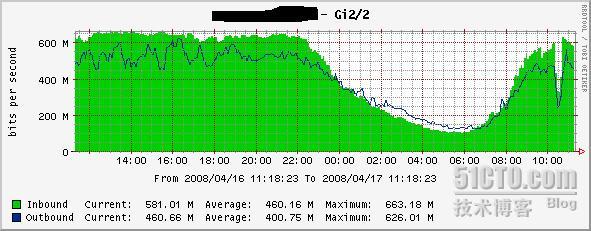
去年搞了这个,做了一台服务器用来监控网络,运行大半年,一直很好,最近主干流量加大,原来的cacti在采集超过500M 800M流量的时候出
现了问题,数据上部去,所以由不得不重新研究一下
1,流量上不去,做了一下三个修改
snmp 版本从v1 改为v2 目前的网络设备基本上都支持v2。所以不存在啥问题的。
traffic interface 改为64Bit/sec
1,流量上不去,做了一下三个修改
snmp 版本从v1 改为v2 目前的网络设备基本上都支持v2。所以不存在啥问题的。
traffic interface 改为64Bit/sec
但是由于pooller使用的是cmd.php 效率底下,所以就更换cactid了。
问题基本上就解决了。
最后,臭美一下我的图,呵呵
转载于:https://blog.51cto.com/lionnle/72035


 8759
8759


 被折叠的 条评论
为什么被折叠?
被折叠的 条评论
为什么被折叠?
 到【灌水乐园】发言


