


疑问:当我们流程流转到某一节点、某一连线或者流程开始和结束的时候我们怎么添加一些业务处理呢?
这就是我们今天讨论的主题了。
activiti的监听应用场景:在某一流程开始或者结束的时候,我们可以加入部分的业务处理,例如:在流程结束后,我们发邮件或者推送短信给我们的申请人,告诉他审批完成。又或者,当有审批人不同意该次请求的时候,我们也需要通知申请人,让其修改该申请。又或者该流程流转到某一节点,也就是需要他审批的时候,需要通知负责人,这时候也可以使用该监听。也可以用在指定下一个节点的处理人等等。
activiti的监听器分为:全局监听、连线监听、节点监听。
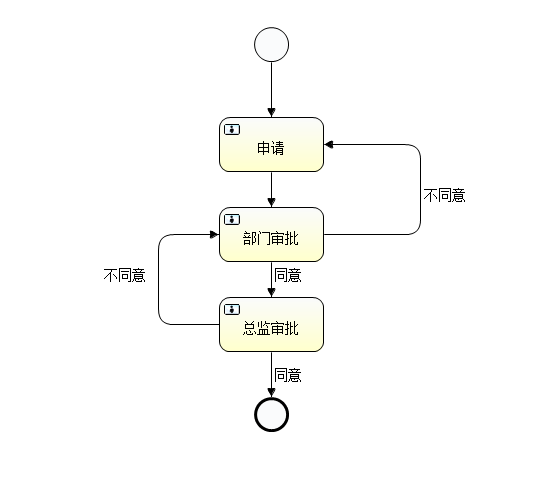
本次演示使用的流程图如下:
全局监听:
主要用于监听流程的开始和结束。
bpmn xml文件如下:
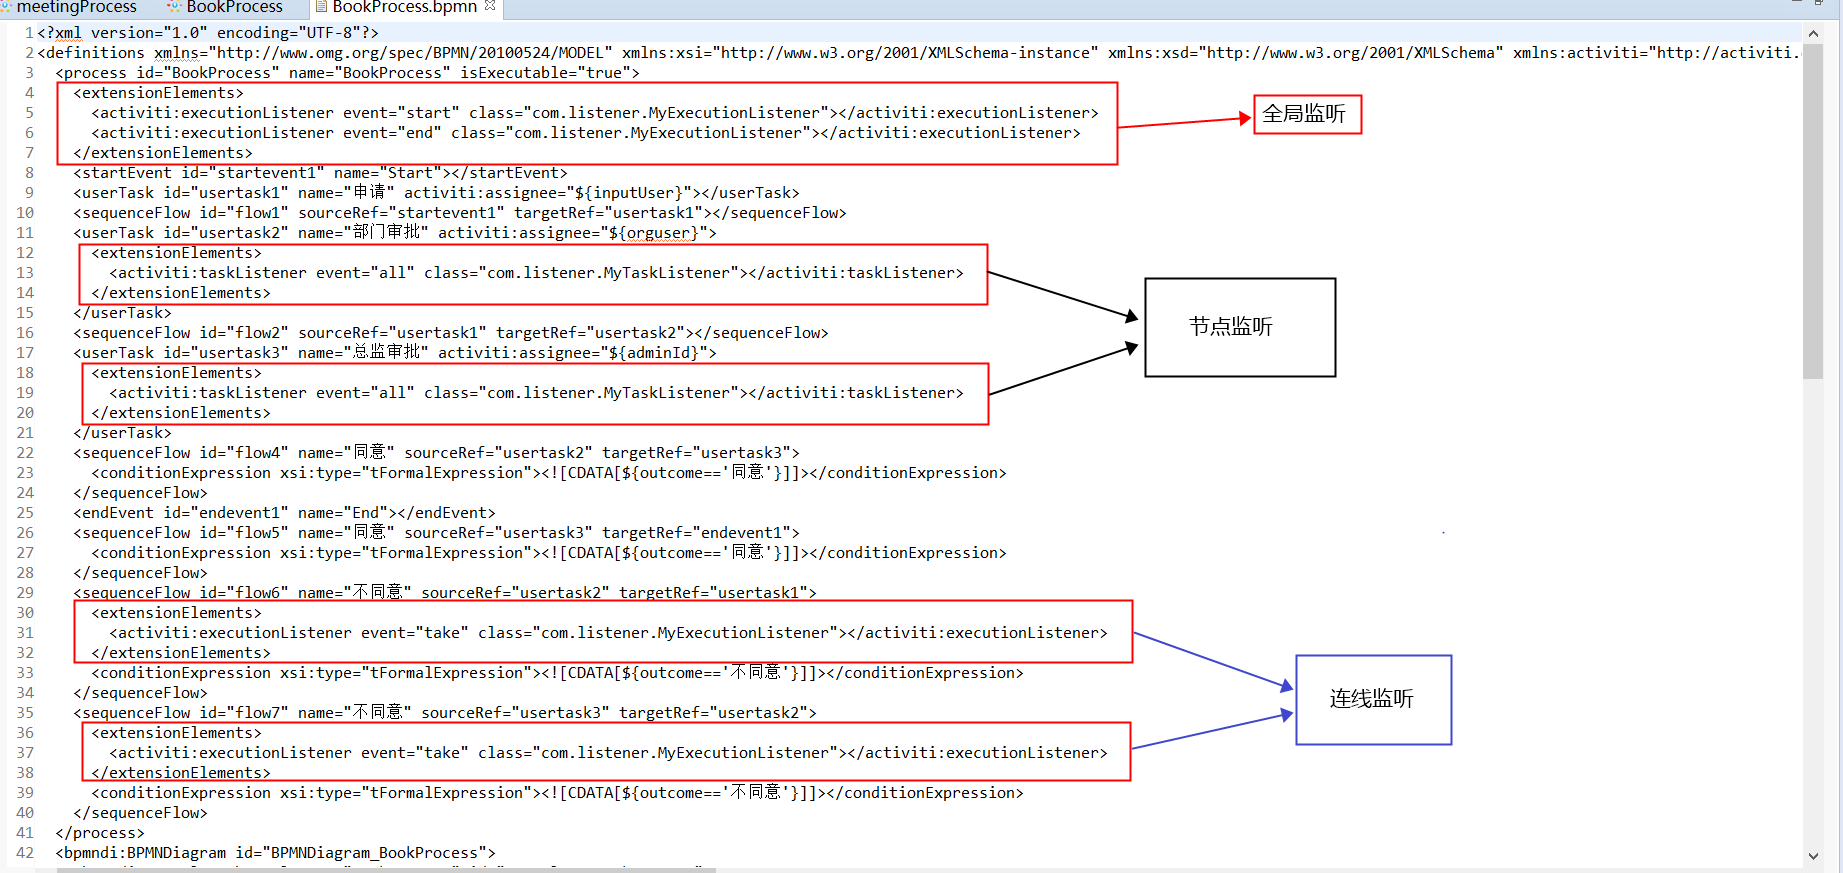
如何去实现呢?我们可以在bpmn的xml文件的 <process id="BookProcess" name="BookProcess" isExecutable="true">的下面添加上我们的监听配置:
<extensionElements>
      <activiti:executionListener event="start" class="com.listener.MyExecutionListener"></activiti:executionListener>
      <activiti:executionListener event="end" class="com.listener.MyExecutionListener"></activiti:executionListener>
    </extensionElements>
其中MyExecutionListener是我们自己定义的监听器类,该类需要实现ExecutionListener接口:
public class MyExecutionListener implements ExecutionListener {

    public void notify(DelegateExecution delegateExecution) throws Exception {

        String eventName = delegateExecution.getEventName();

        if ("start".equals(eventName)) {
            System.out.println("start=========");
        }else if ("end".equals(eventName)) {
            System.out.println("end=========");
        } else if ("take".equals(eventName)) {//连线监听
            System.out.println("take=========");
        }
    }
}
这样我们就可以在start或者end的下面添加一些业务处理。
在DelegateExecution对象中,可获取到的参数有如下:
public interface DelegateExecution extends VariableScope {
    String getId();

    String getProcessInstanceId();

    String getEventName();

    /** @deprecated */
    String getBusinessKey();

    String getProcessBusinessKey();

    String getProcessDefinitionId();

    String getParentId();

    String getCurrentActivityId();

    String getCurrentActivityName();

    String getTenantId();

    EngineServices getEngineServices();
}
通过上述的参数可获取到我们需要的参数,例如getProcessBusinessKey()获取到业务id,通过业务id可以修改我们业务单的状态等等。
连线接听:
当我们的流程经过某一连线的时候,需要实现一些业务,这就需要连线监听。
连线监听的实现和全局监听类似,都需要去实现实现ExecutionListener接口,该接口可获取到所需的参数。
我们只需要在bpmn 的xml的连线下添加监听配置;
 <sequenceFlow id="flow6" name="不同意" sourceRef="usertask2" targetRef="usertask1">
      <extensionElements>
        <activiti:executionListener event="take" class="com.listener.MyExecutionListener"></activiti:executionListener>
      </extensionElements>
      <conditionExpression xsi:type="tFormalExpression"><![CDATA[${outcome=='不同意'}]]></conditionExpression>
    </sequenceFlow>
extensionElements中就是添加我们的监听类,每当流程经过该连线的时候,就会进入MyExecutionListener类,执行else if ("take".equals(eventName))下的代码。这样我们就可以在该方法下面添加我们需要的业务处理。
节点监听:
当流程转到某一节点的时候,需要触发我们自定义的业务,这一节点监听在流程中是经常使用的。
首先,我们需要自定义我们的监听类,自定义监听类需要实现TaskListener接口;
自定义类如下:
public class MyTaskListener implements TaskListener {

    public void notify(DelegateTask delegateTask) {
        String eventName = delegateTask.getEventName();
        if ("create".endsWith(eventName)) {
            System.out.println("create=========");
        }else if ("assignment".endsWith(eventName)) {
            System.out.println("assignment========"+delegateTask.getAssignee());

        }else if ("complete".endsWith(eventName)) {
            System.out.println("complete===========");
        }else if ("delete".endsWith(eventName)) {
            System.out.println("delete=============");
        }
    }
}
DelegateTask对象中,我们可以获取到参数有如下:
public interface DelegateTask extends VariableScope {
    String getId();

    String getName();

    void setName(String var1);

    String getDescription();

    void setDescription(String var1);

    int getPriority();

    void setPriority(int var1);

    String getProcessInstanceId();

    String getExecutionId();

    String getProcessDefinitionId();

    Date getCreateTime();

    String getTaskDefinitionKey();

    boolean isSuspended();

    String getTenantId();

    String getFormKey();

    void setFormKey(String var1);

    DelegateExecution getExecution();

    String getEventName();

    DelegationState getDelegationState();

    void addCandidateUser(String var1);

    void addCandidateUsers(Collection<String> var1);

    void addCandidateGroup(String var1);

    void addCandidateGroups(Collection<String> var1);

    String getOwner();

    void setOwner(String var1);

    String getAssignee();

    void setAssignee(String var1);

    Date getDueDate();

    void setDueDate(Date var1);

    String getCategory();

    void setCategory(String var1);

    void addUserIdentityLink(String var1, String var2);

    void addGroupIdentityLink(String var1, String var2);

    void deleteCandidateUser(String var1);

    void deleteCandidateGroup(String var1);

    void deleteUserIdentityLink(String var1, String var2);

    void deleteGroupIdentityLink(String var1, String var2);

    Set<IdentityLink> getCandidates();
}
通过该对象可以获取处理人,或者指定下一个处理人等等。
接着,我们需要在bpmn的xml文件中配置监听类,在我们的任务节点中加入extensionElements配置,其中class是我们自定义的监听类:
 <userTask id="usertask2" name="部门审批" activiti:assignee="${orguser}">
      <extensionElements>
        <activiti:taskListener event="all" class="com.listener.MyTaskListener"></activiti:taskListener>
      </extensionElements>
    </userTask>
当流程转到该节点的时候,就会触发该类执行,这样我们就可以加入我们的业务处理了。
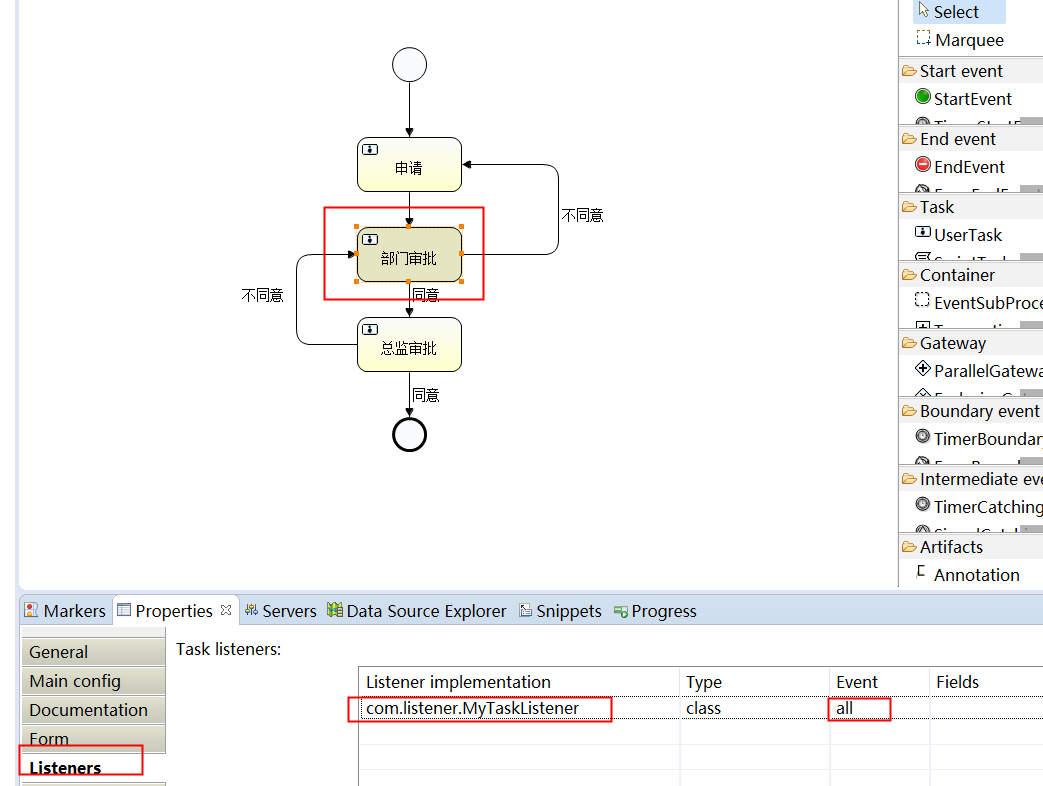
除了我们直接在bpmn的xml文件中配置外,我们也可以通过如下方法添加全局、连线、节点的自定义监听类:
以上就是全局、连线、以及节点监听的描述与介绍,当然也需要执行验证,执行验证类如下:
我们验证类是结合spring的方式:
验证类:
public class activitiTest extends SpringBase {

    @Autowired
    private RepositoryService repositoryService;

    @Autowired
    private RuntimeService runtimeService;

    @Autowired
    private TaskService taskService;

    @Test
    public void deploymentProcessDefinition() {
        Deployment deployment = repositoryService.createDeployment()
                .name("Book")
                .addClasspathResource("BookProcess.bpmn")
                .deploy();
        System.out.println("deploymentId=" + deployment.getId());
        System.out.println("deploymentName=" + deployment.getName());
    }

    /**
     * 执行流程实例
     */
    @Test
    public void startProcessInstance() {
        String processInstanceKey = "BookProcess";
        Map<String,Object> values = new HashMap<String,Object>();

        values.put("inputUser","张三");
        values.put("orguser","李四");
        values.put("adminId","王五");
        String objId="Book"+"."+"123";
        values.put("objId",objId);
        ProcessInstance pi = runtimeService
                .startProcessInstanceByKey(processInstanceKey,objId,values);
        System.out.println("流程实例id:" + pi.getId());  //流程实例id  101
        System.out.println("流程定义id:" + pi.getProcessDefinitionId());   //流程定义ID helloworld:1:4
    }
    /**
     * 查找个人当前的要执行的任务
     */
    @Test
    public void findMyTaskInfo(){
        String assignee = "李四";//流程流转的处理的人物
        List<Task> listTask = taskService
                .createTaskQuery()
                .taskAssignee(assignee)
                .list();
        if (listTask!= null && listTask.size() >0) {
            for (Task task : listTask) {
                System.out.println("任务ID:" + task.getId());
                System.out.println("任务名称:" + task.getName());
                System.out.println("任务时间:" + task.getCreateTime());
                System.out.println("任务的班里人:" + task.getAssignee());
                System.out.println("任务的实例ID:" + task.getProcessDefinitionId());
                System.out.println("执行对象的ID:" + task.getExecutionId());
                System.out.println("任务的班里人:" + task.getAssignee());
                System.out.println("流程定义ID:" + task.getProcessInstanceId());
            }
        }
    }
    /**完成任务*/
    @Test
    public void completeMyPersoinTask() {
        String taskId = "60003";
        Map<String, Object> variables = new HashMap<String,Object>();
        variables.put("outcome","同意");
        taskService.complete(taskId,variables);
      /*  taskService.complete(taskId);*/
        System.out.println("完成任务,任务ID:" + taskId);
    }

}
SpringBase类:
@RunWith(SpringJUnit4ClassRunner.class)
@ContextConfiguration(locations = { "classpath*:/applicationContext.xml" })
public class SpringBase {
}
applicationContext.xml配置文件如下:
<?xml version="1.0" encoding="UTF-8"?>
<beans xmlns="http://www.springframework.org/schema/beans"
       xmlns:xsi="http://www.w3.org/2001/XMLSchema-instance"
       xmlns:p="http://www.springframework.org/schema/p"
       xmlns:aop="http://www.springframework.org/schema/aop"
       xmlns:context="http://www.springframework.org/schema/context"
       xmlns:jee="http://www.springframework.org/schema/jee"
       xmlns:tx="http://www.springframework.org/schema/tx"
       xsi:schemaLocation="
        http://www.springframework.org/schema/aop http://www.springframework.org/schema/aop/spring-aop-4.0.xsd
        http://www.springframework.org/schema/beans http://www.springframework.org/schema/beans/spring-beans-4.0.xsd
        http://www.springframework.org/schema/context http://www.springframework.org/schema/context/spring-context-4.0.xsd
        http://www.springframework.org/schema/jee http://www.springframework.org/schema/jee/spring-jee-4.0.xsd
        http://www.springframework.org/schema/tx http://www.springframework.org/schema/tx/spring-tx-4.0.xsd ">

<!-- 引入properties文件  -->
    <context:property-placeholder location="classpath:jdbc.properties"/>

    <!-- 扫描注解 -->

   <context:component-scan base-package="com"/>

    <bean id="dataSource" class="org.apache.commons.dbcp.BasicDataSource"
          destroy-method="close">
        <property name="driverClassName" value="${jdbc.driverClassName}" />
        <property name="url" value="${jdbc.url}" />
        <property name="username" value="${jdbc.username}" />
        <property name="password" value="${jdbc.password}" />
        <property name="maxActive" value="300" />
        <property name="maxIdle" value="30" />
        <property name="minIdle" value="10" />
        <property name="initialSize" value="15" />
        <property name="maxWait" value="20000" />
    </bean>

    <!-- 事务管理 -->
    <bean id="transactionManager" class="org.springframework.jdbc.datasource.DataSourceTransactionManager">
        <property name="dataSource" ref="dataSource" />
    </bean>
    <!-- 配置事务通知属性 -->
    <tx:advice id="txAdvice" transaction-manager="transactionManager">
        <!-- 定义事务传播属性 -->
        <tx:attributes>
            <tx:method name="insert*" propagation="REQUIRED" />
            <tx:method name="update*" propagation="REQUIRED" />
            <tx:method name="get*" propagation="REQUIRED" read-only="true" />
            <tx:method name="find*" propagation="REQUIRED" read-only="true" />
            <tx:method name="*" propagation="REQUIRED" read-only="true" />
        </tx:attributes>
    </tx:advice>

    <!-- 引擎  -->
    <bean id="processEngineConfiguration" class="org.activiti.spring.SpringProcessEngineConfiguration">
        <!-- 数据源 -->
        <property name="dataSource" ref="dataSource" />

        <!-- 配置事务,统一事务  -->
        <property name="transactionManager" ref="transactionManager" />

        <!--设置建表策略  -->
        <property name="databaseSchemaUpdate" value="true" />

    </bean>

    <!-- 创建引擎对象 -->
    <bean id="processEngine" class="org.activiti.spring.ProcessEngineFactoryBean">
        <property name="processEngineConfiguration" ref="processEngineConfiguration" />
    </bean>

    <bean id="repositoryService" factory-bean="processEngine" factory-method="getRepositoryService" />
    <bean id="runtimeService" factory-bean="processEngine" factory-method="getRuntimeService" />
    <bean id="taskService" factory-bean="processEngine" factory-method="getTaskService" />
    <bean id="historyService" factory-bean="processEngine" factory-method="getHistoryService" />
    <bean id="formService" factory-bean="processEngine" factory-method="getFormService" />

</beans>
本人在这就不把执行结果展示出来了,大家可以自己运行测试一下。如有错误的地方请大家指正。


 8101
8101


 被折叠的 条评论
为什么被折叠?
被折叠的 条评论
为什么被折叠?
 到【灌水乐园】发言


