


首先是本次架构的环境,vm虚拟机中CenteOS 3台:2台tomcat,1台nginx。redis与nginx在一个机子上。
| IP地址 | 功能 | 端口 | 设备 |
| 192.168.1.111 | nginx+redis | nginx=80, redis=6379 | vm |
| 192.168.1.110 | tomcat | 8080 | vm |
| 192.168.1.108 | tomcat | 8080 | vm |
| 192.168.1.109 | 浏览器客户端 | \ | 笔记本 |
----------------------------------------------------------------------------------------------------
第一步:安装jdk,tomcat,nginx,redis
具体的安装过程这里就不细说了,都很简单,具体百度吧。
---------------------------------------------------------------------------------------------------
第二步:配置tomcat,使tomcat的session可以存放在redis中。
首先下载需要的jar包,
tomcat-redis-session-manager-1.2-tomcat-7-java-7.jar
wget地址 https://github.com/jcoleman/tomcat-redis-session-manager/downloads
---------
jedis-2.2.jar
wget地址 http://mvnrepository.com/artifact/redis.clients/jedis
----------------
commons-pool-1.6.jar
wget http://central.maven.org/maven2/commons-pool/commons-pool/1.6/commons-pool-1.6.jar
或者压缩包 http://commons.apache.org/proper/commons-pool/download_pool.cgi
注意版本号要如上,否则很大可能存在jar兼容性问题。(因为先开始我也是去下的比较新的版本commons-pool2-2.4.2和jedis-2.5但报了classNoFindException说是commons-pool缺少config内部类
然后把commons-pool换成1.6,又提示缺少commons-pool2.xxx类,懵逼一会,然后网上各种找资料,说是版本问题,但上面我说的版本是可以的。)
如果想硬刚到底(解决版本问题),可以试试以下操作:使用gradle重新编译官方资源文件为jar包
http://www.oschina.net/question/815618_194320
所有的jar包下载好后,放到tomcat/lib文件夹下,并修改tomcat/conf/context.xml文件,在根节点下添加如下内容:
<valve className="com.radiadesign.catalina.session.RedisSessionHandlerValve" />
<manager className="com.radiadesign.catalina.session.RedisSessionManager" host="192.168.1.111" port="6379" database="0" maxInactiveInterval="60" />注意host要改成redis服务器的地址,这里是192.168.1.111
然后wq保存就行了。
两个tomcat服务器上的tomcat使用相同方法配置。
第三步:
配置nginx的配置文件nginx.conf的upstream 和location /内容
完整的配置:
#用户 和用户组
user apache apache;
#进程数,一般设置和cpu核心数一致
worker_processes  1;
events {
     #linux下的高性能io模式
     use epoll;
    #每个进程的最大并发数
    worker_connections  1024;
}
http {
    include       mime.types;
    default_type  application/octet-stream;
    #sendfile 指令指定 nginx 是否调用 sendfile 函数(zero copy 方式)来输出文件,对于普通应用,
    #必须设为 on,如果用来进行下载等应用磁盘IO重负载应用,可设置为 off,以平衡磁盘与网络I/O处理速度,降低系统的uptime
    sendfile        on;
    keepalive_timeout  65;


	#开启gzip压缩
	gzip on;
	gzip_comp_level 7;
	gzip_min_length  1100; #需要压缩的最小长度
	gzip_buffers    4 8k;
	gzip_types      text/plain application/javascript text/css text/xml application/x-httpd-php; #指定需要压缩的文件类型
	output_buffers  1 32k;
	postpone_output  1460;

    upstream  myserver  {
		#配置集群服务器的真实地址,weight为权重
               server   192.168.1.110:8080  weight=1;
               server   192.168.1.108:8080  weight=1;
    }


    #一个虚拟主机
    server {
        listen       80;
        server_name  localhost;
        root /var/www/html;

	index index.html index.htm index.jsp;

        location / {
		#允许通过的域名
		proxy_pass        http://myserver;
		#替换http请求头为真正的服务器地址
		proxy_set_header   Host             $host;
		proxy_set_header   X-Real-IP        $remote_addr;
		proxy_set_header   X-Forwarded-For  $proxy_add_x_forwarded_for;
        }

        #location ~ .*.jsp$ {
	#	index index.jsp;
	#	proxy_pass http://localhost:8080;
        #}

	#一些静态文件的缓存设置

        #location ~ .*\.(gif|jpg|jpeg|png|bmp|swf)$ {
		#静态文件需要放在本地目录下
	#	root         /var/www/poseidon/root/static;
	#	access_log   off;
        #expires      30d;
        #}
        #location ~ .*\.(js|css)?$ {
        #expires      1h;
        #}
        #error_page   500 502 503 504  /50x.html;
        #location = /50x.html {
        #   root   html;
        #}

	 #设定查看Nginx状态的地址
	 #设置之后可以通过http://localhost/NginxStatus的方式查看nginx状态
	  location /NginxStatus {
		#stub_status            on;
		access_log              on;
		auth_basic              "NginxStatus";
		auth_basic_user_file  conf/htpasswd;
	  }
    }
}
第四步:
启动redis服务器,进入redis文件夹后输入命令src/redis-server ./redis.conf
[root@localhost redis-3.2.1]# pwd
/usr/local/redis-3.2.1
[root@localhost redis-3.2.1]#
成功启动后会看到会看到命令行打印出的数据库图形。如下:
[root@localhost redis-3.2.1]#
[root@localhost redis-3.2.1]# src/redis-server ./redis.conf
13242:M 11 Sep 21:22:57.933 * Increased maximum number of open files to 10032 (it was originally set to 1024).
                _._
           _.-``__ ''-._
      _.-``    `.  `_.  ''-._           Redis 3.2.1 (00000000/0) 64 bit
  .-`` .-```.  ```\/    _.,_ ''-._
 (    '      ,       .-`  | `,    )     Running in standalone mode
 |`-._`-...-` __...-.``-._|'` _.-'|     Port: 6379
 |    `-._   `._    /     _.-'    |     PID: 13242
  `-._    `-._  `-./  _.-'    _.-'
 |`-._`-._    `-.__.-'    _.-'_.-'|
 |    `-._`-._        _.-'_.-'    |           http://redis.io
  `-._    `-._`-.__.-'_.-'    _.-'
 |`-._`-._    `-.__.-'    _.-'_.-'|
 |    `-._`-._        _.-'_.-'    |
  `-._    `-._`-.__.-'_.-'    _.-'
      `-._    `-.__.-'    _.-'
          `-._        _.-'
              `-.__.-'

13242:M 11 Sep 21:22:57.940 # WARNING: The TCP backlog setting of 511 cannot be enforced because /proc/sys/net/core/somaxconn is set to the lower value of 128.
13242:M 11 Sep 21:22:57.940 # Server started, Redis version 3.2.1
13242:M 11 Sep 21:22:57.940 # WARNING overcommit_memory is set to 0! Background save may fail under low memory condition. To fix this issue add 'vm.overcommit_memory = 1' to /etc/sysctl.conf and then reboot or run the command 'sysctl vm.overcommit_memory=1' for this to take effect.
13242:M 11 Sep 21:22:57.941 # WARNING you have Transparent Huge Pages (THP) support enabled in your kernel. This will create latency and memory usage issues with Redis. To fix this issue run the command 'echo never > /sys/kernel/mm/transparent_hugepage/enabled' as root, and add it to your /etc/rc.local in order to retain the setting after a reboot. Redis must be restarted after THP is disabled.
13242:M 11 Sep 21:22:57.941 * DB loaded from disk: 0.000 seconds
13242:M 11 Sep 21:22:57.941 * The server is now ready to accept connections on port 6379
在两个tomcat下分别放入测试项目(需要有登录后保存session功能,并且能在jsp页面显示当前的服务器ip---目的是能看来来nginx的轮询),这里我就不说了,自己写一个。
启动tomcat,don not forget! 是两个tomcat都启动。
启动nginx,在启动nginx之前可以先测试tomcat是否正常启动。
第五步,测试
在笔记本浏览器输入:http://192.168.1.111/EqTest/login.jsp,看到如图1所示登陆界面,再刷新一下,变成了图2所示。在nginx中使用轮询的方式负载,并没采用ip_hash的方式,所以两次请求分别是从两个tomcat服务器响应的,从图片中可以看处。

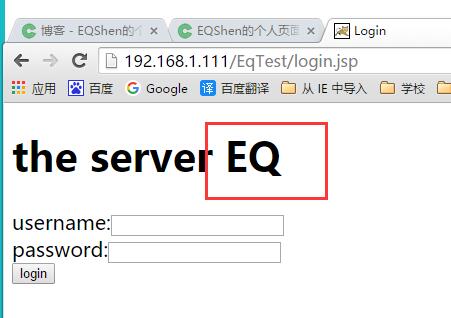
图1.登录界面一 图2.刷新后的登录界面
然后是登录之后,多次刷新页面,如图3,图4所示两种结果。


图3.主界面 图4刷新后的主界面
从上面的结果可以看出是成功的。
--------------------------------------------------------------------------------------------------------------------------------------------
在配置过程中遇到的问题:
第一:jar包版本问题,在第二步已经说明。
第二:java.lang.ClassNotFoundException: com.orangefunction.tomcat.redissessions.RedisSessionHandlerValve
说起来也奇怪,两个tomcat都是同样的版本apache-tomcat-7.0.70,使用的jar包也是一样的,但其中一个没遇到这个问题,另一个启动的时候查看日志遇到了这个问题。
这到底是什么原因,我找了3个小时,期间有的说是jar包版本不对的问题,我也使用gradle对项目源码进行了重新build,然并卵啊!
偶然的一瞬间,我发现一个问题,看contxt.xml配置文件!
<Valve className="com.orangefunction.tomcat.redissessions.RedisSessionHandlerValve" />
	  <Manager className="com.orangefunction.tomcat.redissessions.RedisSessionManager"
	   host="10.10.49.20"
	   port="6379"
	   database="0"
	   maxInactiveInterval="60" />
发现问题了吗???!!! redissessions和session!
正确的配置文件应该是把redissessions改成session!
正确的配置:
<Valve className="com.radiadesign.catalina.session.RedisSessionHandlerValve" />
	<Manager className="com.radiadesign.catalina.session.RedisSessionManager" host="192.168.1.111" port="6379" database="0" maxInactiveInterval="60" />
想在仔细想象为什么会出现这个问题?因为我也是看了网上某个人的博客配置的,他一个人错,就带偏了一部分人。
也许他并没有错,是因为tomcat-redis-session-manager官方的项目调整了包的结构,但博客的内容不可能跟着更新。所以,这也是一种教训和经验吧。一定要以官方文档为准!!!!!
第三:Http status 500 reids denied拒绝问题:
redis 在启动后,在浏览器输入地址测试的时候会出现以下错误:
HTTP Status 500 - DENIED Redis is running in protected mode because protected mode is enabled, no bind address was specified, no authentication password is requested to clients. In this mode connections are only accepted from the loopback interface. If you want to connect from external computers to Redis you may adopt one of the following solutions: 1) Just disable protected mode sending the command 'CONFIG SET protected-mode no' from the loopback interface by connecting to Redis from the same host the server is running, however MAKE SURE Redis is not publicly accessible from internet if you do so. Use CONFIG REWRITE to make this change permanent. 2) Alternatively you can just disable the protected mode by editing the Redis configuration file, and setting the protected mode option to 'no', and then restarting the server. 3) If you started the server manually just for testing, restart it with the '--protected-mode no' option. 4) Setup a bind address or an authentication password. NOTE: You only need to do one of the above things in order for the server to start accepting connections from the outside.
报错内容已经把报错原因说的很清楚了,解决方案也提供了4条。大概意思就是说:redis安全模块启用,没用bind address的情况下,非redis本机上的客户端是无法连接redis服务器的,因为默认的配置bind 的是本地回路127.0.0.1,在给出的解决方案中有2种简单易行 ,第一种修改bind地址,第二种关闭protected mode。于是乎就打开vim ./redis.conf
会看到如下两行:
bind 127.0.0.1
protected-mode yes
那么这个bind是什么意思呢?看注释部分的解释如下
# By default, if no "bind" configuration directive is specified, Redis listens
# for connections from all the network interfaces available on the server.
# It is possible to listen to just one or multiple selected interfaces using
# the "bind" configuration directive, followed by one or more IP addresses.
#
# Examples:
#
# bind 192.168.1.100 10.0.0.1
# bind 127.0.0.1 ::1
#
# ~~~ WARNING ~~~ If the computer running Redis is directly exposed to the
# internet, binding to all the interfaces is dangerous and will expose the
# instance to everybody on the internet. So by default we uncomment the
# following bind directive, that will force Redis to listen only into
# the IPv4 lookback interface address (this means Redis will be able to
# accept connections only from clients running into the same computer it
# is running).
简单解释一下,bind绑定的是本机(注意是redis所在的本机)的网卡接口的ip,只有将本地ip bind后,才可以暴露本机redis服务以供其他机器的客户端使用
如果你本地机器有多个网卡,可以多绑定,如: bind 192.168.1.111 10.0.0.1。
如果bind 是127.0.0.1,只有本地机器的客户端通过redis-cli命令可以连接redis-server。
所以要解决以上错误,有2中方法:
方案1)更改redis.conf 的bind内容为bind xxx.xxx.xxx.xxx 注意xxx.xxx.xxx.xxx是你本机的ip。
或者直接在bind那行的前面加个#号。
方案2)更改protected-mode yes为protected-mode no
最后重启redis服务器:src/redis-server。
怎么样,问题解决了吗?如果没解决那就对了,这里还有一个坑需要你踩:
使用src/redis-server启动的时候使用的是默认的配置文件,所以正确的姿势是:
src/redis-server ./redis.conf
搞定!。
第一次比较正规的发博文,目的除了记录所学知识,还有就是想分享一下,把自己踩的坑分享出来,如有错误,还请不吝指出。多谢!
-----------------------------------------------------------------
参考文章:
http://blog.csdn.net/ahstusujian/article/details/47974699
http://www.oschina.net/question/815618_194320
http://blog.csdn.net/grhlove123/article/details/48047735


 1624
1624

 被折叠的 条评论
为什么被折叠?
被折叠的 条评论
为什么被折叠?
 到【灌水乐园】发言


