


定位服务是很多程序中都用到的,主要使用CoreLocation库中的CLLocationManager类和CLLocation类。
实现结果使用弹窗显示,如下图:

实现步骤:
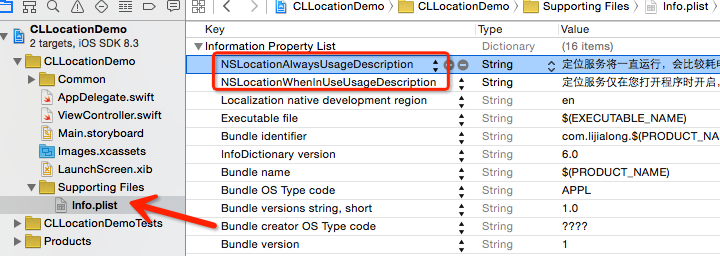
首先,我们需要在Info.plist文件中添加两个字段:
//始终开启定位的用户提示信息
NSLocationAlwaysUsageDescription

//仅在程序使用时开启定位的用户提示信息
NSLocationWhenInUseUsageDescription
如下图,Value为自定义信息,用来显示在系统的设置界面中:
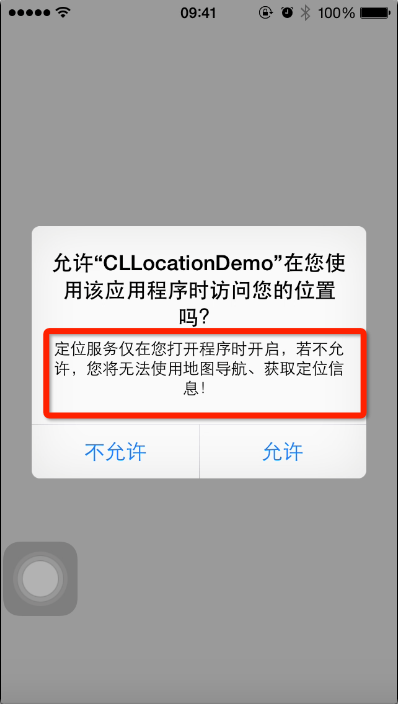
当程序打开时,如果用户没有选择过是否允许App获取定位信息,会弹出窗口显示,在窗口中会显示NSLocationWhenInUseUsageDescription的内容:
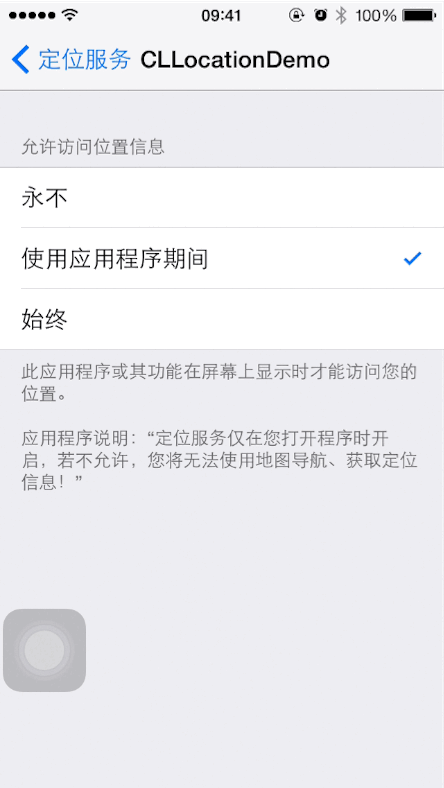
在系统的设置-定位中,显示如下(应用程序说明):
现在,可以开始写代码了:
import UIKit
import CoreLocation

class ViewController: UIViewController,CLLocationManagerDelegate {

    var locationManager:CLLocationManager!

    override func viewDidLoad() {
        super.viewDidLoad()

        //如果设备没有开启定位服务
        if !CLLocationManager.locationServicesEnabled(){
            dispatch_async(dispatch_get_main_queue()){
                SCMessageBox.showquick(self, contentMsg: "无法定位,因为您的设备没有启用定位服务,请到设置中启用")
            }
            return
        }

        locationManager = CLLocationManager()

        //设置精确度
        locationManager.desiredAccuracy = kCLLocationAccuracyBest
        //变化距离  超过50米 重新定位
        locationManager.distanceFilter = 50
        //在IOS8以上系统中,需要使用requestWhenInUseAuthorization方法才能弹窗让用户确认是否允许使用定位服务的窗口
        if SCDevice.getVersion() >=  8.0 {

            //状态为,用户还没有做出选择,那么就弹窗让用户选择
            if CLLocationManager.authorizationStatus() == CLAuthorizationStatus.NotDetermined {
                locationManager.requestWhenInUseAuthorization()
                //locationManager.requestAlwaysAuthorization()
            }
            //状态为,用户在设置-定位中选择了【永不】,就是不允许App使用定位服务
            else if(CLLocationManager.authorizationStatus() == CLAuthorizationStatus.Denied){
                //需要把弹窗放在主线程才能强制显示
                dispatch_async(dispatch_get_main_queue()){
                    SCMessageBox.showquick(self, contentMsg: "无法定位,因为您没有授权本程序使用定位,请至设置中开启!")
                    return
                }
            }
        }
        //设置定位获取成功或者失败后的代理,Class后面要加上CLLocationManagerDelegate协议
        locationManager.delegate = self

        //开始获取定位信息,异步方式
        locationManager.startUpdatingLocation()
    }

    func locationManager(manager: CLLocationManager!, didFailWithError error: NSError!) {
        SCMessageBox.showquick(self, contentMsg: "定位发生异常:\(error)")
    }

    func locationManager(manager: CLLocationManager!, didUpdateLocations locations: [AnyObject]!) {
        if locations.count > 0{ //  使用last 获取 最后一个最新的位置, 前面是上一次的位置信息
            var locationInfo:CLLocation = locations.last as! CLLocation
            SCMessageBox.showquick(self, contentMsg: "经度:\(locationInfo.coordinate.longitude),纬度:\(locationInfo.coordinate.latitude)")
        }
    }
    override func didReceiveMemoryWarning() {
        super.didReceiveMemoryWarning()
        // Dispose of any resources that can be recreated.
    }
}
tips:
本文由wp2osc导入,原文链接:http://devonios.com/get-location.html
由于OSChina的OpenAPI在处理content参数时会自动过滤img标签,所以无法显示图片,详见。


 7183
7183

 被折叠的 条评论
为什么被折叠?
被折叠的 条评论
为什么被折叠?
 到【灌水乐园】发言


