


主要内容
- 模块介绍
- time和datetime模块
- random
- os
- sys
- shutil
- json和picle
- shelve
- xml处理
- hashlib
- re正则表达式
模块介绍1.定义
模块:用来从逻辑上组织python(变量,函数,类,逻辑,实现一个功能),
本质就是.py结尾的python文件(文件名test.py模块名test)
包:用来从逻辑上来组织模块的,本质就是一个目录(必须带有以个__init__.py文件)
2.导入方法
from . import test1    #从当前目录下导入test1
import module_name   #单个
import module_name,module_name2  #多个
import m0odule_alex import m1,m2,m3   #导入模块下的变量
from module_alex import *   #导入模块的全部变量。。。(不建议这么使用
from moodule_alex import logger  as logger_alex   #关键字导入
3.import本质(路径搜索和搜索路径)
导入模块的本质就是把py文件解释一遍
(import test test = 'test.py all code')
import module_name ---> module_name.py -->module_name.py 的路径执行一边--->sys.path
添加要导入的环境变量
# import sys,os
# print(sys.path)
# print(os.path.dirname(os.path.dirname(os.path.abspath(__file__)))  )  #获取当前文件的文件绝对路径(__file__当前文件的文件名)
# sys.path.append(os.path.dirname(os.path.dirname(os.path.abspath(__file__))) )#在搜索路径里添加文件环境变量
导入包的本质就只解释(执行)包的__init__.py文件(需要在__init__文件里导入其他py文件导入包才能生效)
上级目录下的子级文件导入
import os ,sys

sys.path.append(os.path.dirname(os.path.dirname(os.path.abspath(__file__))))
from day5 import package_test

package_test.test1.logger()
4.代码优化
from module__test import test
from module__test import test as test1 #导入模块赋值防止重复源码中调用
5.模块的分类
- 标准库
- 开源库(第三方模块)
- 自定义模块
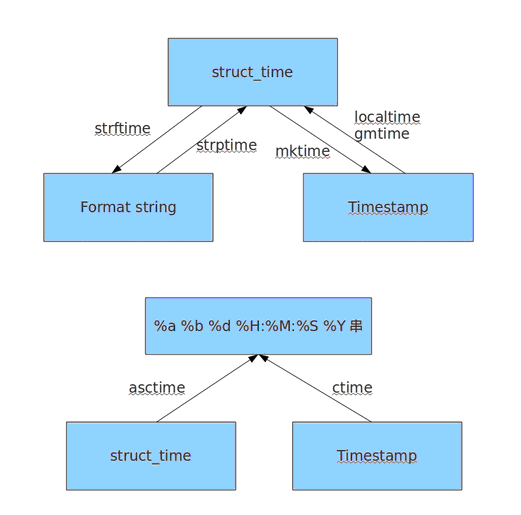
time和datetime模块(标准库)
时间相关的操作,时间有三种表达方式:
- 时间戳 1997年1月1日截止到现今以秒为单位的时间 即:time.time()
- 格式化的字符串 2017-9-10-11:11 即:time.strftime('%Y-%m-%d')
- 结构化时间 元组包含了:年,日,星期等...time.struct_time 即:time.localtime
#_*_coding:utf-8_*_


import time


# print(time.altzone)  #返回与utc时间的时间差,以秒计算\
# print(time.asctime()) #返回时间格式"Fri Aug 19 11:14:16 2016",
# print(time.localtime()) #返回本地时间 的struct time对象格式
# print(time.gmtime(time.time()-800000)) #返回utc时间的struc时间对象格式

# print(time.asctime(time.localtime())) #返回时间格式"Fri Aug 19 11:14:16 2016",
#print(time.ctime()) #返回Fri Aug 19 12:38:29 2016 格式, 同上


# 日期字符串 转成  时间戳
# string_2_struct = time.strptime("2016/05/22","%Y/%m/%d") #将 日期字符串 转成 struct时间对象格式
# print(string_2_struct)
# #
# struct_2_stamp = time.mktime(string_2_struct) #将struct时间对象转成时间戳
# print(struct_2_stamp)


#将时间戳转为字符串格式
# print(time.gmtime(time.time()-86640)) #将utc时间戳转换成struct_time格式
# print(time.strftime("%Y-%m-%d %H:%M:%S",time.gmtime()) ) #将utc struct_time格式转成指定的字符串格式


#时间加减
import datetime

# print(datetime.datetime.now()) #返回 2016-08-19 12:47:03.941925
#print(datetime.date.fromtimestamp(time.time()) )  # 时间戳直接转成日期格式 2016-08-19
# print(datetime.datetime.now() )
# print(datetime.datetime.now() + datetime.timedelta(3)) #当前时间+3天
# print(datetime.datetime.now() + datetime.timedelta(-3)) #当前时间-3天
# print(datetime.datetime.now() + datetime.timedelta(hours=3)) #当前时间+3小时
# print(datetime.datetime.now() + datetime.timedelta(minutes=30)) #当前时间+30分


#
# c_time  = datetime.datetime.now()
# print(c_time.replace(minute=3,hour=2)) #时间替换

random模块(随机模块 )
import random

random.random()#随机浮点数,范围0-1
random.uniform(1,3)   #随机浮点,范围1-3

random.randint(1,3)  #随机1-3
random.randrange(5)  #随机0-5(不包含5)

random.chioce('hello)#随机序列   列表字符串
random.sample('hello',2)   #随机序列可自定义取值数

itme = [1,2,3,4,5,6,7]
random.shuffle(itme    #随机顺序itme
一个验证码功能
#验证码功能四位
import random

checkcode = ''

for i in range(4):
    #i=0
    current = random.randrange(0,4)
   #字母
    if current == i:
        tmp = chr(random.randint(65,90))

    else:
        tmp = random.randint(0,9)

    checkcode+=str(tmp)

print(checkcode)
os模块
提供对操作系统进行调用的接口(类似于命令行操作)
os.getcwd()  #获取当前的工作目录
os.chdir()   #改变当前目录
os.curdir()#返回当前目录
os.padir()   #返回父级目录


os.makedirs(r'c:\a\c\v')   #递归创建目录(上级创建在创建下一级)
os.removedirs(c:\a)         #递归删除目录,若目录为空递归删除上一级如此类推
os.mkdir(C:\a\c\v)     #创建单级目录   创建c下的v
os.rmdir()                 #删除单级目录
os.listdir()             #列出指定目录下所有文件名
os.remove()    #删除文件
os.rename('oldname','newname')     #重新命名文件/目录
os.stat('here')                   #获取文件\目录信息

os.sep           #输入系统特定的路线分割符  win'\\'  linux下‘/’
os.linesep       #输入特定的换行符           win '\t\n'  linux下‘\n’
os.pathsep      #

os.envirn           #系统环境变量(以字典模式输出)
os.name             #当前系统
os.system('dir')    #运行系统 命令

os.abspath(path)   #获取某文件的绝对路径
os.path.split('c:\c\g\gb.txt')        #('C:\c\g','gb.txt')
os.path.dirname(path)          #返回path
os.path.basename(path)          #只取文件名
os.path.exist(r'C:')                 #判断文件是否存在
os.path.isabs()                         #判断是否绝对路径
os.path.isfile()                          #判断是否是文件
os.path.isdir()                          #判断是否是目录
os.path.join()                            #将多个路径组合返回
os.path.getatime                         #返回path所指向的文件或目录的最后存取时间
os.path.getmtime()                     #返回path所指向的文件或目录的最后修改时间
sys模块
sys.argv             #命令行参数LIST,第一个元素是程序本身路径

sys.exit(n)            #退出程序,正常退出exit(0)

sys.version             #获取python解释程序的版本信息

sys.maxint                #最大的int值

sys.path               #返回模块的搜索路径,初始化是使用PYTHONPATH环境变量
sys.stdout.write('palresa')
val = sys.stdin.readline()[:-1]
shuitl模块
文件文件夹的拷贝 ,压缩
import  shutil

f1 = open('笔记', encoding='utf-8'
f2 = open('笔记拷贝','w',encoding = 'utf-8')
shutil.copyfileobj(f1,f2)


shutil.copyfile('笔记拷贝','笔记拷贝二')            #拷贝文件

shutil.copymode(src,dst)                        #仅拷贝,内容主用户均不变

shutil.copystat(src,dst)          #拷贝信息,包括mode bits,atime,mtime,flags

shutil.coy(src,dst)          #拷贝文件和权限

shutil.copy2(src,dst)            #拷贝文件和状态信息

shuil.ignore_patterns(*patterns)
shutil.copytree(src,dst,symlinks,ignore=none)#递归取拷贝(拷贝目录)

shutil.rmtree(path[,ignore_errors[,oerror]])    #递归取删除文件(删除目录)


shutil.move(src,dst)            #移动文件


shutil.make_archive(base_name,format,.....)
#创建压缩包并返回文件当前路径
#base_name  :压缩包的文件名,也可以是压缩包的路径,只是文件名则保存在当前目录
,否则保存至指定路径
format:压缩的种类‘zip’,‘tar’'bztar','gztar'

#root_dir:压缩的文件夹路径(默认当前路径)
owner:用户,默认当前用户
group:组,默认当前组
logger:用于记录日志,通常是logger。logger对象
import shutil
#
# f1 = open('笔记',encoding='utf-8')
#
# f2 = open('笔记拷贝','w',encoding='utf-8')
#
# shutil.copyfileobj(f1,f2)

# shutil.copyfile('笔记拷贝','笔记拷贝二')
# shutil.copystat('笔记','笔记拷贝')

# shutil.make_archive('shutil_archive_test','zip','C:/Users/Administrator/PycharmProjects/s1/day5')


import zipfile

z= zipfile.ZipFile('day5.zip','w')

z.write('p.tesst.py')
print('-------')
z.write('笔记拷贝二')
shuil对压缩包的处理是调用ZipFile和TarFile两个模块来进行的
 ZipFile
TarFile
ZipFile
TarFile
json和pickle
用于序列化的两个模块
- json 用于字符串和python数据和其他语言数据转换
- pickle, 用于python特有的类型和pythonde 数据类型间互换
json和pilckle模块提供了四个功能 :dumps,dump,loads,load
#序列化

import pickle

def sayhi(name):
    print('hello',name)
info = {
    'name':'alex',
    'age':22,
    'func':sayhi
}
f=open('test.text','wb')
f.write(pickle.dumps( info))
# print(json.dumps(info))


f.close()

#反序列化

import json

def sayhi(name):
    print('hello',name)
f = open('test.text','rb')

# data =eval( f.read())
data = json.loads(f.read())

print(data['age'])
pickle和json操作相同
shelve模块
shelve是一额简单的数据存储方案,他只有一个函数就是open(),这个函数接收一个参数就是文件名,然后返回一个shelf对象,你可以用他来存储东西,就可以简单的把他当作一个字典,当你存储完毕的时候,就调用close函数来关闭
# Author:Zhiyu Su
import shelve
import datetime
d = shelve.open('shelve_test')

#读取
print(d.get('name'))
print(d.get('info'))
print(d.get('data'))

#写入
# info = {'age':22,'job':'it'}
#
# name = ['alex','rain','test']
# d['name'] = name   #
# d['info'] = info   #
# d['data'] = datetime.datetime.now()
#
# d.close()
xml处理模块
xml是实现不同语言或程序之间进行数据交换的协议,跟json使用起来更简单,不过,在json没有出生的
时候,大家选择用xml就是通过<>节点来区别数据结构
# Author:Zhiyu Su
import xml.etree.ElementTree as ET

new_xml = ET.Element("personinfolist")   #根节点

personinfo = ET.SubElement(new_xml, "personinfo", attrib={"enrolled": "yes"}) #子节点   attrib(属性)
name = ET.SubElement(personinfo,'name')
name.text = "ALEX"
age = ET.SubElement(personinfo, "age", attrib={"checked": "no"})
sex = ET.SubElement(personinfo, "sex")
age.text = '33'

personinfo2 = ET.SubElement(new_xml, "personinfo", attrib={"enrolled": "no"})
name = ET.SubElement(personinfo2,'name')
name.text = "shuzji"
age = ET.SubElement(personinfo2, "age")
age.text = '19'


et = ET.ElementTree(new_xml)  # 生成文档对象
et.write("test.xml", encoding="utf-8", xml_declaration=True)#xml_declaration=True声明xml文件

ET.dump(new_xml)  # 打印生成的格式
'''personinfolist>
    <personinfo enrolled="yes">
        <name>ALEX</name>
        <age checked="no">33</age>
        <sex />

        </personinfo><personinfo enrolled="no">
        <name>shuzji</name>
        <age>19</age>
    </personinfo>
</personinfolist>'''
xml处理
import xml.etree.ElementTree as ET

tree = ET.parse('xmltest.xml') #要处理的文件
root = tree.getroot()
print(root)  #整个文档
print(root.tag)  #tag标签名


#遍历xml文档

for child in root:
    print(child.tag, child.attrib)    #child.ta打印标签名,child.attrib打印属性
    for i in child:
        print(i.tag,i.text,i.attrib)


# #只遍历year节点
# for node in root.iter('year'):
#     print(node.tag,node.text)
xml修改
import xml.etree.ElementTree as ET

tree = ET.parse("xmltest.xml")
root = tree.getroot()

# 修改
# for node in root.iter('year'):
#     new_year = int(node.text) + 1
#     node.text = str(new_year)
#     node.set("updated", "yes1")  #添加属性
#
# tree.write("xmltest.xml")

# 删除node
for country in root.findall('country'):
    rank = int(country.find('rank').text)
    if rank > 50:
        root.remove(country)

tree.write('output.xml')
configparser模块
用于生成修改常见的配置文档 2.0模块名是ConfigParser
configparser文件
[DEFAULT]
ServerAliveInterval = 45
Compression = yes
CompressionLevel = 9
ForwardX11 = yes

[bitbucket.org]
User = hg

[topsecret.server.com]
Port = 50022
ForwardX11 = no
configparser读
import configparser

conf = configparser.ConfigParser()
conf.read('example.ini')

print(conf.defaults())#打印变为有序的字典
print(conf['bitbucket.org']['user'])
# print(conf.sections())   #读


sec = conf.remove_section('bitbucket.org')
conf.write(open('example.cfg','w'))
configparser写
import configparser

config = configparser.ConfigParser()

config["DEFAULT"] = {'ServerAliveInterval': '45',
                     'Compression': 'yes',
                     'CompressionLevel': '9'}

config['bitbucket.org'] = {}
config['bitbucket.org']['User'] = 'hg'#写值


config['topsecret.server.com'] = {}
topsecret = config['topsecret.server.com']
topsecret['Host Port'] = '50022'  # mutates the parser  赋值
topsecret['ForwardX11'] = 'no'  # same here
config['DEFAULT']['ForwardX11'] = 'yes'
with open('example.ini', 'w') as configfile:   #写入文件
    config.write(configfile)
hashlib模块
用于加密操作
# Author:Zhiyu Su

import hashlib

# m = hashlib.md5()  #md5加密(创建一个加密对象)
# m.update(b'hello')     #加密
# print(m.hexdigest())   #hexdigetst  以十六进制方式加密

# m.update(b'It"s me')
# print(m.hexdigest())

# m.update(b'It"s  been a long')
# print(m.hexdigest())


# m2 = hashlib.md5()
# m2.update(b'helloIt"s me')
# print(m2.hexdigest())

# s2 = hashlib.sha1()
# s2.update(b'helloIt"s me')
# print(s2.hexdigest())

import  hmac

h = hmac.new('你是谁'.encode(encoding='utf-8'))
print(h.digest())
print(h.hexdigest())
re
re正则表达式
常规正则表达式符号(动态模糊的匹配)
'.' 默认匹配除\n之外的任意一个字符,若指定flag DOTALL,则匹配任意字符,包括换行
'^' 匹配字符开头,若指定flags MULTILINE,这种也可以匹配上(r"^a","\nabc\neee",flags=re.MULTILINE)
'$' 匹配字符结尾,或e.search("foo$","bfoo\nsdfsf",flags=re.MULTILINE).group()也可以
'*' 匹配*号前的字符0次或多次,re.findall("ab*","cabb3abcbbac") 结果为['abb', 'ab', 'a']
'+' 匹配前一个字符1次或多次,re.findall("ab+","ab+cd+abb+bba") 结果['ab', 'abb']
'?' 匹配前一个字符1次或0次
'{m}' 匹配前一个字符m次
'{n,m}' 匹配前一个字符n到m次,re.findall("ab{1,3}","abb abc abbcbbb") 结果'abb', 'ab', 'abb']
'|' 匹配|左或|右的字符,re.search("abc|ABC","ABCBabcCD").group() 结果'ABC'
'(...)' 分组匹配,re.search("(abc){2}a(123|456)c", "abcabca456c").group() 结果 abcabca456c
'\A' 只从字符开头匹配,re.search("\Aabc","alexabc") 是匹配不到的
'\Z' 匹配字符结尾,同$
'\d' 匹配数字0-9
'\D' 匹配非数字
'\w' 匹配[A-Za-z0-9]
'\W' 匹配非[A-Za-z0-9]
's' 匹配空白字符、\t、\n、\r , re.search("\s+","ab\tc1\n3").group() 结果 '\t'
'(?P<name>...)' 分组匹配 re.search("(?P<province>[0-9]{4})(?P<city>[0-9]{2})(?P<birthday>[0-9]{4})","371481199306143242").groupdict("city")
结果{'province': '3714', 'city': '81', 'birthday': '1993'}
import re
res = re.match('^chen\d+','cheng321ronghua123')   #重字符串开头匹配
print(res.group())   #cheng321

res = re.search('^R.+','cheng321Ronghua123')   #从全文开始匹配
print(res.group())    #Ronghua123

re.findall('[0-9]{0-3}','aalx2a345aa')   # 0-9的数字找1-3位

#['1','2','345']  返回所有符合条件的以列表形式

re.split('[[0-9]+','abc12de3f45Gh')  #用数字分割
#['abc','de' ,'f','Gh']

re.sub('[[0-9]+','|','abc12de3f45Gh')
#'abc|de|f|Gh'
常用到的匹配语法
re.match 从头开始匹配
re.search 匹配包含
re.findall 把所有匹配到的字符放到以列表中的元素返回
re.splitall 以匹配到的字符当做列表分隔符
re.sub      匹配字符并替换
匹配模式
re.I(re.IGNORECASE): 忽略大小写(括号内是完整写法,下同)
M(MULTILINE): 多行模式,改变'^'和'$'的行为(参见上图)
S(DOTALL): 点任意匹配模式,改变'.'的行为
正则表达式可以使用r"\\"表示。同样,匹配一个数字的"\\d"可以写成r"\d"。


 2494
2494


 被折叠的 条评论
为什么被折叠?
被折叠的 条评论
为什么被折叠?
 到【灌水乐园】发言


