


序言
最近项目要实现这样一个效果:运行后,要有一个service始终保持在后台运行,不管用户作出什么操作,都要保证service不被kill。参考了现今各种定制版的系统和安全厂商牛虻软件,如何能保证自己的Service不被杀死呢?其实除了常规的手段,我们可以参考一下微信和360,设置-程序-正在运行,可以看到微信是同时开启了两个进程和服务:

Service简介
Service是在一段不定的时间运行在后台,不和用户交互应用组件。每个Service必须在manifest中 通过<service>来声明。可以通过contect.startservice和contect.bindserverice来启动。和其他的应用组件一样,运行在进程的主线程中。这就是说如果service需要很多耗时或者阻塞的操作,需要在其子线程中实现(或者用系统提供的IntentService,它继承了Service,它处理数据是用自身新开的线程)。【当然你也可以在新的线程中startService,这样Service就不是在MainThread了】
本地服务 Local Service 用于应用程序内部
它可以启动并运行,直至有人停止了它或它自己停止。在这种方式下,它以调用Context.startService()启动,而以调用Context.stopService()结束。它可以调用Service.stopSelf() 或 Service.stopSelfResult()来自己停止。不论调用了多少次startService()方法,你只需要调用一次stopService()来停止服务。
【用于实现应用程序自己的一些耗时任务,比如查询升级信息,并不占用应用程序比如Activity所属线程,而是单开线程后台执行,这样用户体验比较好】
远程服务 Remote Service 用于Android系统内部的应用程序之间
它可以通过自己定义并暴露出来的接口进行程序操作。客户端建立一个到服务对象的连接,并通过那个连接来调用服务。连接以调用Context.bindService()方法建立,以调用 Context.unbindService()关闭。多个客户端可以绑定至同一个服务。如果服务此时还没有加载,bindService()会先加载它。
【可被其他应用程序复用,比如天气预报服务,其他应用程序不需要再写这样的服务,调用已有的即可】
1,Service的生命周期
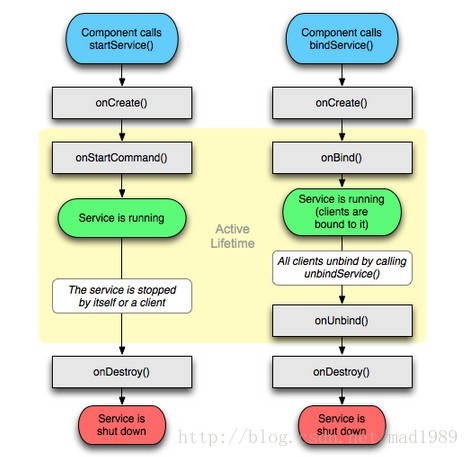
2,Service运行方式
以startService()启动服务,系统将通过传入的Intent在底层搜索相关符合Intent里面信息的service。如果服务没有启动则先运行onCreate,然后运行onStartCommand (可在里面处理启动时传过来的Intent和其他参数),直到明显调用stopService或者stopSelf才将停止Service。无论运行startService多少次,只要调用一次stopService或者stopSelf,Service都会停止。使用stopSelf(int)方法可以保证在处理好intent后再停止。onStartCommand ,在2.0后被引入用于service的启动函数,2.0之前为public void onStart(Intent intent, int startId) 。
以bindService()方法启用服务,调用者与服务绑定在了一起,调用者一旦退出,服务也就终止。onBind()只有采用Context.bindService()方法启动服务时才会回调该方法。该方法在调用者与服务绑定时被调用,当调用者与服务已经绑定,多次调用Context.bindService()方法并不会导致该方法被多次调用。采用Context.bindService()方法启动服务时只能调用onUnbind()方法解除调用者与服务解除,服务结束时会调用onDestroy()方法。
3,拥有service的进程具有较高的优先级
官方文档告诉我们,Android系统会尽量保持拥有service的进程运行,只要在该service已经被启动(start)或者客户端连接(bindService)到它。当内存不足时,需要保持,拥有service的进程具有较高的优先级。
1. 如果service正在调用onCreate,onStartCommand或者onDestory方法,那么用于当前service的进程则变为前台进程以避免被killed。
2. 如果当前service已经被启动(start),拥有它的进程则比那些用户可见的进程优先级低一些,但是比那些不可见的进程更重要,这就意味着service一般不会被killed.
3. 如果客户端已经连接到service (bindService),那么拥有Service的进程则拥有最高的优先级,可以认为service是可见的。
4. 如果service可以使用startForeground(int, Notification)方法来将service设置为前台状态,那么系统就认为是对用户可见的,并不会在内存不足时killed。
5. 如果有其他的应用组件作为Service,Activity等运行在相同的进程中,那么将会增加该进程的重要性。
实现前台:
Service如果要防止尽可能不被系统杀掉,需要设置为在前台运行。
1.MainActivity.java
 1 package com.example.helloteacher;
 2
 3 import com.example.teacherService.HelloteacherService;
 4 import com.example.teacherService.HelloteacherService2;
 5
 6 import android.app.Activity;
 7 import android.content.Intent;
 8 import android.os.Bundle;
 9 import android.util.Log;
10 import android.view.View;
11 import android.widget.Button;
12 import android.widget.TextView;
13
14 public class MainActivity extends Activity {
15     private TextView fuction;
16     private Button start;
17     @Override
18     protected void onCreate(Bundle savedInstanceState) {
19         super.onCreate(savedInstanceState);
20         setContentView(R.layout.activity_main);
21         //初始化控件
22         init();
23         //创建进程
24         inProcess();
25 }
26     ///初始化控件函数
27     private void init() {
28         start=(Button)findViewById(R.id.button1);
29         fuction=(TextView)findViewById(R.id.tv_bottom_funtion);
30         start.setOnClickListener(new StartOnClickListener());
31         fuction.setOnClickListener(new FuctionOnClickListener());
32     }
33     //功能按钮监听实现函数
34     private final class  FuctionOnClickListener implements View.OnClickListener{
35
36         @Override
37         public void onClick(View v) {
38             // TODO Auto-generated method stub
39             Intent intent = new Intent(MainActivity.this, FuctionActivity.class);
40             startActivity(intent);
41         }
42     }
43     //进程函数
44     private void inProcess(){
45         Intent intent =new Intent(MainActivity.this, HelloteacherService.class);
46         startService(intent);
47         Intent intent2 =new Intent(MainActivity.this, HelloteacherService2.class);
48         startService(intent2);
49     }
50     private final class  StartOnClickListener implements View.OnClickListener{
51
52         @Override
53         public void onClick(View v) {
54
55         }
56     }
57
58
59 }
2.HelloteacherService.java
 1 package com.example.teacherService;
 2
 3 import com.example.Receiver.Alarmreceiver;
 4 import com.example.helloteacher.R;
 5
 6 import android.app.AlarmManager;
 7 import android.app.Notification;
 8 import android.app.PendingIntent;
 9 import android.app.Service;
10 import android.content.Intent;
11 import android.os.IBinder;
12 import android.os.SystemClock;
13 import android.util.Log;
14
15 public class HelloteacherService extends Service {
16     HelloteacherService2 hs2;
17     private String TAG="HelloteacherService";
18     @Override
19     public void onCreate() {
20         super.onCreate();
21        Log.i(TAG, "-->>onCreate");
22     }
23
24     @Override
25     public int onStartCommand(Intent intent, int flags, int startId) {
26         Log.i(TAG, "-->>onStartCommand-->>"+startId);
27          flags = START_STICKY;
28
29          //启用前台服务,主要是startForeground()
30             Notification notification = new Notification(R.drawable.ic_launcher, "用电脑时间过长了!白痴!"
31                     , System.currentTimeMillis());
32             notification.setLatestEventInfo(this, "快去休息!!!",
33                     "一定保护眼睛,不然遗传给孩子,老婆跟别人跑啊。", null);
34             //设置通知默认效果
35             notification.flags = Notification.FLAG_SHOW_LIGHTS;
36             startForeground(1, notification);
37
38             AlarmManager manager = (AlarmManager) getSystemService(ALARM_SERVICE);
39             //读者可以修改此处的Minutes从而改变提醒间隔时间
40             //此处是设置每隔55分钟启动一次
41             //这是55分钟的毫秒数
42             int Minutes = 55 * 60 * 1000;
43             //SystemClock.elapsedRealtime()表示1970年1月1日0点至今所经历的时间
44             long triggerAtTime = SystemClock.elapsedRealtime() + Minutes;
45             //此处设置开启AlarmReceiver这个Service
46             Intent i = new Intent(this, Alarmreceiver.class);
47             PendingIntent pi = PendingIntent.getBroadcast(this, 0, i, 0);
48             //ELAPSED_REALTIME_WAKEUP表示让定时任务的出发时间从系统开机算起,并且会唤醒CPU。
49             manager.set(AlarmManager.ELAPSED_REALTIME_WAKEUP, triggerAtTime, pi);
50
51         return super.onStartCommand(intent, flags, startId);
52     }
53    //监听服务2实现函数
54
55
56     @Override
57     public IBinder onBind(Intent arg0) {
58         Log.i(TAG, "-->>onBind");
59         // TODO Auto-generated method stub
60         return null;
61     }
62      @Override
63      public void onDestroy() {
64          Log.i(TAG, "-->>onDestroy");
65             super.onDestroy();
66
67         }
68 }
3.BootReceiver.java
 1 package com.example.Receiver;
 2
 3 import android.app.AlarmManager;
 4 import android.app.PendingIntent;
 5 import android.content.BroadcastReceiver;
 6 import android.content.Context;
 7 import android.content.Intent;
 8 import android.os.SystemClock;
 9
10 public class BootReceiver extends BroadcastReceiver {
11
12     /*要接收的intent源*/
13     static final String ACTION = "android.intent.action.BOOT_COMPLETED";
14
15     public void onReceive(Context context, Intent mintent)
16     {
17         if (Intent.ACTION_BOOT_COMPLETED.equals(mintent.getAction())) {
18             // 启动完成
19             Intent intent = new Intent(context, Alarmreceiver.class);
20             intent.setAction("arui.alarm.action");
21             PendingIntent sender = PendingIntent.getBroadcast(context, 0,
22                     intent, 0);
23             long firstime = SystemClock.elapsedRealtime();
24             AlarmManager am = (AlarmManager) context
25                     .getSystemService(Context.ALARM_SERVICE);
26
27             // 10秒一个周期,不停的发送广播
28             am.setRepeating(AlarmManager.ELAPSED_REALTIME_WAKEUP, firstime,
29                     10 * 1000, sender);
30         }
31     }
32
33
34 }
4.Alarmreceiver.java
 1 package com.example.Receiver;
 2
 3 import com.example.teacherService.HelloteacherService;
 4
 5 import android.content.BroadcastReceiver;
 6 import android.content.Context;
 7 import android.content.Intent;
 8
 9 public class Alarmreceiver extends BroadcastReceiver {
10
11     @Override
12     public void onReceive(Context context, Intent intent) {
13         // TODO Auto-generated method stub
14         if (intent.getAction().equals("arui.alarm.action")) {
15             Intent i = new Intent();
16             i.setClass(context, HelloteacherService.class);
17             // 启动service
18             // 多次调用startService并不会启动多个service 而是会多次调用onStart
19             context.startService(i);
20         }
21     }
22
23 }
5.配置文件
AndroidManifest.xml
下面是添加在配置文件中的部分代码:
 1  <activity android:name="com.example.helloteacher.FuctionActivity" />
 2         <service android:name="com.example.teacherService.HelloteacherService" android:process=":HelloteacherService"/>
 3         <service android:name="com.example.teacherService.HelloteacherService2"/>
 4         <uses-permission android:name="android.permission.RECEIVE_BOOT_COMPLETED"></uses-permission>
 5      <receiver android:name="com.example.Receiver.BootReceiver" >
 6     <intent-filter>
 7        <action android:name="android.intent.action.BOOT_COMPLETED" />
 8     </intent-filter>
 9     </receiver>
10     <receiver  android:name="com.example.Receiver.Alarmreceiver" >
11     <intent-filter>
12         <action android:name="arui.alarm.action" />
13     </intent-filter>
14 </receiver>
通过以上的配置,就可以实现Service的前台运行!下面附上效果图:


 3513
3513

 被折叠的 条评论
为什么被折叠?
被折叠的 条评论
为什么被折叠?
 到【灌水乐园】发言


