


MongoDB副本集
• 早期版本使用master-slave,一主一从和MySQL类似,但slave在此架构中为只读,当主库宕机后,从库不能自动切换为主
• 目前已经淘汰master-slave模式,改为副本集,这种模式下有一个主(primary),和多个从(secondary),只读。支持给它们设置权重,当主宕掉后,权重最高的从切换为主
• 在此架构中还可以建立一个仲裁(arbiter)的角色,它只负责裁决,而不存储数据
• 再此架构中读写数据都是在主上,要想实现负载均衡的目的需要手动指定读库的目标server
副本集架构图

副本集架构图
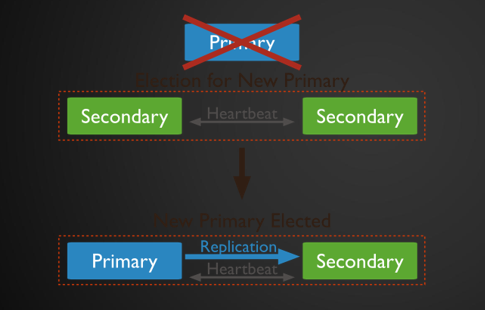
当主宕机之后,Primary自动切换到从
MongoDB副本集搭建
• 三台机器: 192.168.133.130(primary) 192.168.133.132(secondary) 192.168.133.133(secondary)
• 编辑三台机器的配置文件,更改或增加:
• replication://把此行前面的#删除
• ##oplog大小
• oplogSizeMB: 20//前面有两个空格
• ##复制集名称
• replSetName: aminglinux//前面有两个空格
• 分别重启三台机器
• 连接主,在主上运行命令mongo
>use admin
>config={_id:"aminglinux",members:[{_id:0,host:"192.168.133.130:27017"},{_id:1,host:"192.168.133.132:27017"},{_id:2,host:"192.168.133.133:27017"}]} #配置副本集
>rs.initiate(config)
• rs.status() //查看状态
• 如果两个从上的状态为"stateStr" : "STARTUP",说明不成功, 则需要进行如下操作
• rs.add
•> var config={_id:"aminglinux",members:[{_id:0,host:"192.168.133.130:27017"},{_id:1,host:"192.168.133.132:27017"},{_id:2,host:"192.168.133.133:27017"}]}
id后面是副本集的名字
members:第一个是主,第二个是从,第三个...
• >rs.reconfig(config) #初始化,结果是1,说明初始化成功了
• rs.status() #查看状态
• 此时再次查看rs.status()会发现从的状态变为SECONDARY,说明配置成功了
实例:
做实验之前,把三台机器的防火墙关闭
[root@localhost 02]# vim /etc/yum.repos.d/mongo.repo
[mongodb-org-4.0]
name=MongoDB Repository
baseurl=https://repo.mongodb.org/yum/redhat/$releasever/mongodb-org/4.0/x86_64/
gpgcheck=1
enabled=1
gpgkey=https://www.mongodb.org/static/pgp/server-4.0.asc

[root@localhost 02]# yum install -y mongodb-org

[root@localhost 02]# vim /etc/mongod.conf              #把里面的ip换成本机的ip
replication:            #replication前面的#去掉
  oplogSizeMB: 20/
  replSetName: aminglinux/

[root@localhost 02]# systemctl start mongod
[root@localhost 02]# ps aux | grep mongo       #查看进程
[root@localhost 02]# netstat -lntp | grep mongo
[root@localhost 03]# iptables -nvL           #查看防火墙规则


[root@localhost 03]# yum install -y mongodb-org

[root@localhost 03]# vim /etc/yum.repos.d/mongo.repo
[mongodb-org-4.0]
name=MongoDB Repository
baseurl=https://repo.mongodb.org/yum/redhat/$releasever/mongodb-org/4.0/x86_64/
gpgcheck=1
enabled=1
gpgkey=https://www.mongodb.org/static/pgp/server-4.0.asc

[root@localhost 03]# vim /etc/mongod.conf              #把里面的ip换成本机的ip
replication:            #replication前面的#去掉
  oplogSizeMB: 20/
  replSetName: aminglinux/

[root@localhost 03]# systemctl start mongod
[root@localhost 03]# ps aux | grep mongo       #查看进程
[root@localhost 03]# netstat -lntp | grep mongo
[root@localhost 03]# iptables -nvL         #查看防火墙规则


在192.168.133.130(primary)(01)
[root@localhost 01]# vim /etc/mongod.conf
replication:            #replication前面的#去掉
  oplogSizeMB: 20/
  replSetName: aminglinux/

[root@localhost 01]# systemctl start mongod
[root@localhost 01]# ps aux | grep mongo       #查看进程
[root@localhost 01]# netstat -lntp | grep mongo

[root@localhost 01]# vim /etc/mongod.conf
[root@localhost 01]# systemctl restart mongod
[root@localhost 01]# ps aux | grep mongo       #查看进程
[root@localhost 01]# iptables -nvL
[root@localhost 01]#
连接主,在主上运行命令mongo
[root@localhost 01]# mongo
> config={_id:"aminglinux",members:[{_id:0,host:"192.168.133.130:27017"},{_id:1,host:"192.168.133.132:27017"},{_id:2,host:"192.168.133.133:27017"}]}
> rs.reconfig(config)
{"OK" : 1}         结果是1,说明初始化成功了
> rs.status()              #查看状态


> var config={_id:"aminglinux",members:[{_id:0,host:"192.168.133.130:27017"},{_id:1,host:"192.168.133.132:27017"},{_id:2,host:"192.168.133.133:27017"}]}
> rs.status()              #查看状态
>
>
>
>
[root@localhost 01]#
MongoDB副本集测试
• 主上建库,建集合
• >use mydb
• >db.acc.insert({AccountID:1,UserName:"123",password:"123456"})
• >show dbs
• 从上查看
• >show dbs
• 若出现错误Error: listDatabases failed:{ "note" : "from execCommand", "ok" : 0, "errmsg" : "not master" },需要执行
• >rs.slaveok()
实例:
在01机器里面操作
[root@localhost 01]# mongo
aming:PRIMARY> use admin      #切换到admin用户
aming:PRIMARY> use mydb       #创建库
aming:PRIMARY >db.acc.insert({AccountID:1,UserName:"123",password:"123456"})    #创建集合
aming:PRIMARY> show dbs       #查看创建的库和集合


aming:PRIMARY> use mydb    #切换到mydb库
'aming:PRIMARY> show tabls       #查看库里面的表
aming:PRIMARY> use mydb
aming:PRIMARY> use mydb
在02机器里面操作
[root@localhost 02]# mongo
aminglinux:SECONDARY > show dbs
Error: listDatabases failed:{ "note" : "from execCommand", "ok" : 0, "errmsg" : "not master" }
aminglinux:SECONDARY > rs.slaveok()
aminglinux:SECONDARY > show dbs          #查看所有的库
admin
db1
local
mydb
test

aminglinux:SECONDARY > use mydb     #切换到mydb库里面
switched to db mydb
aminglinux:SECONDARY > show tables
acc


在03机器里面操作
[root@localhost 01]# mongo
aminglinux:SECONDARY > show dbs     #
Error: listDatabases failed:{ "note" : "from execCommand", "ok" : 0, "errmsg" : "not master" }
aminglinux:SECONDARY > rs.slaveok()
aminglinux:SECONDARY > show dbs
aminglinux:SECONDARY > use mydb
switched to db mydb
aminglinux:SECONDARY > show tables
acc
副本集更改权重模拟主宕机
• 默认三台机器权重都为1,如果任何一个权重设置为比其他的高,则该台机器马上切换为primary角色,所以我们预设三台机器的权重分别为:130:3,132:2,133:1
• 在主上执行
• cfg = rs.conf()
• cfg.members[0].priority = 3
• cfg.members[1].priority = 2
• cfg.members[2].priority = 1
• rs.reconfig(cfg)
• 这样的话,第二个节点将会成为候选主节点。
• 主上执行 iptables -I INPUT -p tcp --dport 27017 -j DROP
实例:
在主上执行
[root@localhost 01]#
aminglinux:SECONDARY >  rs.conf()            #查看权重
aminglinux:SECONDARY > quit
aminglinux:SECONDARY >
aminglinux:SECONDARY >
aminglinux:SECONDARY >
aminglinux:SECONDARY >

模拟主机宕机
[root@localhost 01]# iptables -I INPUT -p TCP --dport 27017 -j DROP
[root@localhost 01]# iptables -D INPUT -p TCP --dport 27017 -j DROP
[root@localhost 01]# mongo     #查看权重
aminglinux:PRIMARY >            #主机是PRIMARY

在02机器上面操作
[root@localhost 02]# mongo   #登录
aminglinux:SECONDARY > rs.status()             #查看状态

更改权重
aminglinux:PRIMARY > cfg.members[0].priority = 3
3
aminglinux:PRIMARY > cfg.members[1].priority = 2
2
aminglinux:PRIMARY > cfg.members[2].priority = 1
1
aminglinux:PRIMARY > rs.reconfig(cfg)    #生效
aminglinux:PRIMARY > rs.reconfig(cfg)       #查看是否生效
{ “ok” : 1 }
aminglinux:PRIMARY > rs.conf()            #查看新的权重,权重越大,优先级越大
aminglinux:PRIMARY >
aminglinux:PRIMARY >
aminglinux:PRIMARY >
aminglinux:PRIMARY >
[root@localhost 02]#
MongoDB分片介绍
• 分片就是将数据库进行拆分,将大型集合分隔到不同服务器上。比如,本来100G的数据,可以分割成10份存储到10台服务器上,这样每台机器只有10G的数据。
• 通过一个mongos的进程(路由)实现分片后的数据存储与访问,也就是说mongos是整个分片架构的核心,对客户端而言是不知道是否有分片的,客户端只需要把读写操作转达给mongos即可。
• 虽然分片会把数据分隔到很多台服务器上,但是每一个节点都是需要有一个备用角色的,这样能保证数据的高可用。
• 当系统需要更多空间或者资源的时候,分片可以让我们按需方便扩展,只需要把mongodb服务的机器加入到分片集群中即可
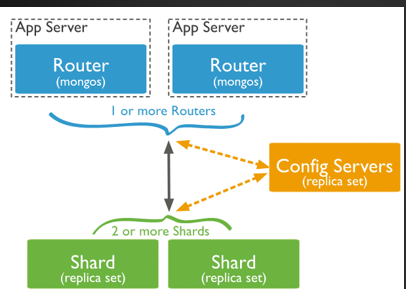
MongoDB分片架构图
MongoDB分片相关概念
• mongos: 数据库集群请求的入口,所有的请求都通过mongos进行协调,不需要在应用程序添加一个路由选择器,mongos自己就是一个请求分发中心,它负责把对应的数据请求请求转发到对应的shard服务器上。在生产环境通常有多mongos作为请求的入口,防止其中一个挂掉所有的mongodb请求都没有办法操作。
• config server: 配置服务器,存储所有数据库元信息(路由、分片)的配置。mongos本身没有物理存储分片服务器和数据路由信息,只是缓存在内存里,配置服务器则实际存储这些数据。mongos第一次启动或者关掉重启就会从 config server 加载配置信息,以后如果配置服务器信息变化会通知到所有的 mongos 更新自己的状态,这样 mongos 就能继续准确路由。在生产环境通常有多个 config server 配置服务器,因为它存储了分片路由的元数据,防止数据丢失!
• shard: 存储了一个集合部分数据的MongoDB实例,每个分片是单独的mongodb服务或者副本集,在生产环境中,所有的分片都应该是副本集。
分片搭建 -服务器规划
• 三台机器 A B C
• A搭建:mongos、config server、副本集1主节点、副本集2仲裁、副本集3从节点
• B搭建:mongos、config server、副本集1从节点、副本集2主节点、副本集3仲裁
• C搭建:mongos、config server、副本集1仲裁、副本集2从节点、副本集3主节点
• 端口分配:mongos 20000、config 21000、副本集1 27001、副本集2 27002、副本集3 27003
• 三台机器全部关闭firewalld服务和selinux,或者增加对应端口的规则
分片搭建 – 创建目录
• 分别在三台机器上创建各个角色所需要的目录
• mkdir -p /data/mongodb/mongos/log
• mkdir -p /data/mongodb/config/{data,log}
• mkdir -p /data/mongodb/shard1/{data,log}
• mkdir -p /data/mongodb/shard2/{data,log}
• mkdir -p /data/mongodb/shard3/{data,log}
实例:
[root@localhost 01]#
[root@localhost 01]#
[root@localhost 01]#
[root@localhost 01]#
[root@localhost 01]#
[root@localhost 01]#
[root@localhost 01]#
[root@localhost 01]#
[root@localhost 01]#
[root@localhost 01]#
[root@localhost 0]#
[root@localhost 01]#
[root@localhost 01]#
[root@localhost 01]#
[root@localhost 01]#
[root@localhost 01]#
[root@localhost 01]#
[root@localhost 01]#
[root@localhost 01]#
分片搭建–config server配置
• mongodb3.4版本以后需要对config server创建副本集
• 添加配置文件(三台机器都操作)
• mkdir /etc/mongod/
• vim /etc/mongod/config.conf //加入如下内容
pidfilepath = /var/run/mongodb/configsrv.pid
dbpath = /data/mongodb/config/data
logpath = /data/mongodb/config/log/congigsrv.log
logappend = true
bind_ip = 0.0.0.0
port = 21000
fork = true
configsvr = true #declare this is a config db of a cluster;
replSet=configs #副本集名称
maxConns=20000 #设置最大连接数
• 启动三台机器的config server
• mongod -f /etc/mongod/config.conf //三台机器都要操作
• 登录任意一台机器的21000端口,初始化副本集
• mongo --port 21000
• config = { _id: "configs", members: [ {_id : 0, host : "192.168.133.130:21000"},{_id : 1, host : "192.168.133.132:21000"},{_id : 2, host : "192.168.133.133:21000"}] }
• rs.initiate(config)
{ "ok" : 1 }
实例:
[root@localhost 01]#
[root@localhost 01]#
[root@localhost 01]#
[root@localhost 01]#
[root@localhost 01]#
[root@localhost 01]#
[root@localhost 01]#
[root@localhost 01]#
[root@localhost 01]#
[root@localhost 01]#
[root@localhost 0]#
[root@localhost 01]#
[root@localhost 01]#
[root@localhost 01]#
[root@localhost 01]#
[root@localhost 01]#
[root@localhost 01]#
[root@localhost 01]#
[root@localhost 01]#
分片搭建–分片配置
•添加配置文件(三台机器都操作)
• vim /etc/mongod/shard1.conf //加入如下内容
pidfilepath = /var/run/mongodb/shard1.pid
dbpath = /data/mongodb/shard1/data
logpath = /data/mongodb/shard1/log/shard1.log
logappend = true
bind_ip = 0.0.0.0
port = 27001
fork = true
httpinterface=true #打开web监控
rest=true
replSet=shard1 #副本集名称
shardsvr = true #declare this is a shard db of a cluster;
maxConns=20000 #设置最大连接数
•
• 启动shard1
• mongod -f /etc/mongod/shard1.conf //三台机器都要操作
• 登录130或者132任何一台机器的27001端口初始化副本集,133之所以不行,是因为shard1我们把133这台机器的27001端口作为了仲裁节点
• mongo --port 27001
• use admin
• config = { _id: "shard1", members: [ {_id : 0, host : "192.168.133.130:27001"}, {_id: 1,host : "192.168.133.132:27001"},{_id : 2, host : "192.168.133.133:27001",arbiterOnly:true}] }
• rs.initiate(config)
实例:
[root@localhost 01]#
[root@localhost 01]#
[root@localhost 01]#
[root@localhost 01]#
[root@localhost 01]#
[root@localhost 01]#
[root@localhost 01]#
[root@localhost 01]#
[root@localhost 01]#
[root@localhost 01]#
[root@localhost 0]#
[root@localhost 01]#
[root@localhost 01]#
[root@localhost 01]#
[root@localhost 01]#
[root@localhost 01]#
[root@localhost 01]#
[root@localhost 01]#
[root@localhost 01]#
•
• 启动shard2
• mongod -f /etc/mongod/shard2.conf //三台机器都要操作
• 登录132或者133任何一台机器的27002端口初始化副本集,130之所以不行,是因为shard2我们把130这台机器的27002端口作为了仲裁节点
• mongo --port 27002
• use admin
• config = { _id: "shard2", members: [ {_id : 0, host : "192.168.133.130:27002" ,arbiterOnly:true},{_id : 1, host : "192.168.133.132:27002"},{_id : 2, host : "192.168.133.133:27002"}] }
• rs.initiate(config)
实例:
[root@localhost 01]#
[root@localhost 01]#
[root@localhost 01]#
[root@localhost 01]#
[root@localhost 01]#
[root@localhost 01]#
[root@localhost 01]#
[root@localhost 01]#
[root@localhost 01]#
[root@localhost 01]#
[root@localhost 0]#
[root@localhost 01]#
[root@localhost 01]#
[root@localhost 01]#
[root@localhost 01]#
[root@localhost 01]#
[root@localhost 01]#
[root@localhost 01]#
[root@localhost 01]#
• 启动shard3
• mongod -f /etc/mongod/shard3.conf //三台机器都要操作
• 登录130或者133任何一台机器的27003端口初始化副本集,132之所以不行,是因为shard3我们把132这台机器的27003端口作为了仲裁节点
• mongo --port 27003
• use admin
• config = { _id: "shard3", members: [ {_id : 0, host : "192.168.133.130:27003"}, {_id : 1, host : "192.168.133.132:27003", arbiterOnly:true}, {_id : 2, host : "192.168.133.133:27003"}] }
• rs.initiate(config)
•
实例:
[root@localhost 01]#
[root@localhost 01]#
[root@localhost 01]#
[root@localhost 01]#
[root@localhost 01]#
[root@localhost 01]#
[root@localhost 01]#
[root@localhost 01]#
[root@localhost 01]#
[root@localhost 01]#
[root@localhost 0]#
[root@localhost 01]#
[root@localhost 01]#
[root@localhost 01]#
[root@localhost 01]#
[root@localhost 01]#
[root@localhost 01]#
[root@localhost 01]#
[root@localhost 01]#
分片搭建–配置路由服务器
• 添加配置文件(三台机器都操作)
• vim /etc/mongod/mongos.conf //加入如下内容
pidfilepath = /var/run/mongodb/mongos.pid
logpath = /data/mongodb/mongos/log/mongos.log
logappend = true
bind_ip = 0.0.0.0
port = 20000
fork = true
configdb = configs/192.168.133.130:21000, 192.168.133.132:21000, 192.168.133.133:21000 #监听的配置服务器,只能有1个或者3个,configs为配置服务器的副本集名字
maxConns=20000 #设置最大连接数
•启动mongos服务,注意命令,前面都是mongod,这里是mongos
• mongos -f /etc/mongod/mongos.conf
实例:
注意:三台机器都要按照mongodb,
[root@localhost 02]# vim /etc/yum.repos.d/mongo.repo
[mongodb-org-4.0]
name=MongoDB Repository
baseurl=https://repo.mongodb.org/yum/redhat/$releasever/mongodb-org/4.0/x86_64/
gpgcheck=1
enabled=1
gpgkey=https://www.mongodb.org/static/pgp/server-4.0.asc


[root@localhost 03]# yum install -y mongodb-org

[root@localhost 03]# vim /etc/yum.repos.d/mongo.repo
[mongodb-org-4.0]
name=MongoDB Repository
baseurl=https://repo.mongodb.org/yum/redhat/$releasever/mongodb-org/4.0/x86_64/
gpgcheck=1
enabled=1
gpgkey=https://www.mongodb.org/static/pgp/server-4.0.asc


[root@localhost 03]# yum install -y mongodb-org


在
[root@localhost 01]#
[root@localhost 01]#
[root@localhost 01]#
[root@localhost 01]#
[root@localhost 01]#
[root@localhost 01]#
[root@localhost 01]#
[root@localhost 01]#
[root@localhost 0]#
[root@localhost 01]#
[root@localhost 01]#
[root@localhost 01]#
[root@localhost 01]#
[root@localhost 01]#
[root@localhost 01]#
[root@localhost 01]#
[root@localhost 01]#
分片搭建–启用分片
• 登录任何一台20000端口
• mongo --port 20000
• 把所有分片和路由器串联
•sh.addShard("shard1/192.168.133.130:27001,192.168.133.132:27001,192.168.133.133:27001")
•sh.addShard("shard2/192.168.133.130:27002,192.168.133.132:27002,192.168.133.133:27002")
•sh.addShard("shard3/192.168.133.130:27003,192.168.133.132:27003,192.168.133.133:27003")
• 查看集群状态
• sh.status()
实例:
[root@localhost 01]#
[root@localhost 01]#
[root@localhost 01]#
[root@localhost 01]#
[root@localhost 01]#
[root@localhost 01]#
[root@localhost 01]#
[root@localhost 01]#
[root@localhost 01]#
[root@localhost 01]#
[root@localhost 0]#
[root@localhost 01]#
[root@localhost 01]#
[root@localhost 01]#
[root@localhost 01]#
[root@localhost 01]#
[root@localhost 01]#
[root@localhost 01]#
[root@localhost 01]#
分片搭建–测试
• 登录任何一台20000端口
• mongo --port 20000
• use admin
• db.runCommand({ enablesharding : "testdb"}) 或者
• sh.enableSharding("testdb") //指定要分片的数据库
• db.runCommand( { shardcollection : "testdb.table1",key : {id: 1} } ) 或者
• sh.shardCollection("testdb.table1",{"id":1} ) //#指定数据库里需要分片的集合和片键
• use testdb
• for (var i = 1; i <= 10000; i++) db.table1.save({id:i,"test1":"testval1"})//插入测试数据
• db.table1.stats()//查看table1状态
实例:
[root@localhost 01]#
[root@localhost 01]#
[root@localhost 01]#
[root@localhost 01]#
[root@localhost 01]#
[root@localhost 01]#
[root@localhost 01]#
[root@localhost 01]#
[root@localhost 01]#
[root@localhost 01]#
[root@localhost 0]#
[root@localhost 01]#
[root@localhost 01]#
[root@localhost 01]#
[root@localhost 01]#
[root@localhost 01]#
[root@localhost 01]#
[root@localhost 01]#
[root@localhost 01]#
MongoDB备份
• 备份指定库
• mongodump --host 127.0.0.1 --port 20000 -d mydb -o /tmp/mongobak
• 它会在/tmp/目录下面生成一个mydb的目录
• 备份所有库
• mongodump --host 127.0.0.1 --port 20000 -o /tmp/mongobak/alldatabase
• 指定备份集合
• mongodump --host 127.0.0.1 --port 20000 -d mydb -c c1 -o /tmp/mongobak/
• 它依然会生成mydb目录,再在这目录下面生成两个文件
• 导出集合为json文件
• mongoexport --host 127.0.0.1 --port 20000 -d mydb -c c1 -o /tmp/mydb2/1.json
实例:
[root@localhost 01]#
[root@localhost 01]#
[root@localhost 01]#
[root@localhost 01]#
[root@localhost 01]#
[root@localhost 01]#
[root@localhost 01]#
[root@localhost 01]#
[root@localhost 01]#
[root@localhost 01]#
[root@localhost 0]#
[root@localhost 01]#
[root@localhost 01]#
[root@localhost 01]#
[root@localhost 01]#
[root@localhost 01]#
[root@localhost 01]#
[root@localhost 01]#
[root@localhost 01]#
MongoDB恢复
•恢复所有库
• mongorestore -h 127.0.0.1 --port 20000 --drop dir/ //其中dir是备份所有库的目录名字,其中--drop可选,意思是当恢复之前先把之前的数据删除,不建议使用
• 恢复指定库
• mongorestore -d mydb dir/ //-d跟要恢复的库名字,dir就是该库备份时所在的目录
• 恢复集合
•mongorestore -d mydb -c testc dir/mydb/testc.bson // -c后面跟要恢复的集合名字,dir是备份mydb库时生成文件所在路径,这里是一个bson文件的路径
• 导入集合
• mongoimport -d mydb -c testc --file /tmp/testc.json
实例:
[root@localhost 01]#
[root@localhost 01]#
[root@localhost 01]#
[root@localhost 01]#
[root@localhost 01]#
[root@localhost 01]#
[root@localhost 01]#
[root@localhost 01]#
[root@localhost 01]#
[root@localhost 01]#
[root@localhost 0]#
[root@localhost 01]#
[root@localhost 01]#
[root@localhost 01]#
[root@localhost 01]#
[root@localhost 01]#
[root@localhost 01]#
[root@localhost 01]#
[root@localhost 01]#
常见问题:
高可用,就是说当一台机器宕机,另外一台可以马上顶上去。 只有主从,是做不到的。
1、某个从节点应该是有问题。 检查每个节点是否都是正常的。 还有iptables啥的。

2、错误一、
做副本集,一直提示,但是我的防火墙肯定都是关闭的,不知道是啥情况
> rs.initiate(config)
{
"ok" : 0,
"errmsg" : "replSetInitiate quorum check failed because not all proposed set members responded affirmatively: 192.168.216.130:27017 failed with not running with --replSet",
"code" : 74,
"codeName" : "NodeNotFound"
}
两错误交替出现
> rs.initiate(config)
{
"ok" : 0,
"errmsg" : "'192.168.216.130:27017' has data already, cannot initiate set.",
"code" : 110,
"codeName" : "CannotInitializeNodeWithData"
答:把你192.168.216.130:27017这里面的数据先删掉,搞一个干净的库。


 1888
1888


 被折叠的 条评论
为什么被折叠?
被折叠的 条评论
为什么被折叠?
 到【灌水乐园】发言


