


This is my third post about C++11.
In the last post I covered how to get started by using Visual Studio and the CTP. That’s fine if you are already used to visual studio, but if you would like to explore more of C++11, you currently need to turn to other compilers.
In this post I’m going through how to get going with a first C++11 program using MinGW-builds and Eclipse.
With this setup you get the complete gcc-4.7.2 support for C++11, including
- std::future, std::async and std::thread missing in other Windows-versions of gcc.
- initializer lists and other things still missing in Visual Studio.
MinGW is a minimalist development environment for native Microsoft Windows applications. (There are also other ways to install gcc on windows, such as cygwin). Currently no standard version of cygwin or MinGW support any of the C++11 features that are related to threads.
"MinGW-Builds" does NOT have those problems. Getting this setup is not hard but requires a few clicks, so it may take you something like half an hour depending on your experience.
Here’s what I’ll cover:
- Install the gcc compiler
- Install Eclipse
- Start Eclipse and create an example project
- Compile and run an example program (with or without the debugger)
- Trouble?
- Example C++11 program.
1. Install gcc: MinGW-Builds
- Download MinGW-Builds.
The version I got was x64-4.7.2-release-posix-sjlj-rev1.7z. The fact that posix is in the name indicates that thethreading model is posix. That’s currently key to getting the gcc support for C++11 threads working on Windows. - Extract the directory mingw to any location - No installation required or possible. I put it at F:\coding\mingw
- Add the compiler to you PATH environment variable. Open the settings program ‘Edit Environment Variables for Your Account’, or from the control panel, Make changes to your user account/Change my environment variables: Add a new User variable PATH, and add the following:
F:\coding\MinGW\bin;F:\coding\MinGW\msys\1.0\bin
Make sure the two directories actually do exist, and that they are separated by a ; character.
You need to log out for this to take effect!
To verify that you got it right, you can open a command prompt, and write
g++ --versionYou should get a response like this, mentioning MinGW-builds:
g++ (Built by MinGW-builds project) 4.7.2
Copyright (C) 2012 Free Software Foundation, Inc. ...
2. Install Eclipse
Download “Eclipse IDE for C/C++ Developers" from http://www.eclipse.org/downloads/ (I used eclipse-cpp-juno-SR1-win32-x86_64.zip)
- Just extract the zip file- No installation in required.
My eclipse directory is put at F:\coding\ , it does not matter at all. Optionally, make a shortcut from the eclipse application found at e.g. F:\coding\eclipse\eclipse.exe to your desktop.
3. Start Eclipse and create an example project
- Run eclipse.exe
- When asked, specify a new workspace location, for example F:\coding\workspace
- Ignore any warnings about Git, EGit and HOME not being set. You can return to that later if you would like to use Git.
- Close the Welcome to Eclipse window (upper left corner).
- Make a new project under the top menu File/ new /C++ Project
- Enter a project name ‘MyFirstCpp11Program’
- Select Toolchain MinGW GCC. (You may need to de-select the marker ‘Show project types and toolshains …’)
- Finish. - Enable C++11 for this project:
This makes Eclipse use C++11 both for compiling and linking, as well as for building an index of known names used by the graphical interface.
EDIT: Note, when using other builds of gcc (also on Linux) I also had to add -pthread to all places where I add -std=c++11 below:
For newer versions of eclipse: Eclipse Juno and later.
[Eclipse C/C++ Development Tools 8.1.1]
- Select the Properties window from the Project menu. Go to the Settings sub-menu under C/C++ Build.
Select [ All configurations ] at the top, and add the option -std=c++11 to the field Other flags Under both GCC C++ Compiler/Miscellaneous and GCC C++ Linker/Miscellaneous. - Under C/C++ General (again in project properties), find the Preprocessor Include Path and go to the Providers Tab. Deselect all except CDT GCC Builtin Compiler Settings. Then untag Share settings entries … . Add the option -std=c++11 to the text box called Command to get compiler specs.
- Go to paths and symbols (again under Under C/C++ General). Selects the Symbols tab, click restore defaults, and then click Apply.
For older versions of eclipse: (Eclipse Indigo)
[eclipse C/C++ Development Tools Version: 8.0.2]
- Select the Properties window from the Project menu. Go to the Settings sub-menu under C/C++ Build.
Select [ All configurations ] at the top, and add the option -std=c++11 to the field Other flags Under both GCC C++ Compiler/Miscellaneous and GCC C++ Linker/Miscellaneous. - Under C/C++ Build (again in project properties), find Discovery Options and add select Discovery profile scope ‘Configuration-wide;. Then add -std=c++11 to the C++ Compiler invocation arguments.
Click ‘Clear’ at ‘Clear discovered entries now’. - You will need to wait a while for the indexer to complete.
- Select the Properties window from the Project menu. Go to the Settings sub-menu under C/C++ Build.
Done!
4. Compile and run and example program (with or without debugger)
My example C++11 program is found at the end of the post. Replace the example program with my example. You can just copy-paste it in place.
- Build the project by clicking the little Hammer at the top.
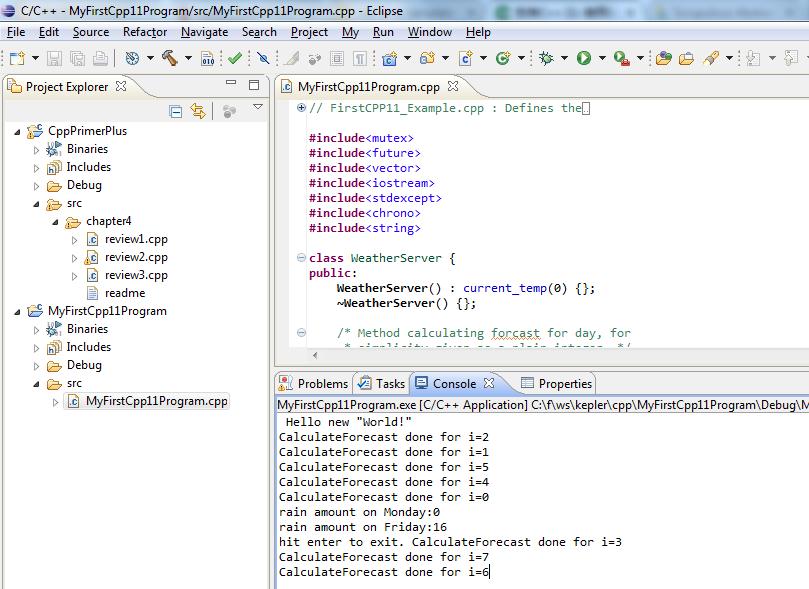
- Run the program by clicking the green play-button.
It should print, among other things, ‘rain amount on Friday:16’. If you can’t find the output, it’s found on the Console tab at the bottom of the Eclipse window. Look for a list of consoles under the icon that looks like a monitor.
You can also run the debugger. Just click the spider (or F11) instead of the play-button. You will need to click F8 (resume) to start the execution, and jump over any break points (which you set by double clicking to white/light gray area to the left of the code). Press the red stop button, or ctrl-F2 top stop.
5. Trouble?
-
If you have trouble compiling or running my examples you may have forgotten to click Apply while configuring the Eclipse project. Eclipse is (or at least has been in the past) picky - do it every time you leave a settings tab.
-
If eclipse still gives you red lines under lock_guard and mutex, first try to modify the source code arbitrarily and recompile, or select Index/rebuild after right clicking on the project in the project explorer.
-
When using other builds (than MinGW-builds) of gcc (also on Linux) I also had to add -pthread to all places where I added -std=c++11 above.
Unfortunately, Eclipse seems to anyhow not understand std:future and std::async, so a few lines related to them will still have a red underline.
Older versions of Eclipse also does not understand how find the members of a class held by shared_ptr. The actual gcc compiler, via MinGW-builds, will understand them correctly.
Update: To upgrade the C++ support in Eclipse, update the CDT by selecting Help/Install New Software. Add the CDT repository (currently http://download.eclipse.org/tools/cdt/releases/juno ), and upgrade all CDT Main Features. For future reference, you’ll find the link to the latest repository at http://www.eclipse.org/cdt/downloads.php
The C++11 support in CDT is evolving quickly, so you may want to try out the nightly builds. It’s as easy as specifying the repository:
http://download.eclipse.org/tools/cdt/builds/kepler/nightly
There seems be no way to downgrade, so be careful (backup your important projects). I had no trouble so far.
I would be very happy for feedback!
In the NEXT post I cover how to compile and use the high-quality Boost C++ libraries with MinGW and eclipse.
6. Example C++11 program
// FirstCPP11_Example.cpp : Defines the
// entry point for the console application.
//
// C++11 Example, Johan Lundberg 2012
// http://scrupulousabstractions.tumblr.com

#include<mutex>
#include<future>
#include<vector>
#include<iostream>
#include<stdexcept>
#include<chrono>
#include<string>

class WeatherServer {
public:
    WeatherServer() : current_temp(0) {};
    ~WeatherServer() {};

    /* Method calculating forcast for day, for
     * simplicity given as a plain integer. */
    int CalculateForecast(unsigned int i){

        /* Lock the mutex, using RAII, for the
         * duration of this calculation (for show).
         * Removing this will allow multiple
         * forecast calculations to run at the same time.
         * Else they will wait for each other */
        std::lock_guard<std::mutex> locker(members_mutex);

        /* Sleep for some time just to show what's going on */
        std::chrono::milliseconds dura( 701 );
        std::this_thread::sleep_for( dura );

        std::cout << "CalculateForecast done for i=" <<i<<std::endl;
        // result is just the square of the input...
        return i*i ;
    }
private:
    int current_temp;
    std::mutex members_mutex;
};

void my_main(){
    auto myWS=std::make_shared<WeatherServer>();
    std::vector<std::future<int>> forecasts;

    int v[]={0,1,2,3,4,5,6,7} ;

    for(auto i: v ){
        // add a background calculation to the list
        forecasts.push_back( std::async(std::launch::async,
            [i,myWS]() { return myWS->CalculateForecast(i); } ));
    }

    /* This line will not compile if you use visual studio older
     * than the CTP Nov 2012: Current versions of visual studio will
     * underline it with red lines, but the actual compiler
     * understands it.  Alternative for older compilers:
     std::string ctpTestString("Hello \"World!\" ");
     */
    std::string ctpTestString=R"( Hello new "World!" )" ;

    std::cout << ctpTestString<<std::endl;

    int rainOnMonday = forecasts[0].get() ;
    int rainOnFriday = forecasts[4].get() ;

    std::cout << "rain amount on Monday:" << rainOnMonday <<std::endl;
    std::cout << "rain amount on Friday:" << rainOnFriday <<std::endl;
    std::cout << "hit enter to exit. " <<std::flush ;
    std::cin.ignore(1);

}

int main(){
    try{
        my_main();
    }catch(std::exception& e){
        std::cout << "main got exception:" << e.what() <<std::endl;
        throw;
    }catch(...){
        std::cout << "main got unknown exception." <<std::endl;
        throw;
    }
} 
Cyper: Win7 64, CDT Kepler, Mingw4.7.2测试通过


 262
262


 被折叠的 条评论
为什么被折叠?
被折叠的 条评论
为什么被折叠?
 到【灌水乐园】发言


