


Apache的Oltu就是实现了OAuth的框架
参考文章:
http://jinnianshilongnian.iteye.com/blog/2038646
https://blog.csdn.net/jing12062011/article/details/78147306
1. 搭建Maven工程框架
<project xmlns="http://maven.apache.org/POM/4.0.0" xmlns:xsi="http://www.w3.org/2001/XMLSchema-instance"
      xsi:schemaLocation="http://maven.apache.org/POM/4.0.0 http://maven.apache.org/xsd/maven-4.0.0.xsd">
      <modelVersion>4.0.0</modelVersion>
      <groupId>com.linkedbear</groupId>
      <artifactId>OAuth-Demo</artifactId>
      <version>0.0.1-SNAPSHOT</version>

      <properties>
           <oauth2.version>1.0.2</oauth2.version>
      </properties>

      <parent>
           <groupId>org.springframework.boot</groupId>
           <artifactId>spring-boot-starter-parent</artifactId>
           <version>2.0.0.RELEASE</version>
      </parent>

      <dependencies>
           <dependency>
                 <groupId>org.springframework.boot</groupId>
                 <artifactId>spring-boot-starter-web</artifactId>
           </dependency>
           <!-- OAuth2协议的框架 -->
           <dependency>
                 <groupId>org.apache.oltu.oauth2</groupId>
                 <artifactId>org.apache.oltu.oauth2.client</artifactId>
                 <version>${oauth2.version}</version>
           </dependency>
           <dependency>
                 <groupId>org.apache.oltu.oauth2</groupId>
                 <artifactId>org.apache.oltu.oauth2.common</artifactId>
                 <version>${oauth2.version}</version>
           </dependency>
           <dependency>
                 <groupId>org.apache.oltu.oauth2</groupId>
                 <artifactId>org.apache.oltu.oauth2.authzserver</artifactId>
                 <version>${oauth2.version}</version>
           </dependency>
           <dependency>
                 <groupId>org.apache.oltu.oauth2</groupId>
                 <artifactId>org.apache.oltu.oauth2.resourceserver</artifactId>
                 <version>${oauth2.version}</version>
           </dependency>
           <!-- 热部署 -->
           <dependency>
                 <groupId>org.springframework.boot</groupId>
                 <artifactId>spring-boot-devtools</artifactId>
           </dependency>
      </dependencies>

      <build>
           <plugins>
                 <plugin>
                      <artifactId>maven-compiler-plugin</artifactId>
                      <configuration>
                            <source>1.8</source>
                            <target>1.8</target>
                      </configuration>
                 </plugin>
           </plugins>
      </build>
</project>
2. 创建工程目录结构
|
|
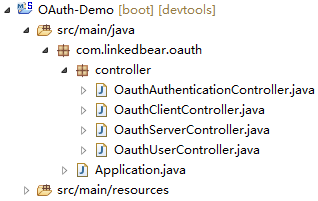
3. 使用授权码模式,编写Controller
3.1 服务消费方
/**
 * 服务消费方Controller层
 * @Title OauthClientController
 * @author LinkedBear
 * @Time 2018年8月1日 下午2:10:14
 */
@Controller
public class OauthClientController {
    //第一步:服务消费方要向用户申请授权码
    @RequestMapping("/applyCode")
    public String applyCode(HttpServletRequest request) {
        System.out.println("----------第一步:服务消费方要向用户申请授权码-----------");

        //第二步的跳转url(请求Code)
        String accessCodeUrl = "getAuthorization";
        //必填,且固定为code
        String responseType = "code";
        //必填
        String clientId = "client";
        //第三步要访问的url
        String redirectUri = "http://localhost:8080/applyToken";

        //创建OAuth客户端对象
        //OAuthClient client = new OAuthClient(new URLConnectionClient());
        //构建OAuth请求
        String locationUri = "";
        try {
            OAuthClientRequest oauthRequest = AuthClientRequest.authorizationLocation(accessCodeUrl)
                    .setRedirectURI(redirectUri)
                    .setClientId(clientId)
                    .setResponseType(responseType)
                    .buildQueryMessage();
            locationUri = oauthRequest.getLocationUri();
            System.out.println("第一步重定向地址:" + locationUri);
        } catch (Exception e) {
            e.printStackTrace();
        }

        //重定向
        return "redirect:http://localhost:8080/" + locationUri;
    }


    //第三步:服务消费方要向认证授权服务器发起请求,携带本机ID和授权码
    @RequestMapping("/applyToken")
    public String applyToken(HttpServletRequest request) {
        System.out.println("----------第三步:服务消费方要向认证授权服务器发起请求,携带本机ID和授权码----------");

        //第四步的跳转url(请求Token)
        //关键:这里是要发请求返回json,故不是重定向,在下面没有url拼接,只能在这里写全
        String accessTokenUrl = "http://localhost:8080/getToken";
        String clientId = "client";
        //用于识别客户端的字段
        String clientSecurt = "clientSecurt";
        //第五步要访问的url
        String redirectUri = "http://localhost:8080/callbackCode";

        String code = request.getParameter("code");
        System.out.println("用户返回的授权码:" + code);

        //创建OAuth客户端对象
        OAuthClient client = new OAuthClient(new URLConnectionClient());
        //构建OAuth请求
        String locationUri = "";
        try {
            //这里的请求因为携带了授权码,并且是请求访问Token,故调用方法会不同
            OAuthClientRequest oauthCodeRequest = OAuthClientRequest.tokenLocation(accessTokenUrl)
                    .setGrantType(GrantType.AUTHORIZATION_CODE)
                    .setRedirectURI(redirectUri)
                    .setClientId(clientId)
                    .setClientSecret(clientSecurt)
                    .setCode(code)
                    .buildQueryMessage();
            locationUri = oauthCodeRequest.getLocationUri();
            System.out.println("第三步重定向地址:" + locationUri);
            //发送请求,并得到响应
            OAuthJSONAccessTokenResponse tokenResponse = client.accessToken(oauthCodeRequest, HttpMethod.POST);
            //取访问Token
            String token = tokenResponse.getAccessToken();
            System.out.println("得到访问Token:" + token);

            //重定向
            return "redirect:http://localhost:8080/applyResource?accessToken=" + token;
        } catch (Exception e) {
            e.printStackTrace();
            return null;
        }
    }


    //第五步:服务消费方持Token访问请求服务提供方
    @RequestMapping("/applyResource")
    @ResponseBody
    public Map<String, Object> applyResource(String accessToken) {
        System.out.println("----------第五步:服务消费方持Token访问请求服务提供方-----------");

        //真正要请求的资源地址
        String realResourceUrl = "http://localhost:8080/getResource";

        //创建OAuth客户端对象
        OAuthClient client = new OAuthClient(new URLConnectionClient());
        try {
            //构建真正的资源访问请求,要附带Token过去
            OAuthClientRequest oauthTokenRequest = new OAuthBearerClientRequest(realResourceUrl)
                    .setAccessToken(accessToken)
                    .buildQueryMessage();
            System.out.println("准备向服务提供方发送请求。。。");
            //请求资源
            OAuthResourceResponse resourceResponse = client.resource(oauthTokenRequest,
                    HttpMethod.GET, OAuthResourceResponse.class);
            String resource = resourceResponse.getBody();
            System.out.println("得到请求的资源" + resource);
            return JSONUtils.parseJSON(resource);
        } catch (Exception e) {
            return null;
        }
    }
}
3.2 用户
/**
 * 用户 Controller层
 * @Title OauthUserController
 * @author LinkedBear
 * @Time 2018年8月1日 下午2:30:29
 */
@Controller
public class OauthUserController {
    public static final String AUTHORIZATION_CODE = "123";

    //第二步:用户收到服务消费方的请求后校验,做出响应,返回授权码
    @SuppressWarnings("unused")
    @RequestMapping("/getAuthorization")
    public Object getAuthorization(HttpServletRequest request) {
        System.out.println("----------第二步:用户收到服务消费方的请求后校验,做出响应-----------");

        try {
            //构建OAuth授权请求
            OAuthAuthzRequest authzRequest = new OAuthAuthzRequest(request);
            //驳回空客户端请求
            if (StringUtils.isEmpty(authzRequest.getClientId())) {
                return null;
            }

            //取responseType,授权码模式的值固定位"code"
            String responseType = authzRequest.getResponseType();
            //构建OAuth响应,此处必须为302重定向
            OAuthAuthorizationResponseBuilder responseBuilder =
                    OAuthASResponse.authorizationResponse(request, HttpServletResponse.SC_FOUND);
            //设置授权码
            responseBuilder.setCode(AUTHORIZATION_CODE);

            //得到服务消费方的重定向地址,并构建OAuth响应
            String redirectUri = authzRequest.getRedirectURI();
            OAuthResponse oauthResponse = responseBuilder.location(redirectUri)
                    .buildQueryMessage();
            //构建完毕后,得到重定向的url
            String locationUri = oauthResponse.getLocationUri();
            System.out.println("第二步重定向地址:" + locationUri);

            return "redirect:" + locationUri;
        } catch (Exception e) {
            e.printStackTrace();
            return null;
        }
    }
}
3.3 认证授权服务器
/**
 * 认证授权服务器Controller层
 * @Title OauthAuthenticationController
 * @author LinkedBear
 * @Time 2018年8月1日 下午2:10:57
 */
@Controller
public class OauthAuthenticationController {
    //第四步:访问授权服务器接收服务消费方的请求,校验并授予访问Token和更新Token
    @PostMapping("/getToken")
    public ResponseEntity<Object> getToken(HttpServletRequest request) {
        System.out.println("----------第四步:访问授权服务器接收服务消费方的请求,校验并授予访问Token和更新Token-----------");

        try {
            //构建OAuth授权请求,此处已有Code
            OAuthTokenRequest authzTokenRequest = new OAuthTokenRequest(request);
            //获取授权码
            String code = authzTokenRequest.getCode();
            //授权码不匹配,直接驳回
            if (!OauthUserController.AUTHORIZATION_CODE.equals(code)) {
                return null;
            }

            //生成Token
            OAuthIssuerImpl tokenCreater = new OAuthIssuerImpl(new MD5Generator());
            String token = tokenCreater.accessToken();
            System.out.println("生成Token:" + token);

            //构建OAuth响应
            OAuthResponse oauthResponse = OAuthASResponse.tokenResponse(HttpServletResponse.SC_OK)
                    .setAccessToken(token)
                    .setTokenType(TokenType.BEARER.name())
                    .buildJSONMessage();
            //返回的数据是一组json
            return new ResponseEntity<Object>(oauthResponse.getBody(), HttpStatus.valueOf(oauthResponse.getResponseStatus()));
        } catch (Exception e) {
            e.printStackTrace();
            return null;
        }
    }
}
3.4 服务提供方
/**
 * 服务提供方Controller层
 * @Title OauthServerController
 * @author LinkedBear
 * @Time 2018年8月1日 下午2:09:35
 */
@Controller
public class OauthServerController {
    //第六步:服务提供方验证Token,返回资源
    @RequestMapping("/getResource")
    @ResponseBody
    public ResponseEntity<Map<String, Object>> getResource(HttpServletRequest request) {
        System.out.println("----------第六步:服务提供方验证Token,返回资源-----------");

        try {
            //最后一步取的是资源,所以构建的请求也不同了,而且要附带一个参数
            OAuthAccessResourceRequest resourceRequest = new OAuthAccessResourceRequest(request, ParameterStyle.QUERY);
            String token = resourceRequest.getAccessToken();
            //这里还需要验证Token。。。
            System.out.println("未校验Token。。。" + token);

            Map<String, Object> map = new HashMap<>();
            map.put("data", Math.random());
            map.put("creater", "LinkedBear");
            return new ResponseEntity<Map<String, Object>>(map, HttpStatus.OK);
        } catch (Exception e) {
            e.printStackTrace();
            return null;
        }
    }
}
3.5 运行结果
----------第一步:服务消费方要向用户申请授权码-----------

第一步重定向地址:getAuthorization?response_type=code&redirect_uri=http%3A%2F%2Flocalhost%3A8080%2FapplyToken&client_id=client

----------第二步:用户收到服务消费方的请求后校验,做出响应-----------

第二步重定向地址:http://localhost:8080/applyToken?code=123

----------第三步:服务消费方要向认证授权服务器发起请求,携带本机ID和授权码-----------

用户返回的授权码:123

第三步重定向地址:http://localhost:8080/getToken?code=123&grant_type=authorization_code&redirect_uri=http%3A%2F%2Flocalhost%3A8080%2FcallbackCode&client_secret=clientSecurt&client_id=client

----------第四步:访问授权服务器接收服务消费方的请求,校验并授予访问Token和更新Token-----------

生成Token:b9bbc794d09cac19f11951972fd7d5b1

得到访问Token:b9bbc794d09cac19f11951972fd7d5b1

----------第五步:服务消费方持Token访问请求服务提供方-----------

准备向服务提供方发送请求。。。

----------第六步:服务提供方验证Token,返回资源-----------

未校验Token。。。b9bbc794d09cac19f11951972fd7d5b1

得到请求的资源{"data":0.08976006535502468,"creater":"LinkedBear"}


 682
682


 被折叠的 条评论
为什么被折叠?
被折叠的 条评论
为什么被折叠?
 到【灌水乐园】发言


