


最近公司系统重构,需要提供API接口给其他部门调用,由于架构原因,这些API有可能会被外部访问,基于安全性的考虑,决定使用OAuth来保护这些API,以免被随意调用。
由于系统众多,不可能在每个系统中都配置OAuth认证授权功能,因此需要构建一个独立的OAuth服务器,专门负责认证授权,这里采用的框架是Spring Boot。
整个认证授权流程中有三个角色:
- 客户端(Client)
- API接口(Resource)
- OAuth服务器(Authorization Server)
授权模式有四种:
- 授权码模式(Authorization Code)
- 简化模式(Implicit)
- 密码模式(Resource Owner Password Credentials)
- 客户端模式(Client Credentials)
具体定义可看理解 OAuth 2.0
因为访问OAuth服务器的都是公司内部系统,并且不可能使用同一个登录页面,所以只有密码模式适用,因此后面配置的时候也只配置密码模式。
具体流程如下图
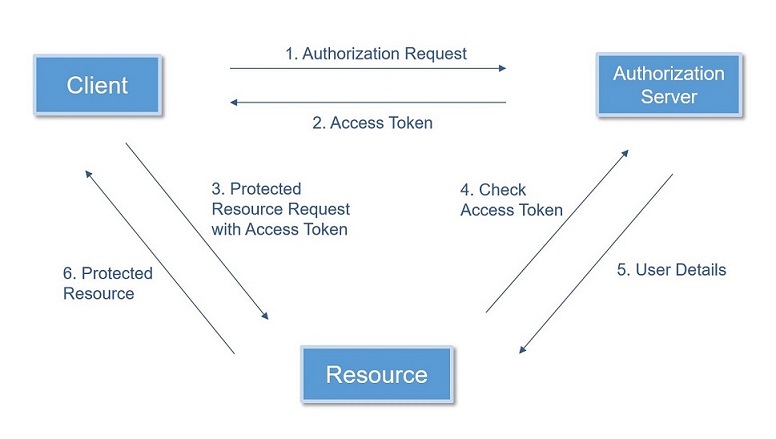
- 客户端向OAuth服务器申请Access Token
- 认证授权成功后OAuth服务器会返回Access Token给客户端
- 客户端带着Access Token调用API接口
- API接口把Access Token交给OAuth服务器检查
- 如果Access Token有效,OAuth服务器会返回用户相关信息(用户名,角色等)给API接口
- API接口根据检查结果来决定返回给客户端的内容
下面开始实现一个简单版的OAuth服务器
- 在pom.xml中配置依赖包和插件
<parent> <groupId>org.springframework.boot</groupId> <artifactId>spring-boot-starter-parent</artifactId> <version>1.5.6.RELEASE</version> </parent> <dependencies> <dependency> <groupId>org.springframework.boot</groupId> <artifactId>spring-boot-starter-web</artifactId> </dependency> <dependency> <groupId>org.springframework.security.oauth</groupId> <artifactId>spring-security-oauth2</artifactId> </dependency> </dependencies> <build> <plugins> <plugin> <groupId>org.springframework.boot</groupId> <artifactId>spring-boot-maven-plugin</artifactId> </plugin> </plugins> </build> - 编写主类Application
@SpringBootApplication @EnableAuthorizationServer @EnableWebSecurity public class Application { public static void main(String[] args) { SpringApplication.run(Application.class, args); } } - 编写OAuth配置类OauthConfig,这里将Token存储在内存中
@Configuration @ImportResource("classpath:/client.xml") public class OauthConfig extends AuthorizationServerConfigurerAdapter { @Autowired private AuthenticationManager authenticationManager; @Override public void configure(AuthorizationServerEndpointsConfigurer endpoints) throws Exception { endpoints.tokenServices(tokenServices(endpoints)).authenticationManager(authenticationManager); } private DefaultTokenServices tokenServices(AuthorizationServerEndpointsConfigurer endpoints) { DefaultTokenServices services = new DefaultTokenServices(); services.setTokenStore(tokenStore()); services.setSupportRefreshToken(true); services.setReuseRefreshToken(false); services.setClientDetailsService(endpoints.getClientDetailsService()); return services; } private TokenStore tokenStore() { return new InMemoryTokenStore(); } } - 在client.xml中配置client信息,这里使用xml文件来配置是因为觉得管理方便
<?xml version="1.0" encoding="UTF-8"?> <beans xmlns="http://www.springframework.org/schema/beans" xmlns:xsi="http://www.w3.org/2001/XMLSchema-instance" xmlns:oauth2="http://www.springframework.org/schema/security/oauth2" xsi:schemaLocation="http://www.springframework.org/schema/security/oauth2 http://www.springframework.org/schema/security/spring-security-oauth2.xsd http://www.springframework.org/schema/beans http://www.springframework.org/schema/beans/spring-beans.xsd"> <oauth2:client-details-service id="clientDetailsService"> <oauth2:client client-id="client1" secret="secret1" authorized-grant-types="password,refresh_token" access-token-validity="1800" refresh-token-validity="604800" scope="all" /> </oauth2:client-details-service> </beans> - 编写用户查询类CustomUserDetailsService,定义一个固定用户,用户名为user,密码为pwd,角色为ROLE_USER
@Component
public class CustomUserDetailsService implements UserDetailsService {

	@Override
	public UserDetails loadUserByUsername(String username) throws UsernameNotFoundException {
		return new User("user", "pwd", AuthorityUtils.createAuthorityList("ROLE_USER"));
	}

}
测试方法
- 使用Maven运行Goal:clean spring-boot:run
- 使用接口调用工具,如Postman,配置HTTP Basic认证,用户名和密码分别对应client.xml中的client-id和secret,使用POST方法和参数grant_type:password,username:user,password:pwd来调用http://localhost:8080/oauth/token,若调用成功便会返回如下格式的JSON字符串
{
    "access_token": "352d9a1c-86aa-4011-9732-4beca4d9f848",
    "token_type": "bearer",
    "refresh_token": "c2295cbf-e33c-4fac-a4c8-eaea25c4c72b",
    "expires_in": 1799,
    "scope": "all"
}
至此便构建了一个简单版的OAuth服务器
后面在 使用Spring Boot构建独立的OAuth服务器(二) 中会进行更多的配置。


 120
120

 被折叠的 条评论
为什么被折叠?
被折叠的 条评论
为什么被折叠?
 到【灌水乐园】发言


