


上一篇讲了怎么找到能用的的滤镜和大概怎么去寻找。。。
这里接着说如何详细地给图片加滤镜效果。。前的准备工作。。。
。
1. 在找到想用的滤镜名字之后。须要知道这个滤镜究竟须要什么參数。
。
例如以下图

这里打印出来的,就是当前的滤镜的所有參数。
。
。例如以下图
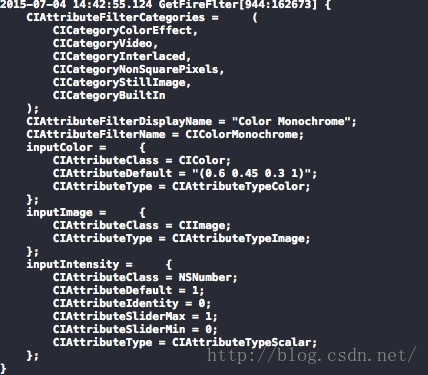
而在CIAttributeFilterName以下的參数,就是须要设置的属性。。
。这里就是inputColor、inputImage、inputIntensity这3个
当中CIAttributeClass表明这个属性须要的是什么类型的值。
设置属性的方法例如以下:

通过使用setValue forKey的方法来设置属性。。。这个key就是k+属性名+Key
在属性设置完之后,就能够输出了!。
。这里直接用CIColorMonochrome这个滤镜来做演示。。
- (UIImage *)imageFilter:(UIImage *)photo Value:(float)value
{
    CIContext *context = [CIContext contextWithOptions:nil];               // 1
    CIImage *image = [[CIImage alloc] initWithImage:photo];                // 2

    CIFilter *filter = [CIFilter filterWithName:@"CIColorMonochrome"];           // 3

    NSLog(@"%@", [filter attributes]);

    [filter setValue:image forKey:kCIInputImageKey];
    [filter setValue:[CIColor colorWithRed:100/255 green:0.4 blue:1] forKey:kCIInputColorKey];

    CIImage *result = [filter valueForKey:kCIOutputImageKey];              // 4
    CGRect extent = [result extent];
    CGImageRef cgImage = [context createCGImage:result fromRect:extent];// 5

    return [UIImage imageWithCGImage:cgImage];
}。return的UIImage就是叠加上滤镜的图片了。


 6285
6285

 被折叠的 条评论
为什么被折叠?
被折叠的 条评论
为什么被折叠?
 到【灌水乐园】发言


