一 负载均衡集群介绍
- 主流开源软件LVS、keepalived、haproxy、nginx等
- 其中LVS属于4层(网络OSI 7层模型),nginx属于7层,haproxy既可以认为是4层,也可以当做7层使用
- keepalived的负载均衡功能其实就是lvs
lvs是keepalived内置的功能 - lvs这种4层的负载均衡是可以分发除80外的其他端口通信的,比如MySQL的,而nginx仅仅支持http,https,mail,haproxy也支持MySQL这种TCP的负载均衡
nginx可以根据网站目录来区分后端真正提供服务的服务器;而4层的只是提供数据包的分发、转发,不会关心包里面的数据 - 相比较来说,LVS这种4层的更稳定,能承受更多的请求,而nginx这种7层的更加灵活,能实现更多的个性化需求
二 LVS介绍
- LVS是由国人章文嵩开发
- 流行度不亚于apache的httpd,基于TCP/IP做的路由和转发,稳定性和效率很高
- LVS最新版本基于Linux内核2.6,有好多年不更新了
- LVS有三种常见的模式:NAT、DR、IP Tunnel
- LVS架构中有一个核心角色叫做分发器(Load balance),它用来分发用户的请求,还有诸多处理用户请求的服务器(Real Server,简称rs)
LVS NAT模式

- 这种模式借助iptables的nat表来实现
- 用户的请求到分发器后,通过预设的iptables规则,把请求的数据包转发到后端的rs上去
- rs需要设定网关为分发器的内网ip
- 用户请求的数据包和返回给用户的数据包全部经过分发器,所以分发器成为瓶颈
- 在nat模式中,只需要分发器有公网ip即可,所以比较节省公网ip资源
LVS IP Tunnel模式

- 这种模式,需要有一个公共的IP配置在分发器和所有rs上,我们把它叫做vip
- 客户端请求的目标IP为vip,分发器接收到请求数据包后,会对数据包做一个加工,会把目标IP改为rs的IP,这样数据包就到了rs上
- rs接收数据包后,会还原原始数据包,这样目标IP为vip,因为所有rs上配置了这个vip,所以它会认为是它自己
LVS DR模式

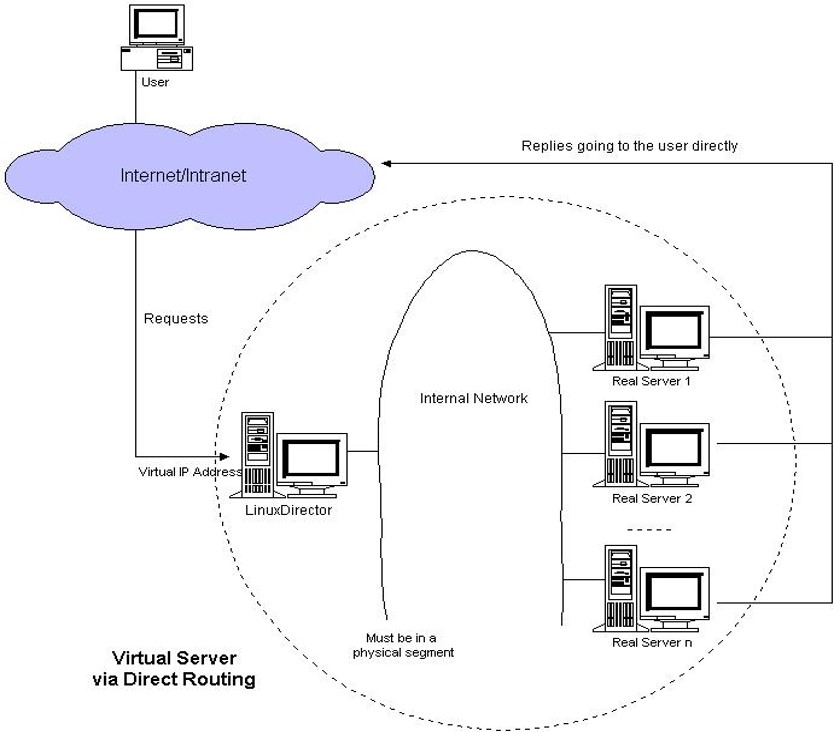
- 这种模式,也需要有一个公共的IP配置在分发器和所有rs上,也就是vip
- 和IP Tunnel不同的是,它会把数据包的MAC地址修改为rs的MAC地址
- rs接收数据包后,会还原原始数据包,这样目标IP为vip,因为所有rs上配置了这个vip,所以它会认为是它自己
三 LVS调度算法
- 轮询 Round-Robin rr
- 加权轮询 Weight Round-Robin wrr
- 最小连接 Least-Connection lc
- 加权最小连接 Weight Least-Connection wlc
- 基于局部性的最小连接 Locality-Based Least Connections lblc
- 带复制的基于局部性最小连接 Locality-Based Least Connections with Replication lblcr
- 目标地址散列调度 Destination Hashing dh
- 源地址散列调度 Source Hashing sh
四 LVS NAT模式搭建
1)准备工作
三台机器
- 分发器,也叫调度器(简写为dir)
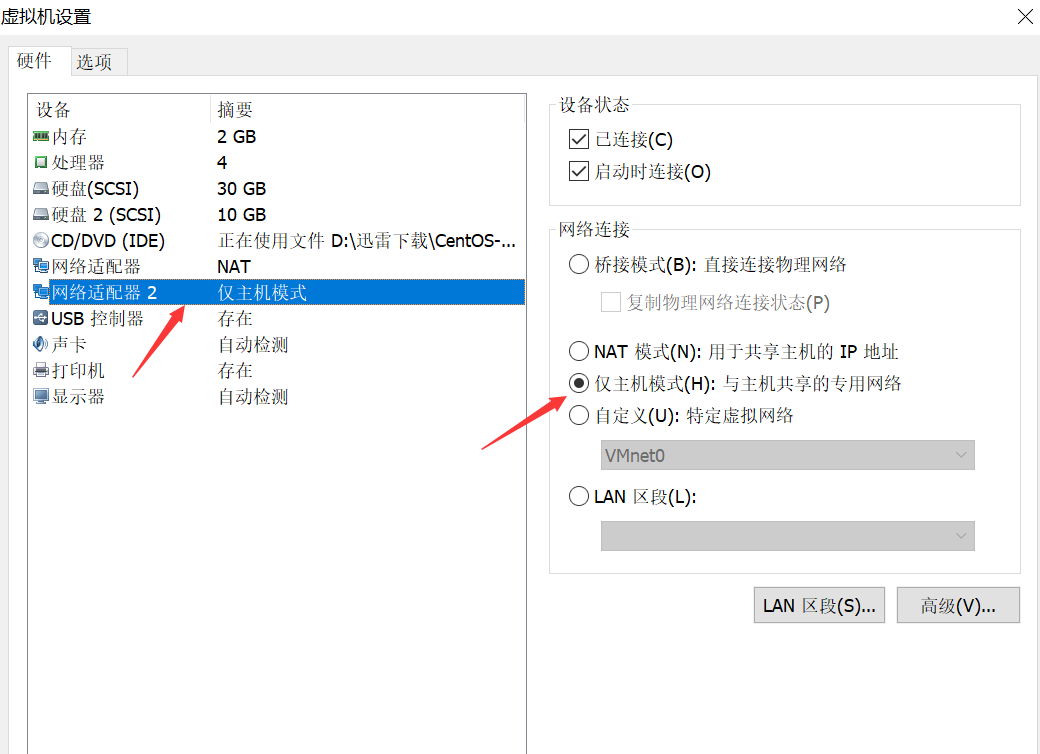
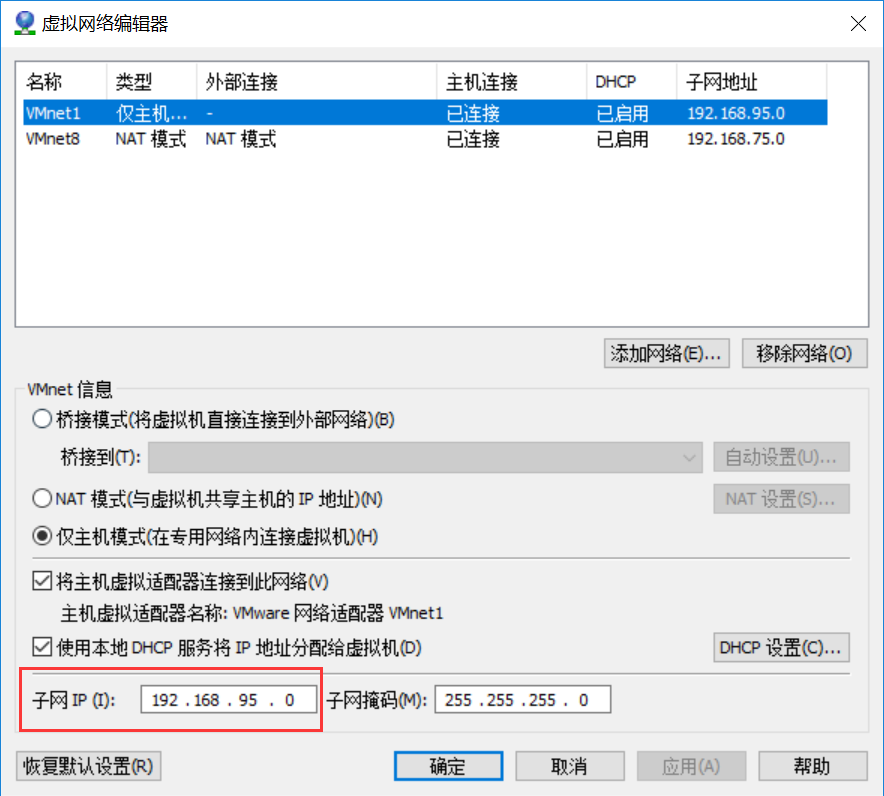
内网:75.136,外网:95.144(vmware仅主机模式) 这里需要两个网卡,我使用的是ens33 和ens37,内网使用ens33网卡,外网使用ens37网卡,并设置为仅主机模式,设置界面如下: 设置完毕后,我们可以查看到这个新的网卡所在的子网为95.0
  下面我们来将ens37的IP设置为95.144,修改的地方是IPADDR,并删除UUID,不需要设置网关
[root@lijie-01 ~]# vi /etc/sysconfig/network-scripts/ifcfg-ens37
HWADDR=00:0C:29:21:5E:CA
TYPE=Ethernet
PROXY_METHOD=none
BROWSER_ONLY=no
BOOTPROTO=none
IPADDR=192.168.95.144
PREFIX=24
DEFROUTE=yes
IPV4_FAILURE_FATAL=no
IPV4_DNS_PRIORITY=100
IPV6INIT=yes
IPV6_AUTOCONF=no
IPV6_DEFROUTE=yes
IPV6_FAILURE_FATAL=no
IPV6_ADDR_GEN_MODE=stable-privacy
IPV6_DNS_PRIORITY=100
NAME=ens37
DEVICE=ens37
ONBOOT=no
ZONE=block
[root@lijie-01 ~]# ifup ens37
连接已成功激活(D-Bus 活动路径:/org/freedesktop/NetworkManager/ActiveConnection/2)
[root@lijie-01 ~]#
随后我们从windows中ping一下新建的这个网卡
C:\Users\mixuyulv>ping 192.168.75.136
正在 Ping 192.168.75.136 具有 32 字节的数据:
来自 192.168.75.136 的回复: 字节=32 时间<1ms TTL=64
来自 192.168.75.136 的回复: 字节=32 时间<1ms TTL=64
来自 192.168.75.136 的回复: 字节=32 时间<1ms TTL=64
来自 192.168.75.136 的回复: 字节=32 时间<1ms TTL=64
192.168.75.136 的 Ping 统计信息:

    数据包: 已发送 = 4,已接收 = 4,丢失 = 0 (0% 丢失),
往返行程的估计时间(以毫秒为单位):

    最短 = 0ms,最长 = 0ms,平均 = 0ms
C:\Users\mixuyulv>
- rs1
内网:75.134,设置网关为75.136
[root@lijie-02 ~]# vi /etc/sysconfig/network-scripts/ifcfg-ens33
TYPE=Ethernet
iPROXY_METHOD=none
BROWSER_ONLY=no
BOOTPROTO=static
DEFROUTE=yes
IPV4_FAILURE_FATAL=no
IPV6INIT=yes
IPV6_AUTOCONF=yes
IPV6_DEFROUTE=yes
IPV6_FAILURE_FATAL=no
IPV6_ADDR_GEN_MODE=stable-privacy
NAME=ens33
DEVICE=ens33
ONBOOT=yes
IPADDR=192.168.75.134
NETMASK=255.255.255.0
GATEWAY=192.168.75.136
DNS1=119.29.29.29
我们还需要重启网络服务,重启后这台机器就不能上网了,
[root@lijie-02 ~]# systemctl restart network.service
[root@lijie-02 ~]# ping www.qq.com
ping: www.qq.com: 未知的名称或服务
[root@lijie-02 ~]#
我们现在再来查看网关就变成了75.136
[root@lijie-02 ~]# route -n
Kernel IP routing table
Destination     Gateway         Genmask         Flags Metric Ref    Use Iface
0.0.0.0         192.168.75.136  0.0.0.0         UG    100    0        0 ens33
192.168.75.0    0.0.0.0         255.255.255.0   U     100    0        0 ens33
192.168.122.0   0.0.0.0         255.255.255.0   U     0      0        0 virbr0
[root@lijie-02 ~]#
- rs2
内网:75.130,设置网关为75.136
[root@lijie-03 ~]# vi /etc/sysconfig/network-scripts/ifcfg-ens33
TYPE=Ethernet
PROXY_METHOD=none
BROWSER_ONLY=no
BOOTPROTO=static
DEFROUTE=yes
IPV4_FAILURE_FATAL=no
IPV6INIT=yes
IPV6_AUTOCONF=yes
IPV6_DEFROUTE=yes
IPV6_FAILURE_FATAL=no
IPV6_ADDR_GEN_MODE=stable-privacy
NAME=ens33
UUID=087b59ca-7e9f-4b76-a456-ada0fa5a7af4
DEVICE=ens33
ONBOOT=yes
IPADDR=192.168.75.130
NETMASK=255.255.255.0
GATEWAY=192.168.75.136
DNS1=119.29.29.29
我们还需要重启网络服务,重启后这台机器就不能上网了,
[root@lijie-03 ~]# systemctl restart network.service
[root@lijie-03 ~]# ping www.qq.com
ping: www.qq.com: 未知的名称或服务
[root@lijie-02 ~]#
我们现在再来查看网关就变成了75.136
[root@lijie-03 ~]# route -n
Kernel IP routing table
Destination     Gateway         Genmask         Flags Metric Ref    Use Iface
0.0.0.0         192.168.75.136  0.0.0.0         UG    100    0        0 ens33
192.168.75.0    0.0.0.0         255.255.255.0   U     100    0        0 ens33
[root@lijie-03 ~]#
- 三台机器上都执行执行
  [root@lijie-01 ~]# systemctl stop firewalld
[root@lijie-01 ~]# systemctl disable firewalld
Removed symlink /etc/systemd/system/multi-user.target.wants/firewalld.service.
Removed symlink /etc/systemd/system/dbus-org.fedoraproject.FirewallD1.service.
[root@lijie-01 ~]# iptables -nvL
Chain INPUT (policy ACCEPT 0 packets, 0 bytes)
 pkts bytes target     prot opt in     out     source               destination
Chain FORWARD (policy ACCEPT 0 packets, 0 bytes)
 pkts bytes target     prot opt in     out     source               destination
Chain OUTPUT (policy ACCEPT 0 packets, 0 bytes)
 pkts bytes target     prot opt in     out     source               destination
[root@lijie-01 ~]#
这里建议使用centos6里面的iptables的方式,需要安装iptables-service
[root@lijie-01 ~]# yum install -y iptables-services
随后启动iptables-service服务
 [root@lijie-01 ~]# systemctl start iptables-services
Failed to start iptables-services.service: Unit not found.
[root@lijie-01 ~]#
我们可以使用下面命令查看iptables-services 这个服务是否成功安装
[root@lijie-01 ~]# rpm -ql iptables-services
/etc/sysconfig/ip6tables
/etc/sysconfig/iptables
/usr/lib/systemd/system/ip6tables.service
/usr/lib/systemd/system/iptables.service
/usr/libexec/initscripts/legacy-actions/ip6tables
/usr/libexec/initscripts/legacy-actions/ip6tables/panic
/usr/libexec/initscripts/legacy-actions/ip6tables/save
/usr/libexec/initscripts/legacy-actions/iptables
/usr/libexec/initscripts/legacy-actions/iptables/panic
/usr/libexec/initscripts/legacy-actions/iptables/save
/usr/libexec/iptables
/usr/libexec/iptables/ip6tables.init
/usr/libexec/iptables/iptables.init
[root@lijie-01 ~]#
从上图我们发现使用的命令有误,开启iptables服务应使用以下命令
[root@lijie-01 ~]# systemctl start iptables
[root@lijie-01 ~]#
随后使iptables有效
[root@lijie-01 ~]# systemctl enable iptables
Created symlink from /etc/systemd/system/basic.target.wants/iptables.service to /usr/lib/systemd/system/iptables.service.
[root@lijie-01 ~]#
上面我们开启iptables的目的是为了清空规则,以便后面调用空规则
[root@lijie-01 ~]# iptables -F
[root@lijie-01 ~]# service iptables save
iptables: Saving firewall rules to /etc/sysconfig/iptables:[  确定  ]
[root@lijie-01 ~]#
还需要关闭selinux
[root@lijie-01 ~]# setenforce 0
[root@lijie-01 ~]#
保险起见,最好还是修改配置文件/etc/selinux/config中selinux值从enforcing变为disabled来关闭selinux
# This file controls the state of SELinux on the system.
# SELINUX= can take one of these three values:
#     enforcing - SELinux security policy is enforced.
#     permissive - SELinux prints warnings instead of enforcing.
#     disabled - No SELinux policy is loaded.
SELINUX=disabled
# SELINUXTYPE= can take one of three two values:
#     targeted - Targeted processes are protected,
#     minimum - Modification of targeted policy. Only selected processes are protected.
#     mls - Multi Level Security protection.
SELINUXTYPE=targeted
至此,准备工作完毕
2)搭建工作
- 在dir上安装ipvsadm
[root@lijie-01 ~]# yum install -y ipvsdam
- 在dir上编写脚本,vim /usr/local/sbin/lvs_nat.sh//内容如下
#! /bin/bash
# director 服务器上开启路由转发功能
echo 1 > /proc/sys/net/ipv4/ip_forward
# 关闭icmp的重定向
echo 0 > /proc/sys/net/ipv4/conf/all/send_redirects
echo 0 > /proc/sys/net/ipv4/conf/default/send_redirects
# 注意区分网卡名字,我的两个网卡分别为ens33和ens37
echo 0 > /proc/sys/net/ipv4/conf/ens33/send_redirects
echo 0 > /proc/sys/net/ipv4/conf/ens37/send_redirects
# director 设置nat防火墙
iptables -t nat -F
iptables -t nat -X
iptables -t nat -A POSTROUTING -s 192.168.75.0/24  -j MASQUERADE
# director设置ipvsadm
IPVSADM='/usr/sbin/ipvsadm'
$IPVSADM -C
#这里的wlc是算法,算法还有如rr、lc
$IPVSADM -A -t 192.168.95.144:80 -s wlc -p 3
$IPVSADM -a -t 192.168.95.144:80 -r 192.168.75.134:80 -m -w 1
$IPVSADM -a -t 192.168.95.144:80 -r 192.168.75.130:80 -m -w 1
我们来执行下这个脚本,没有任何输出,说明脚本没有语法错误
[root@lijie-01 ~]# sh /usr/local/sbin/lvs_nat.sh
[root@lijie-01 ~]#
3)NAT模式效果测试
- 两台rs上都安装nginx
- 设置两台rs的主页,做一个区分,也就是说直接curl两台rs的ip时,得到不同的结果
- 浏览器里访问192.168.95.144,多访问几次看结果差异
扩展:
lvs 三种模式详解 http://www.it165.net/admin/html/201401/2248.html
lvs几种算法 http://www.aminglinux.com/bbs/thread-7407-1-1.html
关于arp_ignore和 arp_announce http://www.cnblogs.com/lgfeng/archive/2012/10/16/2726308.html
lvs原理相关的 http://blog.csdn.net/pi9nc/article/details/23380589
扩展:
lvs 三种模式详解 http://www.it165.net/admin/html/201401/2248.html
lvs几种算法 http://www.aminglinux.com/bbs/thread-7407-1-1.html
关于arp_ignore和 arp_announce http://www.cnblogs.com/lgfeng/archive/2012/10/16/2726308.html
lvs原理相关的 http://blog.csdn.net/pi9nc/article/details/23380589


 405
405

 被折叠的 条评论
为什么被折叠?


