hellopasswd
httpd的用户认证
- vi /usr/local/apache2.4/conf/extra/httpd-vhosts.conf #把123.com虚拟主机编辑为 <VirtualHost *:80> DocumentRoot "/data/wwwroot/www.123.com ServerName www.123.com <Directory /data/wwwroot/www.123.com> #指定认证的目录 AllowOverride AuthConfig #这个相当于打开认证的开关 AuthName "123.com user auth" #自定义认证的名字,作用不大 AuthType Basic #认证的类型,一般为Basic AuthUserFile /data/.htpasswd #指定密码文件所在位置 require valid-user #指定需要认证的用户为全部可用用户 </Directory> </VirtualHost>
- /usr/local/apache2.4/bin/htpasswd -cm /data/.htpasswd user
- 重新加载配置-t,graceful
- 绑定hosts,浏览器测试
- curl -x 127.0.0.1:80 www.123.com #状态码为401
- curl -x 127.0.0.1:80 -u user:passwd www.123.com #状态码为200
将第二个虚拟主机修改为如下
[root@localhost ~]# vi /usr/local/apache2.4/conf/httpd.conf
     31 <VirtualHost *:80>
     32     DocumentRoot "/data/wwwroot/111.com"
     33     ServerName 111.com
     34     ServerAlias www.example.com
     35     <Directory /data/wwwroot/111.com>
     36         AllowOverride AuthConfig
     37         AuthName "111.com user auth"
     38         AuthType Basic
     39         AuthUserFile /data/.htpasswd
     40         require valid-user
     41     </Directory>
     42     ErrorLog "logs/111.com-error_log"
     43     CustomLog "logs/111.com-access_log" common
     44 </VirtualHost>
-c创建密码文件
[root@localhost ~]# /usr/local/apache2.4/bin/htpasswd -c -m /data/.htpasswd user
New password:
Re-type new password:
Adding password for user user
-m为MD5
[root@localhost ~]# cat /data/.htpasswd
user:$apr1$nz4nSFEa$xXz28yuiXSuuWb9LLAPzJ0
若要添加用户,则不需要再次创建-c
[root@localhost ~]# /usr/local/apache2.4/bin/htpasswd -m /data/.htpasswd admin
New password:
Re-type new password:
Adding password for user admin
[root@localhost ~]# cat /data/.htpasswd
user:$apr1$nz4nSFEa$xXz28yuiXSuuWb9LLAPzJ0
admin:$apr1$fb45.Cr9$Wejc/XMUd10Yl3aPhRvJm0
[root@localhost ~]# /usr/local/apache2.4/bin/apachectl -t
Syntax OK
[root@localhost ~]# /usr/local/apache2.4/bin/apachectl graceful
访问111.com
[root@localhost ~]# curl -x 127.0.0.1:80 111.com
<!DOCTYPE HTML PUBLIC "-//IETF//DTD HTML 2.0//EN">
<html><head>
<title>401 Unauthorized</title>
</head><body>
<h1>Unauthorized</h1>
<p>This server could not verify that you
are authorized to access the document
requested.  Either you supplied the wrong
credentials (e.g., bad password), or your
browser doesn't understand how to supply
the credentials required.</p>
</body></html>
出现了401,表示访问页面需要做用户验证
[root@localhost ~]# curl -x 127.0.0.1:80 111.com -I
HTTP/1.1 401 Unauthorized
Date: Sat, 04 Nov 2017 04:10:05 GMT
Server: Apache/2.4.29 (Unix) PHP/5.6.30
WWW-Authenticate: Basic realm="111.com user auth"
Content-Type: text/html; charset=iso-8859-1
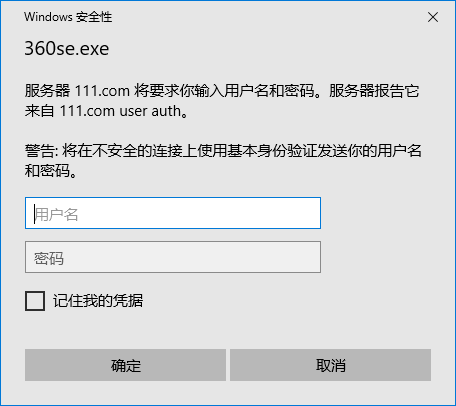
Windows下在hosts文件添加111.com,然后浏览器访问111.com

输入用户和密码就能访问111.com了
而Linux访问的用户认证则需要加-u指定用户和密码则就可以访问成功
[root@localhost ~]# curl -x 127.0.0.1:80 111.com -u user:123
hello!111.com
[root@localhost ~]# curl -x 127.0.0.1:80 111.com -u user:123 -I
HTTP/1.1 200 OK
Date: Sat, 04 Nov 2017 04:15:43 GMT
Server: Apache/2.4.29 (Unix) PHP/5.6.30
X-Powered-By: PHP/5.6.30
Content-Type: text/html; charset=UTF-8
- 针对某一个页面作用户认证
- vi /usr/local/apache2.4/conf/extra/httpd-vhosts.conf <VirtualHost *:80> DocumentRoot "/data/wwwwroot/www.123/com" ServerName www.123.com <FilesMatch user.php> AllowOverride AuthConfig AuthName "111.com user auth" AuthType Basic AuthUserFile /data/.htpasswd require valid-user </FileMatch> </VirtualHost> 针对某一个页面作用户认证
     31 <VirtualHost *:80>
     32     DocumentRoot "/data/wwwroot/111.com"
     33     ServerName 111.com
     34     ServerAlias www.example.com
     35 #    <Directory /data/wwwroot/111.com>
     36     <FilesMatch user.php>
     37         AllowOverride AuthConfig
     38         AuthName "111.com user auth"
     39         AuthType Basic
     40         AuthUserFile /data/.htpasswd
     41         require valid-user
     42     </FilesMatch>
     43 #    </Directory>
     44     ErrorLog "logs/111.com-error_log"
     45     CustomLog "logs/111.com-access_log" common
     46 </VirtualHost>
[root@localhost ~]# /usr/local/apache2.4/bin/apachectl -t
Syntax OK
[root@localhost ~]# /usr/local/apache2.4/bin/apachectl graceful
[root@localhost ~]# vi /data/wwwroot/111.com/user.php
	<?php
		echo "hello!user"
	?>
[root@localhost ~]# curl -x 127.0.0.1:80 111.com
hello!111.com
[root@localhost ~]# curl -x 127.0.0.1:80 111.com/user.php
<!DOCTYPE HTML PUBLIC "-//IETF//DTD HTML 2.0//EN">
<html><head>
<title>401 Unauthorized</title>
</head><body>
<h1>Unauthorized</h1>
<p>This server could not verify that you
are authorized to access the document
requested.  Either you supplied the wrong
credentials (e.g., bad password), or your
browser doesn't understand how to supply
the credentials required.</p>
</body></html>
[root@localhost ~]# curl -x 127.0.0.1:80 -u user:123 111.com/user.php
hello!user
而Windows下的浏览器访问也同样可以
修改与 171220


 4314
4314

 被折叠的 条评论
为什么被折叠?


