


在这篇文章中,我们接着上一篇的内容接着分析。
    public ConfigurableApplicationContext run(String... args) {
        //启动应用的检测
        StopWatch stopWatch = new StopWatch();
        stopWatch.start();
        //SpringBoot的上下文
        ConfigurableApplicationContext context = null;
        //失败分析报告
        FailureAnalyzers analyzers = null;
        configureHeadlessProperty();
        //SpringBoot的runlistener
        SpringApplicationRunListeners listeners = getRunListeners(args);
        listeners.starting();
        try {
        //参数解析
            ApplicationArguments applicationArguments = new DefaultApplicationArguments(
                    args);
                    //配置环境变量
            ConfigurableEnvironment environment = prepareEnvironment(listeners,
                    applicationArguments);
            //输出Banner信息
            Banner printedBanner = printBanner(environment);
            //创建应用上下文
            context = createApplicationContext();
            analyzers = new FailureAnalyzers(context);
            //refresh上下文之前的准备
            prepareContext(context, environment, listeners, applicationArguments,
                    printedBanner);
            refreshContext(context);
            afterRefresh(context, applicationArguments);
            listeners.finished(context, null);
            stopWatch.stop();
            if (this.logStartupInfo) {
                new StartupInfoLogger(this.mainApplicationClass)
                        .logStarted(getApplicationLog(), stopWatch);
            }
            return context;
        }
        catch (Throwable ex) {
            handleRunFailure(context, listeners, analyzers, ex);
            throw new IllegalStateException(ex);
        }
    }
SpringApplication中的run方法的内容如上所示,上面就是整个SpringBoot应用启动的主要调用方法,run方法中的参数即是我们的应用参数。下面我们来简单的分析一下这个启动过程。
StopWatch主要是监控启动过程,统计启动时间,检测应用是否已经启动或者停止。
SpringApplicationRunListeners listeners = getRunListeners(args);
private SpringApplicationRunListeners getRunListeners(String[] args) {
    Class<?>[] types = new Class<?>[] { SpringApplication.class, String[].class };
    return new SpringApplicationRunListeners(logger, getSpringFactoriesInstances(
        SpringApplicationRunListener.class, types, this, args));
}
通过在上一篇文章中的问题,对于getSpringFactoriesInstances这个方法你应该不陌生来吧。这里也是从META-INF/spring.factories中获取类型为org.springframework.boot.SpringApplicationRunListener的配置值,这个默认的配置值为:org.springframework.boot.context.event.EventPublishingRunListener。我们进入到EventPublishingRunListener这个类看一下它的构造函数
    public EventPublishingRunListener(SpringApplication application, String[] args) {
        this.application = application;
        this.args = args;
        //创建一个SimpleApplicationEventMulticaster
        this.initialMulticaster = new SimpleApplicationEventMulticaster();
        //把之前在SpringApplication中获取到的listener循环放入到SimpleApplicationEventMulticaster中
        for (ApplicationListener<?> listener : application.getListeners()) {
    this.initialMulticaster.addApplicationListener(listener);
        }
    }
通过上面的分析,我们可以看到EventPublishingRunListener把SpringApplication中的监听器,都放到了SimpleApplicationEventMulticaster中,进行了统一的管理。listeners.starting();启动事件监听,这里以后我们单独开章节详细说明.
 //创建应用参数解析器
 ApplicationArguments applicationArguments = new DefaultApplicationArguments(
                    args);
我们看一下DefaultApplicationArguments的构造函数的内容:
public DefaultApplicationArguments(String[] args) {
//首先判断不能为null,这里大家可以想一下可变参数如果不传值的话看看是什么内容
Assert.notNull(args, "Args must not be null");
//调用Source对应用参数进行解析
this.source = new Source(args);
this.args = args;
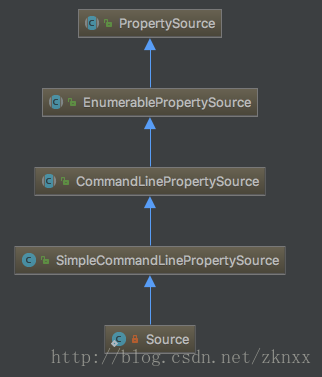
}Source(String[] args) {
//调用父类的构造函数 Source的继承关系如下图所示
super(args);
}
public SimpleCommandLinePropertySource(String... args) {
//对应参数进行解析的工作
super(new SimpleCommandLineArgsParser().parse(args));
}
大家在配置应用参数的时候,是这样这样配置的 - -key=value,为什么要以- -开头呢?在SimpleCommandLineArgsParser的parse方法中你会找到答案。并且Source这个类还继承类PropertySource这个类。
//准备环境变量
ConfigurableEnvironment environment =           prepareEnvironment(listeners,applicationArguments);
private ConfigurableEnvironment prepareEnvironment(
    SpringApplicationRunListeners listeners,
    ApplicationArguments applicationArguments) {
    //获取环境变量
    ConfigurableEnvironment environment = getOrCreateEnvironment();
    //将应用参数放入到环境变量持有对象中
    configureEnvironment(environment, applicationArguments.getSourceArgs());
    //监听器监听环境变量对象的变化
    listeners.environmentPrepared(environment);
    //如果非web环境,则转换为StandardEnvironment对象
    if (!this.webEnvironment) {
        environment = new EnvironmentConverter(getClassLoader())            .convertToStandardEnvironmentIfNecessary(environment);
    }
    return environment;
}
private ConfigurableEnvironment getOrCreateEnvironment() {
//如果已经创建过存放环境变量的对象了,则直接返回
if (this.environment != null) {
return this.environment;
}
//如果是web环境则创建StandardServletEnvironment对象
if (this.webEnvironment) {
return new StandardServletEnvironment();
}
//非web环境,创建StandardEnvironment
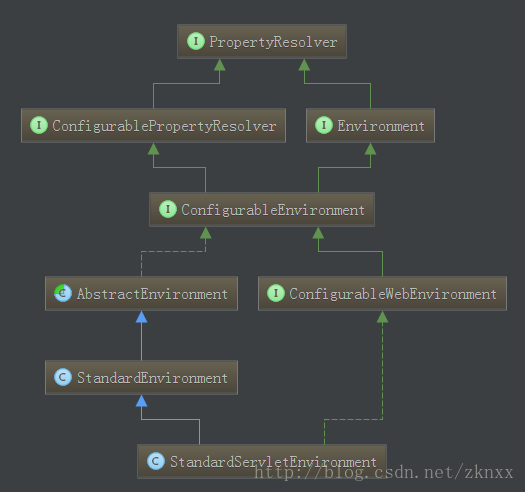
return new StandardEnvironment();
}StandardServletEnvironment的UML图如下所示,StandardServletEnvironment集成了系统变量、环境变量、配置属性信息等内容。这些内容我们以后单开一个篇章来说一下。
//这句话是输出SpringBoot的Banner信息,可以从指定的位置加载信息,可以输出为文字形式,也可以输出为图片形式,如我们常见的SpringBoot的logo就是在这里输出的
Banner printedBanner = printBanner(environment);
Banner的UML类图如下所示:
我们最常见的SpringBoot的logo“图像”就在SpringBootBanner这个类中定义的,这个也是SpringBoot默认的Banner类。


//创建SpringBoot的应用上下文
context = createApplicationContext();
protected ConfigurableApplicationContext createApplicationContext() {
    Class<?> contextClass = this.applicationContextClass;
    if (contextClass == null) {
        try {
        //DEFAULT_WEB_CONTEXT_CLASS = org.springframework.boot.context.embedded.AnnotationConfigEmbeddedWebApplicationContext
        /// DEFAULT_CONTEXT_CLASS = org.springframework.context.annotation.AnnotationConfigApplicationContext
        contextClass = Class.forName(this.webEnvironment
                ? DEFAULT_WEB_CONTEXT_CLASS : DEFAULT_CONTEXT_CLASS);
        }
    }
    return (ConfigurableApplicationContext) BeanUtils.instantiate(contextClass);
}
因为我们是web开发环境,所以这里我们的web上下文是AnnotationConfigEmbeddedWebApplicationContext这个对象,一定要记住这个类,要仔细的看看它的UML类图。


 1420
1420


 被折叠的 条评论
为什么被折叠?
被折叠的 条评论
为什么被折叠?
 到【灌水乐园】发言


