


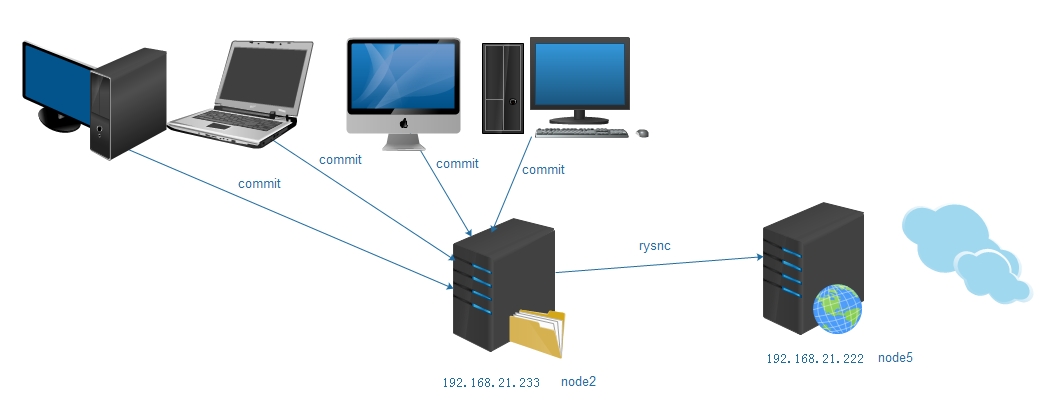
实验架构图如下:

2.实验环境需求(3台主机即可,1台服务器安装svn加rsync,1台web服务器,1台客户端机器)
node2 192.168.21.233 centos 6.6 x64 svn(subversion) + rsync
node5 192.168.21.222 centos 6.6 x64 LAMP(Linux+Apache+MySQL+php)
各软件的作用:svn用来做版本控制的,因为在公司内部上线一个项目时,在多人开发的情况下,都会经过多人修改,此时项目源码的管理就变得非常重要了,在RHEL系列下有这样一款软件svn(subversion)
Subversion is a concurrent version control system which enables one or more users to collaborate in developing and maintaining a hierarchy of files and directories while keeping a history of all changes. Subversion only stores the differences between versions,instead of every complete file. Subversion is intended to be a compelling replacement for CVS.
Subversion是一个并发版本控制系统,使一个或多个用户协作开发和维护一个文件和目录的层次结构,同时保持所有更改的历史。Subversion存储版本之间的差异,而不是每一个完整的文件。Subversion确定为强迫替换CVS。
百度百科对CVS的解释:CVS(Concurrent Versions System)版本控制系统是一种GNU软件包,主要用于在多人开发环境下源码的维护。
rsync是用来将编写好的源码同步到远程的web服务器上。
软件包都通过yum方式来安装 yum install package_name
[root@node5 ~]# rpm -q httpd
httpd-2.2.15-39.el6.centos.x86_64
[root@node5 ~]# rpm -q mysql-server
mysql-server-5.1.73-3.el6_5.x86_64
[root@node5 ~]# rpm -q php
php-5.3.3-40.el6_6.x86_64
[root@node2 ~]# rpm -q subversion
subversion-1.6.11-12.el6_6.x86_64
[root@node2 ~]# rpm -q rsync
rsync-3.0.6-12.el6.x86_64
3.配置环境
[root@node2 ~]# rpm -ql subversion
...
/etc/rc.d/init.d/svnserve 服务启动脚本
...
/usr/bin/svn 会常用到的命令
/usr/bin/svnadmin
...
/usr/share/man/man5/svnserve.conf.5.gz 配置文件手册
....
客户端访问服务器时有三种方式:svnserve访问、svnserve和ssh访问、Apache间接访问,这里以svnserve方式来讲解。
svnadmin - Subversion repository administration too subversion的版本管理工具l
SYNOPSIS 命令格式
svnadmin command /path/to/repos [options] [args]
。。。。。。
Run ‘svnadmin help’ to access the built-in tool documentation. 通过svnadmin查看工具的使用
NAME
svn - Subversion command line client tool subversion的命令行客户端工具
SYNOPSIS 命令格式
svn command [options] [args]
。。。。。
Run ‘svn help’ to access the built-in tool documentation. 查看命令的文档
[root@node2 ~]# svnadmin help
general usage: svnadmin SUBCOMMAND REPOS_PATH [ARGS & OPTIONS ...]
Type 'svnadmin help <subcommand>' for help on a specific subcommand.
Type 'svnadmin --version' to see the program version and FS modules.
Available subcommands: svnadmin help subcommand查看子命令的使用,比如:svnadmin help create
crashtest
create 创建一个新的版本库
deltify
dump
help (?, h)
。。。
[root@node2 ~]# mkdir /svn/project
[root@node2 ~]# svnadmin create /svn/project   创建一个新的版本库
[root@node2 ~]# ls -l /svn/project
total 24
drwxr-xr-x 2 root root 4096 May 15 08:39 conf
drwxr-sr-x 6 root root 4096 May 15 08:39 db
-r--r--r-- 1 root root    2 May 15 08:39 format
drwxr-xr-x 2 root root 4096 May 15 08:39 hooks
drwxr-xr-x 2 root root 4096 May 15 08:39 locks
-rw-r--r-- 1 root root  229 May 15 08:39 README.txt
[root@node2 ~]# ls /usr/local/nginx-1.4.7/auto/
cc          feature       headers  install  modules  os       summary
define      have          include  lib      nohave   sources  types
endianness  have_headers  init     make     options  stubs    unix
[root@node2 ~]# du -sh /usr/local/nginx-1.4.7/auto/
436K    /usr/local/nginx-1.4.7/auto/
导入源码到版本库中,这里使用nginx的部分源码来举例,使用import子命令
-m [--message] ARG       : specify log message ARG    相当于说明性的子串
[root@node2 ~]# svn import /usr/local/nginx-1.4.7/auto/ file:///svn/project/ -m "Initialization of a project"
Adding         /usr/local/nginx-1.4.7/auto/nohave
Adding         /usr/local/nginx-1.4.7/auto/os
Adding         /usr/local/nginx-1.4.7/auto/os/linux
Adding         /usr/local/nginx-1.4.7/auto/os/win32
.......
Adding         /usr/local/nginx-1.4.7/auto/make
Adding         /usr/local/nginx-1.4.7/auto/have_headers

Committed revision 1.
[root@node2 ~]# svn list file:///svn/project/  列出版本库中有哪些文件
cc/
define
endianness
feature
have
have_headers
headers
include
init
install
lib/
make
modules
nohave
options
os/
sources
stubs
summary
types/
unix
[root@node2 ~]# ls /svn/project/conf/
authz  passwd  svnserve.conf
客户端在访问版本库服务器时,服务器会根据版本库目录下conf/svnserve.conf文件中的定义对用户进行访问控制
[root@node2 ~]# vim /svn/project/conf/svnserve.conf 查看man svnserve.conf有配置文件的详细说明
。。。。  做如下修改
[general]
### These options control access to the repository for unauthenticated
### and authenticated users.  Valid values are "write", "read",
### and "none".  The sample settings below are the defaults.
anon-access = none #设置匿名账号访问权限,这里为none无权限
auth-access = write #经过认证的账户可写
### The password-db option controls the location of the password
### database file.  Unless you specify a path starting with a /,
### the file's location is relative to the directory containing
### this configuration file.
### If SASL is enabled (see below), this file will NOT be used.
### Uncomment the line below to use the default password file.
password-db = passwd #账号名称与密码的存放文件名
### The authz-db option controls the location of the authorization
### rules for path-based access control.  Unless you specify a path
### starting with a /, the file's location is relative to the the
### directory containing this file.  If you don't specify an
### authz-db, no path-based access control is done.
### Uncomment the line below to use the default authorization file.
authz-db = authz #基于路径访问的控制文件名,可以对文件或目录设置权限
### This option specifies the authentication realm of the repository.
### If two repositories have the same authentication realm, they should
### have the same password database, and vice versa.  The default realm
### is repository's uuid.
realm = My First Repository  #设置版本库域,如果两个版本库的认证域相同,他们将使用相同的密码数据
[root@node2 ~]# vim /svn/project/conf/passwd    下面给了两个用户

### This file is an example password file for svnserve.
### Its format is similar to that of svnserve.conf. As shown in the
### example below it contains one section labelled [users].
### The name and password for each user follow, one account per line.

[users]
# harry = harryssecret
# sally = sallyssecret
keepalived = keepalived  #用户名 = 密码
haproxy = haproxy
[root@node2 ~]# vim /svn/project/conf/authz
。。。   添加如下内容
[groups]
# harry_and_sally = harry,sally
# harry_sally_and_joe = harry,sally,&joe
operator = keepalived,haproxy   #指定一个operator组包括了刚才的两个用户

[/]                  #设置版本库的根路径
@operator = rw       #指定组对版本库的访问权限为读写
* = r                 #其他用户的权限,权限可以设置为 只读 'r'  读写'rw'  无''
。。。
[root@node2 ~]# ls /svn/project/
conf  db  format  hooks  locks  README.txt
[root@node2 ~]# ls /svn/project/hooks/
post-commit.tmpl          post-unlock.tmpl  pre-revprop-change.tmpl
post-lock.tmpl            pre-commit.tmpl   pre-unlock.tmpl
post-revprop-change.tmpl  pre-lock.tmpl     start-commit.tmpl
在hooks目录下,可以提供一个post-commit的可执行的shell脚本,每当结束对版本库的编辑时,执行commit一下
,即会调用对应版本库中hooks目录下commit脚本执行,这里因为结合rsync来做同步,刚好可以使用到,等会后
面提供脚本的使用内容。
启动svnserve服务
可以用svnserve命令来启动,使用-d选项说明以守护进程方式运行svnserve,-r PATH 为版本库指定一个虚拟
路径,默认svn会将服务器上所有的版本库都共享给用户,使用-r仅发布个别版本给用户,svnserve -d -r /svn/project也可以使用service start svnserve启动svnserve,svnserve默认是监听在tcp的3690端口
客户端访问
svn命令
[root@node2 ~]# svn help
usage: svn <subcommand> [options] [args]
。。。
Available subcommands: 这里()括号中的可以说是简写
add #添加文件
blame (praise, annotate, ann)
cat #查看文件的内容
changelist (cl) #查看改变的列表
checkout (co) #从服务器版本库中复制一份副本到本地
cleanup
commit (ci) #将本地工作副本修改后的内容发布到版本中
copy (cp)
delete (del, remove, rm) #删除文件、目录
diff (di) #对比两个版本之间的差别
export
help (?, h)
import #导入一个源码库到版本库中
info
list (ls) #列出版本库中的文件
lock
log
merge
mergeinfo
mkdir
其他的子命令使用到都可以查看帮助手册的,svn help subcommand
[root@node2 ~]# svn checkout file:///svn/project nginx_source
A nginx_source/nohave
A nginx_source/os
A nginx_source/os/linux
A nginx_source/os/win32
A nginx_source/os/darwin
A nginx_source/os/conf
A nginx_source/os/freebsd
A nginx_source/os/solaris
A nginx_source/unix
。。。
[root@node2 ~]# vim /svn/project/hooks/post-commit 这里通过post-commit脚本
#!/bin/bash
REPOS="$1" #版本库的绝对路径
REV="$2" #对应更新到的版本号
DIR="/root/nginx_source"
export LC_ALL=en_US.UTF-8
export LANG=zh_CN.UTF-8
CURDATE=`/bin/date`
#用来记录日志
echo "Code Deployed by at $CURDATE,$REPOS,$REV" >> /root/nginx_change.log
#当版本库发生改变时,把更新写入到副本当中
/usr/bin/svn update $DIR --username keepalived --password keepalived --no-auth-cache 2>1 /root/nginx_update.log
#使用rsync同步项目到web服务器上
/usr/bin/rsync -r -e ssh --stats --progress $DIR root@192.168.21.222:/var/www/html
这里rsync同步时需要输入远程主机的密码,所以我们可以通过密钥来进行认证,
[root@node2 ~]#ssh-keygen -t rsa -P ''
[root@node2 ~]#ssh-copy-id -i .ssh/id_rsa.pub root@192.168.21.222
在windows上面操作时,需要安装一个软件TortoiseSVN,这里提供一个下载路径是英文版的http://pan.baidu.com/s/1ntoU1jN ,下载后安装,安装好后,在桌面上右击时选择(SVN检出或者SVN Checkout)


接下来就可以打开文件进行操作了,我们修改cc目录下的gcc文件,在第5行添加了(hello Eventyone)和第33行添加了(Hello world!),在cc目录下的owc文件中第10行到第15行的内容
# maximize speed
CFLAGS="$CFLAGS -ot"
# reorder instructions for best pipeline usage
CFLAGS="$CFLAGS -op"
# inline intrinsic functions
CFLAGS="$CFLAGS -oi" 都删除了
而后在project文件夹上右击,选择SVN Commit。。。进行commit操作


[root@node2 ~]# svn cat file:///svn/project/cc/gcc | head -5 发现已经更新了
# Copyright (C) Igor Sysoev
# Copyright (C) Nginx, Inc.
hello Eventyone
[root@node2 ~]# svn cat file:///svn/project/cc/gcc | head -35 | tail -5 两个文件都更新成功
. auto/feature
Hello world£?
CC_TEST_FLAGS=
[root@node5 ~]# ls /var/www/html/ 这里远程也已经把文件同步过来了
nginx_source
[root@node5 ~]# ls /var/www/html/nginx_source/
cc feature headers install modules os summary
define have include lib nohave sources types
endianness have_headers init make options stubs unix
下面通过新增几个文件,查看一下效果,在project目录下新建了两个.txt的文件zabbixtxt、openstack.txt,并在openstack.txt文件添加了如下内容:
Migrating to the cloud
Hello,Openstack
ok,现在进行commit操作


[root@node2 ~]# svn list file:///svn/project
cc/
define
endianness
feature
have
have_headers
headers
include
init
install
lib/
make
modules
nohave
openstatck.txt.txt
options
os/
sources
stubs
summary
types/
unix
zabbix.txt.txt
[root@node2 ~]# svn cat file:///svn/project/openstatck.txt.txt
Migrating to the cloud


Hello£?Openstack[root@node2 ~]#


[root@node5 ~]# ls /var/www/html/nginx_source/
cc          feature       headers  install  modules             options  stubs    unix
define      have          include  lib      nohave              os       summary  zabbix.txt.txt
endianness  have_headers  init     make     openstatck.txt.txt  sources  types
[root@node5 ~]# cat /var/www/html/nginx_source/openstatck.txt.txt
Migrating to the cloud


Hello£?Openstack[root@node5 ~]#    发现一切都ok,就介绍到此
转载于:https://blog.51cto.com/wdllife/1651537


 258
258


 被折叠的 条评论
为什么被折叠?
被折叠的 条评论
为什么被折叠?
 到【灌水乐园】发言


