Corosync在传递信息的时候可以通过一个简单的配置文件来定义信息传递的方式和协议等。它是一个新兴的软件,2008年推出,但其实它并不是一个真正意义上的新软件,在2002年的时候有一个项目Openais , 它由于过大,分裂为两个子项目,其中可以实现HA心跳信息传输的功能就是Corosync ,它的代码60%左右来源于Openais. Corosync可以提供一个完整的HA功能,但是要实现更多,更复杂的功能,那就需要使用Openais了。Corosync是未来的发展方向。在以后的新项目里,一般采用Corosync,而hb_gui可以提供很好的HA管理功能,可以实现图形化的管理。另外相关的图形化有RHCS的套件luci+ricci.
本篇博客为大家介绍一下corosync的安装与使用
安装corosync,需要下载一下软件包
corosync-1.2.7-1.1.el5.i386.rpm
corosynclib-1.2.7-1.1.el5.i386.rpm
heartbeat-3.0.3-2.3.el5.i386.rpm
heartbeat-libs-3.0.3-2.3.el5.i386.rpm
libesmtp-1.0.4-5.el5.i386.rpm
pacemaker-1.1.5-1.1.el5.i386.rpm
pacemaker-libs-1.1.5-1.1.el5.i386.rpm
pacemaker-cts-1.1.5-1.1.el5.i386.rpm
resource-agents-1.0.4-1.1.el5.i386.rpm
cluster-glue-1.0.6-1.6.el5.i386.rpm
cluster-glue-libs-1.0.6-1.6.el5.i386.rpm
组件集群服务的前提条件:
1.时间同步
2.ssh双机互信
3.主机名称与uname –n 保持一致
规划:
172.16.14.3 node1.magedu.com node1
172.16.14.4 node2.magedu.com node2
1.时间同步
系统自启动ntpd服务,首先要进行停止
(172.16.14.3    172.16.14.4)
#   service ntpd stop
#   ntpdate 172.16.0.1
2.ssh双机互信
(172.16.14.3)
#   ssh-keygen -t rsa -f ~/.ssh/id_rsa -P ''
#   ssh-copy-id -i .ssh/id_rsa.pub root@172.16.14.4
(172.16.14.4)
#   ssh-keygen -t rsa -f ~/.ssh/id_rsa -P ''
#   ssh-copy-id -i .ssh/id_rsa.pub root@172.16.14.3
3.主机名与uname –n 保持一致
略去,你懂的
安装
一、安装所需软件包
# yum --nogpgcheck localinstall cluster-glue-1.0.6-1.6.el5.i386.rpm cluster-glue-libs-1.0.6-1.6.el5.i386.rpm corosync-1.2.7-1.1.el5.i386.rpm corosynclib-1.2.7-1.1.el5.i386.rpm heartbeat-3.0.3-2.3.el5.i386.rpm heartbeat-libs-3.0.3-2.3.el5.i386.rpm libesmtp-1.0.4-5.el5.i386.rpm pacemaker-1.1.5-1.1.el5.i386.rpm pacemaker-libs-1.1.5-1.1.el5.i386.rpm pacemaker-cts-1.1.5-1.1.el5.i386.rpm resource-agents-1.0.4-1.1.el5.i386.rpm二、编辑配置文件,并且同步到另一个节点上
#   cd  /etc/corosync
#   corosync-keygen     生成秘钥
#   cp corosync.conf.example corosync.conf
#   vim  corosync.conf
service {
ver:  0
name: pacemaker
# use_mgmtd: yes
}
aisexec {
user: root
group:  root
}
并修改如下行
bindnetaddr: 172.16.0.0
#   scp -p authkey corosync.conf node2:/etc/corosync
#   mkdir /var/log/cluster      建立日志文件所在路径
#   service crorosync start
#   ssh node2 '/etc/init.d/cororcync  start
查看corosync引擎是否正常启动
#   grep -e "Corosync Cluster Engine" -e "configuration file" /var/log/messages
#   grep  TOTEM  /var/log/messages
#   grep pcmk_startup /var/log/messages
# ssh node2 'mkdir /var/log/cluster'三、配置集群的工作属性
#   crm condfigure  show    查看信息
#   crm configure   property stonith-enabled=false  禁用stonith
#   crm condfigure  verify      检查语法
#   crm condfigure  commit      提交
四、建立web资源,提交,查看
Node1:
# yum -y install httpd
# echo "<h1>Node1.magedu.com</h1>" > /var/www/html/index.html
Node2:
# yum -y install httpd
# echo "<h1>Node2.magedu.com</h1>" > /var/www/html/index.html
而后在各节点手动启动httpd服务,并确认其可以正常提供服务。接着使用下面的命令停止httpd服务,并确保其不会自动启动(在两个节点各执行一遍):
然后,停止服务,建立集群服务所需资源:
# /etc/init.d/httpd stop
# chkconfig httpd off
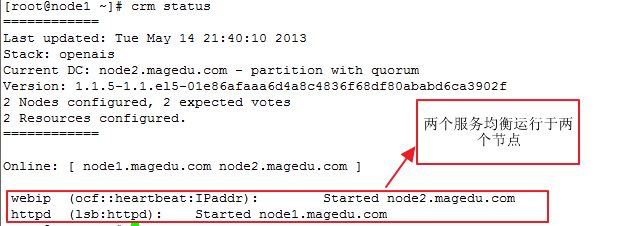
#   crm  configure primitive WebIP ocf:heartbeat:IPaddr params      ip=172.16.100.1  nic=eth0  netmask=16
#   crm configure primitive  httpd lsb:httpd
#   crm  configure  show
#   crm configure verify
#   crm configure commit
#   crm configure   show
五、建立组资源
#crm configure group webservice webip http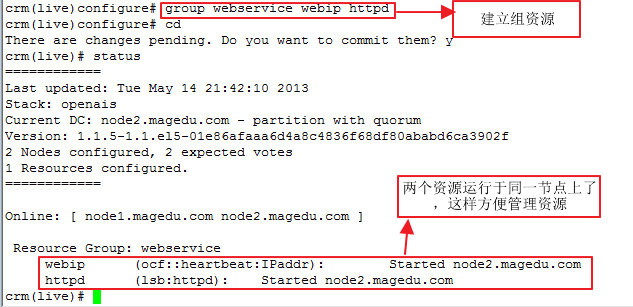
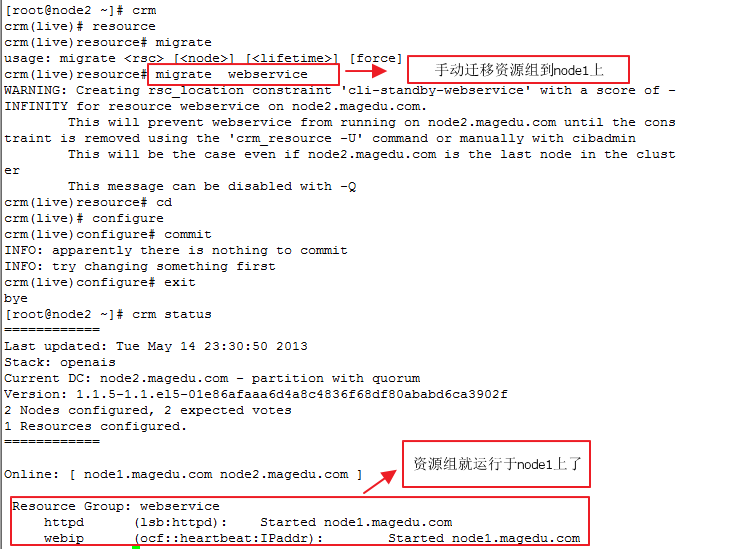
六、手动迁移组资源
#crm resource migrate webservice
#crmstatus
如果之前把另一个节点定义被节点,此时需要重新使节点上线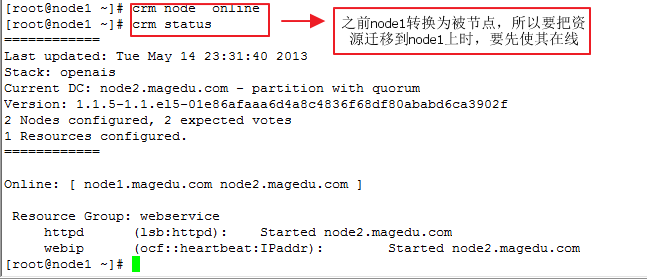
进行手动迁移资源
七、有组的约束,想让两个资源在一起,怎么办?很简单,建立排列约束就ok啦,一起看一下吧
先停止组资源,清理组资源,进行查看,发现组资源已经不存在啦
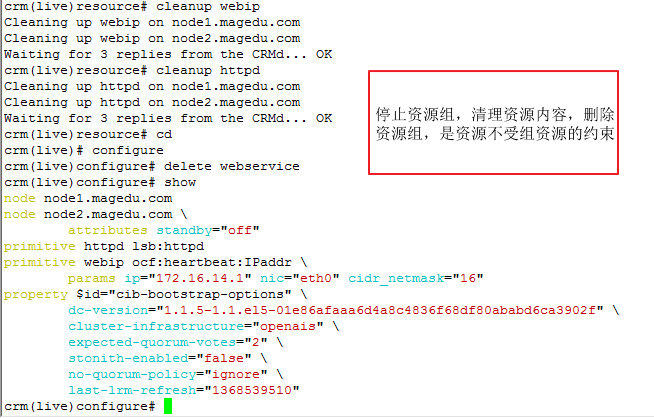
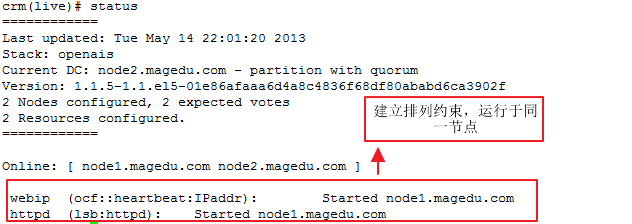
建立排列约束后,资源依然可以运行于同一节点
#   crm  configure   colocation httpd_with_webip inf: httpd webip
#   crm  configure   verify
#   crm  configure  commit
也可以建立顺序约束:
# crm configure order webip_before_httpd mandatory: webip httpd
转载于:https://blog.51cto.com/weihong/1200583


 1744
1744


 被折叠的 条评论
为什么被折叠?


