


最近在一个项目中用到了busybox,开始上网查找相关文档,把自己整理的资料在这里分享下。
1、busybox是什么?
Busybox:是一个集成了许多常用linux命令和工具的软件,可以用来做许多事,这里以项目中用例来说明。
2、安装busybox:
参考文档:http://www.cnblogs.com/xiaowenji/archive/2011/03/12/1982309.html。
3、使用busybox查看网络接口状态:

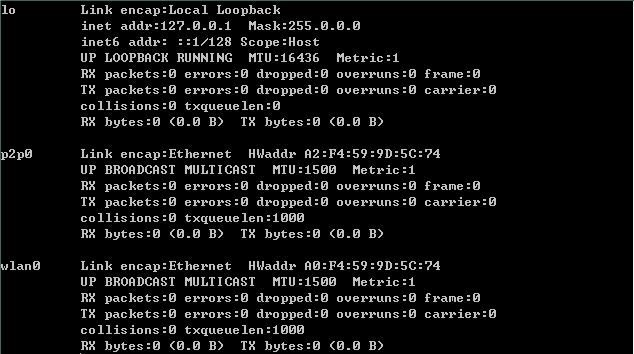
参数详解:
eth0:表示网卡一;
HWaddr:表示网卡的物理地址; inet addr:表示网卡的ip地址; Bcast:表示广播地址;Mask:掩码地址;
eth1:表示网卡二;
lo:表示localhoat,即127.0.0.1;
p2p0:表示网络接口,关于p2p0详情见:http://blog.csdn.net/mirkerson/article/details/38276629;
wlan0:表示无线网卡。
4、busybox在android项目中的使用:
在android项目中需要进行网口测试,即创建网桥实现局域网内互联,测试网口使用状况,结合实例代码说明如下:
 String[] net_set_cmds = new String[] { "busybox ifconfig", "busybox ifconfig eth0 up",
   "busybox ifconfig eth1 up", "busybox brctl addbr br0", "busybox brctl addif br0 eth0",
   "busybox brctl addif br0 eth1", "busybox ifconfig eth0 0.0.0.0",
   "busybox ifconfig eth1 0.0.0.0",
   "busybox ifconfig br0 192.168.88.2 netmask 255.255.255.0",
   "busybox route add default gw 192.168.88.254", "busybox ifconfig" };
 String[] net_restore_cmds = new String[] { "busybox ifconfig", "busybox brctl delif br0 eth0",
   "busybox brctl delif br0 eth1", "busybox ifconfig br0 down", "busybox brctl delbr br0",
   "busybox ifconfig eth0 up", "busybox ifconfig eth1 up", "busybox ifconfig" };
 private void netSetting(final int step, final String[] cmd) {
  Log.i(TAG, "[netSetting].......................A");
  if (step < cmd.length) {
   handler.post(new MyRunnable(cmd[step], new MyOnCommandResultListener(step, cmd)));
  }
  Log.i(TAG, "[netSetting].......................C");
 }
 class MyOnCommandResultListener implements OnCommandResultListener {
  int step;
  String[] cmd;
  public MyOnCommandResultListener(int step, String[] cmd) {
   this.step = step;
   this.cmd = cmd;
  }
  @Override
  public void onResult(String result) {
   netSetting(++step, cmd);
  }
 }

 class MyRunnable implements Runnable {
  String cmd;
  OnCommandResultListener linstener;
  public MyRunnable(String strcmd, OnCommandResultListener onCommandResultListener) {
   cmd = strcmd;
   linstener = onCommandResultListener;
  }
  @Override
  public void run() {
   String result = CommonUtils.getInstance().executeCommand(cmd);
   if (linstener != null) {
    linstener.onResult(result);
   }
  }
 }
这里使用java代码实现了一个网桥的创建,主要看下其中的命令,net_set_cmds这个字符串数组是创建网桥的命令。
busybox ifconfig //会输出当前网络接口的情况
busybox ifconfig eth0 up //启动eth0设备
busybox ifconfig eth1 up //启动eth1设备
busybox brctl addbr br0 //建立一个逻辑网段 delbr 删除网段
busybox brctl addif br0 eth0 //让eth0成为br0的一个端口
busybox brctl addif br0 eth1 //让eth1成为br0的一个端口
busybox ifconfig eth0 0.0.0.0 //网桥的每个物理网卡作为一个端口,运行于混杂模式,而且是在链路层工作,所以就不需要IP了。
busybox ifconfig eth1 0.0.0.0 //
busybox ifconfig br0 192.168.88.2 netmask 255.255.255.0 //给br0配置ip和子网掩码
busybox route add default gw 192.168.88.254 //添加默认网关
调用netSetting(0, net_set_cmds)就可以实现网桥的创建,之后去ping相关ip查看是否ping通,就可检测网口状况。
当然也可以删除网桥,恢复网络状态,其中net_restore_cmds这个字符串数组就是删除网桥的命令。
busybox brctl delif br0 eth0 //从br0中删除eth0端口
busybox brctl delif br0 eth1 //从br0中删除eth1端口
busybox ifconfig br0 down //关闭逻辑网段br0
busybox brctl delbr br0 //删除逻辑网段br0
busybox ifconfig eth0 up //启动eth0设备
busybox ifconfig eth1 up //启动eth1设备
值得注意的是:ifconfig 可以用来配置网络接口的IP地址、掩码、网关、物理地址等;用ifconfig 为网卡指定IP地址,这只是用来调试网络用的,并不会更改系统关于网卡的配置文件。如果您想把网络接口的IP地址固定下来,目前有三个方法:一是通过各个 发行和版本专用的工具来修改IP地址;二是直接修改网络接口的配置文件;三是修改特定的文件,加入ifconfig 指令来指定网卡的IP地址,比如在redhat或Fedora中,把ifconfig 的语名写入/etc/rc.d/rc.local文件中;


 968
968

 被折叠的 条评论
为什么被折叠?
被折叠的 条评论
为什么被折叠?
 到【灌水乐园】发言


