


在本篇开始前,首先感谢每一位留下反馈评论的朋友,在我看来,博客不仅仅是简单的分享,同时也是一个学习和发现的过程。在阅读完一篇文章能对其有所评论和提问,也是一种思考的表现。
在上篇“
Silverlight实例教程 - Out of Browser与COM的交互基础”中,我们讨论了Silverlight的OOB应用访问COM组件基础知识,在大家的反馈中,有不少朋友提出疑问,Silverlight对于COM的支持,使其失去跨平台的优越性,另外,Silverlight仅有Out of Browser模式能支持COM,是否仍旧存在较大的局限性? 对此在本篇我们不进行长篇分析和讨论,只是简单的把我的看法说一下。
Silverlight Out of Browser从Silverlight 3 到现在Silverlight 4,一直遵循跨平台的原则,在微软官方有相关的解释,
Linux,Moonlight从第一个版本发布,就已经有了高级权限模型,在GtkWidget中Moonlight具有full-trust的能力。 也就是说,Silverlight具有信任权限提升,而Mono具有full-trust模式。
Mac, 由于Mac没有Com的概念,所以,Silverlight的COM无法在Mac中运行,但是微软官方也正在寻找一种方式,尝试使用一种模拟的方式来实现在Mac上运行COM的效果,例如,运行AppleScript
在上面的脚本中可以看出,Mac如何通过AppleScript来调用Office Word的,而这样的方式其实也就是Mac对COM的调用,在以后Silverlight的版本中,如果加入对AppleScripts的支持即可在Mac上支持COM的运行;
从上面的描述来看,Silverlight的OOB应用跨平台,并非不能解决,只是时间的问题。作为技术人员,经常对一门技术的前景进行展望,而需要注意的是,尽量不要使用其短处与其他技术的长处进行相比较,这样的对比结果,只会干扰自己的视线和思路。一门能挣钱的技术,就已经算是一门好技术了。
Out of Browser与Office的互操作
言归正传,本篇将继续介绍Silverlight的Out of Browser应用与Office COM组件的交互。相信大家对微软的Office系列并不陌生了,Office在企业项目中使用频率较高,例如在日常项目中经常与遇到导出列表到Excel,或者发送邮件等功能需求,所以微软将其许多功能封装成COM组件,供开发人员使用,增强其应用的灵活性。本篇,我将演示
在Silverlight的OOB应用中,如何使用Office Outlook,Word,Excel组件。
我们仍旧使用上篇的项目代码,对其进行扩展,大家可以到上篇下载演示项目代码。
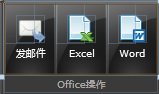
在开始功能代码前,首先需要在UI界面ToolBar中添加三个Button来响应其事件。
1
<
Border
BorderBrush
="
{StaticResource GlossyBlack_StrokeGradient}
"
BorderThickness
="1"
CornerRadius
="2"
Margin
="1"
Padding
="0,1,1,1"
>
2 < StackPanel >
3 < StackPanel Orientation ="Horizontal" >
4 < Button IsTabStop ="False" Width ="56" Height ="80" Style =" {StaticResource BlackGlossyButton} " Margin ="1,0,0,0" Foreground ="White" x:Name ="sendemailBtn" Click ="sendemailBtn_Click" >
5 < StackPanel >
6 < Image VerticalAlignment ="Top" HorizontalAlignment ="Center" Source ="/SilverlightOOBDemo;component/Images/SendEmail.png" Margin ="0,-5,0,0" Stretch ="None" />
7 < TextBlock VerticalAlignment ="Bottom" HorizontalAlignment ="Center" Margin ="0,3,0,0" Text ="发邮件" TextWrapping ="Wrap" />
8 </ StackPanel >
9 </ Button >
10
11 < Button IsTabStop ="False" Width ="56" Height ="80" Style =" {StaticResource BlackGlossyButton} " Margin ="1,0,0,0" Foreground ="White" x:Name ="excelBtn" Click ="excelBtn_Click" >
12 < StackPanel >
13 < Image VerticalAlignment ="Top" HorizontalAlignment ="Center" Source ="/SilverlightOOBDemo;component/Images/Excel.png" Margin ="0,-5,0,0" Stretch ="None" />
14 < TextBlock VerticalAlignment ="Bottom" HorizontalAlignment ="Center" Margin ="0,3,0,0" Text ="Excel" TextWrapping ="Wrap" />
15 </ StackPanel >
16 </ Button >
17
18 < Button IsTabStop ="False" Width ="56" Height ="80" Style =" {StaticResource BlackGlossyButton} " Margin ="1,0,0,0" Foreground ="White" x:Name ="wordBtn" Click ="wordBtn_Click" >
19 < StackPanel >
20 < Image VerticalAlignment ="Top" HorizontalAlignment ="Center" Source ="/SilverlightOOBDemo;component/Images/Word.png" Margin ="0,-5,0,0" Stretch ="None" />
21 < TextBlock VerticalAlignment ="Bottom" HorizontalAlignment ="Center" Margin ="0,3,0,0" Text ="Word" TextWrapping ="Wrap" />
22 </ StackPanel >
23 </ Button >
24 </ StackPanel >
25 < TextBlock Foreground ="#8FFFFFFF" Text ="Office操作" HorizontalAlignment ="Center" VerticalAlignment ="Bottom" Margin ="2" />
26 </ StackPanel >
27 </ Border >
对与三个应用分别添加其Click事件代码。首先,我们先看看
OutLook的COM调用,
1
private
void
sendemailBtn_Click(
object
sender, RoutedEventArgs e)
2 {
3 using (dynamic outlook = AutomationFactory.CreateObject( " Outlook.Application " ))
4 {
5 dynamic mail = outlook.CreateItem( 0 );
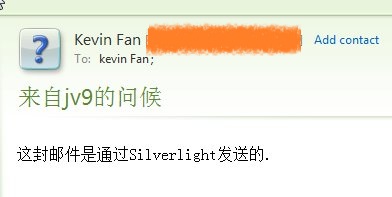
6 mail.To = " qq34506@hotmail.com " ;
7 mail.Subject = " 来自jv9的问候 " ;
8 mail.HTMLBody = " 这封邮件是通过Silverlight发送的. " ;
9 mail.Send();
10 // mail.Display(); 这里是显示出发送邮件的Outlook窗口
11 }
12 }
2 {
3 using (dynamic outlook = AutomationFactory.CreateObject( " Outlook.Application " ))
4 {
5 dynamic mail = outlook.CreateItem( 0 );
6 mail.To = " qq34506@hotmail.com " ;
7 mail.Subject = " 来自jv9的问候 " ;
8 mail.HTMLBody = " 这封邮件是通过Silverlight发送的. " ;
9 mail.Send();
10 // mail.Display(); 这里是显示出发送邮件的Outlook窗口
11 }
12 }
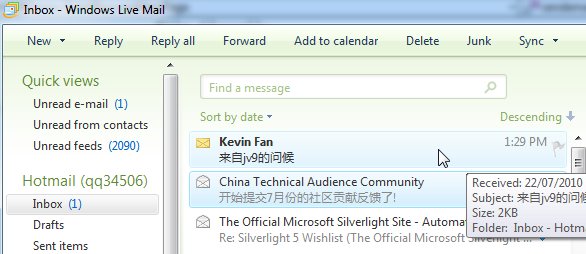
在建立Outlook实例后,我们可以使用Outlook.CreateItem来创建新的邮件实例,其中可以简单的设置发送目的邮箱,标题,内容等。在代码后面有mail.Send和Display两个方法。其中如果调用Display,Silverlight会激活Outlook创建邮件窗口,然后用户确认后发送邮件到目的邮箱。例如:
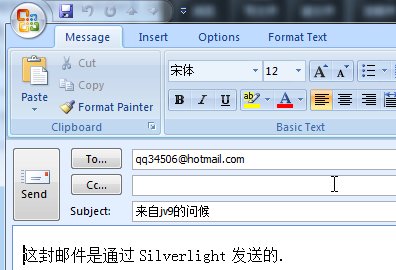
而调用mail.Send则会直接发送邮件到目的邮箱。而通常来说,我们建议使用mail.Display,让用户确认后再发送。
Silverlight操作Office Word
Silverlight操作Office Word比较简单,首先我们添加Word的相应事件:
1
private
void
wordBtn_Click(
object
sender, RoutedEventArgs e)
2 {
3 dynamic word = AutomationFactory.CreateObject( " Word.Application " );
4 word.Visible = true ;
5 dynamic doc = word.Documents.Add();
6
7 string Insertxt = " 这是Silverlight操作Office Word测试。欢迎大家访问我的博客 http://jv9.cnblogs.com " ;
8 dynamic range = doc.Range( 0 , 0 );
9
10 range.Text = Insertxt;
11 }
在创建Word实例后,使用Documents.Add创建一个新的空文档,然后,添加相关文档或者图片到Word中。其运行效果如下:

Silverlight操作Office Excel
相对上面两个Office组件来讲,Excel的使用较为复杂一点,这里我们来详细演示Silverlight导出Excel的实例。
操作Excel不可缺少的是数据库,作为演示实例,我使用Blend 4创建简单的数据集合,使用Blend创建例程数据集合,我曾经在
Blend实例系列中讲过,这里我将简单的演示,
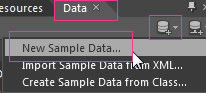
首先使用Blend 4打开当前SilverlightOOBDemo项目,然后在右边属性栏,选择Data,


 100
100

 被折叠的 条评论
为什么被折叠?
被折叠的 条评论
为什么被折叠?
 到【灌水乐园】发言


