


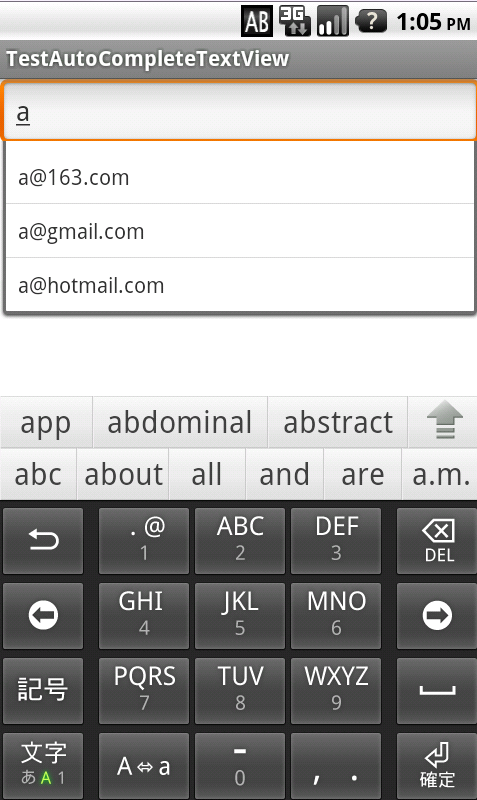
最近学习android时,用到AutoCompleteTextView,感觉挺有意思,于是模仿着网易邮箱地址补全的效果也实现了一个。
AutoCompleteTextView是一个具有自动补全功能的EditView,当用户输入数据后,AutoCompleteTextView就会将用户输入的数据与他自己的adapter中的数据对比,如果用户数据与adapter中的某条数据的开始部分完全匹配,那么adapter中的这条数据就会出现在下拉提示框中。
例如:adapter中有3条数据“abc”,“hjk”,“abd”,而用户输入“ab”,那么下拉提示框中将会出现“abc”和“abd”。(AutoCompleteTextView默认在用户输入两个字符之后才提示,可以通过setThreshold(1)来将它设置为用户输入1个字符后就开始提示)
AutoCompleteTextView在匹配用户输入数据时,会调用performFiltering方法,将用户数据传入,并调用adapter的filter来处理。
因为当用户选中下拉列表中的某一项时,AutoCompleteTextView会使用该项对应的adapter中的数据来填充文本域,这与我们这边的需求不太相同,因为我们的adapter中只有类似于“@163.com”的email地址后缀,下拉框中的数据是我们将用户输入和adapter中的数据拼接而成的。因此我们需要重写replaceText方法,以使AutoCompleteTextView来在用户选中某一项时,用我们指定的文本来填充文本域。
然后我们需要为AutoCompleteTextView设置OnFocusChangeListener来在用户移开焦点后,进行email地址格式检查,并且在再次获得焦点后重启提示功能。
代码如下:(EmailAutoCompleteTextView.java)
public class EmailAutoCompleteTextView extends AutoCompleteTextView {
	private static final String TAG = "EmailAutoCompleteTextView";

	private String[] emailSufixs = new String[] { "@163.com",
		"@gmail.com", "@hotmail.com" };

	public EmailAutoCompleteTextView(Context context) {
		super(context);
		init(context);
	}

	public EmailAutoCompleteTextView(Context context, AttributeSet attrs) {
		super(context, attrs);
		init(context);
	}

	public EmailAutoCompleteTextView(Context context, AttributeSet attrs,
			int defStyle) {
		super(context, attrs, defStyle);
		init(context);
	}

	public void setAdapterString(String[] es) {
		if(es != null && es.length > 0)
			this.emailSufixs = es;
	}

	private void init(final Context context) {
		//adapter中使用默认的emailSufixs中的数据,可以通过setAdapterString来更改
		this.setAdapter(new EmailAutoCompleteAdapter(context, R.layout.auto_complete_item, emailSufixs));

		//使得在输入1个字符之后便开启自动完成
		this.setThreshold(1);

		this.setOnFocusChangeListener(new OnFocusChangeListener() {

			@Override
			public void onFocusChange(View v, boolean hasFocus) {
				if(hasFocus) {
					String text = EmailAutoCompleteTextView.this.getText().toString();
					//当该文本域重新获得焦点后,重启自动完成
					if(!"".equals(text))
						performFiltering(text, 0);
				} else {
					//当文本域丢失焦点后,检查输入email地址的格式
					EmailAutoCompleteTextView ev = (EmailAutoCompleteTextView) v;
					String text = ev.getText().toString();
					//这里正则写的有点粗暴:)
					if(text != null && text.matches("^[a-zA-Z0-9_]+@[a-zA-Z0-9]+\\.[a-zA-Z0-9]+$")) {
						Toast to = new Toast(context);
						ImageView i = new ImageView(context);
						i.setBackgroundResource(R.drawable.img_success);
						to.setView(i);
						to.show();
					} else {
						Toast toast = Toast.makeText(context, "邮件地址格式不正确", Toast.LENGTH_SHORT);
						toast.setGravity(Gravity.TOP, 0, 50);
						toast.show();
					}
				}
			}
		});
	}


	@Override
	protected void replaceText(CharSequence text) {
		//当我们在下拉框中选择一项时,android会默认使用AutoCompleteTextView中Adapter里的文本来填充文本域
		//因为这里Adapter中只是存了常用email的后缀
		//因此要重新replace逻辑,将用户输入的部分与后缀合并
		Log.i(TAG + " replaceText", text.toString());
		String t = this.getText().toString();
		int index = t.indexOf("@");
		if(index != -1)
			t = t.substring(0, index);
		super.replaceText(t + text);
	}

	@Override
	protected void performFiltering(CharSequence text, int keyCode) {
		//该方法会在用户输入文本之后调用,将已输入的文本与adapter中的数据对比,若它匹配
		//adapter中数据的前半部分,那么adapter中的这条数据将会在下拉框中出现
		Log.i(TAG + " performFiltering", text.toString() + "   " + keyCode);
		String t = text.toString();

		//因为用户输入邮箱时,都是以字母,数字开始,而我们的adapter中只会提供以类似于"@163.com"
		//的邮箱后缀,因此在调用super.performFiltering时,传入的一定是以"@"开头的字符串
		int index = t.indexOf("@");
		if(index == -1) {
			if(t.matches("^[a-zA-Z0-9_]+$")) {
				super.performFiltering("@", keyCode);
			}
			else
				this.dismissDropDown();//当用户中途输入非法字符时,关闭下拉提示框
		} else {
			super.performFiltering(t.substring(index), keyCode);
		}
	}


	private class EmailAutoCompleteAdapter extends ArrayAdapter<String> {

		public EmailAutoCompleteAdapter(Context context, int textViewResourceId, String[] email_s) {
			super(context, textViewResourceId, email_s);
		}

		@Override
		public View getView(int position, View convertView, ViewGroup parent) {
			Log.i(TAG, "in GetView");
			View v = convertView;
			if (v == null)
				v = LayoutInflater.from(getContext()).inflate(
						R.layout.auto_complete_item, null);
			TextView tv = (TextView) v.findViewById(R.id.tv);

			String t = EmailAutoCompleteTextView.this.getText().toString();
			int index = t.indexOf("@");
			if(index != -1)
				t = t.substring(0, index);
			//将用户输入的文本与adapter中的email后缀拼接后,在下拉框中显示
			tv.setText(t + getItem(position));
			Log.i(TAG, tv.getText().toString());
			return v;
		}
	}
}
<LinearLayout xmlns:android="http://schemas.android.com/apk/res/android"
    android:layout_width="match_parent"
    android:layout_height="match_parent"
    android:orientation="vertical" >

    <com.example.testautocompletetextview.EmailAutoCompleteTextView
        android:id="@+id/act"
        android:layout_width="match_parent"
        android:layout_height="wrap_content"
        android:hint="Email Address"
        android:textColor="@color/black" />

    <!-- 用于测试移开焦点 -->
    <EditText
        android:layout_width="match_parent"
        android:layout_height="wrap_content"
        android:layout_marginTop="20dp"
        android:drawableLeft="@drawable/amount_selected" />

</LinearLayout>
<?xml version="1.0" encoding="utf-8"?>
<TextView xmlns:android="http://schemas.android.com/apk/res/android"
    android:id="@+id/tv"
    android:padding="8dp"
    android:layout_width="match_parent"
    android:layout_height="wrap_content" />
提示截图:


 1021
1021


 被折叠的 条评论
为什么被折叠?
被折叠的 条评论
为什么被折叠?
 到【灌水乐园】发言


