


CentOS7官网下载:http://www.centos.org
DELL服务器安装,提示“Disk sda contains BIOS RAID metadata”
今天,单位要求在DELL PowerEdge T110服务器上安装CentOS6.3操作系统,碰到三个问题:
1、采用Deployment - Deploy OS引导安装,可是在CentOS系统识别不到硬盘?
1)个人感觉是主板设置原因,于是通过重启服务器,按F2进入“System Setup”。发现硬盘模式为:RAID,将其改为AHCI模式
2)重新引导CentOS6.3安装,发现只识别到一块硬盘“sdb”,想下了,自己刚忽略了系统提示信息,如问题2
2、“Disk sda contains BIOS RAID metadata, but is not part of any recognized BIOS RAID sets. Ignoring disk sda”?
1)有道翻译了下,语句的意思是:“磁盘sda包含BIOS RAID的元数据,但不属于任何公认的BIOS RAID集,忽略sda磁盘”
2)解决办法:在CentOS6.3安装菜单选择项时,按【Tab】键,再按下空格键,输入nodmraid,回车。进行系统的安装,此时就识别到两块硬盘了
3、服务器重启后,自动选择了“F10=System Services”,无法进入F2选项
网上找到的解决办法是:在开机时,按【Del】键。自己实验了下,真的可以解决。
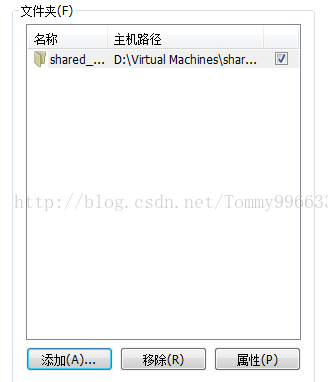
1.为了方便与主机交换文件建立共享文件夹:点击对话框顶部“选项”,选择“共享文件夹”,右侧点击“总是启用”点击“添加”按提示添加自己想要添加的目录,然后点击“确认”,完成虚拟机设置。
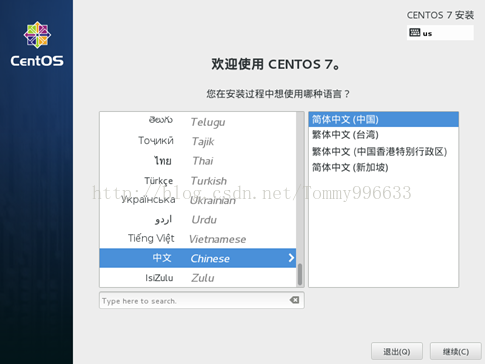
2.按“Enter”建,选择“install CentOS 7”。选择“中文 Chinese”,“简体中文(中国)”,单击“继续(C)”
3.选择“最小化”,单击“安装位置”,选择“我要配置分区”,单击“完成(D)”,进入分区界面。
4.点击“+”创建新分区,挂载点选择“SWAP”(注:相当于Windows的虚拟内存,大小一般为内存的2倍)填写容量(2GB),然后点击“添加挂载点(A)”
5.再点击“+”创建新分区,挂载点选择“/boot”,填写容量(200MB),然后点击“添加挂载点(A)”,右侧“文件系统”选择“ext4”
6.再点击“+”创建新分区,挂载点选择“/”,填写容量(8GB),然后点击“添加挂载点(A)”,侧“文件系统”选择“ext4”
7.再点击“+”创建新分区,挂载点选择“/usr”(注:用了安装软件),填写容量(20GB),然后点击“添加挂载点(A)”,右侧“文件系统”选择“ext4”
8.再点击“+”创建新分区,挂载点选择“/home”,这里不填容量,从而把剩余容量分配给/home,然后点击“添加挂载点(A)”,右侧“文件系统”选择“ext4”, 如下图所示
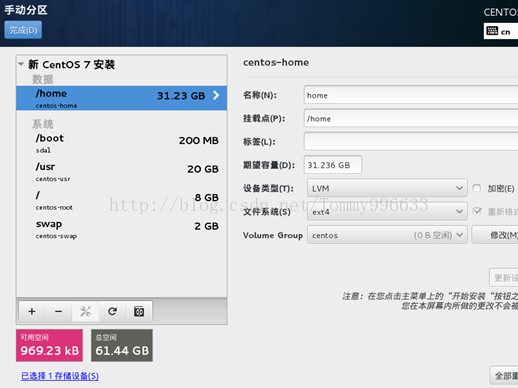
9.单击左上角“完成(D)”,“接受更改”完成磁盘创建。
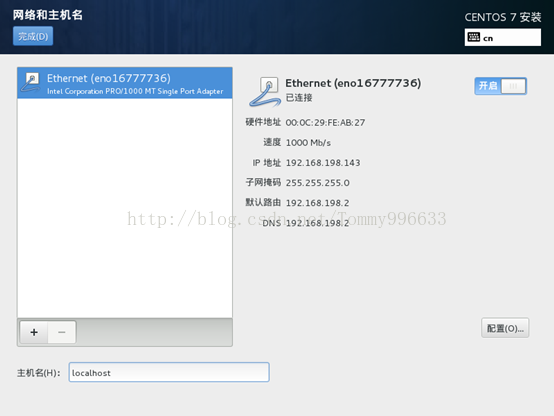
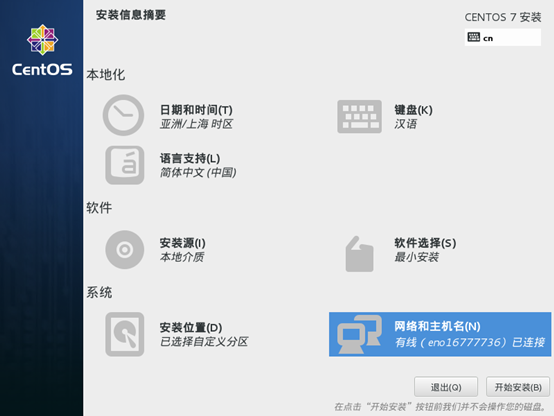
10.点击“网路与主机名”,填写主机名。开启以太网连接。然后点击“完成(D)”
11.点击“开始安装(B)”
12.设置ROOT密码
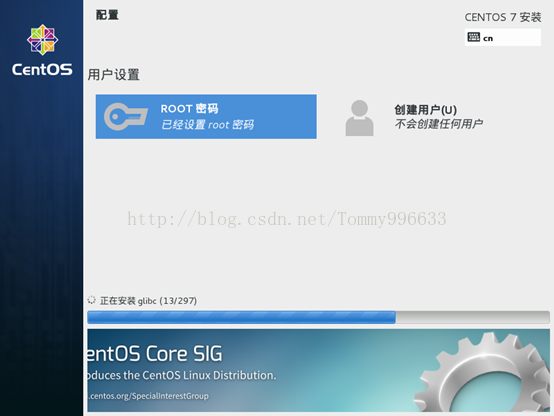
13.点击“重启”开机出现错误提示,任性不管,一会解决,按“Enter”键录入ROOT登入
14.安装net-tools,这样才能使用“ifconfig”命令查看IP地址:
输入命令yum install net-tools -y
查看ip地址并记下。
14.解决网卡命名问题
系统安装完后,网卡信息可能如下:
# ifconfig
1:lo:mtu 65536 qdisc noqueue state UNKNOWN
    link/loopback 00:00:00:00:00:00 brd00:00:00:00:00:00
    inet 127.0.0.1/8 scope host lo
       valid_lft forever preferred_lft forever
    inet6 ::1/128 scope host
       valid_lft forever preferred_lft forever
2:eno16777736:mtu 1500 qdisc pfifo_faststate UP qlen 1000
    link/ether 00:0c:29:8b:e3:0f brdff:ff:ff:ff:ff:ff
    inet 10.0.0.20/24 brd 10.0.0.255 scopeglobal eno16777736
       valid_lft forever preferred_lft forever
    inet6 fe80::20c:29ff:fe8b:e30f/64 scopelink
       valid_lft forever preferred_lft forever
2、修改网卡配置文件,修改NAME为eth0,并将DEVICE行删除
# cd /etc/sysconfig/network-scripts/
# vim ifcfg-eno16777736

# mv ifcfg-eno16777736 ifcfg-eth0
4、修改/etc/sysconfig/grub,添加net.ifnames=0 biosdevname=0 如下图所示:

上图中,红框部分是我所添加的内容(注意它的位置)。紧接着,执行如下命令:
grub2-mkconfig -o /boot/grub2/grub.cfg
5.创建规则,当有多个网卡,并且想要控制器设备名,而不是让内核以自己的方式命名,需修改下规则。
#  vim/etc/udev/rules.d/70-persistent-ipoib.rules
SUBSYSTEM=="net",ACTION=="add",DRIVERS=="?*",ATTR(address)=="00:0c:29:8b:e3:0f",ATTR(type)=="1",KERNEL=="eth*",NAME="eth0"
SUBSYSTEM=="net",ACTION=="add",DRIVERS=="?*",ATTR(address)=="00:0c:29:8b:e3:04",ATTR(type)=="1",KERNEL=="eth*",NAME="eth1"
6. 然后重启虚拟机,网卡名就正常了。开机还是有错误不管。Enter后ROOT登入
15.解决开机问题dm-0: WRITE SAME failed. Manually zeroing
原因:硬件,一般是raid卡不支持WRITE SAME特性
解决方法:规避WRITE SAME,打开putty登入系统
1、创建disable-write-same脚本(可放在/usr/local/sbin),
#! /bin/sh
# Disable SCSI WRITE_SAME, which is not supported by underlying disk
# emulation.  Run on boot from, eg, /etc/rc.local
#
# See http://www.it3.be/2013/10/16/write-same-failed/
#
# Written by Ewen McNeill <ewen@naos.co.nz>, 2014-07-17
#---------------------------------------------------------------------------

find /sys/devices -name max_write_same_blocks |
    while read DISK; do
        echo 0 >"${DISK}"
    done
2、修改脚本为可执行权限
chmod a+x disable-write-same
3、将脚本放入/etc/rc.local在开机时运行:<以后有什么开机就运行的就可以直接写到这里的尼!>
vi /etc/rc.local 加入
sudo /usr/local/sbin/disable-write-same
16.右击虚拟机标签,安装“VMware Tools”.
(1)挂载VMware tools光盘
mount -t iso9660 -o loop /dev/cdrom /media
cp /media/* ~
tar zxf VMwareTools-9.9.0-2304977.tar.gz
cd vmware-tools-distrib/
./vmware-install.pl
提示没有安装perl编译器 那就安装perl:
yum install perl -y
./vmware-install.pl
一路Enter键。。。
(2)然后你就会发现你以前设置的虚拟机与主机的分享目录就会出现在/mnt/hgfs/目录下,为了方便访问你也可
以再你root/目录下创建一个到你的共享目录的软连接
ln -s /mnt/hgfs/shared_file/ ~/shared
17.配置阿里云源
# # cat aliyun.repo
[base]
name=CentOS-$releasever - Base - mirrors.aliyun.com
failovermethod=priority
baseurl=http://mirrors.aliyun.com/centos/$releasever/os/$basearch/
        http://mirrors.aliyuncs.com/centos/$releasever/os/$basearch/
#mirrorlist=http://mirrorlist.centos.org/?release=$releasever&arch=$basearch&repo=os
gpgcheck=1
gpgkey=http://mirrors.aliyun.com/centos/RPM-GPG-KEY-CentOS-7

#released updates
[updates]
name=CentOS-$releasever - Updates - mirrors.aliyun.com
failovermethod=priority
baseurl=http://mirrors.aliyun.com/centos/$releasever/updates/$basearch/
        http://mirrors.aliyuncs.com/centos/$releasever/updates/$basearch/
#mirrorlist=http://mirrorlist.centos.org/?release=$releasever&arch=$basearch&repo=updates
gpgcheck=1
gpgkey=http://mirrors.aliyun.com/centos/RPM-GPG-KEY-CentOS-7

#additional packages that may be useful
[extras]
name=CentOS-$releasever - Extras - mirrors.aliyun.com
failovermethod=priority
baseurl=http://mirrors.aliyun.com/centos/$releasever/extras/$basearch/
        http://mirrors.aliyuncs.com/centos/$releasever/extras/$basearch/
#mirrorlist=http://mirrorlist.centos.org/?release=$releasever&arch=$basearch&repo=extras
gpgcheck=1
gpgkey=http://mirrors.aliyun.com/centos/RPM-GPG-KEY-CentOS-7

#additional packages that extend functionality of existing packages
[centosplus]
name=CentOS-$releasever - Plus - mirrors.aliyun.com
failovermethod=priority
baseurl=http://mirrors.aliyun.com/centos/$releasever/centosplus/$basearch/
        http://mirrors.aliyuncs.com/centos/$releasever/centosplus/$basearch/
#mirrorlist=http://mirrorlist.centos.org/?release=$releasever&arch=$basearch&repo=centosplus
gpgcheck=1
enabled=0
gpgkey=http://mirrors.aliyun.com/centos/RPM-GPG-KEY-CentOS-7

#contrib - packages by Centos Users
[contrib]
name=CentOS-$releasever - Contrib - mirrors.aliyun.com
failovermethod=priority
baseurl=http://mirrors.aliyun.com/centos/$releasever/contrib/$basearch/
        http://mirrors.aliyuncs.com/centos/$releasever/contrib/$basearch/
#mirrorlist=http://mirrorlist.centos.org/?release=$releasever&arch=$basearch&repo=contrib
gpgcheck=1
enabled=0
gpgkey=http://mirrors.aliyun.com/centos/RPM-GPG-KEY-CentOS-7
http://mirrors.aliyun.com/help/centos
18.配置epel源
# cat /etc/yum.repos.d/epel.repo
[epel]
name=Extra Packages for Enterprise Linux 7 - $basearch
baseurl=http://mirrors.aliyun.com/epel/7/$basearch
http://mirrors.aliyuncs.com/epel/7/$basearch
failovermethod=priority
enabled=1
gpgcheck=0
gpgkey=file:///etc/pki/rpm-gpg/RPM-GPG-KEY-EPEL-7

[epel-debuginfo]
name=Extra Packages for Enterprise Linux 7 - $basearch - Debug
baseurl=http://mirrors.aliyun.com/epel/7/$basearch/debug
http://mirrors.aliyuncs.com/epel/7/$basearch/debug
failovermethod=priority
enabled=0
gpgkey=file:///etc/pki/rpm-gpg/RPM-GPG-KEY-EPEL-7
gpgcheck=0

[epel-source]
name=Extra Packages for Enterprise Linux 7 - $basearch - Source
baseurl=http://mirrors.aliyun.com/epel/7/SRPMS
http://mirrors.aliyuncs.com/epel/7/SRPMS
failovermethod=priority
enabled=0
gpgkey=file:///etc/pki/rpm-gpg/RPM-GPG-KEY-EPEL-7
gpgcheck=0

# yum clean all
# yum makecache
一,需要软件:
1.apr-1.5.1.tar.gz
2.apr-util-1.5.4.tar.gz
3.pcre-8.20.tar.zip
4.httpd-2.4.10.tar.gz
二,安装apr
yum install gcc libtools python-devel -y
tar zxf apache/apr-1.5.1.tar.gz
cd ./apache/apr-1.5.1
./configure --prefix=/usr/local/apr
make && make install
三,安装apr-util
tar zxf apr-util-1.5.4.tar.gz
cd  apr-util-1.5.4
./configure --prefix=/usr/local/apr-util --with-apr=/usr/local/apr
make && make install
四,安装pcre库
yum install gcc-c++ -y
tar zxf pcre-8.20.tar.gz
cd pcre-8.20
./configure --prefix=/usr/local/pcre
make && make install
五,安装Apache服务器
tar zxf  httpd-2.4.10.tar.gz
cd httpd-2.4.10
./configure--prefix=/usr/local/apache --with-apr=/usr/local/apr --with-apr-util=/usr/local/apr-util --with-pcre=/usr/local/pcre
make && make install
六,配置Apache
cd /usr/local/usr/apache/conf/
修改条目如下:
1.搜索ServerName www.example.com:80 去掉前面的注释
2.修改DocumentRoot到/home/htdocs,以及这一行下面的一句中的<Directory到/home/htdocs
出错error:在主机输入虚拟机IP不能访问
原因:防火墙拦截了80端口
解决:firewall-cmd --permanent --add-port=80/tcp
设置Apache为Linux服务并实现开机自启动
添加Apache到Linux服务
cp /usr/local/apache/bin/apachectl /etc/rc.d/init.d/
mv /etc/rc.d/init.d/apachectl /etc/rc.d/init.d/httpd
#vi httpd
在第一行下添加如下两行文字
# Comments to support chkconfig on RedHat Linux
# chkconfig: 2345 90 90
# description:http server
注册该服务
chkconfig --add httpd #所有开机模式下自启动
chkconfig httpd on #345开机模式下自启动
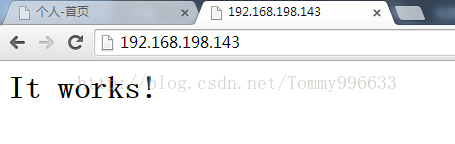
再输入地址发现可以了:
以后开启就用Apache/bin 目录下的./apachectl -k start,停止就用./apachectl -k stop.
当然你也可以把/usr/local/apahce/bin加入PATH,这样在任何目录下都可以使用了.
http://www.tudouyu.cn/post/15.html
一,软件包
MySQL-5.6.22-1.el7.src.rpm
二,编译安装MySQL(参考mysql官方:http://dev.mysql.com/doc/refman/5.6/en/installing-source-distribution.html )
rpm -i  MySQL-5.6.22-1.el7.src.rpm
mv ./rpmbuild/SOURCES/mysql-5.6.22.tar.gz ./
\rm -r MySQL-5.6.22-1.el7.src.rpm rpmbuild/
tar zxf mysql-5.6.22.tar.gz
cd mysql-5.6.22
mkdir /home/data
2.安装辅助函数库
由于安装还要有用到ncurses-devel cmake,所以 yum install ncurses-devel cmake -y
3.新增mysql用户组和用户
groupadd mysql
useradd -r -g mysql mysql
4.编译安装(注意:由于从新的MySQL5.6开始编译采用CMake 编译参数见mysql源码安装手册:http://dev.mysql.com/doc/refman/5.6/en/mysql-install-db.html )
例如:
cmake  \
-DCMAKE_INSTALL_PREFIX=/usr/local/mysql \
-DMYSQL_UNIX_ADDR=/usr/local/mysql/mysql.sock \
-DDEFAULT_CHARSET=utf8 \
-DDEFAULT_COLLATION=utf8_general_ci \
-DWITH_INNOBASE_STORAGE_ENGINE=1 \
-DWITH_ARCHIVE_STORAGE_ENGINE=1 \
-DWITH_BLACKHOLE_STORAGE_ENGINE=1 \
-DMYSQL_DATADIR=/home/data/ \
-DMYSQL_TCP_PORT=3306 \
-DENABLE_DOWNLOADS=1
make
make install
出错后重新运行配置,需要删除CMakeCache.txt文件
rm CMakeCache.txt
5.配置
修改mysql安装目录
cd /usr/local/mysql
chown -R mysql:mysql .
修改mysql数据库文件目录
cd /data/mysqldb
chown -R mysql:mysql .
初始化MySQL数据库
cd /usr/local/mysql
scripts/mysql_install_db --user=mysql --datadir=/data/mysqldb --basedir=/usr/local/mysql
复制mysql服务启动配置文件
cp /usr/local/mysql/support-files/my-default.cnf /etc/my.cnf
(注:如果/etc/my.cnf文件存在,则覆盖。)
复制mysql服务启动脚本及加入PATH路径
cp support-files/mysql.server /etc/init.d/mysqld
vi /etc/profile
#在文件末尾加入
      PATH=/usr/local/mysql/bin:/usr/local/mysql/lib:$PATH
      export PATH
#保存退出并运行
source /etc/profile
#重新加载该文件
启动mysql服务并加入开机自启动
service mysqld start
chkconfig mysqld on
检查mysql服务是否启动 netstat -tulnp | grep 3306
设置root的初始密码
mysqladmin -uroot password ‘你的密码’
一 软件包
#libmcrypt-2.5.7.tar.gz
#curl-7.40.0.tar.gz
#libpng-1.5.18.tar.gz
#freetype-2.5.4.tar.gz
#libxml2-2.9.2.tar.gz
#gdbm-1.11.tar.gz
#gettext-0.19.4.tar.gz
#mhash-0.9.3.tar.gz
#jpegsrc.v9a.gz
#libgd-2.1.0.tar.bz2 #最好用.bz2的用.gz的会在编译PHP时出错
#zlib-1.2.8.tar.gz
#libiconv-1.14.tar.gz
#php-5.6.4.tar.gz
二,编译安装zlib
tar zxf zlib-1.2.8.tar.gz
cd zlib-1.2.8
./configure --prefix=/usr/local/zlib
make && make install
三,编译安装libjpeg
tar zxf jpegsrc.v9a.gz
cd jpeg-9a/
./configure --prefix=/usr/local/libjpeg --enable-shared --enable-static
make && make install
四,编译安装libpng
tar zxf libpng-1.5.18.tar.gz
cd libpng-1.5.18
./configure --prefix=/usr/local/libpng
make && make install
五,编译安装freetype
tar zxf freetype-2.5.4.tar.gz
cd freetype-2.5.4
./configure=/usr/local/freetype
make && make install
六,编译安装libgd
yum install bzip2 -y
tar jxf libgd-2.1.0.tar.bz2
cd libgd-2.1.0
#configure时不要指定prefix了,编译PHP时会出错
./configure --with-jpeg=/usr/local/libjpeg --with-png=/usr/local/libpng --with-freetype=/usr/local/freetype --with-zlib=/usr/local/zlib
make && make install
七,编译安装curl
tar zxf curl-7.40.0.tar.gz
cd curl-7.40.0
./configure --prefix=/usr/local/curl
make && make install
八,编译安装gdbm
tar zxf gdbm-1.11.tar.gz
cd gdbm-1.11
./configure --prefix=/usr/local/gdbm
make && make install
九,编译安装libcrympt
tar zxf libmcrypt-2.5.7.tar.gz
cd libmcrypt-2.5.7
./configure --prefix=/usr/local/libmcrypt
make && make install
十,编译安装gettext
tar zxf gettext-0.19.4.tar.gz
cd gettext-0.19.4
./configure --prefix=/usr/local/gettext
make && make install
十一,编译安装iconv
tar zxf libiconv-1.14.tar.gz
cd libiconv-1.14
./iconv --prefix=/usr/local/libiconv
make && make install
在make时候报下面错误:
./stdio.h:1010:1: 错误: ‘gets’未声明(不在函数内)
make[2]: *** [progname.o] 错误 1
make[2]:正在离开目录 `/home/lmos/libiconv-1.14/srclib'
make[1]: *** [all] 错误 2
make[1]:正在离开目录 `/home/lmos/libiconv-1.14/srclib'
make: *** [all] 错误 2
解决方法:进入srclib目录执行 sed -i -e '/gets is a security/d' ./stdio.in.h
十二,编译安装libxml2
yum install python-devel libxslt-dev python-lxml python-dev -y
tar zxf libxml2-2.9.2.tar.gz
cd libxml2-2.9.2
./configure --prefix=/usr/local/libxml2 --with-zlib=/usr/local/zlib
make && make install
十三,编译安装mhash
tar zxf mhash-0.9.3.tar.gz
cd mhash-0.9.3
./configure --prefix=/usr/local/mhash
make && make install
十四,编译安装php
tar zxf php-5.6.4.tar.gz
cd php-5.6.4
#对于默认安装即./configure没有带prefix参数的可以直接只写出--with-XXX不用赋值
#具体参数可通过./configure --help来查询
./configure  \
--prefix=/usr/local/php \
--with-apxs2=/usr/local/apache/bin/apxs \
--enable-calendar \
--with-mysql=/usr/local/mysql \
--with-pdo-mysql=/usr/local/mysql/bin/mysql_config \
--with-iconv=/usr/local/libiconv \
--enable-mbstring \
--with-curl=/usr/local/curl \
--enable-exif \
--with-gd \
--with-zlib \
--with-jpeg-dir=/usr/local/libjpeg \
--with-png-dir=/usr/local/libpng \
--with-freetype-dir=/usr/local/freetype \
--with-gdbm=/usr/local/gdbm \
--with-libxml-dir=/usr/local/libxml2 \
--enable-gd-native-ttf \
--enable-sockets \
--with-mcrypt=/usr/local/libmcrypt \
--with-gettext=/usr/local/gettext \
--with-mhash=/usr/local/mhash \
--enable-shmop
--with-config-file-path=/usr/local/php/etc
make && make install
#php.ini的位置也可在编译时指定:----with-config-file-path=YOURPATH
将配置文件复制一份到/usr/local/php/etc/下面
cd php-5.6.4
cp php.ini-production /usr/local/php/etc/php.ini
安装所要软件
wget http://mirror.nienbo.com/memcached/libmemcached/libmemcached-1.0.16.tar.gz
wget http://pecl.php.net/get/memcached-1.0.2.tgz
4.安装libmemcached
#tar zxvf libmemcached-1.0.16.tar.gz
#cd libmemcached-1.0.16
#./configure --prefix=/usr/local/libmemcached  --with-memcached
#make && make install
5.php的扩展memcached的安装
#tar zxvf memcached-1.0.2.tar.gz
#cd memcached-1.0.2#/usr/local/php/bin/phpize
#./configure --enable-memcached --with-php-config=/usr/local/php/bin/php-config --with-libmemcached-dir=/usr/local/libmemcached (如果libmemcached安装没有指定--prefix,此处就无需 --with-libmemcached-dir)
#make && make install
vi /usr/local/php/lib/php.ini
加上extension=memcached.so重起一下httpd服务就可以了。

参考:
十五,配置Apache httpd.conf
要改的有如下几处:
1.# vi /usr/local/apache/conf/httpd.conf
查找AddType application/x-gzip .gz .tgz
在其下加入
AddType application/x-tar .tgz
AddType application/x-httpd-php .php
AddType p_w_picpath/x-icon .ico
2.修改DirectoryIndex 行,添加index.php
修改为DirectoryIndex index.php index.html
十六,修改php.ini
找到timezone,修改为timezone=Asia/Shanghai
十七,测试
#再Apache服务器根路径新建index.php文件如下
cd /home/htdocs/
vi index.php
<?php
phpinfo();
?>
在主机输入地址虚拟机IP地址,查看模块是否加载.
CentOS 7源码安装最新版LNMP环境
系统:CentOS 7 x86_64
NGINX:nginx-1.7.12
数据库:mariadb-10.0.13
PHP:php-5.5.23
首先把centos7的防火墙更换成iptables,可以参见如下链接
centos7防火墙改为iptables 参考: http://www.612459.com/fuwuq/1063.html
修改成iptables之后就可以清空iptables里面的过滤规则了,然后再关闭selinux服务。记得不要忘了先安装gcc gcc-c++ wget net-tools等功能哦。
首先安装mariadb
下载编译好了的二进制包,版本为 mariadb-10.0.13-linux-glibc_214-x86_64.tar.gz
1、下载二进制包到/usr/local/src 目录下:
[root@centos74 ~]# cd /usr/local/src/
[root@centos74 src]# wget http://ftp.osuosl.org/pub/mariadb/mariadb-10.0.13/bintar-quantal-amd64/mariadb-10.0.13-linux-glibc_214-x86_64.tar.gz
2、将压缩包解压到/usr/local 目录下:
[root@centos74 src]# tar zvxf mariadb-10.0.13-linux-glibc_214-x86_64.tar.gz -C /usr/local/
3、创建mariadb 数据初始化目录/data/mysql:
[root@centos74 src]# mkdir -p /data/mysql
4、添加系统用户mysql,禁止登陆系统,同时,将mariadb 数据初始化目录所属主和组都修改为mysql:
[root@centos74 src]# useradd -r -s /sbin/nologin mysql
[root@centos74 src]# chown -R mysql.mysql /data/mysql/
5、重命名解压出来的mariadb 目录:
[root@centos74 src]# mv /usr/local/mariadb-10.0.13-linux-x86_64/ /usr/local/mysql
6、进入重命名后的目录,初始化mariadb:
[root@centos74 src]# cd /usr/local/mysql/
[root@centos74 src]# chown root.mysql
[root@centos74 mysql]# ./scripts/mysql_install_db --datadir=/data/mysql --user=mysql
Installing MariaDB/MySQL system tables in '/data/mysql' ...
140906 2:03:19 [Note] InnoDB: Using mutexes to ref count buffer pool pages
140906 2:03:19 [Note] InnoDB: The InnoDB memory heap is disabled
140906 2:03:19 [Note] InnoDB: Mutexes and rw_locks use GCC atomic builtins
140906 2:03:19 [Note] InnoDB: Compressed tables use zlib 1.2.3
140906 2:03:19 [Note] InnoDB: Using Linux native AIO
140906 2:03:19 [Note] InnoDB: Using CPU crc32 instructions
140906 2:03:19 [Note] InnoDB: Initializing buffer pool, size = 128.0M
........................................................................
The latest information about MariaDB is available at http://mariadb.org/.
You can find additional information about the MySQL part at:
http://dev.mysql.com
Support MariaDB development by buying support/new features from
SkySQL Ab. You can contact us about this at sales@skysql.com.
Alternatively consider joining our community based development effort:
http://mariadb.com/kb/en/contributing-to-the-mariadb-project/
报错:WARNING: The host 'test4' could not be looked up with resolveip.
解决办法:vim /etc/hosts 在最后一行添加192.168.1.242 test4
报错:./bin/mysqld: error while loading shared libraries: libaio.so.1: cannot open shared object file: No such file or directory
解决办法:yum -y install libaio-devel libaio
7、复制配置文件到/etc目录覆盖之前的my.cnf:
[root@centos74 mysql]# cp support-files/my-large.cnf /etc/my.cnf
cp:是否覆盖"/etc/my.cnf"? y
8、复制mysql 启动脚本文件到/etc/init.d 目录下并重命名为mysqld:
[root@centos74 mysql]# cp support-files/mysql.server /etc/init.d/mysqld
同时修改启动脚本的权限为755:
[root@centos74 mysql]# chmod 755 /etc/init.d/mysqld
9、编辑启动脚本,定义datadir 路径:
[root@centos74 mysql]# vim /etc/init.d/mysqld
定义数据存放路径:
datadir=/data/mysql
10、将mariadb自带命令放入$PATH
[root@localhost ~]# PATH=$PATH:/etc/init.d/#当前有效,重启shell就失效
[root@localhost ~]# echo "export PATH=$PATH:/etc/init.d/" >>/etc/profile
[root@localhost ~]# echo "export PATH=$PATH:/usr/local/mysql/bin/" >>/etc/profile
[root@localhost ~]# source /etc/profile
11、启动mariadb:
[root@centos74 mysql]# /etc/init.d/mysqld start
Starting MySQL. SUCCESS!
第二步,开始安装php
针对Nginx的php安装和针对apache的php安装是有区别的,因为Nginx中的php是以fastcgi的方式结合nginx的,可以理解为nginx代理了php的fastcgi,而apache是把php作为自己的模块来调用的。
php官方下载地址: http://www.php.net/downloads.php
下载php
[rot@localhost src]# cd /usr/local/src
[root@localhost src]# wget http://am1.php.net/distributions/php-5.5.23.tar.gz
解压php
[root@localhost src]# tar zxf php-5.5.23.tar.gz
创建相关账户
[root@localhost src]# useradd -s /sbin/nologin php-fpm
配置编译参数
[root@localhost src]# cd php-5.5.23
[root@localhost src]# yum -y install gcc make gd-devel libjpeg-devel libpng-devel libxml2-devel bzip2-devel libcurl-devel libmcrypt-devel
[root@localhost php-5.5.23]# ./configure --prefix=/usr/local/php --with-config-file-path=/usr/local/php/etc --enable-fpm --with-fpm-user=php-fpm --with-fpm-group=php-fpm --with-mysql=mysqlnd --with-pdo-mysql=mysqlnd --with-mysqli=mysqlnd --with-libxml-dir --with-gd --with-jpeg-dir --with-png-dir --with-freetype-dir --with-iconv-dir --with-zlib-dir --with-mcrypt --enable-soap --enable-gd-native-ttf --enable-ftp --enable-mbstring --enable-exif --disable-ipv6 --with-pear --with-curl --enable-bcmath --enable-mbstring --enable-sockets --with-gd --with-libxml-dir=/usr/local --with-gettext
错误:configure: error: xml2-config not found. Please check your libxml2 installation.
解决办法:yum -y install libxml2-devel
错误:configure: error: Please reinstall the libcurl distribution -easy.h should be in <curl-dir>/include/curl/
解决办法:yum -y install libcurl-devel
错误:configure: error: jpeglib.h not found.
解决办法:yum -y install libjpeg-turbo-devel
错误:configure: error: png.h not found.
解决办法:yum -y install libpng-devel
错误:configure: error: freetype-config not found.
解决办法:yum -y install freetype-devel
错误:configure: error: mcrypt.h not found. Please reinstall libmcrypt.
解决办法:yum -y install libmcrypt-devel
安装php
[root@localhost php-5.3.27]# make && make install
以上每一个步骤,如果没有完全执行正确,那么下一步是无法进行的,使用 echo $? 看结果是否为 “0” , 如果不是,就是没有执行正确。
修改配置文件
cp php.ini-production /usr/local/php/etc/php.ini
vim /usr/local/php/etc/php-fpm.conf
把如下内容写入该文件:
[global]
pid = /usr/local/php/var/run/php-fpm.pid
error_log = /usr/local/php/var/log/php-fpm.log
[www]
listen = /tmp/php-fcgi.sock
user = php-fpm
group = php-fpm
listen.owner = nobody
listen.group = nobody
pm = dynamic
pm.max_children = 50
pm.start_servers = 20
pm.min_spare_servers = 5
pm.max_spare_servers = 35
pm.max_requests = 500
rlimit_files = 1024
保存配置文件后,检验配置是否正确的方法为:
/usr/local/php/sbin/php-fpm -t
如果出现诸如 “test is successful” 字样,说明配置没有问题。
启动php-fpm
cp /usr/local/src/php-5.5.23/sapi/fpm/init.d.php-fpm /etc/init.d/php-fpm
chmod 755 /etc/init.d/php-fpm
service php-fpm start
如果想让它开机启动,执行:
chkconfig php-fpm on
检测是否启动:
ps aux |grep php-fpm
看看是不是有很多个进程(大概20多个)。
安装nginx
yum -y install pcre-devel zlib-devel libxslt-devel gd-devel openssl openssl-devel
下载nginx
cd /usr/local/src/
wget http://nginx.org/download/nginx-1.7.12.tar.gz
解压nginx
tar zxvf nginx-1.7.12.tar.gz
配置编译参数
cd nginx-1.7.12
./configure \
--prefix=/usr/local/nginx \
--user=nginx --group=nginx \
--with-http_ssl_module \
--with-http_spdy_module \
--with-http_realip_module \
--with-http_addition_module \
--with-http_xslt_module \
--with-http_p_w_picpath_filter_module \
--with-http_sub_module \
--with-http_auth_request_module \
--with-http_gzip_static_module \
--with-http_stub_status_module \
--with-pcre
make && make install
编写nginx启动脚本,并加入系统服务
vim /etc/init.d/nginx
写入如下内容:
#!/bin/bash
# chkconfig: - 30 21
# description: http service.
# Source Function Library
. /etc/init.d/functions
# Nginx Settings

NGINX_SBIN="/usr/local/nginx/sbin/nginx"
NGINX_CONF="/usr/local/nginx/conf/nginx.conf"
NGINX_PID="/usr/local/nginx/logs/nginx.pid"
RETVAL=0
prog="Nginx"

start() {
        echo -n $"Starting $prog: "
        mkdir -p /dev/shm/nginx_temp
        daemon $NGINX_SBIN -c $NGINX_CONF
        RETVAL=$?
        echo
        return $RETVAL
}

stop() {
        echo -n $"Stopping $prog: "
        killproc -p $NGINX_PID $NGINX_SBIN -TERM
        rm -rf /dev/shm/nginx_temp
        RETVAL=$?
        echo
        return $RETVAL
}

reload(){
        echo -n $"Reloading $prog: "
        killproc -p $NGINX_PID $NGINX_SBIN -HUP
        RETVAL=$?
        echo
        return $RETVAL
}

restart(){
        stop
        start
}

configtest(){
    $NGINX_SBIN -c $NGINX_CONF -t
    return 0
}

case "$1" in
  start)
        start
        ;;
  stop)
        stop
        ;;
  reload)
        reload
        ;;
  restart)
        restart
        ;;
  configtest)
        configtest
        ;;
  *)
        echo $"Usage: $0 {start|stop|reload|restart|configtest}"
        RETVAL=1
esac

exit $RETVAL
保存后,更改权限:
chmod 755 /etc/init.d/nginx
chkconfig --add nginx
如果想开机启动,请执行:
chkconfig nginx on
更改nginx配置
首先把原来的配置文件清空:
> /usr/local/nginx/conf/nginx.conf
“>” 这个符号为重定向的意思,单独用它,可以把一个文本文档快速清空。
vim /usr/local/nginx/conf/nginx.conf
写入如下内容:
user nginx nginx;
worker_processes 2;
error_log /usr/local/nginx/logs/nginx_error.log crit;
pid /usr/local/nginx/logs/nginx.pid;
worker_rlimit_nofile 51200;

events
{
    use epoll;
    worker_connections 6000;
}

http
{
    include mime.types;
    default_type application/octet-stream;
    server_names_hash_bucket_size 3526;
    server_names_hash_max_size 4096;
    log_format combined_realip '$remote_addr $http_x_forwarded_for [$time_local]'
    '$host "$request_uri" $status'
    '"$http_referer" "$http_user_agent"';
    sendfile on;
    tcp_nopush on;
    keepalive_timeout 30;
    client_header_timeout 3m;
    client_body_timeout 3m;
    send_timeout 3m;
    connection_pool_size 256;
    client_header_buffer_size 1k;
    large_client_header_buffers 8 4k;
    request_pool_size 4k;
    output_buffers 4 32k;
    postpone_output 1460;
    client_max_body_size 10m;
    client_body_buffer_size 256k;
    client_body_temp_path /usr/local/nginx/client_body_temp;
    proxy_temp_path /usr/local/nginx/proxy_temp;
    fastcgi_temp_path /usr/local/nginx/fastcgi_temp;
    fastcgi_intercept_errors on;
    tcp_nodelay on;
    gzip on;
    gzip_min_length 1k;
    gzip_buffers 4 8k;
    gzip_comp_level 5;
    gzip_http_version 1.1;
    gzip_types text/plain application/x-javascript text/css text/htm application/xml;

server
{
    listen 80;
    server_name localhost;
    index index.html index.htm index.php;
    root /usr/local/nginx/html;

    location ~ \.php$ {
        root  /usr/local/nginx/html;
        include fastcgi_params;
        fastcgi_pass unix:/tmp/php-fcgi.sock;
        fastcgi_index index.php;
        fastcgi_param SCRIPT_FILENAME /usr/local/nginx/html$fastcgi_script_name;
    }

}

}
保存配置后,先检验一下配置文件是否有错误存在:
/usr/local/nginx/sbin/nginx -t
如果显示内容如下,则配置正确,否则需要根据错误提示修改配置文件:
nginx: the configuration file /usr/local/nginx/conf/nginx.conf syntax is ok
nginx: configuration file /usr/local/nginx/conf/nginx.conf test is successful
启动nginx:
service nginx start
如果不能启动,请查看 “/usr/local/nginx/logs/error.log” 文件,检查nginx是否启动:
ps aux |grep nginx
看是否有进程。
测试是否解析php文件
创建测试文件:
vim /usr/local/nginx/html/test.php
内容如下:
<?php echo phpinfo();?>
测试:
[root@localhost nginx]# curl localhost/test.php
或者使用浏览器打开http://YourServerIPAddress/test.php
重要:如果解析不了,检查日志发现连接不到php,我的php版本为5.5.23,比较新的版本,需要在php/etc/php-fpm.conf文件中添加
listen.owner = nobody
listen.group = nobody
这两行,再重启一下服务就能使用php了
原因是/tmp/php-fcgi.sock这个文件没有读权限
至此,最新版的LNMP环境源码编译安装完成了.
http://www.aminglinux.com/bbs/forum.php
zabbix编译安装http://www.1987.name/744.html
在此lnmp基础上面搭建discuz论坛。
1.MySQL 配置
mysql -u root -p 123456
mysql> update user set host='%' where user='root' and host='localhost';
mysql> grant all on *.* to root@'localhost' identified by '123456';
mysql> grant all on *.* to root@'127.0.0.1' identified by '123456';
mysql> flush privileges;
2.php-fpm配置
vim /usr/local/php/etc/php-fpm.conf
把如下内容写入该文件:
[global]
pid = /usr/local/php/var/run/php-fpm.pid
error_log = /usr/local/php/var/log/php-fpm.log
[www]
listen = 127.0.0.1:9000
user = nginx
group = nginx
listen.owner = nobody
listen.group = nobody
pm = dynamic
pm.max_children = 50
pm.start_servers = 20
pm.min_spare_servers = 5
pm.max_spare_servers = 35
pm.max_requests = 500
rlimit_files = 1024
保存配置文件后,检验配置是否正确的方法为:如果出现诸如 “test is successful” 字样,说明配置没有问题。
/usr/local/php/sbin/php-fpm -t
启动php-fpm
cp /usr/local/src/php-5.5.23/sapi/fpm/init.d.php-fpm /etc/init.d/php-fpm
chmod 755 /etc/init.d/php-fpm
service php-fpm start
如果想让它开机启动,执行:
chkconfig php-fpm on
检测是否启动: ps aux |grep php-fpm
3.nginx配置如下
[root@website conf]# cat nginx.conf
user nginx nginx;
worker_processes 2;
error_log /usr/local/nginx/logs/error.log notice;
pid logs/nginx.pid;
worker_rlimit_nofile 5120;
events {
use epoll;
worker_connections 5120;
}
http {
include mime.types;
default_type application/octet-stream;
server_names_hash_bucket_size 128;
client_header_buffer_size 32k;
large_client_header_buffers 4 32k;
client_max_body_size 8m;
#limit_zone one $binary_remote_addr 32k;
sendfile on;
tcp_nopush on;
keepalive_timeout 60;
tcp_nodelay on;
gzip on;
gzip_min_length 1k;
gzip_buffers 4 16k;
gzip_http_version 1.0;
gzip_comp_level 2;
gzip_types text/plain application/x-javascript text/css application/xml;
gzip_vary on;
log_format wwwlogs '$remote_addr - $remote_user [$time_local] $request $status $body_bytes_sent $http_referer $http_user_agent $http_x_forwarded_for';
server {
listen 80;
server_name www.bbs.com;
location / {
root /data/webroot/html/discuz;
index index.php;
}
location ~ \.php$ {
root /data/webroot/html/discuz;
fastcgi_pass 127.0.0.1:9000;
fastcgi_index index.php;
fastcgi_param SCRIPT_FILENAME /data/webroot/html/discuz$fastcgi_script_name;
include fastcgi_params;
}
}
}
检测nginx语法正确性
# /usr/local/nginx/sbin/nginx -t
nginx: the configuration file /usr/local/nginx/conf/nginx.conf syntax is ok
nginx: configuration file /usr/local/nginx/conf/nginx.conf test is successful
重启nginx服务
service nginx restart
4.安装discuz论坛
下载相关软件包:http://download.comsenz.com/DiscuzX/
# unzip Discuz_X3.2_SC_UTF8.zip
# mv upload /data/webroot/html/discuz
# chown -R www.www /data/webroot/html/discuz
在本地Hosts文件中添加如下记录:
C:\Windows\System32\Drivers\etc\hosts
#打开此文件添加如下内容
192.168.100.12 www.bbs.com
7. 客户端谷歌浏览器访问域名www.bbs.com;域名安装如下图


bbs论坛安装完成后,最好删除或者重命名bbs目录下install目录
# cd /data/webroot/discuz/
# mv install install.bak
重新登陆再次访问bbs论坛

到此bbs论坛搭建完成,Dizcuz 具有非常丰富的功能,如用户注册, 论坛主题设置,页面访问权限设置,发起投票(需装插件)等功能。
参考:http://dreamfire.blog.51cto.com/418026/1148203/
转载于:https://blog.51cto.com/hao360/1621329


 6万+
6万+

 被折叠的 条评论
为什么被折叠?
被折叠的 条评论
为什么被折叠?
 到【灌水乐园】发言


