


先更新
apt update -y && apt upgrade -ysudo apt-get install libreadline6-dev:i386 libgl1-mesa-dev g++-multilib tofrodos python-markdown libxml2-utils xsltproc zlib1g-dev:i386 dpkg-dev libsdl1.2-dev libesd0-dev git-core gnupg flex bison gperf build-essential libgl1-mesa-dev zip curl zlib1g-dev gcc-multilib g++-multilib libc6-dev-i386 lib32ncurses5-dev x11proto-core-dev libx11-dev lib32z-dev ccache libgl1-mesa-dev libxml2-utils xsltproc unzip m4 android-tools-adb -y
java安装
mkdir /usr/java
jdk-6u45-linux-x64.bin 放置到 /usr/java 安卓4.4.4必须使用oracle jdk 1.6
/usr/java目录下 执行 jdk-6u45-linux-x64.bin
export JAVA_HOME=/usr/java/jdk1.6.0_45
export JAVA_BIN=/usr/java/jdk1.6.0_45/bin
export PATH=$PATH:$JAVA_HOME/bin
export CLASSPATH=.:$JAVA_HOME/lib/dt.jar:$JAVA_HOME/lib/tools.jar
export JAVA_HOME JAVA_BIN PATH CLASSPATH
source /etc/profile修改后生效一下
下载源码
mkdir ~/bin
PATH=~/bin:$PATH
curl https://storage.googleapis.com/git-repo-downloads/repo > ~/bin/repo
chmod a+x ~/bin/repo
mkdir android cd android git config --global user.name "k4n5ha0" git config --global user.email "k4n5ha0@qq.com" repo init -u https://aosp.tuna.tsinghua.edu.cn/platform/manifest -b android-4.4.4_r2
repo sync --no-tags --no-clone-bundle //开始下载代码
#!/bin/sh
repo sync
while [ $? -ne 0 ]
do
repo sync
done

sh myrepo.sh  可以保持重试
安装make
ubuntu16.04自带的make版本过高,无法编译。因此需要将make降至3.82.
下载地址ftp://ftp.gnu.org/gnu/make/
下载后到Downloads下将文件拷到其他目录(home下即可),然后解压
tar -zxvf make3.8.2.tar.gz
解压后进入到make3.8.2的目录下
./configure
make
sudo make install
执行完后在/usr/local/bin中可得到新版本的make,复制到/usr/bin中即可
seven@ThinkPad:/usr/local/bin$ sudo mv make /usr/bin
注:make过程中可能会出现错误,不用理会,只要make install能够成功执行即可。
安装android device monitor
http://www.androiddevtools.cn/
直接下载 ADT Bundle
运行 /root/adt-bundle-linux-x86_64-20140702/sdk/tools/monitor
作为调试用的ddms
编译开始
lunch  //选择你的编译版本
echo export USE_CCACHE=1 >> ~/.bashrc
prebuilts/misc/linux-x86/ccache/ccache -M 50G
source build/envsetup.sh
lunch
make -j8
执行
source build/envsetup.sh && lunch && emulator -memory 1024

增加点内存
调大运行ram
dumpsys meminfo 这条命令在adb shell 后可以查看安卓内存使用
别忘记开启虚这个安卓的usb调试 mtp设备 否则会被当成是usb的储存设备
当然还是要开启安装未知源的选项,不过奇怪的是必须重启才生效
/
如果出现错误  error: do_inode_allocate_extents: Failed to allocate 12275 blocks

"/root/android/build/target/board/generic_x86/BoardConfig.mk"

修改上面路径的文件  修改 BOARD_SYSTEMIMAGE_PARTITION_SIZE 这个参数为如下代码

BOARD_SYSTEMIMAGE_PARTITION_SIZE := 524288000

如果要调试的app体积很大,需要将这个值增大
/
编译kernel 我们使用3.4的内核
注意:我们要在 安卓源码主目录
#/root/android/ 作为主目录
git clone  https://android.googlesource.com/kernel/goldfish.git
cd goldfish/
git branch -a
git checkout android-goldfish-3.4

#注意要选中内核目标版本
#然后切换到 安卓主目录
#/root/android/ 目录下
source build/envsetup.sh
lunch
cd /root/android/goldfish
#进入kernel目录后 然后编译内核
/root/android/external/qemu/distrib/build-kernel.sh

提示成功如下!!!!!!
Kernel goldfish_armv7 copied to /tmp/kernel-qemu successfully !

#如此执行虚拟机
#cd /root/android/
source build/envsetup.sh
lunch
emulator -kernel /tmp/kernel-qemu/kernel-qemu-armv7 -memory 1024
我们把目录转移一下
emulator -kernel /root/android/kernel-qemu/kernel-qemu-armv7

#我们就搞个  ango.sh在 安卓主目录下

#!/bin/bash
source build/envsetup.sh && lunch
emulator -kernel /root/android/kernel-qemu/kernel-qemu-armv7
/
防止TracerPid反调试
/root/android/goldfish/fs/proc/array.c
做如下修改
static inline void task_state(struct seq_file *m, struct pid_namespace *ns,
				struct pid *pid, struct task_struct *p)
{
	struct group_info *group_info;
	int g;
	struct fdtable *fdt = NULL;
	const struct cred *cred;
	pid_t ppid, tpid;

	rcu_read_lock();
	ppid = pid_alive(p) ?
		task_tgid_nr_ns(rcu_dereference(p->real_parent), ns) : 0;
	tpid = 0;
	if (pid_alive(p)) {
		struct task_struct *tracer = ptrace_parent(p);
		if (tracer)
			tpid = task_pid_nr_ns(tracer, ns);
	}
	tpid = 0;  //保证TracerPid为0
	cred = get_task_cred(p);
	seq_printf(m,
		"State:\t%s\n"
		"Tgid:\t%d\n"
		"Pid:\t%d\n"
		"PPid:\t%d\n"
		"TracerPid:\t%d\n"
		"Uid:\t%d\t%d\t%d\t%d\n"
		"Gid:\t%d\t%d\t%d\t%d\n",
		//get_task_state(p),  //注释本行
		"S (sleeping)",         //强制为sleep的进程状态
		task_tgid_nr_ns(p, ns),
		pid_nr_ns(pid, ns),
		ppid, tpid,
		cred->uid, cred->euid, cred->suid, cred->fsuid,
		cred->gid, cred->egid, cred->sgid, cred->fsgid);

进程状态参考
static const char * const task_state_array[] = {
	"R (running)",		/*   0 */
	"S (sleeping)",		/*   1 */
	"D (disk sleep)",	/*   2 */
	"T (stopped)",		/*   4 */
	"t (tracing stop)",	/*   8 */
	"Z (zombie)",		/*  16 */
	"X (dead)",		/*  32 */
	"x (dead)",		/*  64 */
	"K (wakekill)",		/* 128 */
	"W (waking)",		/* 256 */
};
/
防止fork反调试
修改 /root/android/bionic/libc/bionic/fork.c 文件
#include <unistd.h>
#include "pthread_internal.h"
#include "bionic_pthread.h"
#include "cpuacct.h"
#include <fcntl.h>  //必须增加这个头文件!!!!!!!!!!!!!!!!!!!!!!!!!!!!!!!!!!!!!!!!

#define BUF_LENTH 1000   //必须增加这个参数!!!!!!!!!!!!!!!!!!!!!!!!!!!!!!!!!!!!!!!!

extern int  __fork(void);

// 进行脱壳apk进程的过滤
int is_target_apk_pid()
{
    char szBuffer[BUF_LENTH] = {0};
    char szCmd[BUF_LENTH] = {0};

    // 格式化字符串得到/proc/pid/cmdline
    sprintf(szCmd, "/proc/%d/cmdline", getpid());

    // 获取当前pid进程的文件名称字符串(比较粗糙)
    int fd = open(szCmd, O_RDONLY);
    if (read(fd, szBuffer, BUF_LENTH))
    {
        //......
    }
    else
    {
        //......
    }
    close(fd);

    // 判断当前pid进程是否是需要的过滤的脱壳apk进程
    //memset(szCmd, 0, sizeof(szCmd));
    //sprintf(szCmd,"/data/data/%s", szBuffer);
    if (strstr(szBuffer, "com.jianbao"))   //要监控的进程名字!!!!!!!!!!!!!!!!!!!!!
    {
        return 1;
    }

    return 0;
}

int  fork(void)
{
    int  ret;
	if (is_target_apk_pid())
    {
        return -1;
    }
    /* Posix mandates that the timers of a fork child process be
     * disarmed, but not destroyed. To avoid a race condition, we're
     * going to stop all timers now, and only re-start them in case
     * of error, or in the parent process
     */
    __timer_table_start_stop(1);
    __bionic_atfork_run_prepare();

    ret = __fork();
    if (ret != 0) {  /* not a child process */
        __timer_table_start_stop(0);
        __bionic_atfork_run_parent();
    } else {
        // Fix the tid in the pthread_internal_t struct after a fork.
        __pthread_settid(pthread_self(), gettid());

        /*
         * Newly created process must update cpu accounting.
         * Call cpuacct_add passing in our uid, which will take
         * the current task id and add it to the uid group passed
         * as a parameter.
         */
        cpuacct_add(getuid());
        __bionic_atfork_run_child();
    }
    return ret;
}
///
此方法证明干扰ida调试 请勿修改!
/root/android/dalvik/vm/native/dalvik_system_VMDebug.cpp
修改Debug.isDebuggerConnected 反调试
static void Dalvik_dalvik_system_VMDebug_isDebuggerConnected(const u4* args,
    JValue* pResult)
{
    UNUSED_PARAMETER(args);

    //RETURN_BOOLEAN(dvmDbgIsDebuggerConnected()); 注释这行 修改为下一行
	RETURN_BOOLEAN(false);
}
//
增加ida调试断点
修改 此文件 "/root/android/dalvik/vm/Native.cpp"
version = (*func)(gDvmJni.jniVm, NULL);之前加入
ALOGI("JNI_OnLoad!!!!!!!!!!!!");
在调试的时候直接在ida中 按G
让 libdvm.so 基地址加上 0x4FDE0 就是这个地址 如果你熟悉了
0x4FDE0直接用 模块基地址 减去
ALOGI("JNI_OnLoad!!!!!!!!!!!!");地址之后的BLX之前的地址算一下就能得出很简单
shift + f7能看到加载的基地址
直接在 ida里面搜索jni_Onload字符串就能找到对应的地址
f5状态下 按tab键 就能切换到对应的汇编代码
之后就是对应的地址减去基地址就行了
///
双机调试设置 注意执行顺序!
ubuntu上
adb forward tcp:23946 tcp:12345安卓上
/data/local/tmp/android_server -p12345 &
防止壳检测 把名字改一改
/data/local/tmp/com.360 -p12345
windows上
使用MobaXterm
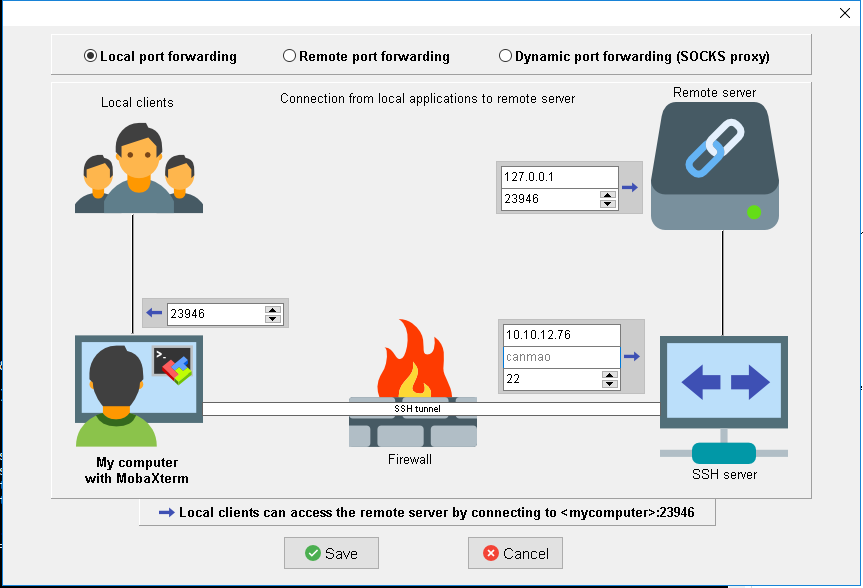
其中10.10.12.76就是ubuntu机
这样ida 附加调试就能断下来
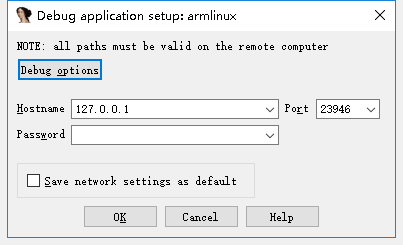
以调试模式启动应用
使用AndroidKiller打开APK文件进行反编译,可以看到文件的包名和入口
adb shell am start -D -n longbin.helloworld/longbin.helloworld.SplashActivity
就可以ida附加了 附加的参数要如下设置
f5状态下 按tab键 就能切换到对应的汇编代码
在ubuntu下面打开ddms要做一下设置
-startup
plugins/org.eclipse.equinox.launcher_1.3.0.v20120522-1813.jar
--launcher.library
plugins/org.eclipse.equinox.launcher.gtk.linux.x86_64_1.1.200.v20120913-144807
-data
@noDefault
-vmargs
-XX:MaxPermSize=256m
-Xms512m
-Xmx1024m
修改为
-startup
plugins/org.eclipse.equinox.launcher_1.3.0.v20120522-1813.jar
--launcher.library
plugins/org.eclipse.equinox.launcher.gtk.linux.x86_64_1.1.200.v20120913-144807
-data
@noDefault
-vm
/root/android-studio/jre/bin/java
-vmargs
-XX:MaxPermSize=256m
-Xms512m
-Xmx1024m
也就是增加一下jre路径
///
启动ddms
执行一下adb shell
启动虚拟机
进入adb shell 后
/data/local/tmp/com.360 -p12345
执行
adb forward tcp:23946 tcp:12345
adb shell am start -D -n com.jianbao.doctor/com.jianbao.doctor.activity.SplashActivity
然后ida附加 并且下断点
之后执行
jdb -connect com.sun.jdi.SocketAttach:hostname=127.0.0.1,port=8700
两个小脚本
#!/bin/bash
/root/adt-bundle-linux-x86_64-20140702/sdk/tools/monitor
-->启动ddms的
#!/bin/bash
source build/envsetup.sh && lunch
emulator -kernel /root/android/kernel-qemu/kernel-qemu-armv7
-->启动虚拟机的
执行如下py脚本自动会断在jni_Onload载入前的关键BLX 我用了硬地址
硬地址直接用 BLX的地址转换成10进制就能得出327150 很简单
import idautils
import idc
import idaapi

def main():
    # begin to locate libdvm.so module base

    has_art = False
    module_base = GetFirstModule()
    while module_base != None:
        module_name = GetModuleName(module_base)
        if module_name.find('libdvm.so') >= 0:
            has_art = True
            break

        module_base = GetNextModule(module_base)

    if has_art == False:
        print '[*]unable to find libdvm.so module base'
        return

    module_size = GetModuleSize(module_base)
    blx_r12_ea = 0
    print '[*]found libdvm.so base=>0x%08X, Size=0x%08X' % (module_base, module_size)
    print("[-]begin to search JNI_OnLoad")
    print "[-]found string JNI_OnLoad BLX R12 addr=>0x%X" % (module_base + 327150)
    AddBpt(module_base + 327150)
    print("[*]script by SexyBoy, enjoy~~")
main()


 5372
5372


 被折叠的 条评论
为什么被折叠?
被折叠的 条评论
为什么被折叠?
 到【灌水乐园】发言


