一、LVS/DR简单介绍
企业常用模型
DR(Direct Routing)直接路由模式。LB收到请求包后,将请求包中目标MAC地址转换为某个选定RS的MAC地址后将包转发出去,RS收到请求包后 ,可直接将应答内容传给用户。此时要求LB和所有RS都必须在一个物理段内,且LB与RS群共享一个虚拟IP。
lvs-dr
模型特征
(常用)
1
、集群节点必须在一个物理网络上(mac)
2、rip可以使用公网地址
3
、director
处理入站请求,
4
、realserver
网关不指向director
5
、不支持端口映射
6
、大多数操作系统支持realservers
7
、dr dirctor
比nat director
性能优越
二、
实验说明
实验拓朴图
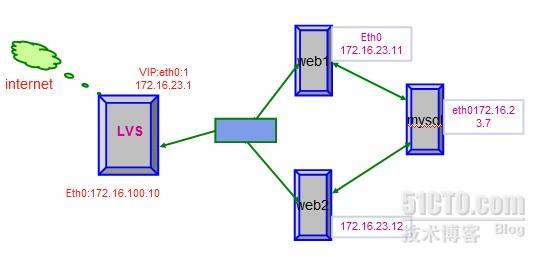
172.16.23.10是LVS与互联网通信的物理地址,简称为DIP
172.16.23.1
是LVS
与内部真实服务器通信的地址,简称为VIP
172.16.23.12与172.16.23.12就是LVS通过一些调度算法,选择服务器响应的真实服务器web地址,这两个服务器上还有一个lo上网卡别名lo:0 172.16.23.1 即跟VIP地址一样 web是nginx+php
172.16.23.7 是mysql服务器地址
本次实验主要是通过LVS
这个负载均衡通过一些调度算法,对web
进行负载均衡,而且是可进行加密进行,即实现ssl
,并且通过web1,web2
分别安装pam
进行对mysql
这台服务器进行管理。都是桥接
三、
实现过程
1
、构建web1,web2
这两台服务器,上一篇博客已经写过,这里只进行ssl
说明。
Web1
上先CA
证书
cd /etc/pki/CA
vim ../tls/openssl.cnf
修改一些参数找到 [CA_default] dir
设置为dir = /etc/pki/CA
(umask 077;openssl genrsa 1024>private/cakey.pem)
openssl req -new -x509 -key private/cakey.pem -out cacert.pem
mkdir newcerts certs crl
touch index.txt
echo 01>serial
echo 01>crlnumber
2
、web1
建httpd
证书
cd /etc/httpd/conf
mkdir ssl
cd ssl
(umask 077;openssl genrsa 1024 > httpd.key)
openssl req -new -key httpd.key -out httpd.csr
3
、向CA
即自已申请证书
openssl ca -in httpd.csr -out httpd.crt
ca
进行签发
4
、修改配置文件即/etc/nginx/nginx.conf
肉容中下
server {
listen 443;
server_name www.server1.com;
ssl on;
ssl_certificate /etc/httpd/ssl/httpd.crt; /httpd
证书
ssl_certificate_key /etc/httpd/ssl/httpd.key; /
证书私钥
ssl_session_timeout 5m;
ssl_protocols SSLv2 SSLv3 TLSv1;
#ssl_ciphers ALL:!ADH:!EXPORT56:RC4+RSA:+HIGH:+MEDIUM
# ssl_prefer_server_ciphers on; 这两项先不起用
location / {
root /www;
index index.php index.html index.htm; //添加index.php
}
location ~ \.php$ {
root /www;
fastcgi_pass 127.0.0.1:9000;
fastcgi_index index.php;
fastcgi_param SCRIPT_FILENAME /scripts$fastcgi_script_name;
fastcgi_param HTTPS on ; /这里要添加如下内容,启用https
include fastcgi_params;
}
}
}
5
、安装mysql
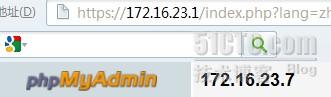
图形管理工具
(1) 需要在网上下载phpMyAdmin-2.11.10-all-languages
Tar xf phpMyAdmin-2.11.10-all-languages –C / //解压到根目录下
mv phpMyAdmin-2.11.10 www /www 即是本地网页存放目录
(2) cd /www 添加配置文件
cp config.sample.inc.php config.inc.php
(3) vim config.inc.php 修改以下参数
$cg['Servers'][$i]['host'] = 'localhost'; $cfg['Servers'][$i]['host'] = '172.16.23.7';
//mysql
的主机ip
地址
$cfg['blowfish_secret'] = '';
修改为$cfg['blowfish_secret'] = 'fsfsfsfs';
//
这里随便写些值,主要是cookier
加密,不改无法登录。
(4
)验证访问
输入mysql
服务器上边的
用户名:pam
及密码:12345
登录成功
Web2
设置类似,这里不再书写!
6
、mysql
服务器进行设置
进入mysql
命令行,给web1,web2
授权访问数据库
grant all privileges on *.* to pam@172.16.23.11 identified by '12345';
grant all privileges on *.* to pam@l72.16.23.12 identified by '12345';
flush privileges;
7
、web1
登录pam
时出现问题及解决方法
Cookies 必须启用才能登入。
多次尝试无法登录,修改多次config.inc.php
无结果。
最后上网查可能是时间有问题。
我就在不能登录的那台服务器看,时间错了两个月
Date 0414220812.33 //
月日时分年秒
Hwclock –w //
指设置好的系统时间同步到硬件里
进行尝成功!
8
、LVS/DR
设置
持久防火墙标记包持久性
实现将同一个服务的不同端口定向到同一个realserver
即客户端请求发往80,及443端口都将由LVS通过算法定向到同一个realserver
ipvsadm -C
iptables -t mangle -L -n
iptables -t mangle -A PREROUTING -i eth0 -p tcp -d 172.16.23.1 --dport 80 -j MARK --set-mark 20 [0-99整数] //定义标记
iptables -t mangle -A PREROUTING -i eth0 -p tcp -d 172.16.23.1 --dport 443 -j MARK --set-mark 20 [0-99]
iptables
定义集群,及集群服务列表
ipvsadm -A -f 20 -s rr -p 1200 //DR持久连接
ipvsadm -a -f 20 -r 172.16.23.11 -g -w 3
ipvsadm -a -f 20 -r 172.16.23.12 -g -w 2
ipvsadm -Ln
9、
进行验证
成功!
要mysql
服务器上进行ab
测试
LVS
服务器上查看,ipvsadm –Lcn
至此整个过程完成!!!


 1414
1414


 被折叠的 条评论
为什么被折叠?
被折叠的 条评论
为什么被折叠?
 到【灌水乐园】发言


