


With the release of vSphere 5 VMware included the ability to roll your own ISO files to include 3rd party drives and CIM providers. This is handy if you have a build that requires drivers that are not available in the base VMware ISO’s or your manufacturers custom ISO’s.
So why might you need this information. Well I know this task is on the study list for many people, I’ve also been asked by some team members over time about how to make a custom ISO with drivers added in.
In this how to guide I’m using the downloadable offline bundle that you can grab from VMware. It is possible to grab the packages with an HTTP address also. But I like to have it local so I can use when needed.
Step 1:
Open PowerCLI window and type the following command. This will load up the offline bundle that we want to use. I have already place the ESXi offline bundle in a folder called Image on c:
Add-EsxSoftwareDepot c:\p_w_picpath\name_of_file.zip

Step 2:
Next I unzipped my driver package into a folder called “Driver” within the p_w_picpath folder. These folders can be anything, these are just the names I used to keep things simple. You can then add in VIB bundles the same way as the offline bundle. If you have multiple driver or VIB packages you will need to add each one separately.
Add-EsxSoftwareDepot c:\p_w_picpath\drivers\name_of_VIB_file.zip

Step 3:
Now that I have added the driver to my build, I want to list out all packages that will be included. To list out available packages you can use the following commands. I am showing some different options so if the list is long you can narrow it down. In this example I just want to search for the Cisco drivers that I added.
Get-EsxSoftwarePackage (this will show everything)
Get-EsxSoftwarePackage -Vendor Cisco
Get-EsxSoftwarePackage -Vendor Ci* (can wildcard the name)

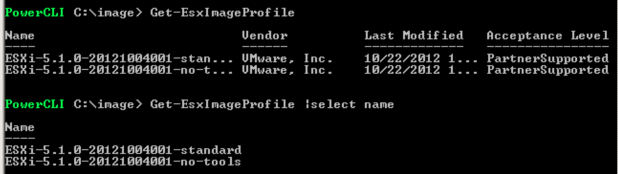
Step 4:
Next you will need to see which p_w_picpath profiles exist within the offline bundle that we added in the first step. To show available p_w_picpath profiles use the command below. If you do not add the “select name” after the command the profile names might show up entirely, you can see from the example below.
get-esxp_w_picpathprofile | select name (this will show full names)
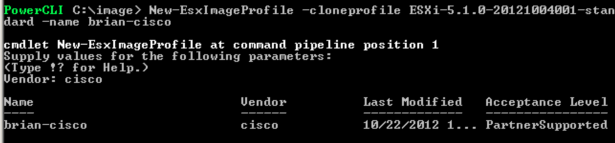
Step 5:
You will select the profile that you want to use as your base to add in your driver packages. Once you have the name selected we need to clone it.
new-esxp_w_picpathprofile -cloneprofile ESXi-5.0.00-20130402001-standard -name brian-cisco
The profile name you are cloning is case sensative and will need to match what you look up in the existing profile list.
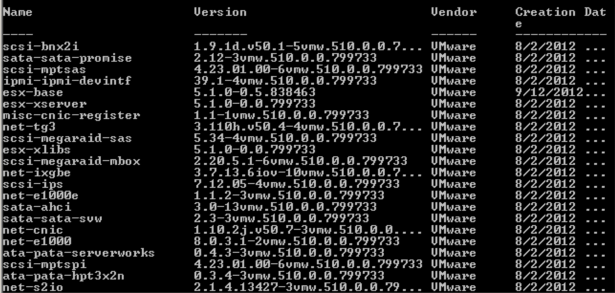
Step 6:
To list all the VIBs in a specific profile use the command below. You will get a list in the format shown below.
(get-esxp_w_picpathprofile -name brian-cisco).viblist
Step 7:
Next we need to find the drive we want to add. Refer to step 3 to get find the package you want to insert. Write down the one you need and use it in the next step.
Step 8:
Next we need to insert the drive/VIB into the profile that we created.
add-esxsoftwarepackage -p_w_picpathprofile brian-cisco -softwarepackage NAME

Step 9:
Now you are ready to export the profile we create to an ISO file that you can use for your install.
export-esxp_w_picpathprofile -p_w_picpathprofile brian-cisco -exporttoiso -filepath “c:\p_w_picpathbuilder\brian.iso”

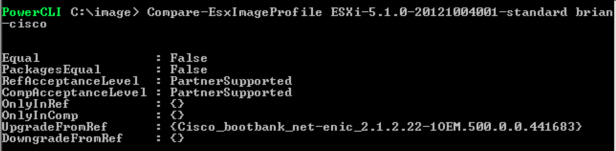
Step 10:
This step is optional but if you want to compare the Image Profile that we created against the one we cloned it from. If you don’t remember the names, look up the names with - get-esxp_w_picpathprofile | select name
compare-esxp_w_picpathprofile OriginalProfileName NewProfileName
compare-esxp_w_picpathprofile ESXi-5.0.0-2132131 brian-cisco (as an example)
转载于:https://blog.51cto.com/hj192837/1125347


 3882
3882


 被折叠的 条评论
为什么被折叠?
被折叠的 条评论
为什么被折叠?
 到【灌水乐园】发言


