[转]AngularJS 使用 UI Router 实现表单向导

本文转自:http://www.oschina.net/translate/angularjs-multi-step-form-using-ui-router

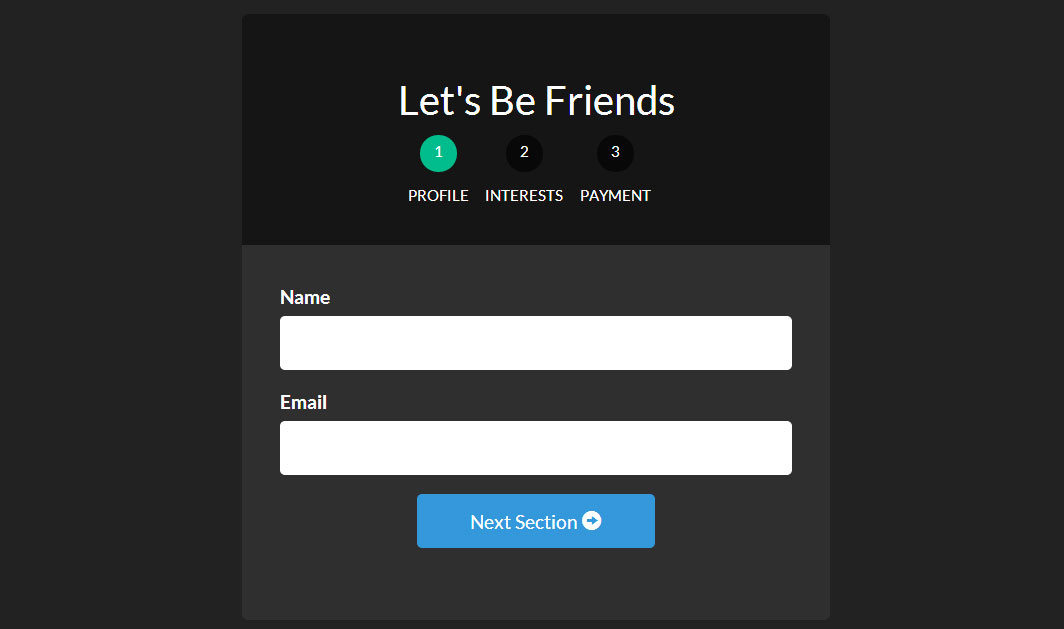
今天我们将使用AngularJs和伟大的UI Router以及Angular ngAnimate module创建一个带动画的多步表单。这项技术可以用在你想要简化用户操作的大表单上。

我们看到这项技术已经应用在了许多的网页上。比如购物车,注册表单,入职流程以及许多多步表单,让用户更容易在线填写表单。

下面我们将构建它:

angular-ui-router-multi-step-form

使用UI Router,它能内嵌状态,为每个状态显示不同的view,我们能让多步表单变得相当的容易。

为了快速的理解UI Router是怎样工作的,看我们的文章:AngularJS使用UI-Router路由

让我们言归正传,开始创建我们的最棒的表单!

地狱星星            
地狱星星 翻译于 11个月前

0人顶


 翻译的不错哦!                        

创建工程

创建工程有个模板结构. 需要个 布局文件 , 每个表单的视图文件, 格式文件, 以及JavaScript 文件.

下面就是文件清单,先创建好它们,接着在填充内容

?
1
2
3
4
5
6
7
- index.html
- form.html
- form-profile.html
- form-interests.html
- form-payment.html
- app.js
- style.css


每个表单-____.html表示层级结构中的html文件. 这些结构最终创建我们的表单结构.

petert            
petert 翻译于 11个月前

0人顶


 翻译的不错哦!                        

我们的布局/模板文件 index.html

我们通过建立一个主文件来引入我们所需要的所有资源以开始我们的项目 ,这里我们使用 index.html 文件作为主文件

现在,我们加载我们所需的资源(AngularJS, ngAnimate, Ui Router, 以及其他脚本和样式表)并且设定一个 ui-view用来告知 UI Router 我们的视图需要显示到哪里。这里我们使用 Bootstrap 来快速应用样式。

?
1
2
3
4
5
6
7
8
9
10
11
12
13
14
15
16
17
18
19
20
21
22
23
24
25
26
27
28
29
30
31
<!-- index.html -->
<! DOCTYPE  html>
< html >
< head >
     < meta  charset = "utf-8" >
 
     <!-- CSS -->
     < link  rel = "stylesheet"  href = "//netdna.bootstrapcdn.com/bootswatch/3.1.1/darkly/bootstrap.min.css" >
     < link  rel = "stylesheet"  href = "style.css" >
     
     <!-- JS -->
     <!-- load angular, nganimate, and ui-router -->
     < script  src = "//ajax.googleapis.com/ajax/libs/angularjs/1.2.16/angular.min.js" ></ script >
     < script  src = "//cdnjs.cloudflare.com/ajax/libs/angular-ui-router/0.2.10/angular-ui-router.min.js" ></ script >
     < script  src = "//ajax.googleapis.com/ajax/libs/angularjs/1.2.16/angular-animate.min.js" ></ script >
     < script  src = "app.js" ></ script >
     
</ head >
 
<!-- apply our angular app -->
< body  ng-app = "formApp" >
 
     < div  class = "container" >
 
         <!-- views will be injected here -->
         < div  ui-view></ div >
 
     </ div >
 
</ body >
</ html >

完成所有文件的引入后,让我们进入 app.js 开始创建Angular应用和最基本的路由配置。 注意我们是如何把Angular App (formApp) 应用到 body 上面的。

CandySunPlus            
CandySunPlus 翻译于 10个月前

1人顶


 翻译的不错哦!                        

创建我们的Angular App app.js

现在我们来创建应用和路由。 在一个大型应用中, 你肯定希望把你的Angular应用、路由、控制器分布到它们各自的模块中,但是为了完成我们的简单用例,我们将把它们都放到app.js这个欢乐的大家庭中。

?
1
2
3
4
5
6
7
8
9
10
11
12
13
14
15
16
17
18
19
20
21
22
23
24
25
26
27
28
29
30
31
32
33
34
35
36
37
38
39
40
41
42
43
44
45
46
47
48
49
50
51
52
53
54
55
56
// app.js
// create our angular app and inject ngAnimate and ui-router 
// =============================================================================
angular.module( 'formApp' , [ 'ngAnimate' 'ui.router' ])
 
// configuring our routes 
// =============================================================================
.config( function ($stateProvider, $urlRouterProvider) {
     
     $stateProvider
     
         // route to show our basic form (/form)
         .state( 'form' , {
             url:  '/form' ,
             templateUrl:  'form.html' ,
             controller:  'formController'
         })
         
         // nested states 
         // each of these sections will have their own view
         // url will be nested (/form/profile)
         .state( 'form.profile' , {
             url:  '/profile' ,
             templateUrl:  'form-profile.html'
         })
         
         // url will be /form/interests
         .state( 'form.interests' , {
             url:  '/interests' ,
             templateUrl:  'form-interests.html'
         })
         
         // url will be /form/payment
         .state( 'form.payment' , {
             url:  '/payment' ,
             templateUrl:  'form-payment.html'
         });
         
     // catch all route
     // send users to the form page 
     $urlRouterProvider.otherwise( '/form/profile' );
})
 
// our controller for the form
// =============================================================================
.controller( 'formController' function ($scope) {
     
     // we will store all of our form data in this object
     $scope.formData = {};
     
     // function to process the form
     $scope.processForm =  function () {
         alert( 'awesome!' );
     };
     
});


现在我们拥有了一个已经注入了ngAnimate和ui.router的应用。 我们同样也建立了相应的路由。注意我们是如何为每一个视图区域定义 url,视图文件(templateUrl) 和 控制器的。

form 将是我们的主视图区域。它同样有一个以 . 分割的子视图区域 form.profile。这种想法能实现在应用状态发生变化时(译者:可能是路由、queryString等),子视图将会在主视图区域中显示出来。(译者:而且可以作到仅更新子视图区域变化,记录子视图区域状态)。

我们将在下一节中进行演示。 现在我们需要为form以及它的子视图区域创建视图。

CandySunPlus            
CandySunPlus 翻译于 10个月前

1人顶


 翻译的不错哦!                        

表单模板视图 form.html

让我们从新建form.html开始。这个文件将会在我们剩下的表单视图文件中充当模板的作用,正如index.html被用作整个项目的总体模板一样。我们所要作的是在该文件中包含ui-view,这样可以使嵌套声明知道该在何处注入他们的视图。

?
1
2
3
4
5
6
7
8
9
10
11
12
13
14
15
16
17
18
19
20
21
22
23
24
25
26
27
28
29
30
31
32
33
34
35
<!-- form.html -->
< div  class = "row" >
< div  class = "col-sm-8 col-sm-offset-2" >
 
     < div  id = "form-container" >
 
         < div  class = "page-header text-center" >
             < h2 >Let's Be Friends</ h2 >
             
             <!-- the links to our nested states using relative paths -->
             <!-- add the active class if the state matches our ui-sref -->
             < div  id = "status-buttons"  class = "text-center" >
                 < a  ui-sref-active = "active"  ui-sref = ".profile" >< span >1</ span > Profile</ a >
                 < a  ui-sref-active = "active"  ui-sref = ".interests" >< span >2</ span > Interests</ a >
                 < a  ui-sref-active = "active"  ui-sref = ".payment" >< span >3</ span > Payment</ a >
             </ div >
         </ div >
         
         <!-- use ng-submit to catch the form submission and use our Angular function -->
         < form  id = "signup-form"  ng-submit = "processForm()" >
 
             <!-- our nested state views will be injected here -->
             < div  id = "form-views"  ui-view></ div >
         </ form >
 
     </ div >
 
     <!-- show our formData as it is being typed -->
     < pre >
         {{ formData }}
     </ pre >
 
 
</ div >
</ div >

注意我们是如何第二次在项目中使用ui-view的。这就是UI Router伟大的地方:我们可以嵌套声明和视图。这能够在我们开发应用时提供给我们非常多的灵活性。关于UI Router视图的内容,请参见 官方文档

添加基于状态的激活类

我们希望每一个状态按钮能够在他们被激活时展示。为了达到这个效果,我们将会使用UI Router提供的ui-sref-active。如果ui-sref和当前状态一致,则会添加我们指定的类。

为了给自己的表单添加验证,请参见AngularJS表单验证

现在,你可能想知道我们的表单究竟看起来是什么样子。让我们打开浏览器看一眼。

angular-multi-step-form-ui-router-basic

目前为止,我们并没有完全按照希望的那样得到所有的内容,但是这是一系列伟大事情的开端。让我们继续前进,添加一点样式,之后会添加一些嵌入视图和注释。

0x0bject            
0x0bject 翻译于 10个月前

0人顶


 翻译的不错哦!                        

基础Stylingstyle.css

我们将设计我们的form-container和status-buttons来是我们的表单看起来更好。

?
1
2
3
4
5
6
7
8
9
10
11
12
13
14
15
16
17
18
19
20
21
22
/* style.css */
/* BASIC STYLINGS
============================================================================= */
body                            {  padding-top : 20px ; }
 
/* form styling */
#form-container                {  background : #2f2f2f margin-bottom : 20px ;
     border-radius: 5px ; }
#form-container .page-header   {  background : #151515 margin : 0 padding : 30px
     border-top-left-radius: 5px ; border-top-right-radius: 5px ; }
 
/* numbered buttons */
#status-buttons                 {  }
#status-buttons a               {  color : #FFF display :inline- block font-size : 12px margin-right : 10px text-align : center text-transform : uppercase ; }
#status-buttons a:hover         {  text-decoration : none ; }
 
/* we will style the span as the circled number */
#status-buttons span            {  background : #080808 display : block height : 30px margin : 0  auto  10px padding-top : 5px width : 30px
     border-radius: 50% ; }
 
/* active buttons turn light green-blue*/
#status-buttons a.active span   {  background : #00BC8C ; }


现在我们的按钮更好看了并且更符合我们想要的了,接下来我们看下嵌套视图。

嵌套视图form-profile.html, form-interests.html, form-payment.html

这部分会比较简单。我们将定义不同的带有我们需要的输入框的视图。并且将他们绑定到formData对象以便我们能看到输入的数据。

下面是我们用于嵌套视图的视图文件:

表单概要视图

?
1
2
3
4
5
6
7
8
9
10
11
12
13
14
15
16
17
18
<!-- form-profile.html -->
< div  class = "form-group" >
     < label  for = "name" >Name</ label >
     < input  type = "text"  class = "form-control"  name = "name"  ng-model = "formData.name" >
</ div >
 
< div  class = "form-group" >
     < label  for = "email" >Email</ label >
     < input  type = "text"  class = "form-control"  name = "email"  ng-model = "formData.email" >
</ div >
 
< div  class = "form-group row" >
< div  class = "col-xs-6 col-xs-offset-3" >
     < a  ui-sref = "form.interests"  class = "btn btn-block btn-info" >
     Next Section < span  class = "glyphicon glyphicon-circle-arrow-right" ></ span >
     </ a >
</ div >
</ div >


表单兴趣视图

?
1
2
3
4
5
6
7
8
9
10
11
12
13
14
15
16
17
18
19
20
21
22
23
24
<!-- form-interests.html -->
< label >What's Your Console of Choice?</ label >
< div  class = "form-group" >
     < div  class = "radio" >
         < label >
            < input  type = "radio"  ng-model = "formData.type"  value = "xbox"  checked>
            I like XBOX
         </ label >
     </ div >
     < div  class = "radio" >
         < label >
             < input  type = "radio"  ng-model = "formData.type"  value = "ps" >
             I like PS4
         </ label >
     </ div >
</ div >
 
< div  class = "form-group row" >
< div  class = "col-xs-6 col-xs-offset-3" >
     < a  ui-sref = "form.payment"  class = "btn btn-block btn-info" >
     Next Section < span  class = "glyphicon glyphicon-circle-arrow-right" ></ span >
     </ a >
</ div >
</ div >


表单支付视图

?
1
2
3
4
5
6
7
<!-- form-payment.html -->
< div  class = "text-center" >
     < span  class = "glyphicon glyphicon-heart" ></ span >
     < h3 >Thanks For Your Money!</ h3 >
     
     < button  type = "submit"  class = "btn btn-danger" >Submit</ button >
</ div >


既然我们已经定义了这些视图,那么当我们浏览表单时,他们就会显示出来。同样我们用下一个按钮和ui-sref来连接每一个新视图.

GoodLoser            
GoodLoser 翻译于 10个月前

0人顶


 翻译的不错哦!                        

当使用ui-sref时,你要连接到你路由中定义的state而不是URL。然后Angular会使用这个来为你构建href。

下面是我们表单目前的每一个页面。

angular-multi-step-form-profile

angular-multi-step-form-interests

angular-multi-step-form-payment

为了让我们的页面不同寻常,让我们加上动画效果。

GoodLoser            
GoodLoser 翻译于 11个月前

0人顶


 翻译的不错哦!                        

让我们的表单产生动画效果

因为在项目开始的时候,我们已经加载了ngAnimate,它已经添加到需要动画的的类上了。当视图进入或退出的时候,它将自动添加类ng-enter和ng-leave。

现在我们所有做的就是通过样式形成我们最终的表单。为了理解Angular动画,这篇文章是一个很好的起点。

让我们进去css文件,将动画,并应用到我们的表单上

?
1
2
3
4
5
6
7
8
9
10
11
12
13
14
15
16
17
18
19
20
21
22
23
24
25
26
27
28
29
30
31
32
33
34
35
36
37
38
39
40
41
42
43
44
45
46
47
48
49
50
51
52
53
/* style.css */
/* ANIMATION STYLINGS
============================================================================= */
#signup-form            {  position : relative min-height : 300px overflow : hidden padding : 30px ; }
#form-views             {  width : auto ; }
 
/* basic styling for entering and leaving */
/* left and right added to ensure full width */
#form-views.ng-enter,
#form-views.ng-leave      {  position : absolute left : 30px right : 30px ;
     transition: 0.5 all  ease; -moz-transition: 0.5 all  ease; -webkit-transition: 0.5 all  ease; 
}
     
/* enter animation */
#form-views.ng-enter            { 
     -webkit-animation:slideInRight  0.5 both  ease;
     -moz-animation:slideInRight  0.5 both  ease;
     animation:slideInRight  0.5 both  ease; 
}
 
/* leave animation */
#form-views.ng-leave            { 
     -webkit-animation:slideOutLeft  0.5 both  ease;
     -moz-animation:slideOutLeft  0.5 both  ease;
     animation:slideOutLeft  0.5 both  ease;   
}
 
/* ANIMATIONS
============================================================================= */
/* slide out to the left */
@keyframes slideOutLeft {
     to         { transform: translateX( -200% ); }
}
@-moz-keyframes slideOutLeft {    
     to         { -moz-transform: translateX( -200% ); }
}
@-webkit-keyframes slideOutLeft {
     to         { -webkit-transform: translateX( -200% ); }
}
 
/* slide in from the right */
@keyframes slideInRight {
     from     { transform:translateX( 200% ); }
     to         { transform: translateX( 0 ); }
}
@-moz-keyframes slideInRight {
     from     { -moz-transform:translateX( 200% ); }
     to         { -moz-transform: translateX( 0 ); }
}
@-webkit-keyframes slideInRight {
     from     { -webkit-transform:translateX( 200% ); }
     to         { -webkit-transform: translateX( 0 ); }
}

首先,确定视图离开或进去时,表单的样式,他们是绝对定位的。需要确认当视图进入的时候一个视图不会放到另一个视图的下面。

其次,应用我们的动画到.ng-enter和.ng-leave类

第三,用@keyframes定义动画。所有这些部分组合到一起,我们的表单就有了Angular动画,基于状态的UI Router和Angular数据绑定。

地狱星星            
地狱星星 翻译于 10个月前

1人顶


 翻译的不错哦!                        

结论

UI-Router, ngAnimate, 和其他很多有趣的 Angular功能会创建出很多很棒的应用 希望本文能展示给你一些创建Angular应用的小技巧和编译的工具使用方法 t.

这些概念也能引申到其他用户界面设计方面, 尤其在发挥你的创造性方面提供指引.感谢你花时间阅读本文,如有疑问欢迎指正.

petert            
petert 翻译于 11个月前

0人顶


 翻译的不错哦!                        


  • 0
    点赞
  • 0
    收藏
    觉得还不错? 一键收藏
  • 0
    评论

“相关推荐”对你有帮助么?

  • 非常没帮助
  • 没帮助
  • 一般
  • 有帮助
  • 非常有帮助
提交
评论
添加红包

请填写红包祝福语或标题

红包个数最小为10个

红包金额最低5元

当前余额3.43前往充值 >
需支付:10.00
成就一亿技术人!
领取后你会自动成为博主和红包主的粉丝 规则
hope_wisdom
发出的红包
实付
使用余额支付
点击重新获取
扫码支付
钱包余额 0

抵扣说明:

1.余额是钱包充值的虚拟货币,按照1:1的比例进行支付金额的抵扣。
2.余额无法直接购买下载,可以购买VIP、付费专栏及课程。

余额充值