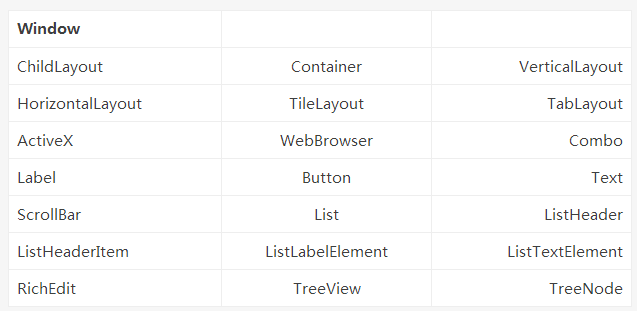
Duilib的界面布局使用xml文件进行描述,在Duilib v1.1版本的xml布局文件中我们可以使用以下这些标签(后续版本标签有扩充):
这些标签总的来讲可以分为三类:
- 窗口类,该类别中只有一个Window标签,它表示一个Window窗口,是每个xml布局文件的根节点,也是必不可少的元素。
- 容器类,和该类别相关的标签有ChildLayout、Container、VerticalLayout、HorizontalLayout、TileLayout、TabLayout。该类标签主要用于控制按钮、编辑框等这些控件在窗口中如何摆放。例如VerticalLayout容器下的控件默认情况下都会按照先后顺序竖直摆放,而HorizontalLayout容器下的控件则水平摆放,需要注意的是容易中可以嵌套其他容器。
- 控件类,剩下的标签都属于控件类,例如Button标签表示窗口中的一个按钮、Edit标签用来表示编辑框等等。
一个最简单的xml布局文件需要哪些元素呢?实际上只需要一个Window标签和一个容器类标签就够了,容器类标签可以是ChildLayout、Container、VerticalLayout、HorizontalLayout、TileLayout、TabLayout中的任意一种,例如下面一个最简单的布局文件:
<?xml version="1.0" encoding="utf-8" standalone="yes" ?>
<Window size="432,320">
    <TabLayout name="MainLayout">

    </TabLayout>
</Window>
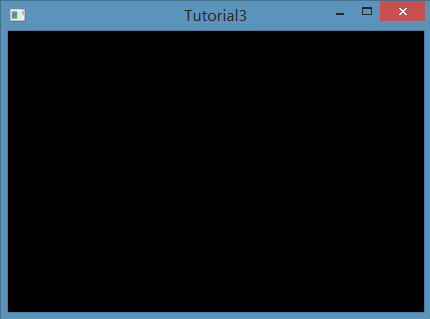
界面运行效果:
可以看到一个黑乎乎的窗口,客户区中什么都没有。
下面笔者向大家介绍一下HorizontalLayout和VerticalLayout容器在布局中的使用,使用这两种容器基本能完成大部分软件的界面效果。
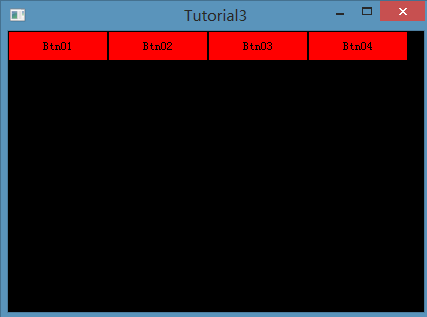
1.HorizontalLayout,HorizontalLayout容器下的所有元素都会按照先后顺序水平排列,例如我们可以向该容器中添加几个按钮:
<?xml version="1.0" encoding="utf-8" standalone="yes" ?>
<Window size="432,320">
    <HorizontalLayout name="MainLayout">
        <Button text="Btn01" width="100" height="30" bkcolor="#FFFF0000" borderround="2,2"/>
        <Button text="Btn02" width="100" height="30" bkcolor="#FFFF0000" borderround="2,2"/>
        <Button text="Btn03" width="100" height="30" bkcolor="#FFFF0000" borderround="2,2"/>
        <Button text="Btn04" width="100" height="30" bkcolor="#FFFF0000" borderround="2,2"/>
    </HorizontalLayout>
</Window>
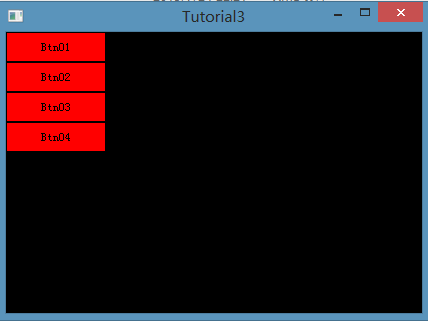
2.VerticalLayout容器则和HorizontalLayout相反,在VerticalLayout容器中的窗口元素都会按照顺序竖直排列,把上面布局内容进行修改:
<?xml version="1.0" encoding="utf-8" standalone="yes" ?>
<Window size="432,320">
    <VerticalLayout name="MainLayout">
        <Button text="Btn01" width="100" height="30" bkcolor="#FFFF0000" borderround="2,2"/>
        <Button text="Btn02" width="100" height="30" bkcolor="#FFFF0000" borderround="2,2"/>
        <Button text="Btn03" width="100" height="30" bkcolor="#FFFF0000" borderround="2,2"/>
        <Button text="Btn04" width="100" height="30" bkcolor="#FFFF0000" borderround="2,2"/>
    </VerticalLayout>
</Window>
3.容器中可以再嵌套容器,我们可以在一个容器中嵌套任何其他容器,例如一个VerticalLayout中可以嵌套多个HorizontalLayout或VerticalLayout等等。
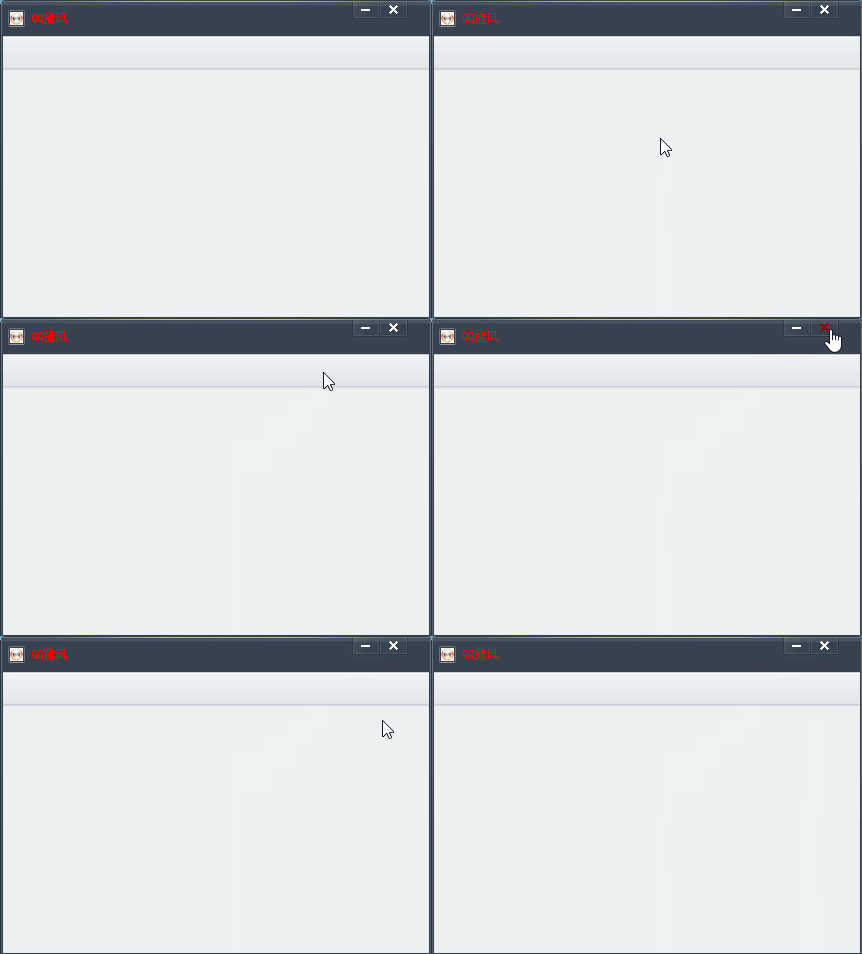
有了这些特性我们就可以完成大部分软件界面的布局,下面我们来完成一个简单的案例,效果如下:
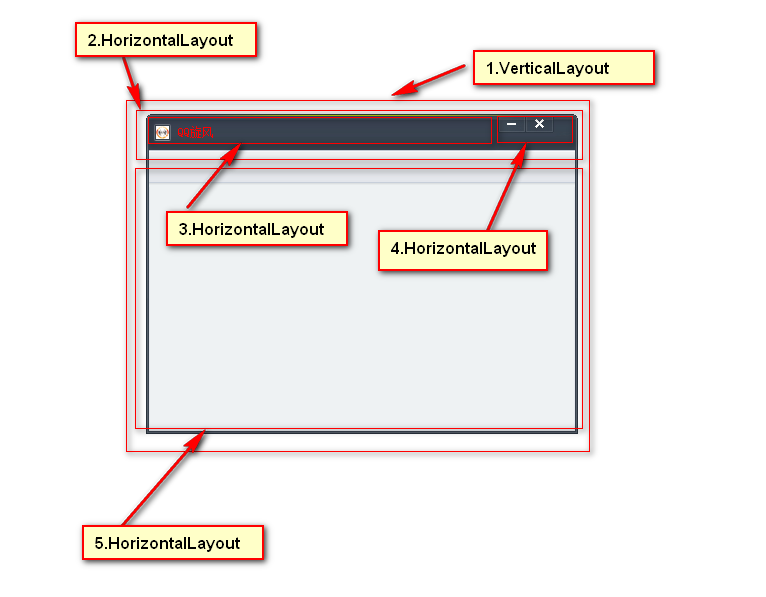
这个界面很简单,我们先来分析一下它的布局:
上图很直观的反应了整个界面的布局情况,我们只需要在3.HorizontalLayout中添加一个Text控件,在4.HorizontalLayout中添加两个按钮控件并指定按钮的背景图片即可。
xml布局内容如下:
<?xml version="1.0" encoding="utf-8" standalone="yes" ?>
<Window size="432,320" sizebox="4,4,6,6" caption="0,0,0,30">
    <Font name="宋体" size="12"  />
    <Font name="宋体" size="26"  />
    <VerticalLayout name="MainLayout"  bkimage="bg.png">
         <HorizontalLayout height="30">
            <HorizontalLayout>
                <Text text="QQ旋风"  padding="30,12,0,0" textcolor="#FFFF0000" height="30" align="center"   font="0"  ></Text>
            </HorizontalLayout>
            <HorizontalLayout width="80"  >
                 <Button name="MinBtn" width="28" height="17" padding="0,2,0,0" normalimage="file='max_min.png' source='0,0,28,17' dest='0,0,28,17' "  hotimage="file='max_min_h.png' source='0,0,28,17' dest='0,0,28,17" ></Button>
                 <Button name="CloseBtn" width="28" height="17" padding="0,2,0,0" normalimage="file='max_min.png' source='28,0,56,17' dest='0,0,28,17' "  hotimage="file='max_min_h.png' source='28,0,56,17' dest='0,0,28,17'" ></Button>
            </HorizontalLayout>
         </HorizontalLayout>
         <HorizontalLayout >
         </HorizontalLayout>
    </VerticalLayout>
</Window>除此之外我们需要去掉系统原有的标题栏,对WM_NCPAINT、WM_NCCALCSIZE、WM_NCACTIVATE三个系统消息进行屏蔽即可,在消息处理switch case语句中,增加下面代码
case WM_NCPAINT:
case WM_NCCALCSIZE:
case WM_NCACTIVATE:
return 0;
加载界面代码和上节基本相同,完整内容如下:
#include <Windows.h>
#include "../DuiLib/StdAfx.h"
using namespace DuiLib;

class CMyWnd : public CWindowWnd,public INotifyUI
{
public:
    CMyWnd(){}
    LPCTSTR GetWindowClassName() const
    {
        return L"MyWnd";
    }
    UINT GetClassStyle() const{
        return UI_CLASSSTYLE_FRAME|CS_DBLCLKS;
    }
    void Notify(TNotifyUI& msg)
    {
        if(msg.sType == L"click")
        {
            if(msg.pSender->GetName() == L"CloseBtn")
            {
                ::PostQuitMessage(0);

            }else if(msg.pSender->GetName() == L"MinBtn")
            {
                ::SendMessage(m_hWnd,WM_SYSCOMMAND, SC_MINIMIZE, 0);
            }
        }
    }
    LRESULT HandleMessage(UINT uMsg, WPARAM wParam, LPARAM lParam)
    {
        switch(uMsg)
        {
        case WM_CREATE:
            {
                m_PaintMgr.Init(m_hWnd);
                //从xml中加载界面
                CDialogBuilder builder;
                m_pRoot = builder.Create(L"tutorial4.xml",(UINT)0,NULL,&m_PaintMgr);
                m_PaintMgr.AttachDialog(m_pRoot);
                m_PaintMgr.AddNotifier(this);
            }
            break;
        case WM_NCPAINT:
        case WM_NCCALCSIZE:
        case WM_NCACTIVATE:
            return 0;
            break;
        case WM_DESTROY:
            ::PostQuitMessage(0);
            break;
        case WM_KEYDOWN:
            {
                int nVirtKey = (int) wParam;
                if(VK_ESCAPE == nVirtKey)
                {
                    ::PostQuitMessage(0);
                }
            }
            break;
        }
        LRESULT lRes=0;
        if(m_PaintMgr.MessageHandler(uMsg,wParam,lParam,lRes)) return lRes;
        return CWindowWnd::HandleMessage(uMsg,wParam,lParam);
    }
    ~CMyWnd(){
        delete m_pRoot;
    }
private:
    CPaintManagerUI m_PaintMgr;
    CControlUI* m_pRoot;
};
INT WinMain(HINSTANCE hInst,HINSTANCE hPreInst,LPSTR lpCmdLine,INT Show)
{
    CPaintManagerUI::SetInstance(hInst);
    CPaintManagerUI::SetResourcePath(CPaintManagerUI::GetResourcePath());
    //创建主窗口
    CMyWnd* pFrame = new CMyWnd();
    pFrame->Create(NULL,L"Tutorial4",UI_WNDSTYLE_FRAME,WS_EX_WINDOWEDGE);
    pFrame->CenterWindow();
    pFrame->ShowWindow(true);
    CPaintManagerUI::MessageLoop();

    return 0;
}
其他容器和控件的使用将在后面的博文中介绍。
博文源码:https://github.com/rongbo-j/duilib-tutorial




 139
139

 被折叠的 条评论
为什么被折叠?


