


1.1、单位转换
- px 像素是屏幕上显示数据的最基本的点。
- dpi 每英寸点数,也可称为像素密度,即 屏幕对角线像素值 ÷ 英寸值
![]()
- dp 在每英寸160点的显示器上,1dp = 1px,即 px = dp(dpi/160)
- sp 指定字体大小,用户修改显示字体时,字体大小会随之改变。
注:分辨率与屏幕大小没有关系,屏幕大小是物理外观,而分辨率则是显示能力
1.2、静态布局
1、LinearLayout(线性布局)

注:gravity和layout_gravity一个是和子控件相关,一个是和父控件相关。
简单实例:
<LinearLayout
    android:layout_width="match_parent"
    android:layout_height="wrap_content"
    android:layout_marginTop="20dp"
    android:orientation="horizontal">
    <TextView
        android:layout_width="0dp"
        android:layout_height="wrap_content"
        android:layout_weight="1"
        android:gravity="center"
        android:background="#00ff00"
        android:text="one"/>
    <TextView
        android:layout_width="0dp"
        android:layout_height="wrap_content"
        android:layout_weight="1"
        android:gravity="center"
        android:background="#ff0000"
        android:text="two"/>
</LinearLayout>
运行效果:

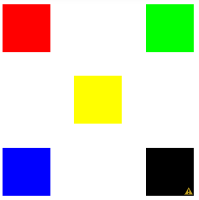
2、RelativeLayout(相对布局)

如果在布局超出屏幕最大高度时,使用相对布局,系统会自动加上滚动条来显示。
TextView,RelativeLayout(LinearLayout) 默认不具备可点击性的,要让background的selector 起作用有两种方法:
- 在代码中给其设置点击事件OnClickListener
- 在xml中设置clickable = true
设置该属性后才能正常使用状态选择器。
简单实例:
<RelativeLayout
    android:layout_width="200dp"
    android:layout_height="200dp"
    android:layout_margin="10dp">
    <TextView
        android:layout_width="50dp"
        android:layout_height="50dp"
        android:background="#ff0000"/>
    <TextView
        android:layout_width="50dp"
        android:layout_height="50dp"
        android:layout_alignParentRight="true"
        android:background="#00ff00"/>
    <TextView
        android:layout_width="50dp"
        android:layout_height="50dp"
        android:layout_alignParentLeft="true"
        android:layout_alignParentBottom="true"
        android:background="#0000ff"/>
    <TextView
        android:layout_width="50dp"
        android:layout_height="50dp"
        android:layout_alignParentRight="true"
        android:layout_alignParentBottom="true"
        android:background="#000000"/>
    <TextView
        android:layout_width="50dp"
        android:layout_height="50dp"
        android:layout_centerInParent="true"
        android:background="#ffff00"/>
</RelativeLayout>
运行效果:
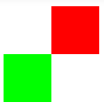
3、AbsoluteLayout(绝对布局)

简单实例:
<AbsoluteLayout
    android:layout_width="match_parent"
    android:layout_height="match_parent"
    android:layout_margin="10dp">
    <TextView
        android:layout_width="50dp"
        android:layout_height="50dp"
        android:layout_x="50dp"
        android:background="#ff0000"/>
    <TextView
        android:layout_width="50dp"
        android:layout_height="50dp"
        android:layout_y="50dp"
        android:background="#00ff00"/>
</AbsoluteLayout>
运行效果:
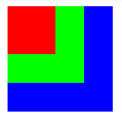
4、FrameLayout(帧布局)
帧布局每次添加的控件都显示在最上面,最后显示在界面上的是最后添加的一个控件。
帧布局是比较干净的布局,常用于两个布局的切换。
<FrameLayout
    android:layout_width="match_parent"
    android:layout_height="match_parent"
    android:layout_margin="10dp"
    android:orientation="vertical" >
    <TextView
        android:layout_width="110dp"
        android:layout_height="110dp"
        android:background="#0000ff" />
    <TextView
        android:layout_width="80dp"
        android:layout_height="80dp"
        android:background="#00ff00" />
    <TextView
        android:layout_width="50dp"
        android:layout_height="50dp"
        android:background="#ff0000" />
</FrameLayout>
运行效果:
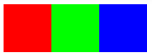
5、TableLayout(表格布局)

每个TabRow表示一行。
简单实例:
<TableLayout
    android:layout_width="match_parent"
    android:layout_height="match_parent"
    android:layout_margin="10dp">
    <!-- 占据1行三列 -->
    <TableRow>
        <TextView
            android:layout_width="50dp"
            android:layout_height="50dp"
            android:background="#ff0000"/>
        <TextView
            android:layout_width="50dp"
            android:layout_height="50dp"
            android:background="#00ff00"/>
        <TextView
            android:layout_width="50dp"
            android:layout_height="50dp"
            android:background="#0000ff"/>
    </TableRow>
</TableLayout>
运行效果:
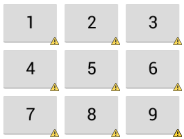
6、GridLayout(网格布局)
首先它与LinearLayout布局一样,也分为水平和垂直两种方式,但是通过指定android:columnCount设置列数的属性后,控件会自动换行进行排列。
另一方面,对于GridLayout布局中的子控件,默认按照wrap_content的方式设置其显示,这只需要在GridLayout布局中显式声明即可。
其次,若要指定某控件显示在固定的行或列,只需设置该子控件的android:layout_row和android:layout_column属性即可,
但是需要注意:android:layout_row=”0”表示从第一行开始,android:layout_column=”0”表示从第一列开始,这与编程语言中一维数组的赋值情况类似。
最后,如果需要设置某控件跨越多行或多列,只需将该子控件的android:layout_rowSpan或者layout_columnSpan属性设置为数值,
再设置其layout_gravity属性为fill即可,前一个设置表明该控件跨越的行数或列数,后一个设置表明该控件填满所跨越的整行或整列。
简单实例:
<GridLayout
    android:layout_width="wrap_content"
    android:layout_height="wrap_content"
    android:columnCount="3"
    android:orientation="horizontal"
    android:rowCount="3" >
    <Button android:text="1" />
    <Button android:text="2" />
    <Button android:text="3" />
    <Button android:text="4" />
    <Button android:text="5" />
    <Button android:text="6" />
    <Button android:text="7" />
    <Button android:text="8" />
    <Button android:text="9" />
</GridLayout>
运行效果:
1.3、动态布局
使用动态布局的时候,最重要的是LayoutParams类,其中Viewgroup的LayoutParams是模板类,每个ViewGroup都有不同的LayoutParams类,
该类包含一些布局的信息,表达父容器对孩子的期望。
例如:LinerLayout中的LayoutParams继承于ViewGroup的MarginLayoutParams,而MarginLayoutParams又继承于ViewGroup的LayoutParams类。
1、线性布局
线性布局可以设置垂直或水平方向排列,在设置gravity属性时和静态布局一样需要注意:
- 垂直排列时,只能设置水平居中。
- 水平排列时,只能设置垂直居中。
其中,线性布局的LayoutParams除了可以设置margin值外,还可以设置它特有的权重属性weight。
LinearLayout linearLayout = new LinearLayout(this);
linearLayout.setOrientation(LinearLayout.VERTICAL);

Button button1 = new Button(this);
button1.setText("button1");
LinearLayout.LayoutParams params1 = new LayoutParams(LayoutParams.WRAP_CONTENT,
        LayoutParams.WRAP_CONTENT);
params1.gravity = Gravity.CENTER_HORIZONTAL;
linearLayout.addView(button1, params1);

Button button2 = new Button(this);
button2.setText("button2");
LinearLayout.LayoutParams params2 = new LayoutParams(LayoutParams.WRAP_CONTENT,
        LayoutParams.WRAP_CONTENT);
params2.gravity = Gravity.CENTER_HORIZONTAL;
linearLayout.addView(button2, params2);

setContentView(linearLayout);
运行效果:

2、相对布局
动态的相对布局主要通过它的LayoutParams的addRule()方法来指定子控件的位置。
RelativeLayout relativeLayout = new RelativeLayout(this);

Button button1 = new Button(this);
button1.setId(1);
button1.setText("button1");
RelativeLayout.LayoutParams params1 = new LayoutParams(LayoutParams.WRAP_CONTENT,
        LayoutParams.WRAP_CONTENT);
params1.addRule(RelativeLayout.ALIGN_PARENT_TOP);
params1.addRule(RelativeLayout.CENTER_HORIZONTAL, RelativeLayout.TRUE);
relativeLayout.addView(button1, params1);

Button button2 = new Button(this);
button2.setId(2);
button2.setText("button2");
RelativeLayout.LayoutParams params2 = new LayoutParams(LayoutParams.WRAP_CONTENT,
        LayoutParams.WRAP_CONTENT);
params2.addRule(RelativeLayout.BELOW, 1);
params2.addRule(RelativeLayout.ALIGN_LEFT, 1);
relativeLayout.addView(button2, params2);

setContentView(relativeLayout);
如果RelativeLayout中要设置控件在父容器的相对位置时,需要这样写:
params.addRule(RelativeLayout.ALIGN_PARENT_RIGHT, RelativeLayout.TRUE);
运行结果:
注意:这里动态布局只介绍两种,其他的布局用法大同小异,这里不再一一叙述。
1.4、布局填充器
1、第一种
View view = View.inflate(this,R.layout.activity_main,null);
该方法内部其实就是调用了第二种
2、第二种
LayoutInflater inflater = LayoutInflater.from(this);
View view = inflater.inflate(R.layout.activity_main,null);
LayoutInflater是用来找layout文件夹下的xml布局文件实例化,而findViewById()是找具体某一个xml下的具体widget控件(如:Button,TextView等)。
3、第三种
LayoutInflater inflater = (LayoutInflater)getSystemService(LAYOUT_INFLATER_SERVICE);
View view = inflater.inflate(R.layout.activity_main,null);
getSystemService()是Android很重要的一个API,它是Activity的一个方法,根据传入参数Name的值来产生相应的Object,然后转化为相应的服务对象。
LayoutInflater其实就是使用Android提供的pull解析方式来解析布局文件的,同时setContentView()方法内部也是使用LayoutInflater加载布局的。
1.5、获取屏幕的宽高
获取WindowManager有两种方式,通过WindowManager来获取屏幕的宽高信息
WindowManager wManager = (WindowManager) context.getSystemService(Context.WINDOW_SERVICE);
mWidth = wManager.getDefaultDisplay().getWidth();
mHeight = wManager.getDefaultDisplay().getHeight();
注意:在Activity中获取WindowManager还可以通过getWindowManager()方法来获取。


 703
703


 被折叠的 条评论
为什么被折叠?
被折叠的 条评论
为什么被折叠?
 到【灌水乐园】发言


