


微信开放平台--扫码登陆
微信开放平台https://open.weixin.qq.com
网站应用微信登录开发指南
准备工作
网站应用微信登录是基于OAuth2.0协议标准构建的微信OAuth2.0授权登录系统。
在进行微信OAuth2.在进行微信OAuth2.0授权登录接入之前,在微信开放平台注册开发者帐号,并拥有一个已审核通过的网站应用,并获得相应的AppID和AppSecret,申请微信登录且通过审核后,可开始接入流程。
https://open.weixin.qq.com/cgi-bin/showdocument?action=dir_list&t=resource/res_list&verify=1&id=open1419316505&token=&lang=zh_CN
新增一个网站应用的入口https://open.weixin.qq.com/cgi-bin/frame?t=home/web_tmpl&lang=zh_CN
实践:https://www.cnblogs.com/0201zcr/p/5133062.html
微信公众号开发:
微信-公众平台https://mp.weixin.qq.com

https://github.com/ihaolin/wechat
--获取用户信息中文乱码的解决方案
在微信开发中我们会经常需要获取用户的信息。
微信给我们提供了获取用户信息的api,
地址为
https://api.weixin.qq.com/cgi-bin/user/info?access_token=ACCESS_TOKEN&openid=OPENID&lang=zh_CN
将其中的access_token替换为我们的access_token
openid为关注用户的openid就可以获取到用户的信息了。
问题描述
不过获取到的数据却是中文乱码
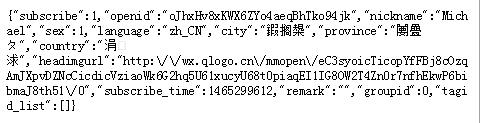
而用Java程序获取的结果也是一样的

解决方案
这个乱码主要是由于微信那边采用的是“ISO-8859-1”编码造成的。
我们对获取的结果进行编码
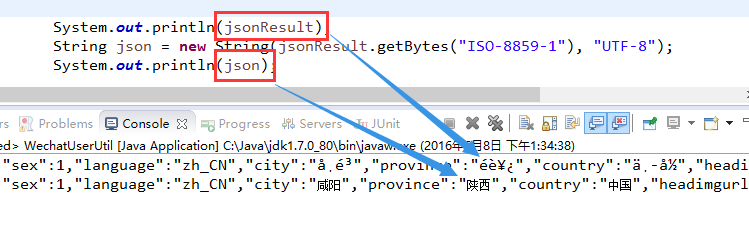
    String token = AccessTokenTool.getAccessToken();
    String URL = "https://api.weixin.qq.com/cgi-bin/user/info?access_token=ACCESS_TOKEN&openid=OPENID&lang=zh_CN";
    // 原始json
    String jsonResult = HttpUtil.sendGet(URL.replace("OPENID", openid).replace("ACCESS_TOKEN", token));
    System.out.println(jsonResult);
    // 编码后的json
    String json = new String(jsonResult.getBytes("ISO-8859-1"), "UTF-8");
    System.out.println(json);
获取自定义菜单乱码也是一样的解决方法

参考文献
http://blog.csdn.net/frankcheng5143/article/details/51612550
微信公众号开发小结:
使用了框架https://gitee.com/kingshine/FastBootWeixin
造型理由,基于spring boot,readme一看就懂,项目活跃。虽然个别地方还是不很理解
遇到的问题:
项目集成了spring security,要对FastBootWeixin相关的url进行权限处理 pass
点击按钮后需要跳转到相关url,这个时候需要附带能够标识用户的相关信息,譬如code或openId。目前采取的处理办法是这样的:
WxButton中写有一个url,这个url会盅到后台另一个url,这个url会redirect到获取code的url,然后微信回调第三个接口。
目前方案的流程:
btn Url-->后台api_1【redirect 获取用户信息的url https://mp.weixin.qq.com/wiki?t=resource/res_main&id=mp1421140842】-->微信服务器回调接口2 api_2 -->根据code从FastBootWeixin,至此就获取到用户的openId
--->根据openId获取到用户UserName,生成token--->redirect 前端页面地址?token=生成的用户token---->前端服务目前已经拿到token,相当于完成了登陆过程
===========================================================================
===========================================================================
上面的交互流程看看怎么优化下
微信公众号的一些有用的功能,回复信息后,后台可以给予响应。这个地方也可以是一个好的入口
其它问题:
这个项目是前后端分离的,并且分开部署。微信公众号需要使用80端口,前端页面也要使用80端口。
这个时候要么分开部署到两台机器,要么使用nginx分流
user nginx;
worker_processes auto;
error_log /var/log/nginx/error.log;
pid /run/nginx.pid;

# Load dynamic modules. See /usr/share/nginx/README.dynamic.
include /usr/share/nginx/modules/*.conf;

events {
    worker_connections 1024;
}

http {
    log_format  main  '$remote_addr - $remote_user [$time_local] "$request" '
                      '$status $body_bytes_sent "$http_referer" '
                      '"$http_user_agent" "$http_x_forwarded_for"';

    access_log  /var/log/nginx/access.log  main;

    sendfile            on;
    tcp_nopush          on;
    tcp_nodelay         on;
    keepalive_timeout   65;
    types_hash_max_size 2048;

    include             /etc/nginx/mime.types;
    default_type        application/octet-stream;

    # Load modular configuration files from the /etc/nginx/conf.d directory.
    # See http://nginx.org/en/docs/ngx_core_module.html#include
    # for more information.
    include /etc/nginx/conf.d/*.conf;

    server {
        #listen       80 default_server;
        server_name  _;
        root         /usr/share/nginx/html;
		client_max_body_size	10m;

        # Load configuration files for the default server block.
        include /etc/nginx/default.d/*.conf;

        location /{
            proxy_pass 	http://localhost:8081;
        }

        location /wx{
            proxy_pass 	http://localhost:8080;
        }

        location /api{
            proxy_pass 	http://localhost:8080;
        }

        location /swagger-ui.html{
            proxy_pass http://localhost:8080;
        }

        location /swagger{
            proxy_pass http://localhost:8080;
        }

        location /swagger-resources{
            proxy_pass http://localhost:8080;
        }

        location /webjars{
            proxy_pass http://localhost:8080;
        }

        location /v2/api-docs{
            proxy_pass http://localhost:8080;
        }


        error_page 404 /404.html;
            location = /40x.html {
        }

        error_page 500 502 503 504 /50x.html;
            location = /50x.html {
        }
    }

}
上面配置中两个坑:
(1)一个是前端的坑:前端的nodejs程序只listen了服务器的外网ip,所以上面的配置没有生效。
错误信息如下:
The page you are looking for is temporarily unavailable. Please try again later.
然后curl 一个这个localhost:8081 也是connect refuse的。尝试了几次,不行。然后问前端的同学,说没有监听localhost和127.0.0.1 (哭)
解决办法:

        location /{
            proxy_pass 	http://localhost:8081;
        }
改为
        location /{
            proxy_pass 	http://nodesjs监听的IP(引自为服务器的外网ip):8081;
        }
(2)FastBootWeixin框架在微信网页授权时,报错:
微信登录失败
授权回调域名校验出错,错误码:1003
解决办法:
将
        location /wx{
            proxy_pass 	http://localhost:8080;
        }
更改为:
        location /wx{
            proxy_set_header   Host $host; //解决getRequestURL、getServerName、getServerPort
                                           //如果nginx是80服务,上面就够,代表默认servlet_port是80;否则需要Host $host:$server_port,不配置servlet_port会导致丢失端口
            proxy_pass 	http://localhost:8080;
        }
Tips:授权域名回调,此处回调的域名在正规企业号中配置的地方:
开发--->接口权限-->网页授权获取用户基本信息 后面的“修改”-->公众号设置-->功能设置-->网页授权域名
PS:在企业号或服务号中设置域名时,还需要一个文件MP_verify_s48K3hK0cfXLUMMn.txt,如果需要nginx 转发,配置办法如下:
        location = /MP_verify_s48K3hK0cfXLUMMn.txt{
              proxy_set_header   Host $host;
              proxy_pass        http://localhost:8080;
        }
上面配置中有两个注意事项:
1:location后面要加空格,否则会报错:
[root@localhost nginx]# nginx -s reload
nginx: [emerg] unknown directive "location=/MP_verify_s48K3hK0cfXLUMMn.txt" in /etc/nginx/nginx.conf:64
2: 扩展名的点号"."前不需要加转义符“\”,因为使用“=”时,是直接匹配,没有使用正则表达式
一、语法规则:
location [=|~|~*|^~] /uri/ { … }
= 开头表示精确匹配
^~ 开头表示uri以某个常规字符串开头,理解为匹配 url路径即可。nginx不对url做编码,因此请求为/static/20%/aa,可以被规则^~ /static/ /aa匹配到(注意是空格)。
~ 开头表示区分大小写的正则匹配
~*  开头表示不区分大小写的正则匹配
!~和!~*分别为区分大小写不匹配及不区分大小写不匹配 的正则
/ 通用匹配,任何请求都会匹配到。
多个location配置的情况下匹配顺序为(参考资料而来,还未实际验证,试试就知道了,不必拘泥,仅供参考):
首先匹配 =,其次匹配^~, 其次是按文件中顺序的正则匹配,最后是交给 / 通用匹配。当有匹配成功时候,停止匹配,按当前匹配规则处理请求。
例子,有如下匹配规则:
location = / {
   #规则A
}
location = /login {
   #规则B
}
location ^~ /static/ {
   #规则C
}
location ~ \.(gif|jpg|png|js|css)$ {
   #规则D
}
location ~* \.png$ {
   #规则E
}
location !~ \.xhtml$ {
   #规则F
}
location !~* \.xhtml$ {
   #规则G
}
location / {
   #规则H
}
那么产生的效果如下:
访问根目录/, 比如http://localhost/ 将匹配规则A
访问 http://localhost/login 将匹配规则B,http://localhost/register 则匹配规则H
访问 http://localhost/static/a.html 将匹配规则C
访问 http://localhost/a.gif, http://localhost/b.jpg 将匹配规则D和规则E,但是规则D顺序优先,规则E不起作用,而 http://localhost/static/c.png 则优先匹配到规则C
访问 http://localhost/a.PNG 则匹配规则E,而不会匹配规则D,因为规则E不区分大小写。
访问 http://localhost/a.xhtml 不会匹配规则F和规则G,http://localhost/a.XHTML不会匹配规则G,因为不区分大小写。规则F,规则G属于排除法,符合匹配规则但是不会匹配到,所以想想看实际应用中哪里会用到。
访问 http://localhost/category/id/1111 则最终匹配到规则H,因为以上规则都不匹配,这个时候应该是nginx转发请求给后端应用服务器,比如FastCGI(php),tomcat(jsp),nginx作为方向代理服务器存在。
http://blog.csdn.net/oranyujian/article/details/42169597
注意事项:
1、回调页面域名或路径需使用字母、数字及“-”的组合(例:wx.qq.com或wx.qq.com/mp),不支持IP地址、端口号及短链域名。填写的域名或路径需与实际回调URL中的域名或路径相同。
2、填写的域名须通过ICP备案的验证。
3、将文件MP_verify_s48K3hK0cfXLUMMn.txt(点击下载)上传至填写域名或路径指向的web服务器(或虚拟主机)的目录(若填写域名,将文件放置在域名根目录下,例如wx.qq.com/MP_verify_s48K3hK0cfXLUMMn.txt;若填写路径,将文件放置在路径目录下,例如wx.qq.com/mp/MP_verify_s48K3hK0cfXLUMMn.txt),并确保可以访问。

在测试号中设置时,点“修改”会直接弹出对话框,让填写需要回调的域名
http://blog.sina.com.cn/s/blog_56d8ea900102vhaj.html
http://blog.csdn.net/sondx/article/details/7593540
原因解析:
已经确认过“网页授权获取用户基本信息”中配置的url是没有错误的
后与FastBootWeinxin项目的作者光正 联系(在此处要感谢一个光正,赞)
确定回调地址是这样的
https://open.weixin.qq.com/connect/oauth2/authorize?appid=wxd63033623663454d&redirect_uri=http%3A%2F%2Flocalhost%3A9090%2Fwx%2Fv1%2Fnavigate%2Findex%2Fbtn&response_type=code&scope=snsapi_userinfo&state&connect_redirect=1#wechat_redirect
,原因是redirect_uri是通过下面的api获取的
String redirectUrl = request.getRequestURL() + (StringUtils.isEmpty(request.getQueryString()) ? "" : "?" + request.getQueryString());
来获取的,然后
但是因为你这个通过nginx代理,所以导致取requestURL时取到的是localhost
使用nginx后后端

差点忘记了,还有一个大坑:
接入指南https://mp.weixin.qq.com/wiki?t=resource/res_main&id=mp1421135319
项目中使用了com.alibaba.fastjson.support.spring.FastJsonHttpMessageConverter,然后就凭空出了一个坑:
返回的echostr,加了一个双引号一个双引号,
然后微信服务器认证就不通过
解决办法:
在com.alibaba.fastjson.support.spring.FastJsonHttpMessageConverter前面添加org.springframework.http.converter.StringHttpMessageConverter就不会出现这个问题
   @Override
    public void configureMessageConverters(List<HttpMessageConverter<?>> converters) {

        // See SPR-7316,for weixin token verify.fastjson will convert string 123 to "123"
        StringHttpMessageConverter stringHttpMessageConverter = new StringHttpMessageConverter();
        stringHttpMessageConverter.setWriteAcceptCharset(false);
        //增加两个优先处理的转换类型.
        converters.add(new ByteArrayHttpMessageConverter());
        converters.add(stringHttpMessageConverter);

        FastJsonHttpMessageConverter httpMessageConverter = new FastJsonHttpMessageConverter();
        FastJsonConfig fastJsonConfig = new FastJsonConfig();
        fastJsonConfig.setSerializerFeatures(SerializerFeature.QuoteFieldNames,
                SerializerFeature.WriteEnumUsingToString,
                SerializerFeature.WriteMapNullValue,
                SerializerFeature.WriteDateUseDateFormat,
                SerializerFeature.DisableCircularReferenceDetect);
        fastJsonConfig.setSerializeFilters((ValueFilter) (o, s, source) -> {
            if (source == null) {
                return "";
            }
            if (source instanceof Date) {
                return ((Date) source).getTime();
            }
            return source;
        });
        httpMessageConverter.setFastJsonConfig(fastJsonConfig);
        converters.add(httpMessageConverter);
    }
spring3.0开始引用org.springframework.http.converter.HttpMessageConverter

定义上面报错原因的途径:
在postman中带上微信服务器的参数【日志中有】,去访问配置的接口,查看返回值即可
还有一个坑,差点忘掉:
使用nginx后,swaager上展示的接口不能调用,所以的请求地址都变成对127.0.0.1主机的请求,显示是不对的【应该是部署的服务器地址】
解决办法
swagger.host=1gepingguo.cn
这样调用的接口,就会请求http://1gepingguo.cn/具体的api接口


 3591
3591

 被折叠的 条评论
为什么被折叠?
被折叠的 条评论
为什么被折叠?
 到【灌水乐园】发言


