


LinearLayout是线性布局控件,它包含的子控件将以横向或竖向的方式排列,按照相对位置来排列所有的widgets或者其他的containers,超过边界时,某些控件将缺失或消失。因此一个垂直列表的每一行只会有一个widget或者是container,而不管他们有多宽,而一个水平列表将会只有一个行高(高度为最高子控件的高度加上边框高度)。LinearLayout保持其所包含的widget或者是container之间的间隔以及互相对齐(相对一个控件的右对齐、中间对齐或者左对齐)。
xml属性

android:baselineAligned;//是否允许用户调整它内容的基线。

android:baselineAlignedChildIndex;//当一个线性布局与另一个布局是按基线对齐的一部分,它可以指定其内容的基线对齐方式。

android:gravity;//指定如何在该对象中放置此对象的内容(x/y坐标值)。

android:orientation:设置它内容的对其方向(横向/竖向)。<?xml version="1.0" encoding="utf-8"?>
<LinearLayout
xmlns:android="http://schemas.android.com/apk/res/android"
android:orientation="vertical"
android:layout_width="fill_parent"
android:layout_height="fill_parent"
android:gravity="center_horizontal">
<!--
android:orientation="vertical" 表示竖直方式对齐
android:orientation="horizontal"表示水平方式对齐
android:layout_width="fill_parent"定义当前视图在屏幕上 可以消费的宽度,fill_parent即填充整个屏幕。
android:layout_height="wrap_content":随着文字栏位的不同
而改变这个视图的宽度或者高度。有点自动设置框度或者高度的意思
layout_weight 用于给一个线性布局中的诸多视图的重要度赋值。
所有的视图都有一个layout_weight值,默认为零,意思是需要显示
多大的视图就占据多大的屏幕空 间。若赋一个高于零的值,则将父视
图中的可用空间分割,分割大小具体取决于每一个视图的
layout_weight 值以及该值在当前屏幕布局的整体
layout_weight值和在其它视图屏幕布 局的layout_weight值中所占的比率而定。
举个例子:比如说我们在 水平方向上有一个文本标签和两个文本编辑元素。
该文本标签并无指定layout_weight值,所以它将占据需要提供的最少空间。
如果两个文本编辑元素每一个的layout_weight值都设置为1,则两者平分
在父视图布局剩余的宽度(因为我们声明这两者的重要度相等)。如果两个
文本编辑元素其中第一个的layout_weight值设置为1,而第二个的设置为2,
则剩余空间的三分之二分给第一个,三分之一分给第二个(数值越小,重要 度越高)。
-->
<TextView
android:layout_width="wrap_content"
android:layout_height="wrap_content"
android:text="BB"
/>
<TextView
android:layout_width="wrap_content"
android:layout_height="wrap_content"
android:text="BB"
/>
</LinearLayout>需要注意的是LinearLayout布局不会换行:当组件排到容器尽头时,其余的组件将不会被显示。
先明确几个概念的区别:
padding margin都是边距的含义,关键问题得明白是什么相对什么的边距.
padding是控件的内容相对控件的边缘的边距.
margin是控件边缘相对父空间的边距.

android:gravity 属性是对该view 内容的限定.比如一个button 上面的text. 你可以设置该text 在view的靠左,靠右等位置.该属性就干了这个.
android:layout_gravity是用来设置该view中的子view相对于父view的位置.比如一个button 在linearlayout里,你想把该button放在靠左,靠右等位置就可以在linearlayout中通过该属性设置.
二:属性效果:
<?xml version="1.0" encoding="utf-8"?>
<LinearLayout android:id="@+id/custom_titlebar"
xmlns:android="http://schemas.android.com/apk/res/android"
android:orientation="horizontal"
android:layout_width="fill_parent"
android:layout_height="wrap_content">
<Button
    android:id="@+id/imageViewLoginState"
	android:layout_width="fill_parent"
	android:layout_height="fill_parent"
	android:layout_weight="1"
	android:text="1">
    </Button>
<Button
    android:id="@+id/imageViewLoginState1"
	android:layout_width="fill_parent"
	android:layout_height="fill_parent"
	android:layout_weight="2"
	android:text="2"
	>
</Button>
</LinearLayout> 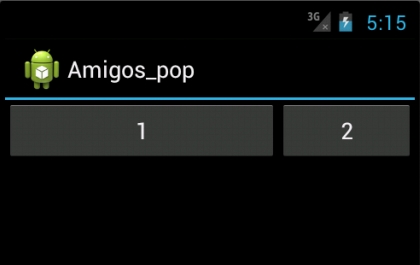
二:接下来看一下 android:layout_width属性:
这里测试的是垂直布局android:orientation="vertical",所以针对组件的 android:layout_height属性;如果测试的水平布局,则需针对组件的 android:layout_width属性。
1. android:layout_height="fill_parent"
设置 :TextView_one属性android:layout_weight="1"
TextView_Two属性android:layout_weight="3"
效果:

接下来我们只是设置一下1. android:layout_height="wrap_content",其他属性不变
运行效果:


 188
188


 被折叠的 条评论
为什么被折叠?
被折叠的 条评论
为什么被折叠?
 到【灌水乐园】发言


